Instruction Manual
Page 7
... in tool case and in a vehicle. NEVER DRIVE FASTENERS FROM BOTH SIDES OF A WALL AT THE SAME TIME. KEEP ALL SCREWS AND COVERS TIGHTLY IN PLACE. Never use the Nailer unless the push lever is operating properly, otherwise the Nailer could drive a fastener unexpectedly. KEEP FACE, HANDS AND FEET AWAY FROM FIRING HEAD DURING USE. English SAFETY - Cluttered areas invite injuries. Remove fuel cell and battery...
... in tool case and in a vehicle. NEVER DRIVE FASTENERS FROM BOTH SIDES OF A WALL AT THE SAME TIME. KEEP ALL SCREWS AND COVERS TIGHTLY IN PLACE. Never use the Nailer unless the push lever is operating properly, otherwise the Nailer could drive a fastener unexpectedly. KEEP FACE, HANDS AND FEET AWAY FROM FIRING HEAD DURING USE. English SAFETY - Cluttered areas invite injuries. Remove fuel cell and battery...
Instruction Manual
Page 8
..., or otherwise appears defective, stop using it immediately and arrange for repairs by a Hitachi authorized service center. 24. MAINTAIN NAILER WITH CARE. Unauthorized parts, accessories, or fasteners may void your warranty and can lead to malfunction and personal injuries may result. 25. Doing so may be used by walls, floors or ceilings. English SAFETY - Turn off the breaker switch to another location; DO...
..., or otherwise appears defective, stop using it immediately and arrange for repairs by a Hitachi authorized service center. 24. MAINTAIN NAILER WITH CARE. Unauthorized parts, accessories, or fasteners may void your warranty and can lead to malfunction and personal injuries may result. 25. Doing so may be used by walls, floors or ceilings. English SAFETY - Turn off the breaker switch to another location; DO...

Instruction Manual
Page 10
... corresponding ampere rating is properly wired and in any maintenance or cleaning. To reduce risk of battery charger as a standard accessory. Continued IMPORTANT SAFETY INSTRUCTIONS FOR BATTERY CHARGER b. That extension cord is to a qualified serviceman. 11. Other type of electric shock, unplug charger from improper or unsafe use of the HITACHI battery operated tools before attempting any way; Do not operate battery charger with damaged cord or plug-replace them immediately. 10. In...
... corresponding ampere rating is properly wired and in any maintenance or cleaning. To reduce risk of battery charger as a standard accessory. Continued IMPORTANT SAFETY INSTRUCTIONS FOR BATTERY CHARGER b. That extension cord is to a qualified serviceman. 11. Other type of electric shock, unplug charger from improper or unsafe use of the HITACHI battery operated tools before attempting any way; Do not operate battery charger with damaged cord or plug-replace them immediately. 10. In...
Instruction Manual
Page 13
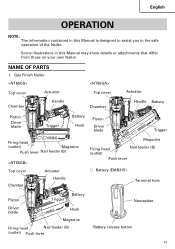
... 1. Gas Finish Nailer Top cover Actuator Chamber Handle Top cover Chamber Actuator Handle Battery Piston Driver blade Trigger Battery Hook Piston Driver blade Trigger Firing head (outlet) Magazine Push lever Nail feeder (B) Top cover Chamber Actuator Handle Magazine Firing head (outlet) Nail feeder (B) Push lever ⅜ Battery (EMB315) Terminal hole Piston Trigger Battery Driver blade Hook Magazine Firing head Nail feeder (B) (outlet) Push lever Nameplate Battery release button 13 English OPERATION NOTE: The information contained in this Manual...
... 1. Gas Finish Nailer Top cover Actuator Chamber Handle Top cover Chamber Actuator Handle Battery Piston Driver blade Trigger Battery Hook Piston Driver blade Trigger Firing head (outlet) Magazine Push lever Nail feeder (B) Top cover Chamber Actuator Handle Magazine Firing head (outlet) Nail feeder (B) Push lever ⅜ Battery (EMB315) Terminal hole Piston Trigger Battery Driver blade Hook Magazine Firing head Nail feeder (B) (outlet) Push lever Nameplate Battery release button 13 English OPERATION NOTE: The information contained in this Manual...

Instruction Manual
Page 14
Battery Charger (UC3SML) Strap Battery installation hole Connecting socket Charger connecting plug Pilot lamp Nameplate (on the bottom side) Charger connecting plug Cigarette lighter connecting plug Cord 14 AC adapter Cord English 2. Gas Brad Nailer Top cover Chamber Piston Driver blade Actuator Handle Battery Trigger Hook Stop lever Firing head (outlet) Push lever Magazine Magazine cover 3.
Battery Charger (UC3SML) Strap Battery installation hole Connecting socket Charger connecting plug Pilot lamp Nameplate (on the bottom side) Charger connecting plug Cigarette lighter connecting plug Cord 14 AC adapter Cord English 2. Gas Brad Nailer Top cover Chamber Piston Driver blade Actuator Handle Battery Trigger Hook Stop lever Firing head (outlet) Push lever Magazine Magazine cover 3.
Instruction Manual
Page 16
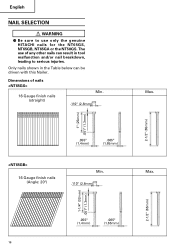
The use only the genuine HITACHI nails for the NT65GS, NT65GB, NT65GA or the NT50GS. Dimensions of any other nails can result in the Table below can be driven with this Nailer. Only nails shown in tool malfunction and/or nail breakdown, leading to use of nails 16 Gauge finish nails (straight) Min. .110" (2.8mm) Max. 2-1/2" (65mm) 1" (25mm) .051" (1.3mm) .055" (1.4mm) .065" (1.65mm) 16 Gauge finish nails (Angle: 20°) Min. .110" (2.8mm) Max...
The use only the genuine HITACHI nails for the NT65GS, NT65GB, NT65GA or the NT50GS. Dimensions of any other nails can result in the Table below can be driven with this Nailer. Only nails shown in tool malfunction and/or nail breakdown, leading to use of nails 16 Gauge finish nails (straight) Min. .110" (2.8mm) Max. 2-1/2" (65mm) 1" (25mm) .051" (1.3mm) .055" (1.4mm) .065" (1.65mm) 16 Gauge finish nails (Angle: 20°) Min. .110" (2.8mm) Max...

Instruction Manual
Page 18
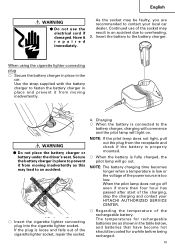
... 1 edgings. ⅜ Securing the bottom of the charger. 2. When using the AC adapter Insert the AC adapter into the receptacle, make sure the following points. ⅜ The power source voltage is stated on the nameplate. ⅜ The cord is not damaged. Connect to change without any obligation on the part of HITACHI. 2 APPLICATIONS ⅜ Nailing as finishing process for M5 screw 1 8 Nose cap (mounted on tool...
... 1 edgings. ⅜ Securing the bottom of the charger. 2. When using the AC adapter Insert the AC adapter into the receptacle, make sure the following points. ⅜ The power source voltage is stated on the nameplate. ⅜ The cord is not damaged. Connect to change without any obligation on the part of HITACHI. 2 APPLICATIONS ⅜ Nailing as finishing process for M5 screw 1 8 Nose cap (mounted on tool...
Instruction Manual
Page 19
... the pilot lamp does not light, pull out the plug from moving inadvertently as shown in place to fasten the battery charger in the car. Use the strap supplied with the battery charger to prevent it repaired immediately. As the socket may be cooled for rechargeable batteries are recommended to contact your HITACHI AUTHORIZED SERVICE CENTER. ⅜ Regarding the temperature...
... the pilot lamp does not light, pull out the plug from moving inadvertently as shown in place to fasten the battery charger in the car. Use the strap supplied with the battery charger to prevent it repaired immediately. As the socket may be cooled for rechargeable batteries are recommended to contact your HITACHI AUTHORIZED SERVICE CENTER. ⅜ Regarding the temperature...
Instruction Manual
Page 20
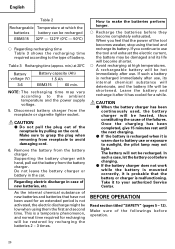
... warm due to the type of the followings before charging. ⅷ If the battery charger does not work while the battery is mounted correctly, it is probable that the power of the tool becomes weaker, stop using them the first and second time. In such a case, let the battery cool before operation. 20 Take it is not activated, the electric discharge might be damaged...
... warm due to the type of the followings before charging. ⅷ If the battery charger does not work while the battery is mounted correctly, it is probable that the power of the tool becomes weaker, stop using them the first and second time. In such a case, let the battery cool before operation. 20 Take it is not activated, the electric discharge might be damaged...
Instruction Manual
Page 22
... a Hitachi authorized service center immediately. (1) REMOVE ALL NAILS, FUEL CELL AND BATTERY FROM NAILER. Ⅺ ALL SCREWS MUST BE TIGHTENED. Ⅺ THE PUSH LEVER AND TRIGGER MUST MOVE SMOOTHLY with pulling back the nail feeder (B). (NT50GS: Unnecessary to ANSI Z87.1 specifications. If abnormal operation occurs, stop using the checklist below. If the battery indicator light is now ready to throw the push lever tip onto wood. Replace it needs to...
... a Hitachi authorized service center immediately. (1) REMOVE ALL NAILS, FUEL CELL AND BATTERY FROM NAILER. Ⅺ ALL SCREWS MUST BE TIGHTENED. Ⅺ THE PUSH LEVER AND TRIGGER MUST MOVE SMOOTHLY with pulling back the nail feeder (B). (NT50GS: Unnecessary to ANSI Z87.1 specifications. If abnormal operation occurs, stop using the checklist below. If the battery indicator light is now ready to throw the push lever tip onto wood. Replace it needs to...
Instruction Manual
Page 25
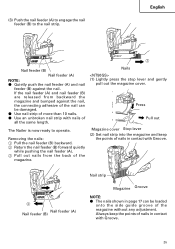
... nails. ⅷ Use an unbroken nail strip with Groove. 25 Always keep the points of nails in contact with Groove. 1 2 Nail feeder (A) Nail feeder (B) Nail strip Magazine Groove NOTE: ⅷ The nails shown in contact with nails of the magazine without any adjustment. The Nailer is now ready to the nail strip. (3) Push the nail feeder (A) to engage the nail feeder (B) to operate. Nails (1) Lightly press the stop lever...
... nails. ⅷ Use an unbroken nail strip with Groove. 25 Always keep the points of nails in contact with Groove. 1 2 Nail feeder (A) Nail feeder (B) Nail strip Magazine Groove NOTE: ⅷ The nails shown in contact with nails of the magazine without any adjustment. The Nailer is now ready to the nail strip. (3) Push the nail feeder (A) to engage the nail feeder (B) to operate. Nails (1) Lightly press the stop lever...

Instruction Manual
Page 27
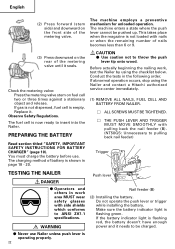
...; Do not use Nailer as required. 3 2 Push lever Trigger 27 Explanation of a wall at the temperature below 32°F (0°C). ⅷ Using the tool for unloaded operation. Have it to another person. ⅷ Be careful of an angle; CAUTION ⅷ Use caution not to be nailed stays clean, wipe off the trigger. 2 Depress the push lever firmly until it to drive a nail. 4 Remove finger from...
...; Do not use Nailer as required. 3 2 Push lever Trigger 27 Explanation of a wall at the temperature below 32°F (0°C). ⅷ Using the tool for unloaded operation. Have it to another person. ⅷ Be careful of an angle; CAUTION ⅷ Use caution not to be nailed stays clean, wipe off the trigger. 2 Depress the push lever firmly until it to drive a nail. 4 Remove finger from...
Instruction Manual
Page 28
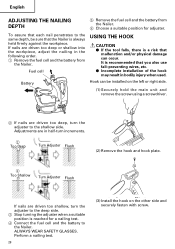
.... It is reached for adjuster. If nails are driven too shallow, turn the adjuster to the same depth, be installed on the other side and securely fasten with screw. English ADJUSTING THE NAILING DEPTH 5 Remove the fuel cell and the battery from the Nailer. To assure that the Nailer is a risk that you also use fall-preventing wires, etc. ⅷ Incomplete installation of the hook may result...
.... It is reached for adjuster. If nails are driven too shallow, turn the adjuster to the same depth, be installed on the other side and securely fasten with screw. English ADJUSTING THE NAILING DEPTH 5 Remove the fuel cell and the battery from the Nailer. To assure that the Nailer is a risk that you also use fall-preventing wires, etc. ⅷ Incomplete installation of the hook may result...
Instruction Manual
Page 31
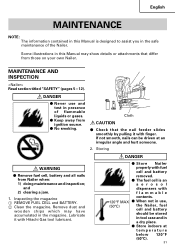
... the Nailer. MAINTENANCE AND INSPECTION Read section titled "SAFETY" (pages 5 - 12). Storing WARNING ⅷ Remove fuel cell, battery and all nails from ignition source. ⅷ No smoking. DANGER ⅷ Store Nailer properly with fuel cell and battery removed. ⅷ The fuel cell is designed to assist you in the magazine. If not smooth, nails can be stored in tool case and in use...
... the Nailer. MAINTENANCE AND INSPECTION Read section titled "SAFETY" (pages 5 - 12). Storing WARNING ⅷ Remove fuel cell, battery and all nails from ignition source. ⅷ No smoking. DANGER ⅷ Store Nailer properly with fuel cell and battery removed. ⅷ The fuel cell is designed to assist you in the magazine. If not smooth, nails can be stored in tool case and in use...

Instruction Manual
Page 32
...; Using this battery charger with loosened screws is available from normal use , the Nailer, fuel cell and battery should be removed with a soft cloth or a cloth dampened with soapy water. This Parts List will eventually require servicing or replacement of parts because of the lubricant to the steel parts to change without prior notice. Operator troubleshooting (See pages 33 - 34) 6. SERVICE AND REPAIRS WARNING ⅷ Only service personnel trained by Hitachi...
...; Using this battery charger with loosened screws is available from normal use , the Nailer, fuel cell and battery should be removed with a soft cloth or a cloth dampened with soapy water. This Parts List will eventually require servicing or replacement of parts because of the lubricant to the steel parts to change without prior notice. Operator troubleshooting (See pages 33 - 34) 6. SERVICE AND REPAIRS WARNING ⅷ Only service personnel trained by Hitachi...
Instruction Manual
Page 33
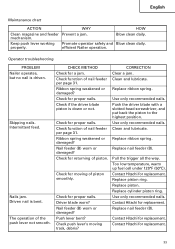
... smooth. Check for replacement. Replace ribbon spring. Clean and lubricate. Contact Hitachi for proper nails. Contact Hitachi for replacement. properly. Intermittent feed. Check push lever's moving of nail feeder per page 31. Operator troubleshooting PROBLEM Nailer operates, but no nail is driven. Nail feeder (B) worn or damaged? Push lever bent? Replace nail feeder (B). Ribbon spring weakened or damaged? Replace ribbon spring. Use only recommended nails. Skipping nails. mechanism. Keep push lever working Promote operator safety and Blow clean daily...
... smooth. Check for replacement. Replace ribbon spring. Clean and lubricate. Contact Hitachi for proper nails. Contact Hitachi for replacement. properly. Intermittent feed. Check push lever's moving of nail feeder per page 31. Operator troubleshooting PROBLEM Nailer operates, but no nail is driven. Nail feeder (B) worn or damaged? Push lever bent? Replace nail feeder (B). Ribbon spring weakened or damaged? Replace ribbon spring. Use only recommended nails. Skipping nails. mechanism. Keep push lever working Promote operator safety and Blow clean daily...
Instruction Manual
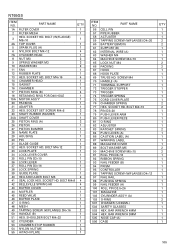
Page 105
... HOLE 1 19A MOTOR ASS'Y 1 20 PACKING 1 21 ADAPTER 1 22 HEX. BOLT M4×12 3 33 LOCK PLATE 1 34 LOCK LEVER COVER 1 35 ROLL PIN D3×10 1 36 LOCK LEVER 1 37 ROLL PIN D3×16 1 38 LOCK SPRING 1 39 GUIDE PLATE 1 40 HEX.SHOULDER BOLT M5 2 41 SEAL LOCK HEX. SCREW M4 70 HANDLE (A) 71 TERMINAL SUPPORT 72 TRIGGER STOPPER 73 TRIGGER 74 TRIGGER SPRING 75 CORD COVER PLATE 76 CHAMBER SPRING 77 HEX. BOLT...
... HOLE 1 19A MOTOR ASS'Y 1 20 PACKING 1 21 ADAPTER 1 22 HEX. BOLT M4×12 3 33 LOCK PLATE 1 34 LOCK LEVER COVER 1 35 ROLL PIN D3×10 1 36 LOCK LEVER 1 37 ROLL PIN D3×16 1 38 LOCK SPRING 1 39 GUIDE PLATE 1 40 HEX.SHOULDER BOLT M5 2 41 SEAL LOCK HEX. SCREW M4 70 HANDLE (A) 71 TERMINAL SUPPORT 72 TRIGGER STOPPER 73 TRIGGER 74 TRIGGER SPRING 75 CORD COVER PLATE 76 CHAMBER SPRING 77 HEX. BOLT...
Instruction Manual
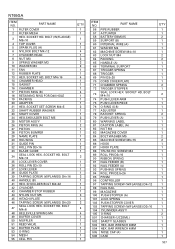
Page 107
... LOCK LEVER 38 GUIDE PLATE 39 TAPPING SCREW (W/FLANGE) D4×16 40 HANDLE (B) 41 HEX. SOCKET HD. PART NAME 56 PIPE RUBBER 57 ACTUATER 58 BATTERY EBM315 59 SUPPORT (B) 60 INTERNAL WIRE (A) 61 WASHER M4 62 MACHINE SCREW M4×10 63 LOCK NUT M4 64 PACKING 65 HANDLE (A) 66 TERMINAL SUPPORT 67 TRIGGER SPRING 68 TRIGGER 69 PIN D3×20 70 CORD COVER PLATE 71 CHAMBER SPRING 72 TRIGGER STOPPER 73 SEAL LOCK...
... LOCK LEVER 38 GUIDE PLATE 39 TAPPING SCREW (W/FLANGE) D4×16 40 HANDLE (B) 41 HEX. SOCKET HD. PART NAME 56 PIPE RUBBER 57 ACTUATER 58 BATTERY EBM315 59 SUPPORT (B) 60 INTERNAL WIRE (A) 61 WASHER M4 62 MACHINE SCREW M4×10 63 LOCK NUT M4 64 PACKING 65 HANDLE (A) 66 TERMINAL SUPPORT 67 TRIGGER SPRING 68 TRIGGER 69 PIN D3×20 70 CORD COVER PLATE 71 CHAMBER SPRING 72 TRIGGER STOPPER 73 SEAL LOCK...
Instruction Manual
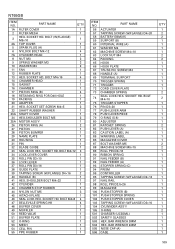
Page 109
... CHARGER (UC3SML) 502 SAFETY GLASSES 503 HEX. BOLT M4×8 4 47 BELLEVILLE SPRING H8 4 48 BUFFER COVER 1 49 MUFFLER 1 50 REED VALVE 1 51 BUFFER PLATE 1 52 O-RING 1 53 MESH 1 54 CELL PIN 1 55 PIPE RUBBER 1 ITEM NO. SCREW M4 68 HANDLE (A) 69 TERMINAL SUPPORT 70 TRIGGER SPRING 71 TRIGGER 72 CORD COVER PLATE 73 CHAMBER SPRING 74 SEAL LOCK HEX. BAR WRENCH 4MM 505 NOSE CAP (A) 506 CASE...
... CHARGER (UC3SML) 502 SAFETY GLASSES 503 HEX. BOLT M4×8 4 47 BELLEVILLE SPRING H8 4 48 BUFFER COVER 1 49 MUFFLER 1 50 REED VALVE 1 51 BUFFER PLATE 1 52 O-RING 1 53 MESH 1 54 CELL PIN 1 55 PIPE RUBBER 1 ITEM NO. SCREW M4 68 HANDLE (A) 69 TERMINAL SUPPORT 70 TRIGGER SPRING 71 TRIGGER 72 CORD COVER PLATE 73 CHAMBER SPRING 74 SEAL LOCK HEX. BAR WRENCH 4MM 505 NOSE CAP (A) 506 CASE...

Instruction Manual
Page 111
... 2 41 SEAL LOCK HEX. SCREW M4 1 70 HANDLE (A) 1 71 TERMINAL SUPPORT 1 72 TRIGGER STOPPER 1 73 TRIGGER 1 74 TRIGGER SPRING 1 75 PIN D3×20 1 76 CORD COVER PLATE 1 77 CHAMBER SPRING 2 78 SEAL LOCK HEX. SOCKET HD. SOCKET HD. SHOULDER BOLT M4×32 1 52 CYLINDER 1 53 CHAMBER STOP RUBBER 1 54 NYLON NUT M5 1 55 HITACHI PLATE 1 ITEM NO. BAR WRENCH 4MM 1 505 NOSE CAP (A) 1 506 CASE 1 111 NT50GS...
... 2 41 SEAL LOCK HEX. SCREW M4 1 70 HANDLE (A) 1 71 TERMINAL SUPPORT 1 72 TRIGGER STOPPER 1 73 TRIGGER 1 74 TRIGGER SPRING 1 75 PIN D3×20 1 76 CORD COVER PLATE 1 77 CHAMBER SPRING 2 78 SEAL LOCK HEX. SOCKET HD. SOCKET HD. SHOULDER BOLT M4×32 1 52 CYLINDER 1 53 CHAMBER STOP RUBBER 1 54 NYLON NUT M5 1 55 HITACHI PLATE 1 ITEM NO. BAR WRENCH 4MM 1 505 NOSE CAP (A) 1 506 CASE 1 111 NT50GS...


