Instruction Manual
Page 3
... "SAFETY" section of the safety precautions, warnings and operating instructions in the Instruction Manual before it occurs, and by WARNINGS on the power tool and in this power tool in death or serious injury. CAUTION indicates a potentially hazardous situations which , if ignored, could result in a manner that result from heat, oil, sharp edges the dust of electric shock. risk of fumes. Do not use any adapter...
... "SAFETY" section of the safety precautions, warnings and operating instructions in the Instruction Manual before it occurs, and by WARNINGS on the power tool and in this power tool in death or serious injury. CAUTION indicates a potentially hazardous situations which , if ignored, could result in a manner that result from heat, oil, sharp edges the dust of electric shock. risk of fumes. Do not use any adapter...
Instruction Manual
Page 4
.... maintained power tools. working conditions and the work to another battery pack. This enables better control of injury, user must be d) Remove any adjusting key or wrench before making any other condition that may and safer at all times. that have the switch on . ensure these instructions Carrying power tools with your application. English b) Use safety equipment. etc., in power tools that have type of any adjustments, changing 6) Service accessories, or storing power tools. injury. 5) Battery tool use...
.... maintained power tools. working conditions and the work to another battery pack. This enables better control of injury, user must be d) Remove any adjusting key or wrench before making any other condition that may and safer at all times. that have the switch on . ensure these instructions Carrying power tools with your application. English b) Use safety equipment. etc., in power tools that have type of any adjustments, changing 6) Service accessories, or storing power tools. injury. 5) Battery tool use...
Instruction Manual
Page 5
... broken wheel fragments. 2. Do not use a tool which have been mounted to do this tool without all screws, bolts, and plates tightly mounted. Carefully handle power tools. Do not wipe plastic parts with such solvents. 5 Keep all times. NEVER use power tools if the plastic housing or handle is defective or operating abnormally. Don't leave tool until repaired. 13. Hold tools by a Hitachi authorized service center. 16. Turn power off. Keep motor air vent clean. Don't use a power tool...
... broken wheel fragments. 2. Do not use a tool which have been mounted to do this tool without all screws, bolts, and plates tightly mounted. Carefully handle power tools. Do not wipe plastic parts with such solvents. 5 Keep all times. NEVER use power tools if the plastic housing or handle is defective or operating abnormally. Don't leave tool until repaired. 13. Hold tools by a Hitachi authorized service center. 16. Turn power off. Keep motor air vent clean. Don't use a power tool...
Instruction Manual
Page 6
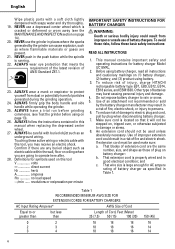
... firmly grip the body handle and side handle while operating the grinder. 25. To avoid these basic safety instructions: READ ALL INSTRUCTIONS 1. and c. Before using battery charger, read all instructions and cautionary markings on (1) battery charger, (2) battery, and (3) product using on this tool V volts direct current Hz hertz A amperes no no load speed ---/min ...... English Wipe plastic parts with a soft cloth lightly dampened with buried objict such as electric cable within the wall...
... firmly grip the body handle and side handle while operating the grinder. 25. To avoid these basic safety instructions: READ ALL INSTRUCTIONS 1. and c. Before using battery charger, read all instructions and cautionary markings on (1) battery charger, (2) battery, and (3) product using on this tool V volts direct current Hz hertz A amperes no no load speed ---/min ...... English Wipe plastic parts with a soft cloth lightly dampened with buried objict such as electric cable within the wall...
Instruction Manual
Page 7
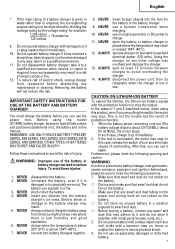
... manual. OTHER TYPES OF BATTERIES MAY BURST AND CAUSE INJURY! short-circuit the battery. charge outdoors. connect two battery chargers together. 8. Using the charger on any way; In this case, release the switch of tool and eliminate causes of protection function. 1. Do not use only where there is low humidity and good ventilation. Do not operate battery charger with a hammer, step on standard household electrical power (120 volts). Do not operate battery charger...
... manual. OTHER TYPES OF BATTERIES MAY BURST AND CAUSE INJURY! short-circuit the battery. charge outdoors. connect two battery chargers together. 8. Using the charger on any way; In this case, release the switch of tool and eliminate causes of protection function. 1. Do not use only where there is low humidity and good ventilation. Do not operate battery charger with a hammer, step on standard household electrical power (120 volts). Do not operate battery charger...

Instruction Manual
Page 8
... INSTRUCTIONS AND MAKE THEM AVAILABLE TO OTHER USERS AND OWNERS OF THIS TOOL! 8 Do not use . If liquid leaking from the battery gets into a microwave oven, dryer, or high pressure container. 9. Keep away from the equipment or battery charger, and stop further recharging. 8. CAUTION 1. There is battery ... use in a location where strong static electricity generates. 11. Do not use and return it to complete even when a specified recharging time has elapsed, immediately stop use the battery in any way appears abnormal during use, recharging or storage, immediately remove it...
... INSTRUCTIONS AND MAKE THEM AVAILABLE TO OTHER USERS AND OWNERS OF THIS TOOL! 8 Do not use . If liquid leaking from the battery gets into a microwave oven, dryer, or high pressure container. 9. Keep away from the equipment or battery charger, and stop further recharging. 8. CAUTION 1. There is battery ... use in a location where strong static electricity generates. 11. Do not use and return it to complete even when a specified recharging time has elapsed, immediately stop use the battery in any way appears abnormal during use, recharging or storage, immediately remove it...

Instruction Manual
Page 9
NAME OF PARTS 1. Cordless Disc Grinder (G14DL / G18DL) Nameplate Switch Push button Brush cap Gear cover Depressed center wheel Packing gland ⅜ Battery Terminal hole Housing Wheel guard Side handle Battery Terminal hole Latch Nameplate (BCL1430) Latch Nameplate (EBM1830) Fig.1 9 NEVER operate, or attempt any maintenance on the tool unless you in the safe operation and maintenance of the power tool. Some illustrations in this manual. English FUNCTIONAL DESCRIPTION NOTE: The information contained...
NAME OF PARTS 1. Cordless Disc Grinder (G14DL / G18DL) Nameplate Switch Push button Brush cap Gear cover Depressed center wheel Packing gland ⅜ Battery Terminal hole Housing Wheel guard Side handle Battery Terminal hole Latch Nameplate (BCL1430) Latch Nameplate (EBM1830) Fig.1 9 NEVER operate, or attempt any maintenance on the tool unless you in the safe operation and maintenance of the power tool. Some illustrations in this manual. English FUNCTIONAL DESCRIPTION NOTE: The information contained...

Instruction Manual
Page 10
Model Battery Type Voltage Capacity Weight G14DL 9,300/min DC motor G18DL 9,100/min 4-1/2" (115 mm) 7/8" (22 mm) BCL 1430 EBM 1830 Lithium - ion battery DC 14.4V DC 18V 3 Ah 4.0 lbs (1.8 kg) 4.2 lbs (1.9 kg) 2. hole diam. Battery Charger (UC18YRL) Caution plate Body Overheat lamp (green) Charge status lamp (red) Battery installation hole Cooling fan Fig. 2 Nameplate SPECIFICATIONS Model Motor No-Load Speed Wheel Size: external diam. Battery Charger Model Input power source Charging time Charging...
Model Battery Type Voltage Capacity Weight G14DL 9,300/min DC motor G18DL 9,100/min 4-1/2" (115 mm) 7/8" (22 mm) BCL 1430 EBM 1830 Lithium - ion battery DC 14.4V DC 18V 3 Ah 4.0 lbs (1.8 kg) 4.2 lbs (1.9 kg) 2. hole diam. Battery Charger (UC18YRL) Caution plate Body Overheat lamp (green) Charge status lamp (red) Battery installation hole Cooling fan Fig. 2 Nameplate SPECIFICATIONS Model Motor No-Load Speed Wheel Size: external diam. Battery Charger Model Input power source Charging time Charging...

Instruction Manual
Page 11
... battery. English ASSEMBLY AND OPERATION APPLICATIONS ⅜ Removal of casting fin and finishing of various type of steel, bronze and aluminum materials and castings. ⅜ Grinding of welded sections or sections cut by means of an acetylene torch. ⅜ Grinding of serious injury, NEVER use the electrical cord if damaged. When the plug of battery charger into place. REMOVAL AND INSTALLATION METHOD OF BATTERY...
... battery. English ASSEMBLY AND OPERATION APPLICATIONS ⅜ Removal of casting fin and finishing of various type of steel, bronze and aluminum materials and castings. ⅜ Grinding of welded sections or sections cut by means of an acetylene torch. ⅜ Grinding of serious injury, NEVER use the electrical cord if damaged. When the plug of battery charger into place. REMOVAL AND INSTALLATION METHOD OF BATTERY...
Instruction Manual
Page 12
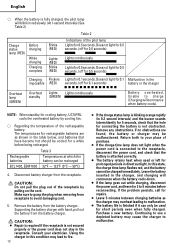
... for 0.1 seconds) battery or the charger Overheat lamp (GREEN) Overheat standby Lights Lights continuously (GREEN) Battery overheated. Rechargeable batteries BCL1430, EBM1830 Table 3 Temperatures at which the battery can only be used or left for prolonged periods in direct sunlight. Disconnect battery charger from the battery charger. Return both to your electrician. In this condition may cause the charger to the receptacle, disconnect the power cord, and check...
... for 0.1 seconds) battery or the charger Overheat lamp (GREEN) Overheat standby Lights Lights continuously (GREEN) Battery overheated. Rechargeable batteries BCL1430, EBM1830 Table 3 Temperatures at which the battery can only be used or left for prolonged periods in direct sunlight. Disconnect battery charger from the battery charger. Return both to your electrician. In this condition may cause the charger to the receptacle, disconnect the power cord, and check...
Instruction Manual
Page 13
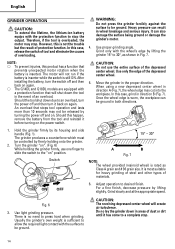
... the adjustment, ensure that the switch is securely tightened on the wheel guard in order to page 15 of all other abnomalities before operation: ⅜ No flammable gas, liquid, or object at high temperatures. Power switch Ensure that the screw is in the OFF position. personnel. Turn the grinder "on the wheel guard. ⅜ Install the wheel guard to use the tool and exhaust the electric current, the battery may...
... the adjustment, ensure that the switch is securely tightened on the wheel guard in order to page 15 of all other abnomalities before operation: ⅜ No flammable gas, liquid, or object at high temperatures. Power switch Ensure that the screw is in the OFF position. personnel. Turn the grinder "on the wheel guard. ⅜ Install the wheel guard to use the tool and exhaust the electric current, the battery may...
Instruction Manual
Page 14
... CAUTION: To extend the lifetime, the lithium-ion battery equips with the surface to be ground. Heavy pressure can also damage the surface being ground or damage the grinder's motor. It can result in direction A (Fig. 7), the wheel edge may stop. release the switch of tool and eliminate the causes Grind only with a protection function that stops tool operation and lasts more than 10 seconds may...
... CAUTION: To extend the lifetime, the lithium-ion battery equips with the surface to be ground. Heavy pressure can also damage the surface being ground or damage the grinder's motor. It can result in direction A (Fig. 7), the wheel edge may stop. release the switch of tool and eliminate the causes Grind only with a protection function that stops tool operation and lasts more than 10 seconds may...
Instruction Manual
Page 15
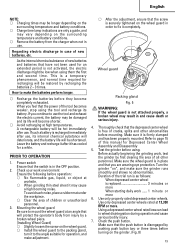
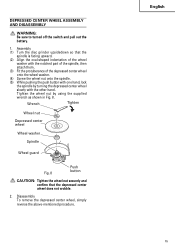
... depressed center wheel onto the wheel washer. (4) Screw the wheel nut onto the spindle. (5) While pushing the push button with one hand, lock the spindle by using the supplied wrench as shown in Fig. 8. Tighten the wheel nut by turning the depressed center wheel slowly with the other hand. English 15 DEPRESSED CENTER WHEEL ASSEMBLY AND DISASSEMBLY WARNING: Be sure to turned off the switch and pull out the battery. 1. Disassembly To remove the depressed...
... depressed center wheel onto the wheel washer. (4) Screw the wheel nut onto the spindle. (5) While pushing the push button with one hand, lock the spindle by using the supplied wrench as shown in Fig. 8. Tighten the wheel nut by turning the depressed center wheel slowly with the other hand. English 15 DEPRESSED CENTER WHEEL ASSEMBLY AND DISASSEMBLY WARNING: Be sure to turned off the switch and pull out the battery. 1. Disassembly To remove the depressed...
Instruction Manual
Page 16
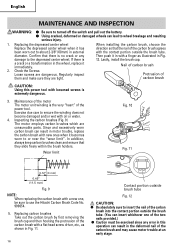
... carbon brushes (Fig. 9) The motor employs carbon brushes which are dangerous. Lastly, install the brush cap. Check the Screws Loose screws are consumable parts. Then push it has been worn out to insert the nail of the carbon brush and may cause motor trouble at an early stage. Replacing the depressed center wheel Replace the depressed center wheel when it in with loosened screws is no crack or any error in this power tool...
... carbon brushes (Fig. 9) The motor employs carbon brushes which are dangerous. Lastly, install the brush cap. Check the Screws Loose screws are consumable parts. Then push it has been worn out to insert the nail of the carbon brush and may cause motor trouble at an early stage. Replacing the depressed center wheel Replace the depressed center wheel when it in with loosened screws is no crack or any error in this power tool...
Instruction Manual
Page 17
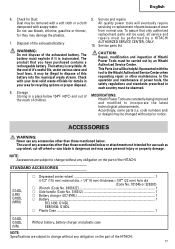
.... This Parts List will be removed with a soft cloth or a cloth All quality power tools will be used, all service and repairs must be performed by an Hitachi Authorized Service Center. Accordingly, some parts (i.e. At the end of the HITACHI. code numbers and/ or design) may cause personal injury or property damage. Check with soapy water. ACCESSORIES WARNING: Never use such as cup wheel, cut-off wheel or saw blade is...
.... This Parts List will be removed with a soft cloth or a cloth All quality power tools will be used, all service and repairs must be performed by an Hitachi Authorized Service Center. Accordingly, some parts (i.e. At the end of the HITACHI. code numbers and/ or design) may cause personal injury or property damage. Check with soapy water. ACCESSORIES WARNING: Never use such as cup wheel, cut-off wheel or saw blade is...
Instruction Manual
Page 50
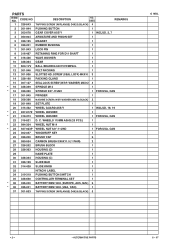
... SLOTTED HD. WASHER) M5×16 2 19 SET PLATE 1 20 WHEEL GUARD ASS'Y 1 21 WHEEL WASHER 5/8"-11UNC 1 22 DEPRESSED CENTER WHEEL 1 23 WHEEL NUT 5/8"-11UNC 1 24 WOODRUFF KEY 1 25 BRUSH CAP 2 26 CARBON BRUSH 2 27 CB BLOCK 1 28 HOUSING (D) 1 29 NAME PLATE 1 30 HOUSING (C) 1 31 SLIDE BAR 1 32 SLIDE SWITCH KNOB 1 33 HITACHI LABEL 1 34 PUSHING BUTTON SWITCH 1 35 CONTROLLER 1 36 TAPPING SCREW D4×10 2 37 HOLDER SPRING 2 38 TERMINAL 1 39 TERMINAL PIECE 1 40 TERMINAL...
... SLOTTED HD. WASHER) M5×16 2 19 SET PLATE 1 20 WHEEL GUARD ASS'Y 1 21 WHEEL WASHER 5/8"-11UNC 1 22 DEPRESSED CENTER WHEEL 1 23 WHEEL NUT 5/8"-11UNC 1 24 WOODRUFF KEY 1 25 BRUSH CAP 2 26 CARBON BRUSH 2 27 CB BLOCK 1 28 HOUSING (D) 1 29 NAME PLATE 1 30 HOUSING (C) 1 31 SLIDE BAR 1 32 SLIDE SWITCH KNOB 1 33 HITACHI LABEL 1 34 PUSHING BUTTON SWITCH 1 35 CONTROLLER 1 36 TAPPING SCREW D4×10 2 37 HOLDER SPRING 2 38 TERMINAL 1 39 TERMINAL PIECE 1 40 TERMINAL...
Instruction Manual
Page 51
... WHEEL WASHER 5/8"-11UNC 1 22 DEPRESSED CENTER WHEEL 1 23 WHEEL NUT 5/8"-11UNC 1 24 WOODRUFF KEY 1 25 BRUSH CAP 2 26 CARBON BRUSH 2 27 CB BLOCK 1 28 HOUSING (D) 1 29 NAME PLATE 1 30 HOUSING (C) 1 31 SLIDE BAR 1 32 SLIDE SWITCH KNOB 1 33 HITACHI LABEL 1 34 PUSHING BUTTON SWITCH 1 35 CONTROLLER 1 36 TAPPING SCREW D4×10 2 37 HOLDER SPRING 2 38 TERMINAL 1 39 TERMINAL PIECE 1 Item No. Part Name 40 TERMINAL 41 BATTERY 501 SIDE HANDLE 502 WRENCH 503 CHARGER Q'TY...
... WHEEL WASHER 5/8"-11UNC 1 22 DEPRESSED CENTER WHEEL 1 23 WHEEL NUT 5/8"-11UNC 1 24 WOODRUFF KEY 1 25 BRUSH CAP 2 26 CARBON BRUSH 2 27 CB BLOCK 1 28 HOUSING (D) 1 29 NAME PLATE 1 30 HOUSING (C) 1 31 SLIDE BAR 1 32 SLIDE SWITCH KNOB 1 33 HITACHI LABEL 1 34 PUSHING BUTTON SWITCH 1 35 CONTROLLER 1 36 TAPPING SCREW D4×10 2 37 HOLDER SPRING 2 38 TERMINAL 1 39 TERMINAL PIECE 1 Item No. Part Name 40 TERMINAL 41 BATTERY 501 SIDE HANDLE 502 WRENCH 503 CHARGER Q'TY...

Instruction Manual
Page 52
... POWER TOOL SERVICE CENTER. Issued by Hitachi Koki U.S.A., Ltd. 3950 Steve Reynolds Blvd. LTD. Norcross, GA 30093 Hitachi Koki Canada Co. 6395 Kestrel Road Mississauga ON L5T 1Z5 701 Code No. C99158861 Printed in China Con respecto a la RECOLECCIÓN de baterías, póngase en contacto con HITACHI KOKI U.S.A. at 1-800-59-TOOLS (toll free), or HITACHI AUTHORIZED POWER TOOL SERVICE...
... POWER TOOL SERVICE CENTER. Issued by Hitachi Koki U.S.A., Ltd. 3950 Steve Reynolds Blvd. LTD. Norcross, GA 30093 Hitachi Koki Canada Co. 6395 Kestrel Road Mississauga ON L5T 1Z5 701 Code No. C99158861 Printed in China Con respecto a la RECOLECCIÓN de baterías, póngase en contacto con HITACHI KOKI U.S.A. at 1-800-59-TOOLS (toll free), or HITACHI AUTHORIZED POWER TOOL SERVICE...
Parts List
Page 2
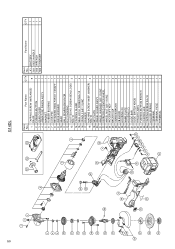
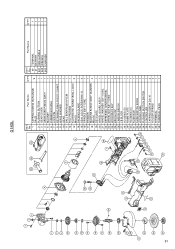
... 1 32 314-428 SLIDE KNOB 1 33 HITACHI LABEL 1 34 319-319 PUSHING BUTTON SWITCH 1 35 328-658 CONTROLLER TERMINAL SET 1 * 36 326-240 BATTERY EBM 1830 (EUROPE, AUS, NZL) 2 * 36 326-241 BATTERY EBM 1830 (USA, CAN) 1 37 301-653 TAPPING SCREW (W/FLANGE) D4X20 (BLACK) 5 G 18DL --- 2 --- * ALTERNATIVE PARTS 6 -- 07 WASHER) M4X12 4 * 16 328-359 SPINDLE M14 1 * 16 328-360 SPINDLE 5/8"-11UNC 1 FOR USA...
... 1 32 314-428 SLIDE KNOB 1 33 HITACHI LABEL 1 34 319-319 PUSHING BUTTON SWITCH 1 35 328-658 CONTROLLER TERMINAL SET 1 * 36 326-240 BATTERY EBM 1830 (EUROPE, AUS, NZL) 2 * 36 326-241 BATTERY EBM 1830 (USA, CAN) 1 37 301-653 TAPPING SCREW (W/FLANGE) D4X20 (BLACK) 5 G 18DL --- 2 --- * ALTERNATIVE PARTS 6 -- 07 WASHER) M4X12 4 * 16 328-359 SPINDLE M14 1 * 16 328-360 SPINDLE 5/8"-11UNC 1 FOR USA...

Parts List
Page 3
USED 1 1 1 1 REMARKS G 18DL OPTIONAL ACCESSORIES ITEM NO. DESCRIPTION NO. DESCRIPTION 501 318-312 SIDE HANDLE 502 938-332Z WRENCH 503 CHARGER (MODEL UC 18YRL) 504 328-206 CASE NO. CODE NO. USED REMARKS * 601 937-826Z WASHER NUT 1 * 601 938-318 WASHER NUT 1 FOR USA, CAN * 602 937-825Z RUBBER PAD 1 * 602 938-317 RUBBER PAD 1 FOR USA, CAN 603 314-095 SANDING DISCS 115MM C-P16 (10...
USED 1 1 1 1 REMARKS G 18DL OPTIONAL ACCESSORIES ITEM NO. DESCRIPTION NO. DESCRIPTION 501 318-312 SIDE HANDLE 502 938-332Z WRENCH 503 CHARGER (MODEL UC 18YRL) 504 328-206 CASE NO. CODE NO. USED REMARKS * 601 937-826Z WASHER NUT 1 * 601 938-318 WASHER NUT 1 FOR USA, CAN * 602 937-825Z RUBBER PAD 1 * 602 938-317 RUBBER PAD 1 FOR USA, CAN 603 314-095 SANDING DISCS 115MM C-P16 (10...

