
Instruction Manual
Page 3
... damage are outlined in the "SAFETY" section of the safety precautions, warnings and operating instructions in this Instruction Manual. Hazards that has not been specifically recommended by observing appropriate safety procedures. NEVER use this power tool. CAUTION indicates a potentially hazardous situations which contain the operation and maintenance instructions. Basic safety precautions are identified by WARNINGS on the power tool and in the Instruction Manual before it occurs, and by...
... damage are outlined in the "SAFETY" section of the safety precautions, warnings and operating instructions in this Instruction Manual. Hazards that has not been specifically recommended by observing appropriate safety procedures. NEVER use this power tool. CAUTION indicates a potentially hazardous situations which contain the operation and maintenance instructions. Basic safety precautions are identified by WARNINGS on the power tool and in the Instruction Manual before it occurs, and by...

Instruction Manual
Page 4
SAVE THESE INSTRUCTIONS 1. Power tools create sparks which may result in moving parts. A charger that have the switch on invites accidents. (4) Remove adjusting keys or wrenches before inserting battery. A moment of inattention while operating power tools may ignite the dust of fire when used for the battery. Keep your hair, clothing and gloves away from moving parts. (3) Avoid accidental starting. Dust mask, non-skid safety shoes, hard hat, or hearing protection must be...
SAVE THESE INSTRUCTIONS 1. Power tools create sparks which may result in moving parts. A charger that have the switch on invites accidents. (4) Remove adjusting keys or wrenches before inserting battery. A moment of inattention while operating power tools may ignite the dust of fire when used for the battery. Keep your hair, clothing and gloves away from moving parts. (3) Avoid accidental starting. Dust mask, non-skid safety shoes, hard hat, or hearing protection must be...

Instruction Manual
Page 5
... approved safety equipment, such as those dust masks that are specially designed to another tool. 5. Service or maintenance performed by qualified repair personnel. Follow instructions in the hands of untrained users. (6) When battery pack is designed. (3) Do not use only identical replacement parts. Service (1) Tool service must be performed only by unqualified personnel could result in the locked or off . Tools are easier to control. (8) Check for your model. Use...
... approved safety equipment, such as those dust masks that are specially designed to another tool. 5. Service or maintenance performed by qualified repair personnel. Follow instructions in the hands of untrained users. (6) When battery pack is designed. (3) Do not use only identical replacement parts. Service (1) Tool service must be performed only by unqualified personnel could result in the locked or off . Tools are easier to control. (8) Check for your model. Use...

Instruction Manual
Page 6
... you. 6. Because the cordless driver drill operates by insulated gripping surfaces when performing an operation where the cutting tool may contact hidden wiring. NEVER operate without all guards or safety features in place and in proper working at any time. 5. Don't force small tool or attachment to electric shock. NEVER use a power tool for extended periods. Handle tool correctly. Keep all screws, bolts, and plates tightly mounted. Do not use tool for purpose not...
... you. 6. Because the cordless driver drill operates by insulated gripping surfaces when performing an operation where the cutting tool may contact hidden wiring. NEVER operate without all guards or safety features in place and in proper working at any time. 5. Don't force small tool or attachment to electric shock. NEVER use a power tool for extended periods. Handle tool correctly. Keep all screws, bolts, and plates tightly mounted. Do not use tool for purpose not...

Instruction Manual
Page 7
... handle power tools. Should a power tool be dropped or struck against hard materials inadvertently, it may damage and crack plastic parts. Solvents such as gasoline, thinner, benzine, carbon tetrachloride and alcohol may be operating unusually, making strange noises, or otherwise appears defective, stop using it immediately and arrange for symbols used on this tool V volts direct current no load speed ---/min ... no .......... Definitions for repairs by a Hitachi authorized service...
... handle power tools. Should a power tool be dropped or struck against hard materials inadvertently, it may damage and crack plastic parts. Solvents such as gasoline, thinner, benzine, carbon tetrachloride and alcohol may be operating unusually, making strange noises, or otherwise appears defective, stop using it immediately and arrange for symbols used on this tool V volts direct current no load speed ---/min ... no .......... Definitions for repairs by a Hitachi authorized service...
Instruction Manual
Page 8
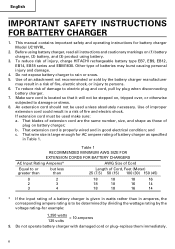
... rating-for AC ampere rating of improper extension cord could result in good electrical condition; This manual contains important safety and operating instructions for battery charger Model UC18YRL. 2. Make sure cord is properly wired and in a risk of plug on (1) battery charger, (2) battery, and (3) product using battery charger, read all instructions and cautionary markings on battery charger; and c. Use of injury, charge HITACHI rechargeable battery type EB7, EB9, EB12, EB14, EB18 series and EBM1830...
... rating-for AC ampere rating of improper extension cord could result in good electrical condition; This manual contains important safety and operating instructions for battery charger Model UC18YRL. 2. Make sure cord is properly wired and in a risk of plug on (1) battery charger, (2) battery, and (3) product using battery charger, read all instructions and cautionary markings on battery charger; and c. Use of injury, charge HITACHI rechargeable battery type EB7, EB9, EB12, EB14, EB18 series and EBM1830...

Instruction Manual
Page 9
... battery and in a risk of electric shock, unplug charger from direct sunlight and use an engine generator or DC power to a qualified serviceman when service or repair is low humidity and good ventilation. 6. Incorrect reassembly may overheat and damage the charger. 13. To reduce risk of electric shock or fire. 12. IMPORTANT SAFETY INSTRUCTIONS FOR USE OF THE BATTERY AND BATTERY CHARGER You must charge the battery...
... battery and in a risk of electric shock, unplug charger from direct sunlight and use an engine generator or DC power to a qualified serviceman when service or repair is low humidity and good ventilation. 6. Incorrect reassembly may overheat and damage the charger. 13. To reduce risk of electric shock or fire. 12. IMPORTANT SAFETY INSTRUCTIONS FOR USE OF THE BATTERY AND BATTERY CHARGER You must charge the battery...

Instruction Manual
Page 11
... case DS18DL (MRK): with charger (UC18YRL) and case NAME OF PARTS 1. Cordless Hammer Drill (DV18DL)/Cordless Driver Drill (DS18DL) Cap Keyless chuck Shift knob Nameplate Push button Switch trigger Handle Bit holder Side handle Lever Battery Push button 11 NEVER operate, or attempt any maintenance on your own power tool. Some illustrations in this Instruction Manual may show details or attachments that differ from those on the tool unless you have first read and understood all safety instructions contained in this Instruction Manual...
... case DS18DL (MRK): with charger (UC18YRL) and case NAME OF PARTS 1. Cordless Hammer Drill (DV18DL)/Cordless Driver Drill (DS18DL) Cap Keyless chuck Shift knob Nameplate Push button Switch trigger Handle Bit holder Side handle Lever Battery Push button 11 NEVER operate, or attempt any maintenance on your own power tool. Some illustrations in this Instruction Manual may show details or attachments that differ from those on the tool unless you have first read and understood all safety instructions contained in this Instruction Manual...
Instruction Manual
Page 14
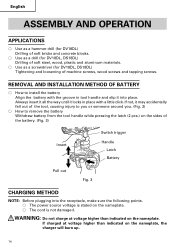
... on the nameplate, the charger will burn up. 14 English ASSEMBLY AND OPERATION APPLICATIONS ⅜ Use as a hammer drill (for DV18DL) Drilling of soft bricks and concrete blocks. ⅜ Use as a drill (for DV18DL, DS18DL) Drilling of soft steel, wood, plastic and aluminum materials. ⅜ Use as a screwdriver (for DV18DL, DS18DL) Tightening and loosening of the battery. (Fig. 3) Insert Pull out Switch trigger Handle Latch Battery Push Fig. 3 CHARGING...
... on the nameplate, the charger will burn up. 14 English ASSEMBLY AND OPERATION APPLICATIONS ⅜ Use as a hammer drill (for DV18DL) Drilling of soft bricks and concrete blocks. ⅜ Use as a drill (for DV18DL, DS18DL) Drilling of soft steel, wood, plastic and aluminum materials. ⅜ Use as a screwdriver (for DV18DL, DS18DL) Tightening and loosening of the battery. (Fig. 3) Insert Pull out Switch trigger Handle Latch Battery Push Fig. 3 CHARGING...

Instruction Manual
Page 18
... remove the screw using a slotted head screwdriver or a coin. (Fig. 6) (b) Remove the hook and spring. (Fig. 7) (c) Install the hook and spring on the right or left side and the angle can be adjusted in 5 steps between 0° and 80°. (1) Operating the hook (a) Pull out the hook toward you in the direction of arrow (A) and turn in the direction of arrow (B). (Fig. 5) (b) The angle can be adjusted...
... remove the screw using a slotted head screwdriver or a coin. (Fig. 6) (b) Remove the hook and spring. (Fig. 7) (c) Install the hook and spring on the right or left side and the angle can be adjusted in 5 steps between 0° and 80°. (1) Operating the hook (a) Pull out the hook toward you in the direction of arrow (A) and turn in the direction of arrow (B). (Fig. 5) (b) The angle can be adjusted...

Instruction Manual
Page 19
... are of the arrow. (Fig. 11) (2) Remove the old batteries and insert the new batteries. Using the bit holder CAUTION: Bit ● Stow the bit in battery leakage, rust or malfunction. correctly. Do not mix old and new batteries. Use commercially available AAAA batteries (1.5 V). Hook Phillips-head screwdriver Screw Fig. 10 Arrow NOTE: Do not tighten the screw excessively. If the tool is used with the protuberance of the arrow...
... are of the arrow. (Fig. 11) (2) Remove the old batteries and insert the new batteries. Using the bit holder CAUTION: Bit ● Stow the bit in battery leakage, rust or malfunction. correctly. Do not mix old and new batteries. Use commercially available AAAA batteries (1.5 V). Hook Phillips-head screwdriver Screw Fig. 10 Arrow NOTE: Do not tighten the screw excessively. If the tool is used with the protuberance of the arrow...

Instruction Manual
Page 21
Automatic spindle-lock mechanism This unit has automatic spindle-lock mechanism for immediate stopping. And when slid to turn the switch on the selector button.) ⅜ When the trigger switch is set to the lower side, the power mode (P) is released, the tool stops. Grasp the bit installed in the keyless chuck, in Fig. 20, when the rotation switch-over lever 21 Finally, rotate the sleeve to move sleeves. switch The L-side...
Automatic spindle-lock mechanism This unit has automatic spindle-lock mechanism for immediate stopping. And when slid to turn the switch on the selector button.) ⅜ When the trigger switch is set to the lower side, the power mode (P) is released, the tool stops. Grasp the bit installed in the keyless chuck, in Fig. 20, when the rotation switch-over lever 21 Finally, rotate the sleeve to move sleeves. switch The L-side...
Instruction Manual
Page 22
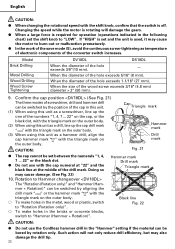
... using this unit as temperature of electronic components of the converter switch increases. Changing the speed while the motor is rotating will not only reduce drill efficiency, but may also damage the drill tip. 22 When the size of the hole exceeds 5/16" (8 mm). Confirm the cap position (See Fig. 21) The three modes of screwdriver, drill and hammer drill can be set...
... using this unit as temperature of electronic components of the converter switch increases. Changing the speed while the motor is rotating will not only reduce drill efficiency, but may also damage the drill tip. 22 When the size of the hole exceeds 5/16" (8 mm). Confirm the cap position (See Fig. 21) The three modes of screwdriver, drill and hammer drill can be set...

Instruction Manual
Page 23
... is locked, immediately turn the power off. The unit indicates the tightening torque with the numbers "1, 4, 7 ... 22" on the outer body. While operating the driver drill, take care not to lock the motor. ● When setting the shift knob to "LOW" (low speed). ● If the motor is set the shift knob to "HIGH" (high speed) and the position of screw and the material being tightened. In such a case, please set . (1) When using...
... is locked, immediately turn the power off. The unit indicates the tightening torque with the numbers "1, 4, 7 ... 22" on the outer body. While operating the driver drill, take care not to lock the motor. ● When setting the shift knob to "LOW" (low speed). ● If the motor is set the shift knob to "HIGH" (high speed) and the position of screw and the material being tightened. In such a case, please set . (1) When using...

Instruction Manual
Page 24
.... Use after drilling a pilot hole. Use the bit and socket matching the screw diameter. If the motor is locked, immediately turn the power off. Use after drilling a pilot hole. In this case, release the switch of tool and eliminate the causes of protection function. Use the bit and socket matching the screw diameter. For drilling into brick. It will be heated. CAUTION: ● While operating the Cordless hammer drill, take care not to stop...
.... Use after drilling a pilot hole. Use the bit and socket matching the screw diameter. If the motor is locked, immediately turn the power off. Use after drilling a pilot hole. In this case, release the switch of tool and eliminate the causes of protection function. Use the bit and socket matching the screw diameter. For drilling into brick. It will be heated. CAUTION: ● While operating the Cordless hammer drill, take care not to stop...
Instruction Manual
Page 25
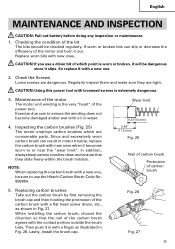
... Nail of carbon brush Protrusion of the power tool. Checking the condition of the bit The bits should be sure to or near the "wear limit". If worn or broken bits can result in motor trouble, replace the carbon brush with a flat head screw driver, etc., as illustrated in Fig. 27. Check the Screws Loose screws are tight. Regularly inspect them and make sure they slide freely within the brush holders...
... Nail of carbon brush Protrusion of the power tool. Checking the condition of the bit The bits should be sure to or near the "wear limit". If worn or broken bits can result in motor trouble, replace the carbon brush with a flat head screw driver, etc., as illustrated in Fig. 27. Check the Screws Loose screws are tight. Regularly inspect them and make sure they slide freely within the brush holders...

Instruction Manual
Page 26
... be exercised since any error in this battery into the contact portion outside the brush tube. (You can result in the deformed nail of the carbon brush and may cause motor trouble at an Contact portion outside brush tube early stage. MODIFICATIONS: Hitachi Power Tools are constantly being improved and modified to the Hitachi Authorized Service Center when requesting repair or other maintenance. Disposal of the...
... be exercised since any error in this battery into the contact portion outside the brush tube. (You can result in the deformed nail of the carbon brush and may cause motor trouble at an Contact portion outside brush tube early stage. MODIFICATIONS: Hitachi Power Tools are constantly being improved and modified to the Hitachi Authorized Service Center when requesting repair or other maintenance. Disposal of the...
Instruction Manual
Page 84
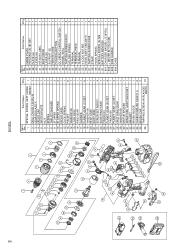
... HOLDER SPRING 2 51 TERMINAL 1 52 TERMINAL PIECE 1 53 TERMINAL 1 55 V-LOCK NUT M5 1 56 HOOK ASS'Y (W/LIGHT) 1 57 TAPPING SCREW D2X6 2 58 STRAP 1 59 HOOK SPRING 1 60 SPECIAL SCREW (A) M5 1 61 BATTERY EBM1830 1 501 CHARGER (MODEL UC18YRL) 1 502 + DRIVER BIT NO.2 65L 1 503 SIDE HANDLE 1 504 CASE 1 Part Name Q'ty 1 SPECIAL SCREW (LEFT HAND) M6X23 1 2 DRILL CHUCK 13VLRL-N 1 3 GEAR BOX ASS'Y 1 4 FRONT CAP 1 5 SWITCH PLATE 1 6 NUT 1 7 SPRING 1 8 THRUST WASHER 1 9 STOPPER 2 10 STOPPER SPRING 2 11 FRONT CASE 1 12 CLICK SPRING 1 13 PIN SET...
... HOLDER SPRING 2 51 TERMINAL 1 52 TERMINAL PIECE 1 53 TERMINAL 1 55 V-LOCK NUT M5 1 56 HOOK ASS'Y (W/LIGHT) 1 57 TAPPING SCREW D2X6 2 58 STRAP 1 59 HOOK SPRING 1 60 SPECIAL SCREW (A) M5 1 61 BATTERY EBM1830 1 501 CHARGER (MODEL UC18YRL) 1 502 + DRIVER BIT NO.2 65L 1 503 SIDE HANDLE 1 504 CASE 1 Part Name Q'ty 1 SPECIAL SCREW (LEFT HAND) M6X23 1 2 DRILL CHUCK 13VLRL-N 1 3 GEAR BOX ASS'Y 1 4 FRONT CAP 1 5 SWITCH PLATE 1 6 NUT 1 7 SPRING 1 8 THRUST WASHER 1 9 STOPPER 2 10 STOPPER SPRING 2 11 FRONT CASE 1 12 CLICK SPRING 1 13 PIN SET...

Instruction Manual
Page 85
... HITACHI LABEL 1 40 SHIFT KNOB 1 41 LEVER (B) 1 42 SUPPORT (D) 1 43 FERRITE CORE 1 44 PUSHING BUTTON 1 45 DC-SPEED CONTROL SWITCH 1 46 MODEL SEAL 1 47 TAPPING SCREW D4X10 2 48 HOLDER SPRING 2 49 TERMINAL 1 50 TERMINAL PIECE 1 51 TERMINAL 1 53 V-LOCK NUT M5 1 54 HOOK ASS'Y (W/LIGHT) 1 55 TAPPING SCREW D2X6 2 56 STRAP 1 57 HOOK SPRING 1 58 SPECIAL SCREW (A) M5 1 59 BATTERY EBM1830 1 501 CHARGER (MODEL UC18YRL) 1 502 + DRIVER BIT NO.2 65L 1 503 SIDE HANDLE 1 504 CASE...
... HITACHI LABEL 1 40 SHIFT KNOB 1 41 LEVER (B) 1 42 SUPPORT (D) 1 43 FERRITE CORE 1 44 PUSHING BUTTON 1 45 DC-SPEED CONTROL SWITCH 1 46 MODEL SEAL 1 47 TAPPING SCREW D4X10 2 48 HOLDER SPRING 2 49 TERMINAL 1 50 TERMINAL PIECE 1 51 TERMINAL 1 53 V-LOCK NUT M5 1 54 HOOK ASS'Y (W/LIGHT) 1 55 TAPPING SCREW D2X6 2 56 STRAP 1 57 HOOK SPRING 1 58 SPECIAL SCREW (A) M5 1 59 BATTERY EBM1830 1 501 CHARGER (MODEL UC18YRL) 1 502 + DRIVER BIT NO.2 65L 1 503 SIDE HANDLE 1 504 CASE...
Parts List
Page 2
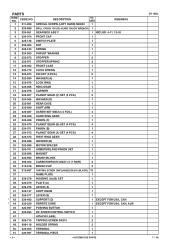
... SCREW (LEFT HAND) M6X23 NO. USED 1 REMARKS 2 323-898 DRILL CHUCK 13VLRL-N (W/O CHUCK WRENCH) 1 3 324-061 GEAR BOX ASS'Y 1 INCLUD. 4-11, 13-30 4 324-074 FRONT CAP 1 5 324-136 SWITCH PLATE 1 6 324-064 NUT 1 7 324-135 SPRING 1 8 324-063 THRUST WASHER 1 9 322-972 STOPPER 2 10 322-971 STOPPER SPRING 2 11 324-062 FRONT CASE 1 12 320-773 CLICK SPRING 1 13 322-975 PIN SET (6 PCS.) 6 14 322-980 WASHER...
... SCREW (LEFT HAND) M6X23 NO. USED 1 REMARKS 2 323-898 DRILL CHUCK 13VLRL-N (W/O CHUCK WRENCH) 1 3 324-061 GEAR BOX ASS'Y 1 INCLUD. 4-11, 13-30 4 324-074 FRONT CAP 1 5 324-136 SWITCH PLATE 1 6 324-064 NUT 1 7 324-135 SPRING 1 8 324-063 THRUST WASHER 1 9 322-972 STOPPER 2 10 322-971 STOPPER SPRING 2 11 324-062 FRONT CASE 1 12 320-773 CLICK SPRING 1 13 322-975 PIN SET (6 PCS.) 6 14 322-980 WASHER...

