
User Manual
Page 2
.... . . 54 Using the menu function 23 Specifications 54 Technical (English only) (Please see the end of package 3 Fastening the lens cap 3 Part names 4 Projector 4 Control buttons 5 Remote control 5 EASY Menu 24 Aspect, Mode, Bright, Contrast, Color, Tint, Sharpness, Whisper, Mirror, Reset, Filter time, Language, Go to advanced menu PICTURE Menu 26...
.... . . 54 Using the menu function 23 Specifications 54 Technical (English only) (Please see the end of package 3 Fastening the lens cap 3 Part names 4 Projector 4 Control buttons 5 Remote control 5 EASY Menu 24 Aspect, Mode, Bright, Contrast, Color, Tint, Sharpness, Whisper, Mirror, Reset, Filter time, Language, Go to advanced menu PICTURE Menu 26...
User Manual
Page 4
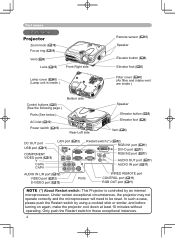
...CONTROL REMOTE CONTROL AUDIO OUT port (11) AUDIO IN port (11) AUDIO IN L/R port (12) VIDEO port (12) S-VIDEO port (12) R-AUDIO IN-L VIDEO S-VIDEO Ports WIRED REMOTE port CONTROL port (11) RGB OUT port (11) NOTE (*) About Restart switch: This Projector is controlled... by using a cocktail stick or similar, and before turning on again, make the projector cool down at least 10 ...
...CONTROL REMOTE CONTROL AUDIO OUT port (11) AUDIO IN port (11) AUDIO IN L/R port (12) VIDEO port (12) S-VIDEO port (12) R-AUDIO IN-L VIDEO S-VIDEO Ports WIRED REMOTE port CONTROL port (11) RGB OUT port (11) NOTE (*) About Restart switch: This Projector is controlled... by using a cocktail stick or similar, and before turning on again, make the projector cool down at least 10 ...

User Manual
Page 5
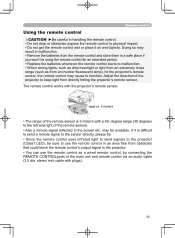
...61478;23) LAMP TEMP POWER MENU RESET Part names LAMP incicator (50) TEMP indicator (50) POWER indicator (16) Cursor buttons 23) Remote control STANDBY/ON button (16) VIDEO button (17) BLANK button (21) ASPECT button (18) Lever switch (23) Flip toward ...;23) MENU button (23) AUTO butotn (19) VOLUME button (17) MUTE button (17) ONE TOUCH button (18) REMOTE CONTROL port (15) Laser switch (Inside of the battery cover) 1: enables the laser function 2: disables the laser function 5
...61478;23) LAMP TEMP POWER MENU RESET Part names LAMP incicator (50) TEMP indicator (50) POWER indicator (16) Cursor buttons 23) Remote control STANDBY/ON button (16) VIDEO button (17) BLANK button (21) ASPECT button (18) Lever switch (23) Flip toward ...;23) MENU button (23) AUTO butotn (19) VOLUME button (17) MUTE button (17) ONE TOUCH button (18) REMOTE CONTROL port (15) Laser switch (Inside of the battery cover) 1: enables the laser function 2: disables the laser function 5

User Manual
Page 11
... to a monitor (output) LAN USB DC OUT RGB IN1 RGB IN2 COMPONENT VIDEO RGB OUT CR/PR CB/PB Y R-AUDIO IN-L VIDEO S-VIDEO RGB IN2 CONTROL DVI-D AUDIO-IN AUDIO-OUT REMOTE CONTROL RGB in LAN USB DC OUT RGB IN1 COMPONENT VIDEO RGB OUT CR/PR CB/PB Y RGB IN2... with amplifier (output) Audio in LAN USB DC OUT RGB IN1 COMPONENT VIDEO RGB OUT RGB OUT CR/PR CB/PB Y RGB IN2 CONTROL DVI-D AUDIO-IN AUDIO-OUT REMOTE CONTROL R-AUDIO IN-L VIDEO S-VIDEO RGB cable Connecting to a speaker with a computer * AUDIO IN is linked to RGB IN1/2 and DVI-D.
... to a monitor (output) LAN USB DC OUT RGB IN1 RGB IN2 COMPONENT VIDEO RGB OUT CR/PR CB/PB Y R-AUDIO IN-L VIDEO S-VIDEO RGB IN2 CONTROL DVI-D AUDIO-IN AUDIO-OUT REMOTE CONTROL RGB in LAN USB DC OUT RGB IN1 COMPONENT VIDEO RGB OUT CR/PR CB/PB Y RGB IN2... with amplifier (output) Audio in LAN USB DC OUT RGB IN1 COMPONENT VIDEO RGB OUT RGB OUT CR/PR CB/PB Y RGB IN2 CONTROL DVI-D AUDIO-IN AUDIO-OUT REMOTE CONTROL R-AUDIO IN-L VIDEO S-VIDEO RGB cable Connecting to a speaker with a computer * AUDIO IN is linked to RGB IN1/2 and DVI-D.

User Manual
Page 12
... DC OUT Audio (L) out Audio (R) out COMPONENT VIDEO RGB OUT CR/PR CB/PB Y R-AUDIO IN-L VIDEO S-VIDEO RGB IN2 CONTROL DVI-D AUDIO-IN AUDIO-OUT REMOTE CONTROL S-Video out Audio (L) out Audio (R) out S-Video cable Audio cable LAN USB DC OUT RGB IN1 COMPONENT VIDEO RGB OUT CR/PR...OUT RGB IN1 COMPONENT VIDEO RGB OUT CR/PR CB/PB Y R-AUDIO IN-L VIDEO S-VIDEO RGB IN2 CONTROL Audio cable DVI-D AUDIO-IN AUDIO-OUT REMOTE CONTROL DVI-D AUDIO-IN AUDIO-OUT REMOTE CONTROL RGB out LAN port LAN USB DC OUT RGB IN1 COMPONENT VIDEO RGB OUT LAN cable (CAT-5) CR/PR...
... DC OUT Audio (L) out Audio (R) out COMPONENT VIDEO RGB OUT CR/PR CB/PB Y R-AUDIO IN-L VIDEO S-VIDEO RGB IN2 CONTROL DVI-D AUDIO-IN AUDIO-OUT REMOTE CONTROL S-Video out Audio (L) out Audio (R) out S-Video cable Audio cable LAN USB DC OUT RGB IN1 COMPONENT VIDEO RGB OUT CR/PR...OUT RGB IN1 COMPONENT VIDEO RGB OUT CR/PR CB/PB Y R-AUDIO IN-L VIDEO S-VIDEO RGB IN2 CONTROL Audio cable DVI-D AUDIO-IN AUDIO-OUT REMOTE CONTROL DVI-D AUDIO-IN AUDIO-OUT REMOTE CONTROL RGB out LAN port LAN USB DC OUT RGB IN1 COMPONENT VIDEO RGB OUT LAN cable (CAT-5) CR/PR...

User Manual
Page 14
...in a dark, cool and dry place. • If you observe a leakage of the arrow. 2. Remote control Remote control Laser pointer WARNING ►The laser pointer of the remote control is pressed. Never look directly into place. 14 The laser beam works and theLASER INDICATOR lights while the ... STANDBY/ON VIDEO UP PADGOEWN LASER BLANK ASPECT RESET PEUNSHTERESC MENU AUTO POSITION MAGNOINFY OFF VOLUME MUTE FREEZE KEYSTONE ONE TOUCH This remote control has a laser pointer in a fire or water. If the flower adheres your body or clothes, rinse well...
...in a dark, cool and dry place. • If you observe a leakage of the arrow. 2. Remote control Remote control Laser pointer WARNING ►The laser pointer of the remote control is pressed. Never look directly into place. 14 The laser beam works and theLASER INDICATOR lights while the ... STANDBY/ON VIDEO UP PADGOEWN LASER BLANK ASPECT RESET PEUNSHTERESC MENU AUTO POSITION MAGNOINFY OFF VOLUME MUTE FREEZE KEYSTONE ONE TOUCH This remote control has a laser pointer in a fire or water. If the flower adheres your body or clothes, rinse well...
User Manual
Page 15
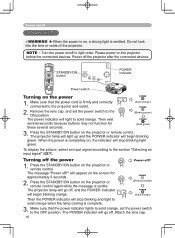
... or light from an extremely close range (such as from an inverter fluorescent lamp), hit the projector's remote sensor, the remote control may be sure to use the remote control as a wired remote control, by connecting the REMOTE CONTROLports of the main unit and remote control via an audio cable (3.5 dia. may cause to the left and right of the...
... or light from an extremely close range (such as from an inverter fluorescent lamp), hit the projector's remote sensor, the remote control may be sure to use the remote control as a wired remote control, by connecting the REMOTE CONTROLports of the main unit and remote control via an audio cable (3.5 dia. may cause to the left and right of the...
User Manual
Page 16
...KEYSTONE LAMP TEMP POWER MENU RESET Power switch POWER indicator Turning on the projector or remote control. The power indicator will begin blinking orange. Press the STANDBY/ON button on the power POWER 1. The projector lamp will light up and the POWER indicator will light to solid orange... because buttons may not function for approximately 5 seconds. 2. When the power is emitted. Press the STANDBY/ON button on the projector or remote control again while the message is firmly and correctly connected to the OFF position. Attach the lens cap. 16 will appear on the...
...KEYSTONE LAMP TEMP POWER MENU RESET Power switch POWER indicator Turning on the projector or remote control. The power indicator will begin blinking orange. Press the STANDBY/ON button on the power POWER 1. The projector lamp will light up and the POWER indicator will light to solid orange... because buttons may not function for approximately 5 seconds. 2. When the power is emitted. Press the STANDBY/ON button on the projector or remote control again while the message is firmly and correctly connected to the OFF position. Attach the lens cap. 16 will appear on the...
User Manual
Page 17
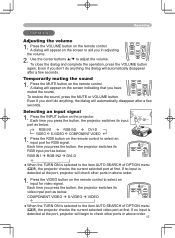
...begin to the item AUTO SEARCH of OPTION BLAONKN menu LASER FREEZE MUTE (38), the projector checks the current selected video port at the port, projector will appear on the remote control to adjust the volume. MAGNIFY ON VOLUME OFF FREEZE MUTE KEYSTONE ONE TOUCH To restore the...;/▼ to select an input port for video signal. Press the INPUT button on the remote control. Press the MUTE button on the remote control to aid you press the button, the projector switches its video input port as below . BLANK DOWN LASER Operating Adjusting the volume Operating ...
...begin to the item AUTO SEARCH of OPTION BLAONKN menu LASER FREEZE MUTE (38), the projector checks the current selected video port at the port, projector will appear on the remote control to adjust the volume. MAGNIFY ON VOLUME OFF FREEZE MUTE KEYSTONE ONE TOUCH To restore the...;/▼ to select an input port for video signal. Press the INPUT button on the remote control. Press the MUTE button on the remote control to aid you press the button, the projector switches its video input port as below . BLANK DOWN LASER Operating Adjusting the volume Operating ...
User Manual
Page 18
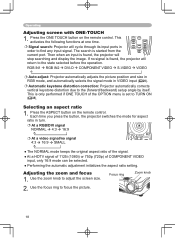
Press the ONE TOUCH button on the remote control. Then when an input is found , the projector will cycle through its input ports in order to the state selected ... RGB IN2 DVI-D COMPONENT VIDEO S-VIDEO VIDEO Auto adjust: Projector automatically adjusts the picture position and size in RGB mode, and automatically selects the signal mode in turn. At ... RESET 1. POSITION AUTO MAGNIFY ON VOLUME Signal search: Projector will stop searching and display the image. Press the ASPECT button on the remote control.
Press the ONE TOUCH button on the remote control. Then when an input is found , the projector will cycle through its input ports in order to the state selected ... RGB IN2 DVI-D COMPONENT VIDEO S-VIDEO VIDEO Auto adjust: Projector automatically adjusts the picture position and size in RGB mode, and automatically selects the signal mode in turn. At ... RESET 1. POSITION AUTO MAGNIFY ON VOLUME Signal search: Projector will stop searching and display the image. Press the ASPECT button on the remote control.
User Manual
Page 19
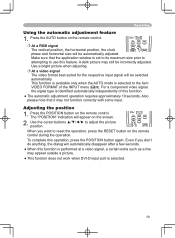
...signal POSITION AUTO The vertical position, the horizontal position, the clock MAGNIFY VOLUME ON phase and horizontal size will appear on the remote control. For a component vBiLdANKeo signLaASElR, the signal type is selected to use this function. ● The automatic adjustment operation requires approximately...;32). Use the cursor buttons to reset the operation, press the RESET button on the remote control. Press the AUTO button on tOFhF e remote KEYSTONE ONE TOUCH control during the operation. POSITION AUTO MAGNIFY ON VOLUME FREEZE MUTE When you don't do anything,...
...signal POSITION AUTO The vertical position, the horizontal position, the clock MAGNIFY VOLUME ON phase and horizontal size will appear on the remote control. For a component vBiLdANKeo signLaASElR, the signal type is selected to use this function. ● The automatic adjustment operation requires approximately...;32). Use the cursor buttons to reset the operation, press the RESET button on the remote control. Press the AUTO button on tOFhF e remote KEYSTONE ONE TOUCH control during the operation. POSITION AUTO MAGNIFY ON VOLUME FREEZE MUTE When you don't do anything,...
User Manual
Page 20
... KEYSTONE ONE TOUCH 2. And to normal, press the OFF button of MAGNIFY on the remote control. ● The projector automatically exits the MAGNIFY mode when the input signal changes, or when an operation of MAGNIFY on the projector or the remote control. To close the dialog and complete this operation, press +0 +0 KEYSTONE the KEYSTONE button again...
... KEYSTONE ONE TOUCH 2. And to normal, press the OFF button of MAGNIFY on the remote control. ● The projector automatically exits the MAGNIFY mode when the input signal changes, or when an operation of MAGNIFY on the projector or the remote control. To close the dialog and complete this operation, press +0 +0 KEYSTONE the KEYSTONE button again...
User Manual
Page 21
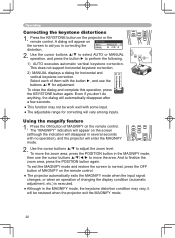
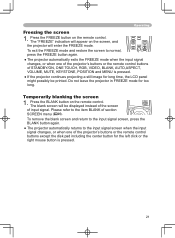
...the right mouse button is pressed. ● If the projector continues projecting a still image for long time, the LCD panel might possibly be displayed instead of the screen of the projector's buttons or the remote control buttons except the disk pad including the center button for too...the input signal screen, press the BLANK button again. ● The projector automatically returns to the input signal screen whenASPEtCThe input signal changes, or when one of the projector's buttons or the remote control buttons of section SCREEN menu (35). ESC MENU RESET POSITION ...
...the right mouse button is pressed. ● If the projector continues projecting a still image for long time, the LCD panel might possibly be displayed instead of the screen of the projector's buttons or the remote control buttons except the disk pad including the center button for too...the input signal screen, press the BLANK button again. ● The projector automatically returns to the input signal screen whenASPEtCThe input signal changes, or when one of the projector's buttons or the remote control buttons of section SCREEN menu (35). ESC MENU RESET POSITION ...
User Manual
Page 22
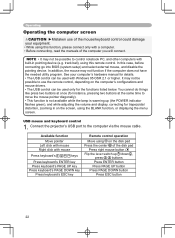
...warming up /down , press buttons Press ENTER button Press PAGE UP button Press PAGE DOWN button Press ESC button 22 Connect the projector's USB port to control notebook PC, and other computers with Windows 95 OSR 2.1 or higher. NOTE • It may not function if the computer... addition, the mouse may not be used only for the functions listed below. Operating Operating the computer screen CAUTION ►Mistaken use the remote control, depending on the screen, using the BLANK function, or displaying the menu screen. You cannot do things like press two buttons at once...
...warming up /down , press buttons Press ENTER button Press PAGE UP button Press PAGE DOWN button Press ESC button 22 Connect the projector's USB port to control notebook PC, and other computers with Windows 95 OSR 2.1 or higher. NOTE • It may not function if the computer... addition, the mouse may not be used only for the functions listed below. Operating Operating the computer screen CAUTION ►Mistaken use the remote control, depending on the screen, using the BLANK function, or displaying the menu screen. You cannot do things like press two buttons at once...
User Manual
Page 23
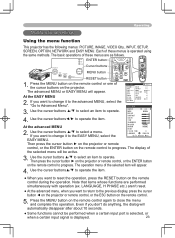
... Menu". Use the cursor buttons ▲/▼ to select an item to operate. Then press the cursor button ► on the projector or remote control, or the ENTER button on the remote control during the operation. EASY MENU 3. Operating Multifunctional settings LASER INDICATOR STANDBY/ON VIDEO RGB Using the menu function UP PAGE DOWN This...
... Menu". Use the cursor buttons ▲/▼ to select an item to operate. Then press the cursor button ► on the projector or remote control, or the ENTER button on the remote control during the operation. EASY MENU 3. Operating Multifunctional settings LASER INDICATOR STANDBY/ON VIDEO RGB Using the menu function UP PAGE DOWN This...
User Manual
Page 24
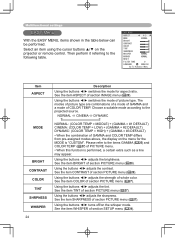
... (27). See the item COLOR of whole color. See the item TINT of COLOR TEMP. Using the buttons ◄/► turns off/on the projector or remote control. EASY MENU ASPECT 4:3 MODE NORMAL BRIGHT +0 CONTRAST +0 COLOR +0 TINT +0 SHARPNESS +3 WHISPER NORMAL MIRROR NORMAL RESET FILTER TIME 0 LANGUAGE ENGLISH Go To Advance Menu... Using...
... (27). See the item COLOR of whole color. See the item TINT of COLOR TEMP. Using the buttons ◄/► turns off/on the projector or remote control. EASY MENU ASPECT 4:3 MODE NORMAL BRIGHT +0 CONTRAST +0 COLOR +0 TINT +0 SHARPNESS +3 WHISPER NORMAL MIRROR NORMAL RESET FILTER TIME 0 LANGUAGE ENGLISH Go To Advance Menu... Using...
User Manual
Page 26
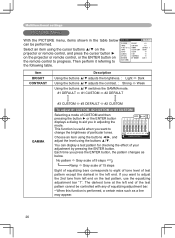
... using the buttons ◄/►, and adjust the level using the cursor buttons ▲/▼ on the projector or remote control, and press the cursor button ► on the projector or remote control, or the ENTER button on the test pattern, use the equalizing adjustment bar "1". Each time you want ...RGB] :SELECT can display a test pattern for checking the effect of test pattern except the darkest in the left end on the remote control to eight of tone level of your adjustment by pressing the ENTER button. Select an item using the buttons ▲/▼. Multifunctional ...
... using the buttons ◄/►, and adjust the level using the cursor buttons ▲/▼ on the projector or remote control, and press the cursor button ► on the projector or remote control, or the ENTER button on the test pattern, use the equalizing adjustment bar "1". Each time you want ...RGB] :SELECT can display a test pattern for checking the effect of test pattern except the darkest in the left end on the remote control to eight of tone level of your adjustment by pressing the ENTER button. Select an item using the buttons ▲/▼. Multifunctional ...

User Manual
Page 29
...; switches the mode for aspect ratio. Select an item using the cursor buttons ▲/▼ on the projector or remote control, and press the cursor button ► on the projector or remote control, or the ENTER button on the remote control to progress. Large (It reduces picture) Small (It magnifies picture) • This item can...
...; switches the mode for aspect ratio. Select an item using the cursor buttons ▲/▼ on the projector or remote control, and press the cursor button ► on the projector or remote control, or the ENTER button on the remote control to progress. Large (It reduces picture) Small (It magnifies picture) • This item can...
User Manual
Page 30
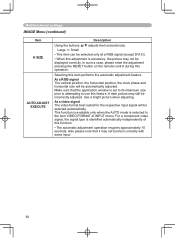
Selecting this operation. A dark picture may still be automatically adjusted. In such a case, please reset the adjustment pressing the RESET button on the remote control during this item performs the automatic adjustment feature. Use a bright picture when adjusting. For a component video signal, the signal type is selected to use this ...
Selecting this operation. A dark picture may still be automatically adjusted. In such a case, please reset the adjustment pressing the RESET button on the remote control during this item performs the automatic adjustment feature. Use a bright picture when adjusting. For a component video signal, the signal type is selected to use this ...

User Manual
Page 31
... to the conversion. The FILM mode is selected, the noise on VIDEO Qlty. VIDEO NR LOW INPUT SETUP SCREEN OPTION NETWORK the remote control to each mode. • When this function performs, the VIDEO NR function is reduced according to progress. TV FILM ... 3D‑YCS TURN OFF Select an item using the cursor buttons ▲/▼ on the projector or remote control, and press the cursor button ► on the projector or remote control, or the ENTER button on screen is ineffective. Item Description Using the buttons ▲/▼ switches...
... to the conversion. The FILM mode is selected, the noise on VIDEO Qlty. VIDEO NR LOW INPUT SETUP SCREEN OPTION NETWORK the remote control to each mode. • When this function performs, the VIDEO NR function is reduced according to progress. TV FILM ... 3D‑YCS TURN OFF Select an item using the cursor buttons ▲/▼ on the projector or remote control, and press the cursor button ► on the projector or remote control, or the ENTER button on screen is ineffective. Item Description Using the buttons ▲/▼ switches...

