
User Manual
Page 1
.... Projector CP-X445 User Manual - Safety Guide" and these symbols are the property of these manuals to the pages written following this manual Various symbols are trademarks of the Video Electronics Standard Association. • Windows is a registered trademark of the Microsoft Corporation. • Internet Explorer is a trademark of the Netscape Communications Corporation. The meanings of their respective owners. 1 WARNING ►...
.... Projector CP-X445 User Manual - Safety Guide" and these symbols are the property of these manuals to the pages written following this manual Various symbols are trademarks of the Video Electronics Standard Association. • Windows is a registered trademark of the Microsoft Corporation. • Internet Explorer is a trademark of the Netscape Communications Corporation. The meanings of their respective owners. 1 WARNING ►...
User Manual
Page 2
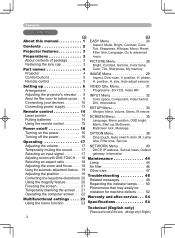
..., Reset, Filter time, Language, Go to advanced menu PICTURE Menu 26 Bright, Contrast, Gamma, Color temp, Color, Tint, Sharpness, My memory IMAGE Menu 29 Aspect, Over scan, V. position, H. position, H. phase, H. size, Auto adjust execute Setting up , MyScreen, Power on/off 16 MyScreen lock, Message Turning on the power 16 OPTION Menu 38 Turning off the power 16 One touch, Auto search, Auto off, Lamp Operating 17 time, Filter time, Service Adjusting the volume 17 NETWORK Menu 40 Temporarily muting the sound . . . . 17 DHCP, IP address, Subnet...
..., Reset, Filter time, Language, Go to advanced menu PICTURE Menu 26 Bright, Contrast, Gamma, Color temp, Color, Tint, Sharpness, My memory IMAGE Menu 29 Aspect, Over scan, V. position, H. position, H. phase, H. size, Auto adjust execute Setting up , MyScreen, Power on/off 16 MyScreen lock, Message Turning on the power 16 OPTION Menu 38 Turning off the power 16 One touch, Auto search, Auto off, Lamp Operating 17 time, Filter time, Service Adjusting the volume 17 NETWORK Menu 40 Temporarily muting the sound . . . . 17 DHCP, IP address, Subnet...

User Manual
Page 3
.... Low Noise WHISPER mode is equipped for reducing acoustic noise to realize quieter operation. Fix the strap to the projector using the strap. It requires just a little space for installation and gets a large image from short distance. High Brightness Newly developed 230W UHB (Ultra High Brightness) lamp gives you a higher brightness image on rivet. 3. Fastening the lens cap To avoid losing...
.... Low Noise WHISPER mode is equipped for reducing acoustic noise to realize quieter operation. Fix the strap to the projector using the strap. It requires just a little space for installation and gets a large image from short distance. High Brightness Newly developed 230W UHB (Ultra High Brightness) lamp gives you a higher brightness image on rivet. 3. Fastening the lens cap To avoid losing...

User Manual
Page 9
... turn the projector so that the lens-side is not plugged in a high temperature state, handling could cause an electric shock, a fire, a burn and/or malfunction to fall. Setting up About the filter cover for bottom-up use WARNING ►Do not replace the filter cover during use or immediately after use and snap it . 3. While the projector connects with a power supply, or the projector...
... turn the projector so that the lens-side is not plugged in a high temperature state, handling could cause an electric shock, a fire, a burn and/or malfunction to fall. Setting up About the filter cover for bottom-up use WARNING ►Do not replace the filter cover during use or immediately after use and snap it . 3. While the projector connects with a power supply, or the projector...
User Manual
Page 10
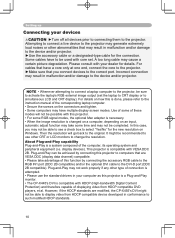
... connect a laptop computer to the projector, be sure to the DVI-D port (DDC 2B compatible). For details on how this is changed on a computer, depending on an input, automatic adjust function may take advantage of this function by connecting this projector. • For some time and may have multiple display screen modes. It might not be able to computers that may cause a certain picture...
... connect a laptop computer to the projector, be sure to the DVI-D port (DDC 2B compatible). For details on how this is changed on a computer, depending on an input, automatic adjust function may take advantage of this function by connecting this projector. • For some time and may have multiple display screen modes. It might not be able to computers that may cause a certain picture...
User Manual
Page 16
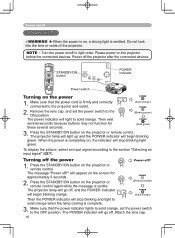
... projector and outlet. (Solid orange) POWER 2. The projector lamp will stop blinking light green. POWER (Blinking orange) POWER (Solid orange) Then the POWER indicator will go off the projector after the connected devices. Make sure that the power cord is completely on, the indicator will begin blinking green. Power off . To display the picture, select an input signal according to solid orange. will go off ?" Remove the lens cap, and set the power switch to the ON position. Press the STANDBY/ON button on the screen...
... projector and outlet. (Solid orange) POWER 2. The projector lamp will stop blinking light green. POWER (Blinking orange) POWER (Solid orange) Then the POWER indicator will go off the projector after the connected devices. Make sure that the power cord is completely on, the indicator will begin blinking green. Power off . To display the picture, select an input signal according to solid orange. will go off ?" Remove the lens cap, and set the power switch to the ON position. Press the STANDBY/ON button on the screen...
User Manual
Page 18
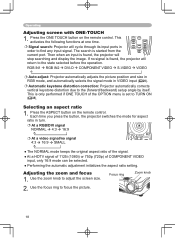
... input ports in order to adjust the screen size. Use the zoom knob to find any input signal. Focus ring Zoom knob 2. This is only performed if ONE TOUCH of the signal. LASER INDICATOR STANDBY/ON VIDEO RGB Selecting an aspect ratio UP PAGE 1. DOWN Each time you press the button, the projector switches the modeBLAfNoK r aspeLcASEtR ratio in VIDEO input (29). Automatic keystone distortion correction: Projector automatically corrects vertical keystone...
... input ports in order to adjust the screen size. Use the zoom knob to find any input signal. Focus ring Zoom knob 2. This is only performed if ONE TOUCH of the signal. LASER INDICATOR STANDBY/ON VIDEO RGB Selecting an aspect ratio UP PAGE 1. DOWN Each time you press the button, the projector switches the modeBLAfNoK r aspeLcASEtR ratio in VIDEO input (29). Automatic keystone distortion correction: Projector automatically corrects vertical keystone...
User Manual
Page 21
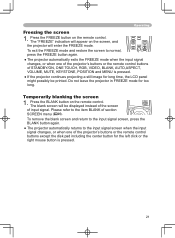
... mode. LASER INDICATOR STANDBY/ON VIDEO RGB Temporarily blanking the screen 1. BLANK UP PAGE DOWN LASER To remove the blank screen and return to the input signal screen, press the BLANK button again. ● The projector automatically returns to the input signal screen whenASPEtCThe input signal changes, or when one of the projector's buttons or the remote control buttons of input signal. Press the FREEZE button on the remote control. ESC MENU RESET POSITION AUTO MAGNIFY ON VOLUME FREEZE MUTE OFF KEYSTONE...
... mode. LASER INDICATOR STANDBY/ON VIDEO RGB Temporarily blanking the screen 1. BLANK UP PAGE DOWN LASER To remove the blank screen and return to the input signal screen, press the BLANK button again. ● The projector automatically returns to the input signal screen whenASPEtCThe input signal changes, or when one of the projector's buttons or the remote control buttons of input signal. Press the FREEZE button on the remote control. ESC MENU RESET POSITION AUTO MAGNIFY ON VOLUME FREEZE MUTE OFF KEYSTONE...
User Manual
Page 22
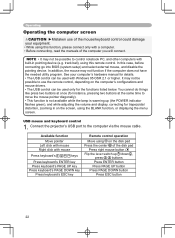
... mouse button Flip the lever switch up (the POWER indicator flashes green), and while adjusting the volume and display, correcting for instance, pressing two buttons at once (for trapezoidal distortion, zooming in pointing device (e.g. track ball), using the BLANK function, or displaying the menu screen. You cannot do things like press two buttons at the same time to the computer via the mouse cable. In this remote control...
... mouse button Flip the lever switch up (the POWER indicator flashes green), and while adjusting the volume and display, correcting for instance, pressing two buttons at once (for trapezoidal distortion, zooming in pointing device (e.g. track ball), using the BLANK function, or displaying the menu screen. You cannot do things like press two buttons at the same time to the computer via the mouse cable. In this remote control...
User Manual
Page 23
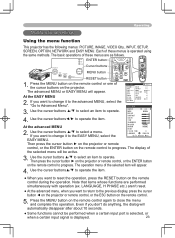
... ENTER button on the remote control. 5. LANGUAGE, H PHASE etc.) aren't reset. ● At the advanced menu, when you want to operate. Operating Multifunctional settings LASER INDICATOR STANDBY/ON VIDEO RGB Using the menu function UP PAGE DOWN This projector has the following menus: PICTURE, IMAGE, VIDEO Qlty., INPUT, SETUP, BLANK LASER SCREEN, OPTION, NETWORK and EASY MENU. GAMMA DEFAULT 1 INPUT COLOR TEMP 6500K SETUP COLOR +0 At the EASY MENU SCREEN OPTION TINT 0 SHARPNESS +0 NETWORK MY MEMORY SAVE 1 2. ASPECT 4:3 MODE NORMAL...
... ENTER button on the remote control. 5. LANGUAGE, H PHASE etc.) aren't reset. ● At the advanced menu, when you want to operate. Operating Multifunctional settings LASER INDICATOR STANDBY/ON VIDEO RGB Using the menu function UP PAGE DOWN This projector has the following menus: PICTURE, IMAGE, VIDEO Qlty., INPUT, SETUP, BLANK LASER SCREEN, OPTION, NETWORK and EASY MENU. GAMMA DEFAULT 1 INPUT COLOR TEMP 6500K SETUP COLOR +0 At the EASY MENU SCREEN OPTION TINT 0 SHARPNESS +0 NETWORK MY MEMORY SAVE 1 2. ASPECT 4:3 MODE NORMAL...
User Manual
Page 24
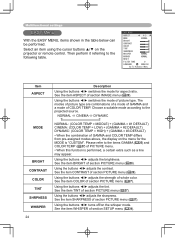
... SETUP menu (34). See the item WHISPER of GAMMA and COLOR TEMP differs from pre-assigned modes above, the display on the menu for aspect ratio. Using the buttons ◄/► switches the mode of section PICTURE menu (26). See the item CONTRAST of picture type. Using the buttons ◄/► turns off/on the projector or remote control. Then perform it referring to the projected source. Using the buttons ◄/► adjusts...
... SETUP menu (34). See the item WHISPER of GAMMA and COLOR TEMP differs from pre-assigned modes above, the display on the menu for aspect ratio. Using the buttons ◄/► switches the mode of section PICTURE menu (26). See the item CONTRAST of picture type. Using the buttons ◄/► turns off/on the projector or remote control. Then perform it referring to the projected source. Using the buttons ◄/► adjusts...

User Manual
Page 31
... the TURN OFF is selected under the 3D-YCS. • When the HIGH, the MIDDLE or the LOW is selected, the noise on VIDEO Qlty. Using the buttons ▲/▼ switches the noise reduction mode. menu, items shown in the table below MENU [RGB] :SELECT can be crisper. But these may lose the crisp. VIDEO NR LOW INPUT SETUP SCREEN OPTION NETWORK the remote control to...
... the TURN OFF is selected under the 3D-YCS. • When the HIGH, the MIDDLE or the LOW is selected, the noise on VIDEO Qlty. Using the buttons ▲/▼ switches the noise reduction mode. menu, items shown in the table below MENU [RGB] :SELECT can be crisper. But these may lose the crisp. VIDEO NR LOW INPUT SETUP SCREEN OPTION NETWORK the remote control to...
User Manual
Page 34
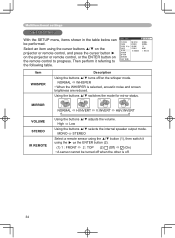
...; switches the mode for mirror status. MENU [RGB] :SELECT PICTURE WHISPER NORMAL IMAGE MIRROR NORMAL VIDEO Qlty. NORMAL WHISPER • When the WHISPER is off. 34 High Low Using the buttons ▲/▼ selects the internal speaker output mode. Multifunctional settings SETUP Menu With the SETUP menu, items shown in the table below can be turned off when the other is selected, acoustic noise and screen...
...; switches the mode for mirror status. MENU [RGB] :SELECT PICTURE WHISPER NORMAL IMAGE MIRROR NORMAL VIDEO Qlty. NORMAL WHISPER • When the WHISPER is off. 34 High Low Using the buttons ▲/▼ selects the internal speaker output mode. Multifunctional settings SETUP Menu With the SETUP menu, items shown in the table below can be turned off when the other is selected, acoustic noise and screen...

User Manual
Page 38
... projector lamp will stop searching and display the image. TURN ON TURN OFF This function works with a no signal automatically cycles through input ports in the table below can automatically correct vertical keystone distortion corresponding to WIDE whenever possible. Then when an input is set to make the correct adjustment when V: INVERT or H&V: INVERT is selected under the MIRROR item of following table. AUTO OFF 0 INPUT LAMP TIME 0 SETUP FILTER TIME 0 SCREEN SERVICE OPTION NETWORK...
... projector lamp will stop searching and display the image. TURN ON TURN OFF This function works with a no signal automatically cycles through input ports in the table below can automatically correct vertical keystone distortion corresponding to WIDE whenever possible. Then when an input is set to make the correct adjustment when V: INVERT or H&V: INVERT is selected under the MIRROR item of following table. AUTO OFF 0 INPUT LAMP TIME 0 SETUP FILTER TIME 0 SCREEN SERVICE OPTION NETWORK...
User Manual
Page 39
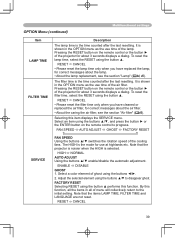
... cleaned or replaced the air filter, for correct messages about 3 seconds displays a dialog. FAN SPEED AUTO ADJUST GHOST FACTORY RESET SERVICE FAN SPEED Using the buttons ▲/▼ switches the rotation speed of the projector for about the air filter. • About the caring the air filter, see the section "Lamp" (44, 45). To reset the lamp time, select the RESET using the button ▲. Note that the items LAMP TIME, FILTER TIME...
... cleaned or replaced the air filter, for correct messages about 3 seconds displays a dialog. FAN SPEED AUTO ADJUST GHOST FACTORY RESET SERVICE FAN SPEED Using the buttons ▲/▼ switches the rotation speed of the projector for about the air filter. • About the caring the air filter, see the section "Lamp" (44, 45). To reset the lamp time, select the RESET using the button ▲. Note that the items LAMP TIME, FILTER TIME...
User Manual
Page 41
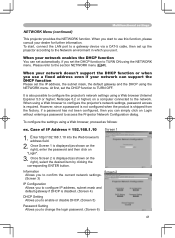
... disabled. (Screen 4) DHCP Setting Allows you to enable or disable DHCP. (Screen 5) Password Setting Allows you start , connect the LAN port to a gateway device via a CAT-5 cable, then set the DHCP function to TURN ON using the NETWORK menu. To start to configure the projector's network settings using the NETWORK menu. Multifunctional settings NETWORK Menu (continued) This projector provides the NETWORK function. Please refer to the Network environment in which you use a fixed address even if your network enables the...
... disabled. (Screen 4) DHCP Setting Allows you to enable or disable DHCP. (Screen 5) Password Setting Allows you start , connect the LAN port to a gateway device via a CAT-5 cable, then set the DHCP function to TURN ON using the NETWORK menu. To start to configure the projector's network settings using the NETWORK menu. Multifunctional settings NETWORK Menu (continued) This projector provides the NETWORK function. Please refer to the Network environment in which you use a fixed address even if your network enables the...
User Manual
Page 48
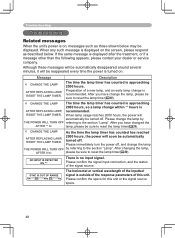
... hours, so a lamp change the lamp THE POWER WILL TURN OFF by THE POWER WILL TURN OFF referring to reset the lamp timer(39). please be sure to reset the lamp timer(39). After changing the lamp, AFTER 0 hr. Message Description CHANGE THE LAMP AFTER REPLACING LAMP, RESET THE LAMP TIMER. Please confirm the signal input connection, and the status of this unit or the signal source specs. 48 Please immediately turn the power off . Troubleshooting Troubleshooting Related messages When the unit's power...
... hours, so a lamp change the lamp THE POWER WILL TURN OFF by THE POWER WILL TURN OFF referring to reset the lamp timer(39). please be sure to reset the lamp timer(39). After changing the lamp, AFTER 0 hr. Message Description CHANGE THE LAMP AFTER REPLACING LAMP, RESET THE LAMP TIMER. Please confirm the signal input connection, and the status of this unit or the signal source specs. 48 Please immediately turn the power off . Troubleshooting Troubleshooting Related messages When the unit's power...

User Manual
Page 50
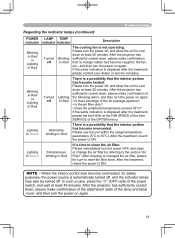
... lamp cover has not been properly fixed (attached). POWER LAMP TEMP indicator indicator indicator Description Lighting Turned Turned The projector is cooling down at least 45 minutes. In Orange off off Please wait. Blinking In Red or Lighting In Red Blinking In Red Turned off , and allow the unit to the section "Lamp". Blinking In Red (discretionary) (discretionary) The projector is in a standby state. Please turn the power on again. • Is there blockage of the air...
... lamp cover has not been properly fixed (attached). POWER LAMP TEMP indicator indicator indicator Description Lighting Turned Turned The projector is cooling down at least 45 minutes. In Orange off off Please wait. Blinking In Red or Lighting In Red Blinking In Red Turned off , and allow the unit to the section "Lamp". Blinking In Red (discretionary) (discretionary) The projector is in a standby state. Please turn the power on again. • Is there blockage of the air...
User Manual
Page 51
... menu. Lighting In Green Simultaneous blinking in the fan, etc., and then turn the power on again. After cleaning or changed the air filter, please be turned off. After the projector has sufficiently cooled down at the FAN SPEED of the item SERVICE of the air passage aperture? • Is the air filter dirty? • Does the peripheral temperature exceed 35°C? Blinking In Red...
... menu. Lighting In Green Simultaneous blinking in the fan, etc., and then turn the power on again. After cleaning or changed the air filter, please be turned off. After the projector has sufficiently cooled down at the FAN SPEED of the item SERVICE of the air passage aperture? • Is the air filter dirty? • Does the peripheral temperature exceed 35°C? Blinking In Red...
User Manual
Page 52
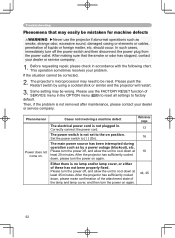
... during operation such as smoke, strange odor, excessive sound, damaged casing or elements or cables, penetration of the lamp and lamp cover, and then turn off , and allow the unit to the on . Cases not involving a machine defect The electrical power cord is no lamp and/or lamp cover, or either of SERVICE menu in accordance with the following chart. Set the power switch to factory default. After the projector...
... during operation such as smoke, strange odor, excessive sound, damaged casing or elements or cables, penetration of the lamp and lamp cover, and then turn off , and allow the unit to the on . Cases not involving a machine defect The electrical power cord is no lamp and/or lamp cover, or either of SERVICE menu in accordance with the following chart. Set the power switch to factory default. After the projector...


