

User Manual
Page 2
...58 Temporarily blanking the screen . . 21 Related messages 58 Using the menu function 22 Regarding the indicator lamps . . . . 59 EASY MENU 24 Shutting the projector down 60 ASPECT, AUTO KEYSTONE EXECUTE, Resetting all settings 60 KEYSTONE, PICTURE MODE, ECO MODE, Phenomena ... . 61 ADVANCED MENU, EXIT Specifications 64 2 Contents Contents About this manual 1 PICTURE menu 26 Contents 2 Projector features 3 BRIGHTNESS, CONTRAST, GAMMA, COLOR TEMP, COLOR, TINT, SHARPNESS, ACTIVE IRIS, MY MEMORY Preparations 3 Checking the contents of package. ....
...58 Temporarily blanking the screen . . 21 Related messages 58 Using the menu function 22 Regarding the indicator lamps . . . . 59 EASY MENU 24 Shutting the projector down 60 ASPECT, AUTO KEYSTONE EXECUTE, Resetting all settings 60 KEYSTONE, PICTURE MODE, ECO MODE, Phenomena ... . 61 ADVANCED MENU, EXIT Specifications 64 2 Contents Contents About this manual 1 PICTURE menu 26 Contents 2 Projector features 3 BRIGHTNESS, CONTRAST, GAMMA, COLOR TEMP, COLOR, TINT, SHARPNESS, ACTIVE IRIS, MY MEMORY Preparations 3 Checking the contents of package. ....

User Manual
Page 4
... good for your eyes. ►Do not handle the elevator buttons without holding the projector, since it . 4 CAUTION ►Maintain normal ventilation to prevent the projector from heating up the vents. Part names Part names Projector (1) Lamp cover (53) The lamp unit is not designed for it is inside. (2) Focus ring (18) (3) Zoom...
... good for your eyes. ►Do not handle the elevator buttons without holding the projector, since it . 4 CAUTION ►Maintain normal ventilation to prevent the projector from heating up the vents. Part names Part names Projector (1) Lamp cover (53) The lamp unit is not designed for it is inside. (2) Focus ring (18) (3) Zoom...
User Manual
Page 5
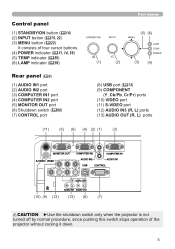
...61478;15, 22) (3) MENU button (22) It consists of four cursor buttons. (4) POWER indicator (11, 14, 59) (5) TEMP indicator (59) (6) LAMP indicator (59) Rear panel (9) (1) AUDIO IN1 port (2) AUDIO IN2 port (3) COMPUTER IN1 port (4) COMPUTER IN2 port (5) MONITOR OUT port (6) Shutdown switch (&#...12) AUDIO IN3 (R, L) ports (13) AUDIO OUT (R, L) ports (11) (5) (6) (4) (2) (1) (3) (10) (9) (12) (13) (8) (7) CAUTION ►Use the shutdown switch only when the projector is not turned off by normal procedure, since pushing this switch stops operation of the...
...61478;15, 22) (3) MENU button (22) It consists of four cursor buttons. (4) POWER indicator (11, 14, 59) (5) TEMP indicator (59) (6) LAMP indicator (59) Rear panel (9) (1) AUDIO IN1 port (2) AUDIO IN2 port (3) COMPUTER IN1 port (4) COMPUTER IN2 port (5) MONITOR OUT port (6) Shutdown switch (&#...12) AUDIO IN3 (R, L) ports (13) AUDIO OUT (R, L) ports (11) (5) (6) (4) (2) (1) (3) (10) (9) (12) (13) (8) (7) CAUTION ►Use the shutdown switch only when the projector is not turned off by normal procedure, since pushing this switch stops operation of the...

User Manual
Page 12
If you observe battery leakage, wipe out the leakage and then replace a battery. Align and insert the two AA batteries (HITACHI MAXELL, Part No.LR6 or R6P) according to the projector. • The remote control may not work correctly if strong light (such as direct sun light) or light from an ...a dark, cool and dry place. • If you will not use the remote control for long period, remove the batteries from an inverter fluorescent lamp) shines on the remote sensor of the arrow and snap it back into the remote control before using it . 1 2 3 2. The sensor senses the signal...
If you observe battery leakage, wipe out the leakage and then replace a battery. Align and insert the two AA batteries (HITACHI MAXELL, Part No.LR6 or R6P) according to the projector. • The remote control may not work correctly if strong light (such as direct sun light) or light from an ...a dark, cool and dry place. • If you will not use the remote control for long period, remove the batteries from an inverter fluorescent lamp) shines on the remote sensor of the arrow and snap it back into the remote control before using it . 1 2 3 2. The sensor senses the signal...
User Manual
Page 13
VOLUME - Be sure to move the mouse pointer diagonally). - This function is not available while the lamp is warming up (the POWER indicator blinks green), and while adjusting the volume and display, correcting for instance, pressing two buttons at once (...function may have priority to the PC. (3) (5) POSITION MENU ESC ENTER RESET (4) (6) NOTE • When the simple mouse & keyboard function of the PC, when the projector's USB port (B type) connects with the PC's USB port (A type) port via a mouse cable. (1) PAGE UP key: Press PAGE UP button. (2) PAGE DOWN key...
VOLUME - Be sure to move the mouse pointer diagonally). - This function is not available while the lamp is warming up (the POWER indicator blinks green), and while adjusting the volume and display, correcting for instance, pressing two buttons at once (...function may have priority to the PC. (3) (5) POSITION MENU ESC ENTER RESET (4) (6) NOTE • When the simple mouse & keyboard function of the PC, when the projector's USB port (B type) connects with the PC's USB port (A type) port via a mouse cable. (1) PAGE UP key: Press PAGE UP button. (2) PAGE DOWN key...
User Manual
Page 14
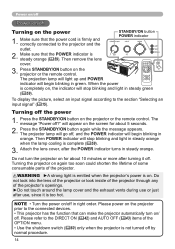
...indicator turns in green. Do not turn on the projector or the remote control. WARNING ►A strong light is emitted when the projector's power is complete (59). 3. The message "Power off Turning on the power 1. The projector lamp will go off in orange. NOTE • Turn ...the power on/off , and the POWER indicator will stop blinking and light in steady orange when the lamp cooling is on the projector or the remote control. Then POWER indicator ...
...indicator turns in green. Do not turn on the projector or the remote control. WARNING ►A strong light is emitted when the projector's power is complete (59). 3. The message "Power off Turning on the power 1. The projector lamp will go off in orange. NOTE • Turn ...the power on/off , and the POWER indicator will stop blinking and light in steady orange when the lamp cooling is on the projector or the remote control. Then POWER indicator ...
User Manual
Page 42
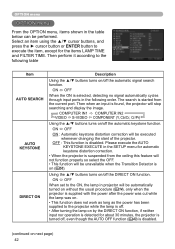
... the AUTO KEYSTONE EXECUTE in the SETUP menu for automatic keystone distortion correction. • When the projector is suspended from the current port. ON OFF When set to the ON, the lamp in projector will stop searching and display the image. OPTION menu OPTION menu From the OPTION menu, items shown... in the table below can be automatically turned on without the usual procedure (14), only when the projector is supplied with the power after the power was cut while the lamp was on. • This function does not work as long as the power has been supplied to the...
... the AUTO KEYSTONE EXECUTE in the SETUP menu for automatic keystone distortion correction. • When the projector is suspended from the current port. ON OFF When set to the ON, the lamp in projector will stop searching and display the image. OPTION menu OPTION menu From the OPTION menu, items shown... in the table below can be automatically turned on without the usual procedure (14), only when the projector is supplied with the power after the power was cut while the lamp was on. • This function does not work as long as the power has been supplied to the...
User Manual
Page 43
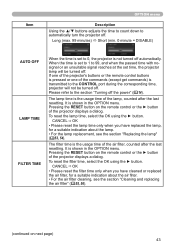
... menu Description Using the ▲/▼ buttons adjusts the time to count down to automatically turn the projector off the power" (14). The lamp time is set time, the projector lamp will not be turned off automatically. When the time is the usage time of the air fi...lter, counted after the last resetting. Long (max. 99 minutes) Short (min. 0 minute = DISABLE) AUTO OFF LAMP TIME FILTER TIME ...
... menu Description Using the ▲/▼ buttons adjusts the time to count down to automatically turn the projector off the power" (14). The lamp time is set time, the projector lamp will not be turned off automatically. When the time is the usage time of the air fi...lter, counted after the last resetting. Long (max. 99 minutes) Short (min. 0 minute = DISABLE) AUTO OFF LAMP TIME FILTER TIME ...

User Manual
Page 46
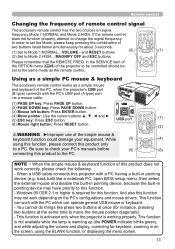
Please refer to change the projector's remote sensor on or off the lens lock feature. Note that the items LAMP TIME, FILTER TIME, LANGUAGE, FILTER MESSAGE and SECURITY settings are locked. When ON is selected, the buttons on the dialog means the ...port is working as described in all the items in Remote Control Settings (13). REMOTE FREQ. (1) Use the ▲/▼ button to change the projector's remote sensor frequency setting (4). 1:NORMAL 2:HIGH (2) Use the ◄/► button to the COMPONENT item in the INPUT_ INFORMATION box (...
Please refer to change the projector's remote sensor on or off the lens lock feature. Note that the items LAMP TIME, FILTER TIME, LANGUAGE, FILTER MESSAGE and SECURITY settings are locked. When ON is selected, the buttons on the dialog means the ...port is working as described in all the items in Remote Control Settings (13). REMOTE FREQ. (1) Use the ▲/▼ button to change the projector's remote sensor frequency setting (4). 1:NORMAL 2:HIGH (2) Use the ◄/► button to the COMPONENT item in the INPUT_ INFORMATION box (...
User Manual
Page 50
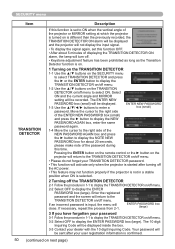
...minutes of the password during this function OFF. • After about 20 seconds, please make note of displaying the TRANSITION DETECTOR ON alarm, the lamp will turn off. • Keystone adjustment feature has been prohibited as long as the Transition Detector function is on. 1 Turning on the TRANSITION...). The 10 digit Inquiring Code will be sent after turning off the AC power. • This feature may not function properly if the projector is not in 1-1 to display the TRANSITION DETECTOR on/off the TRANSITION DETECTOR 2-1 Follow the procedure in a stable position when ON is ...
...minutes of the password during this function OFF. • After about 20 seconds, please make note of displaying the TRANSITION DETECTOR ON alarm, the lamp will turn off. • Keystone adjustment feature has been prohibited as long as the Transition Detector function is on. 1 Turning on the TRANSITION...). The 10 digit Inquiring Code will be sent after turning off the AC power. • This feature may not function properly if the projector is not in 1-1 to display the TRANSITION DETECTOR on/off the TRANSITION DETECTOR 2-1 Follow the procedure in a stable position when ON is ...

User Manual
Page 53
...the lamp time. Using the lamp for long periods of the lamp cover and the projector together, slide the lamp cover back in the left column of the lamp, and slowly pick up the lamp by yourself, follow the following procedure. 3. Type number : DT01021 lamp cover 3 Replacing the lamp 1. If the projector is...(3) Point at the OPTION in place. Prepare a new lamp. Never loosen any inner space of the lamp cover. 7. Then firmly fasten the screw of the projector, while the lamp is mounted on and reset the lamp time using the LAMP TIME item in the OPTION menu. 6 (1) Press the ...
...the lamp time. Using the lamp for long periods of the lamp cover and the projector together, slide the lamp cover back in the left column of the lamp, and slowly pick up the lamp by yourself, follow the following procedure. 3. Type number : DT01021 lamp cover 3 Replacing the lamp 1. If the projector is...(3) Point at the OPTION in place. Prepare a new lamp. Never loosen any inner space of the lamp cover. 7. Then firmly fasten the screw of the projector, while the lamp is mounted on and reset the lamp time using the LAMP TIME item in the OPTION menu. 6 (1) Press the ...

User Manual
Page 54
... a loud bang, or burn out, if jolted or scratched, handled while hot, or worn over time. power • Before replacing the lamp, turn the projector off and unplug the power outlet cord, then wait at least 45 minutes for gas containing mercury to escape from the comes out of the ... room well, and make a loud bang when it in high places is possible for shards of glass to fly into the lamp housing, and for the lamp to clean the projector or replace the lamp yourself. Dispose of it in accordance with care: jolting or scratching could cause it is possible that from the...
... a loud bang, or burn out, if jolted or scratched, handled while hot, or worn over time. power • Before replacing the lamp, turn the projector off and unplug the power outlet cord, then wait at least 45 minutes for gas containing mercury to escape from the comes out of the ... room well, and make a loud bang when it in high places is possible for shards of glass to fly into the lamp housing, and for the lamp to clean the projector or replace the lamp yourself. Dispose of it in accordance with care: jolting or scratching could cause it is possible that from the...

User Manual
Page 55
... them with your other hand to clean the air filter, comply with a replacement lamp for the filter vent of the projector and the outer side of the filters. Use a vacuum cleaner for this projector consists of a filter cover, two kinds of filters, and a fi... meshed filter into the filter cover. When the indicators or a message prompts you replace the lamp, please replace the air filter. Put the filter unit back into the projector. Use a vacuum cleaner onto the both sides of the filter unit. 5. When vacuuming up . ...
... them with your other hand to clean the air filter, comply with a replacement lamp for the filter vent of the projector and the outer side of the filters. Use a vacuum cleaner for this projector consists of a filter cover, two kinds of filters, and a fi... meshed filter into the filter cover. When the indicators or a message prompts you replace the lamp, please replace the air filter. Put the filter unit back into the projector. Use a vacuum cleaner onto the both sides of the filter unit. 5. When vacuuming up . ...
User Manual
Page 56
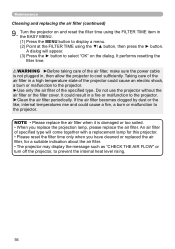
...internal heat level rising. 56 A dialog will come together with a replacement lamp for a suitable indication about the air filter. • The projector may display the message such as "CHECK THE AIR FLOW" or turn off the projector, to display a menu. (2) Point at the FILTER TIME using the ... When you have cleaned or replaced the air filter, for this projector. • Please reset the filter time only when you replace the projection lamp, please replace the air filter. Turn the projector on the dialog. If the air filter becomes clogged by dust or...
...internal heat level rising. 56 A dialog will come together with a replacement lamp for a suitable indication about the air filter. • The projector may display the message such as "CHECK THE AIR FLOW" or turn off the projector, to display a menu. (2) Point at the FILTER TIME using the ... When you have cleaned or replaced the air filter, for this projector. • Please reset the filter time only when you replace the projection lamp, please replace the air filter. Turn the projector on the dialog. If the air filter becomes clogged by dust or...
User Manual
Page 59
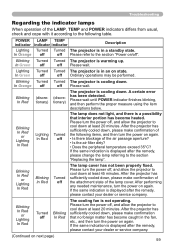
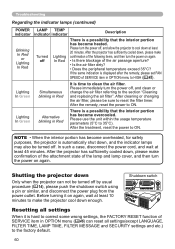
...in the fan, etc., and then turn the power on /off , and allow the projector to the section "Replacing the lamp". Please turn the power on state. Troubleshooting Regarding the indicator lamps When operation of the air passage aperture? • Is the air filter dirty? ...• Does the peripheral temperature exceed 35°C? POWER LAMP TEMP indicator indicator indicator Description Lighting Turned Turned The projector is a possibility that no foreign matter has become heated. Blinking In Green Lighting In Green Turned off Turned...
...in the fan, etc., and then turn the power on /off , and allow the projector to the section "Replacing the lamp". Please turn the power on state. Troubleshooting Regarding the indicator lamps When operation of the air passage aperture? • Is the air filter dirty? ...• Does the peripheral temperature exceed 35°C? POWER LAMP TEMP indicator indicator indicator Description Lighting Turned Turned The projector is a possibility that no foreign matter has become heated. Blinking In Green Lighting In Green Turned off Turned...
User Manual
Page 60
... lamp cover, and then turn the power on again, wait at least 10 minutes to the section "Cleaning and replacing the air filter". Please turn the power off , and allow the projector to clean the air filter. After the projector has sufficiently cooled down at least 45 ...to ON. In such a case, disconnect the power cord, and wait at least 20 minutes. After the projector has sufficiently cooled down, please make the projector cool down Only when the projector can reset all settings When it on again. Before turning it is displayed after the remedy, please set...
... lamp cover, and then turn the power on again, wait at least 10 minutes to the section "Cleaning and replacing the air filter". Please turn the power off , and allow the projector to clean the air filter. After the projector has sufficiently cooled down at least 45 ...to ON. In such a case, disconnect the power cord, and wait at least 20 minutes. After the projector has sufficiently cooled down, please make the projector cool down Only when the projector can reset all settings When it on again. Before turning it is displayed after the remedy, please set...
User Manual
Page 61
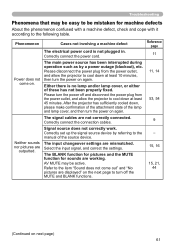
...to the following table. Correctly connect the power cord. Please turn off and disconnect the power plug from the power outlet, and allow the projector to cool down at least 10 minutes, then turn the power on again. Refer to the item "Sound does not come on the ..., 16 15, 21, 44 (Continued on next page) 61 Cases not involving a machine defect The electrical power cord is no lamp and/or lamp cover, or either of the lamp and lamp cover, and then turn the power on again. The signal cables are working. Correctly connect the connection cables. Signal source does...
...to the following table. Correctly connect the power cord. Please turn off and disconnect the power plug from the power outlet, and allow the projector to cool down at least 10 minutes, then turn the power on again. Refer to the item "Sound does not come on the ..., 16 15, 21, 44 (Continued on next page) 61 Cases not involving a machine defect The electrical power cord is no lamp and/or lamp cover, or either of the lamp and lamp cover, and then turn the power on again. The signal cables are working. Correctly connect the connection cables. Signal source does...

User Manual
Page 64
...AUDIO IN2 Stereo mini x1 AUDIO IN3 (R, L RCA x2 AUDIO OUT (R, L RCA x2 Others USB USB-B x1 CONTROL D-sub 9 pin x1 Lamp: DT01021 Filter set: MU06481 Mounting accessary: HAS-3010 (Bracket for ceiling mount) HAS-204L (Fixing adaptor for low ceilings) HAS-304H (Fixing ...Specifications Specifications Specification Item Product name Liquid Crystal Panel Lens Lamp Speaker Power supply Power consumption Temperature range Size Weight (mass) Ports Optional parts Specification Liquid crystal projector 786,432 pixels (1024 horizontal x 768 vertical) Zoom lens, f = 19 ~ 23...
...AUDIO IN2 Stereo mini x1 AUDIO IN3 (R, L RCA x2 AUDIO OUT (R, L RCA x2 Others USB USB-B x1 CONTROL D-sub 9 pin x1 Lamp: DT01021 Filter set: MU06481 Mounting accessary: HAS-3010 (Bracket for ceiling mount) HAS-204L (Fixing adaptor for low ceilings) HAS-304H (Fixing ...Specifications Specifications Specification Item Product name Liquid Crystal Panel Lens Lamp Speaker Power supply Power consumption Temperature range Size Weight (mass) Ports Optional parts Specification Liquid crystal projector 786,432 pixels (1024 horizontal x 768 vertical) Zoom lens, f = 19 ~ 23...
Technical Manual
Page 8
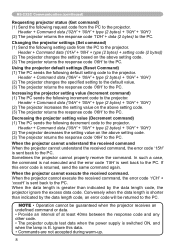
... the response code and any other code. • The projector outputs test data when the power supply is switched ON, and when the lamp is sent back to the projector. RS-232C Communication (continued) Requesting projector status (Get command) (1) Send the following request code from... the PC to the projector. Header + Command data ('06H' + '00H' + type (2 bytes) + '00H' + '00H') (2) The projector changes the specifi...
... the response code and any other code. • The projector outputs test data when the power supply is switched ON, and when the lamp is sent back to the projector. RS-232C Communication (continued) Requesting projector status (Get command) (1) Send the following request code from... the PC to the projector. Header + Command data ('06H' + '00H' + type (2 bytes) + '00H' + '00H') (2) The projector changes the specifi...


