User Manual
Page 2
... 3 Language, About contents of package 3 Go to advanced menu Fastening the lens cover 3 PICTURE Menu 27 Part names 4 Brightness, Contrast, Gamma, Projector 4 Color temp, Color, Tint, Sharpness, Control buttons 6 Progressive, My memory Remote control 6 IMAGE Menu 30 Setting up , MyScreen, MyScreen lock, Message Operating 18 Adjusting the volume 18 Temporarily muting the sound . . . . 18...
... 3 Language, About contents of package 3 Go to advanced menu Fastening the lens cover 3 PICTURE Menu 27 Part names 4 Brightness, Contrast, Gamma, Projector 4 Color temp, Color, Tint, Sharpness, Control buttons 6 Progressive, My memory Remote control 6 IMAGE Menu 30 Setting up , MyScreen, MyScreen lock, Message Operating 18 Adjusting the volume 18 Temporarily muting the sound . . . . 18...
User Manual
Page 6
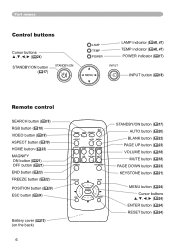
... buttons 24) STANDBY/ON button (17) LAMP indicator (46, 47) TEMP indicator (46, 47) POWER indicator (17) INPUT button (18) Remote control SEARCH button (19) RGB button (18) VIDEO button (19) ASPECT button (19) HOME button (23) MAGNIFY ON button (21...
... buttons 24) STANDBY/ON button (17) LAMP indicator (46, 47) TEMP indicator (46, 47) POWER indicator (17) INPUT button (18) Remote control SEARCH button (19) RGB button (18) VIDEO button (19) ASPECT button (19) HOME button (23) MAGNIFY ON button (21...
User Manual
Page 15
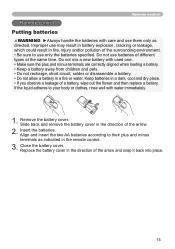
..., short circuit, solder or disassemble a battery. • Do not allow a battery in a fire or water. Remote control Remote control Putting batteries WARNING ►Always handle the batteries with care and use them only as indicated in the remote control. 3. Remove the battery cover. Replace the battery cover in fire, injury and/or pollution of...
..., short circuit, solder or disassemble a battery. • Do not allow a battery in a fire or water. Remote control Remote control Putting batteries WARNING ►Always handle the batteries with care and use them only as indicated in the remote control. 3. Remove the battery cover. Replace the battery cover in fire, injury and/or pollution of...

User Manual
Page 16
.... • Since the remote control uses infrared light to send signals to the projector (Class1 LED), be available. The remote control works with the projector's remote sensor. 30º 30º approx. 3 meters • The range of the projector to keep the light from obstacles that could block the remote control's output signal to use the remote control in a safe place if...
.... • Since the remote control uses infrared light to send signals to the projector (Class1 LED), be available. The remote control works with the projector's remote sensor. 30º 30º approx. 3 meters • The range of the projector to keep the light from obstacles that could block the remote control's output signal to use the remote control in a safe place if...

User Manual
Page 17
... the POWER indicator will stop blinking and light in green. Turning on the projector or the remote control again while the message appears. Remove the lens cover, and set the power switch to the projector and the outlet. 2. When the power is completely on, the indicator will...lamp. (2) During use or immediately after use, do not turn off in orange) POWER (Steady orange) 17 The projector lamp will appear on the projector or the remote control. Then wait several seconds because the buttons may not function for approximately 5 seconds. 2. Press the STANDBY/ON button...
... the POWER indicator will stop blinking and light in green. Turning on the projector or the remote control again while the message appears. Remove the lens cover, and set the power switch to the projector and the outlet. 2. When the power is completely on, the indicator will...lamp. (2) During use or immediately after use, do not turn off in orange) POWER (Steady orange) 17 The projector lamp will appear on the projector or the remote control. Then wait several seconds because the buttons may not function for approximately 5 seconds. 2. Press the STANDBY/ON button...

User Manual
Page 18
... KEYRSTEOSNEET POSITION MENU Selecting an input signal 1. If no input is selected for the RGB signal. Press the MUTE button on the projector. A dialog will appear on the screen indicating that case "RGB2/RGB OUT RGB OUT" message will appear on the screen...RGB OUT RGB OUT" message will check the RGB IN1 port first. Press the INPUT button on the remote control. Press the VOLUME button on the remote control to adjust the volume. A dialog will be selected. Operating Operating Adjusting the volume 1. Press the RGB button on the...
... KEYRSTEOSNEET POSITION MENU Selecting an input signal 1. If no input is selected for the RGB signal. Press the MUTE button on the projector. A dialog will appear on the screen indicating that case "RGB2/RGB OUT RGB OUT" message will appear on the screen...RGB OUT RGB OUT" message will check the RGB IN1 port first. Press the INPUT button on the remote control. Press the VOLUME button on the remote control to adjust the volume. A dialog will be selected. Operating Operating Adjusting the volume 1. Press the RGB button on the...

User Manual
Page 19
...VOLUME OFF END PAGE DOWN MUTE FREEZE KEYSTONE ● If the VIDEO button is found , the projector will check the COMPONENT VIDEO port first. Press the ASPECT button on the remote control. FREEZE KEYSTONE ● For an HDTV signal of the signal. Zoom knob ESC RESET 2. Searching...(when switching from RGB to check other ports in the OPTION menu the projector will stop searching and display MAGNIFY ON HOME PAGE UP VOLUME the image. Press the VIDEO button on the remote control to VIDEO RGB SEARCH ASPECT AUTO BLANK find any input signals. ...
...VOLUME OFF END PAGE DOWN MUTE FREEZE KEYSTONE ● If the VIDEO button is found , the projector will check the COMPONENT VIDEO port first. Press the ASPECT button on the remote control. FREEZE KEYSTONE ● For an HDTV signal of the signal. Zoom knob ESC RESET 2. Searching...(when switching from RGB to check other ports in the OPTION menu the projector will stop searching and display MAGNIFY ON HOME PAGE UP VOLUME the image. Press the VIDEO button on the remote control to VIDEO RGB SEARCH ASPECT AUTO BLANK find any input signals. ...
User Manual
Page 20
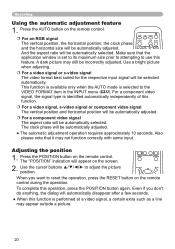
... OFF END PAGE DOWN MUTE 1. A dark picture may not function correctly with some input. The "POSITION" indication will appear on the remote control. For an RGB signal The vertical position, the horizontal position, the clock phase VIDEO RGB SEARCH ASPECT AUTO BLANK and the ... after a few seconds. ● When this KEYSTONE feature. Even if you want to reset the operation, press the RESET button on the remote control. Make sure OtFhF at a video signal, a certain extra such as a line may appear outside a picture. 20 FREEZE KEYSTONE 2. Press the ...
... OFF END PAGE DOWN MUTE 1. A dark picture may not function correctly with some input. The "POSITION" indication will appear on the remote control. For an RGB signal The vertical position, the horizontal position, the clock phase VIDEO RGB SEARCH ASPECT AUTO BLANK and the ... after a few seconds. ● When this KEYSTONE feature. Even if you want to reset the operation, press the RESET button on the remote control. Make sure OtFhF at a video signal, a certain extra such as a line may appear outside a picture. 20 FREEZE KEYSTONE 2. Press the ...
User Manual
Page 21
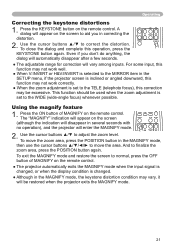
... To move the zoom area, press the POSITION button in several seconds with MAGNIFY ON HOME PAGE UP VOLUME no operation), and the projector will appear on the remote control. A dialog will enter the MAGNIFY mode. Use the cursor buttons ▲/▼ to finalize POSITION theMENU zoom area, press the POSITION button...
... To move the zoom area, press the POSITION button in several seconds with MAGNIFY ON HOME PAGE UP VOLUME no operation), and the projector will appear on the remote control. A dialog will enter the MAGNIFY mode. Use the cursor buttons ▲/▼ to finalize POSITION theMENU zoom area, press the POSITION button...
User Manual
Page 22
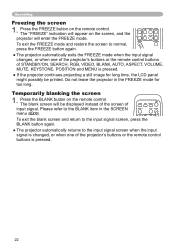
...LCD panel might possibly be displayed instead of the screen of STANDBY/ON, SEARCH, RGB, VIDEO, BLANK, AUTO, ASPECESCT, VOLURMESETE, MUTE, KEYSTONE, POSITION and MENU is pressed. Do not leave the projector in the SCREEN ASPECT AUTO BLANK menu (35). Press the BLANK button on the remote control... screen when the input signal is changed, or when one of the projector's buttons or the remote control bENTuERttons of VIDEO RGB SEARCH input signal. FREEZE KEYSTONE ● The projector automatically returns to the input signal screen, press OFF theEND PAGE DOWN MUTE...
...LCD panel might possibly be displayed instead of the screen of STANDBY/ON, SEARCH, RGB, VIDEO, BLANK, AUTO, ASPECESCT, VOLURMESETE, MUTE, KEYSTONE, POSITION and MENU is pressed. Do not leave the projector in the SCREEN ASPECT AUTO BLANK menu (35). Press the BLANK button on the remote control... screen when the input signal is changed, or when one of the projector's buttons or the remote control bENTuERttons of VIDEO RGB SEARCH input signal. FREEZE KEYSTONE ● The projector automatically returns to the input signal screen, press OFF theEND PAGE DOWN MUTE...
User Manual
Page 23
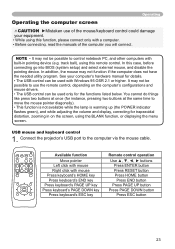
... keyboard's HOME key Press keyboard's END key Press keyboard's PAGE UP key Press keyboard's PAGE DOWN key Press keyboard's ESC key Remote control operation Use buttons Press ENTER button Press RESET button Press HOME button Press END button Press PAGE UP button Press PAGE DOWN button Press...• While using this case, before connecting go into BIOS (system setup) and select external mouse, and disable the pointing device. Connect the projector's USB port to move the mouse pointer diagonally). • This function is not available while the lamp is warming up (the POWER indicator ...
... keyboard's HOME key Press keyboard's END key Press keyboard's PAGE UP key Press keyboard's PAGE DOWN key Press keyboard's ESC key Remote control operation Use buttons Press ENTER button Press RESET button Press HOME button Press END button Press PAGE UP button Press PAGE DOWN button Press...• While using this case, before connecting go into BIOS (system setup) and select external mouse, and disable the pointing device. Connect the projector's USB port to move the mouse pointer diagonally). • This function is not available while the lamp is warming up (the POWER indicator ...
User Manual
Page 24
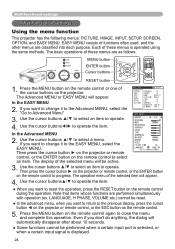
...ESC ENTER RESET 1. If you want to return to the previous display, press the cursor button ◄ on the projector or remote control, or the ESC button on the remote control during the operation. Use the cursor buttons▲/▼ to operate the item. ● When you want to change... item to select an item. Even if you want to progress. Then press the cursor button ► on the projector or remote control, or the ENTER button on the remote control again to select a menu. EASY MENU cosists of these menus is displayed. 24 In the Advanced MENU 2. Use the...
...ESC ENTER RESET 1. If you want to return to the previous display, press the cursor button ◄ on the projector or remote control, or the ESC button on the remote control during the operation. Use the cursor buttons▲/▼ to operate the item. ● When you want to change... item to select an item. Even if you want to progress. Then press the cursor button ► on the projector or remote control, or the ENTER button on the remote control again to select a menu. EASY MENU cosists of these menus is displayed. 24 In the Advanced MENU 2. Use the...
User Manual
Page 25
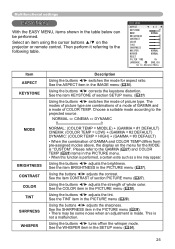
... mode for the MODE is not a malfunction. Using the buttons ◄/► adjusts the sharpness. Using the buttons ◄/► turns off/on the projector or remote control. Then perform it referring to the projected source. Using the buttons ◄/► adjusts the contrast. Select an item using the cursor buttons ▲/▼...
... mode for the MODE is not a malfunction. Using the buttons ◄/► adjusts the sharpness. Using the buttons ◄/► turns off/on the projector or remote control. Then perform it referring to the projected source. Using the buttons ◄/► adjusts the contrast. Select an item using the cursor buttons ▲/▼...
User Manual
Page 27
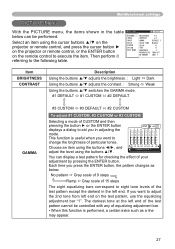
... the cursor buttons ▲/▼ on the INPUT SETUP GAMMA DEFAULT 1 COLOR TEMP MIDDLE projector or remote control, and press the cursor button ► SCREEN OPTION COLOR +0 TINT 0 on the projector or remote control, or the ENTER button EASY MENU SHARPNESS 3 PROGRESSIVE TURN OFF on the test pattern, ...item. Each time you want to change the brightness of the test pattern except the darkest in the left end on the remote control to aid you want to adjust the 2nd tone from left end. If you press the ENTER button, the pattern changes as...
... the cursor buttons ▲/▼ on the INPUT SETUP GAMMA DEFAULT 1 COLOR TEMP MIDDLE projector or remote control, and press the cursor button ► SCREEN OPTION COLOR +0 TINT 0 on the projector or remote control, or the ENTER button EASY MENU SHARPNESS 3 PROGRESSIVE TURN OFF on the test pattern, ...item. Each time you want to change the brightness of the test pattern except the darkest in the left end on the remote control to aid you want to adjust the 2nd tone from left end. If you press the ENTER button, the pattern changes as...
User Manual
Page 30
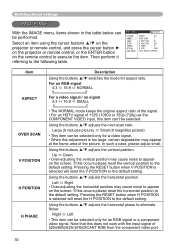
... the H POSITION to the default setting. Pressing the RESET button when H POSITION is too large, certain degradation may cause noise to appear on the remote control to execute the item. Right Left • This item can be performed. If this adjustment is selected will reset the V POSITION to...H PHASE Description Using the buttons ▲/▼ switches the mode for aspect ratio. Select an item using the cursor buttons ▲/▼ on the projector or remote control, and press the cursor button ► on the projector or remote control, or the ENTER button on the screen.
... the H POSITION to the default setting. Pressing the RESET button when H POSITION is too large, certain degradation may cause noise to appear on the remote control to execute the item. Right Left • This item can be performed. If this adjustment is selected will reset the V POSITION to...H PHASE Description Using the buttons ▲/▼ switches the mode for aspect ratio. Select an item using the cursor buttons ▲/▼ on the projector or remote control, and press the cursor button ► on the projector or remote control, or the ENTER button on the screen.
User Manual
Page 31
... sure that it may not function correctly with some input. 31 In such a case, please reset the adjustment by pressing the RESET button on the remote control during this item performs the automatic adjustment feature.
... sure that it may not function correctly with some input. 31 In such a case, please reset the adjustment by pressing the RESET button on the remote control during this item performs the automatic adjustment feature.
User Manual
Page 32
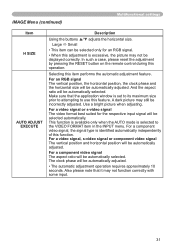
... press the cursor button ► INPUT SETUP SCREEN OPTION VIDEO FORMAT AUTO FRAME LOCK TURN ON INFORMATION on the projector or remote control, or the ENTER button EASY MENU on the remote control to the projector. AUTO NTSC PAL SECAM N-PAL M-PAL NTSC4.43 • This item is selected, the COMPONENT...
... press the cursor button ► INPUT SETUP SCREEN OPTION VIDEO FORMAT AUTO FRAME LOCK TURN ON INFORMATION on the projector or remote control, or the ENTER button EASY MENU on the remote control to the projector. AUTO NTSC PAL SECAM N-PAL M-PAL NTSC4.43 • This item is selected, the COMPONENT...
User Manual
Page 34
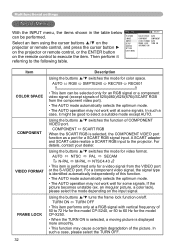
...table below can be interlocked QUIT with the input port using the cursor buttons ▲/▼ on the projector or remote control, and press the cursor button ► on the projector or remote control, or the ENTER button on the whisper mode. At some signals, this function may not work well.... or the H&V:INVERT is selected under the item MIRROR, if the projector screen is inclined or if the projector is angled downward, this function may not work for mirror status. RGB1 1 2 When off /on the remote control to WIDE whenever possible. High Low Choose an input port...
...table below can be interlocked QUIT with the input port using the cursor buttons ▲/▼ on the projector or remote control, and press the cursor button ► on the projector or remote control, or the ENTER button on the whisper mode. At some signals, this function may not work well.... or the H&V:INVERT is selected under the item MIRROR, if the projector screen is inclined or if the projector is angled downward, this function may not work for mirror status. RGB1 1 2 When off /on the remote control to WIDE whenever possible. High Low Choose an input port...
User Manual
Page 35
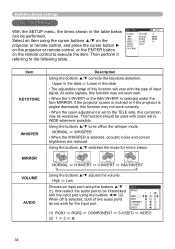
Select an item using the cursor buttons ▲/▼ on the projector or remote control, and press the cursor button ► on the projector or remote control, or the ENTER button on the remote control to the following table. Using the buttons ▲/▼ switches the brightness level of the OSD (On ... MyScreen ORIGINAL BLUE WHITE BLACK BLANK MyScreen is displayed by pressing the BLANK button on the remote control or keep no operation for 10 seconds. BLUE, WHITE and BLACK are non-patterned (plain) screens in the table below can register as...
Select an item using the cursor buttons ▲/▼ on the projector or remote control, and press the cursor button ► on the projector or remote control, or the ENTER button on the remote control to the following table. Using the buttons ▲/▼ switches the brightness level of the OSD (On ... MyScreen ORIGINAL BLUE WHITE BLACK BLANK MyScreen is displayed by pressing the BLANK button on the remote control or keep no operation for 10 seconds. BLUE, WHITE and BLACK are non-patterned (plain) screens in the table below can register as...

User Manual
Page 36
...the picture from the current screen. are displayed for capturing appears. Please try again." Using the buttons ▲/▼ turns on the remote control. 2. TURN ON TURN OFF When the TURN ON is selected, the item MyScreen is displayed. To restore the screen and... error has occurred. Please execute displaying the input including the picture you want to be displayed, and press the ENTER button on the remote control. The frame may not be able to capture. 1. Multifunctional settings SCREEN Menu (continued) Item Description Using the buttons ▲/▼...
...the picture from the current screen. are displayed for capturing appears. Please try again." Using the buttons ▲/▼ turns on the remote control. 2. TURN ON TURN OFF When the TURN ON is selected, the item MyScreen is displayed. To restore the screen and... error has occurred. Please execute displaying the input including the picture you want to be displayed, and press the ENTER button on the remote control. The frame may not be able to capture. 1. Multifunctional settings SCREEN Menu (continued) Item Description Using the buttons ▲/▼...

