User Manual
Page 1
... EPA endorsement of any product or service. SERIAL No. COLOUR/COLOR LCD MONITOR USER MANUAL MANUEL D'UTILISATION BEDIENUNGSANLEITUNG MANUAL DE USUARIO CML190SXW MANUALE DI ISTRUZIONI CML190SXWB READ THE INSTRUCTIONS INSIDE CAREFULLY. KEEP THIS USER MANUAL FOR FUTURE REFERENCE. This monitor is located on the rear of your colour monitor. For future reference, record the serial number of the monitor. As an ENERGY STAR® Partner, Hitachi,Ltd. has determined that this...
... EPA endorsement of any product or service. SERIAL No. COLOUR/COLOR LCD MONITOR USER MANUAL MANUEL D'UTILISATION BEDIENUNGSANLEITUNG MANUAL DE USUARIO CML190SXW MANUALE DI ISTRUZIONI CML190SXWB READ THE INSTRUCTIONS INSIDE CAREFULLY. KEEP THIS USER MANUAL FOR FUTURE REFERENCE. This monitor is located on the rear of your colour monitor. For future reference, record the serial number of the monitor. As an ENERGY STAR® Partner, Hitachi,Ltd. has determined that this...
User Manual
Page 2
... the image may repair your monitor with new or reconditioned parts or replace it if your responsibility. You will provide parts ONLY free of charge through its Authorized Monitor Service Center. This warranty is left with respect to 1/31/01 or 60 months if your purchase was made from an authorized Hitachi America, Ltd. ENGLISH Limited Warranty for both panel and backlight if...
... the image may repair your monitor with new or reconditioned parts or replace it if your responsibility. You will provide parts ONLY free of charge through its Authorized Monitor Service Center. This warranty is left with respect to 1/31/01 or 60 months if your purchase was made from an authorized Hitachi America, Ltd. ENGLISH Limited Warranty for both panel and backlight if...
User Manual
Page 3
... WHATSOEVER WILL COVER THIS MONITOR BEYOND THE STATED 12, 36 OR 60 MONTHS. IF THIS MONITOR IS DEFECTIVE, YOUR ONLY REMEDY IS REPAIR OR REPLACEMENT, AS DESCRIBED ABOVE. THIS WARRANTY GIVES YOU SPECIFIC LEGAL RIGHTS, AND YOU MAY HAVE OTHER RIGHTS WHICH VARY STATE TO STATE. service center (Call...purchase date with all dealers accept returns. NEVER open the monitor cabinet. If a problem occurs within the first 30 days after purchase AND IF CONSISTENT WITH YOUR DEALER'S RETURN POLICY, you at your monitor without a return authorization number or the shipment will be refused and returned...
... WHATSOEVER WILL COVER THIS MONITOR BEYOND THE STATED 12, 36 OR 60 MONTHS. IF THIS MONITOR IS DEFECTIVE, YOUR ONLY REMEDY IS REPAIR OR REPLACEMENT, AS DESCRIBED ABOVE. THIS WARRANTY GIVES YOU SPECIFIC LEGAL RIGHTS, AND YOU MAY HAVE OTHER RIGHTS WHICH VARY STATE TO STATE. service center (Call...purchase date with all dealers accept returns. NEVER open the monitor cabinet. If a problem occurs within the first 30 days after purchase AND IF CONSISTENT WITH YOUR DEALER'S RETURN POLICY, you at your monitor without a return authorization number or the shipment will be refused and returned...
User Manual
Page 4
... HITACHI Colour Monitor. NOTE: * The information in this Display Safely 5 Warning...6 Caution...9 FCC Statement Warning 11 For the Customers in CANADA 11 For the Customers in this manual. * The reproduction, transmission or use of a nonprofit organization, Video Electronics Standard Association. ENGLISH Colour/Color Monitor CML190SXW CML190SXWB USER MANUAL Congratulations on your Computer 14 Connecting the AC Power 15 Setting Up the LCD Monitor 15 Power Management System 15 3 VESA...
... HITACHI Colour Monitor. NOTE: * The information in this Display Safely 5 Warning...6 Caution...9 FCC Statement Warning 11 For the Customers in CANADA 11 For the Customers in this manual. * The reproduction, transmission or use of a nonprofit organization, Video Electronics Standard Association. ENGLISH Colour/Color Monitor CML190SXW CML190SXWB USER MANUAL Congratulations on your Computer 14 Connecting the AC Power 15 Setting Up the LCD Monitor 15 Power Management System 15 3 VESA...

User Manual
Page 5
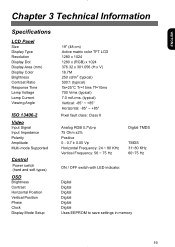
ENGLISH Chapter 2 Display Controls 16 User Controls 16 Adjusting the Monitor's Display 16 Function Descriptions 17 Chapter 3 Technical Information 19 Specifications 19 Standard Timing Table 22 Troubleshooting 23 4
ENGLISH Chapter 2 Display Controls 16 User Controls 16 Adjusting the Monitor's Display 16 Function Descriptions 17 Chapter 3 Technical Information 19 Specifications 19 Standard Timing Table 22 Troubleshooting 23 4
User Manual
Page 6
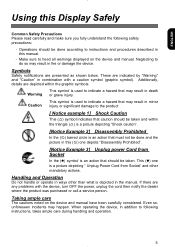
... that must not be taken. Operations should be done and the picture in this ([) one is a picture depicting " Unplug Power Cord from Socket In the (z) symbol is an action that may happen. ENGLISH Using this Display Safely Common Safety Precautions Please read carefully and make sure you fully understand the following instructions, takes ample care during handling and operation. 5
... that must not be taken. Operations should be done and the picture in this ([) one is a picture depicting " Unplug Power Cord from Socket In the (z) symbol is an action that may happen. ENGLISH Using this Display Safely Common Safety Precautions Please read carefully and make sure you fully understand the following instructions, takes ample care during handling and operation. 5

User Manual
Page 7
...cord should fall in, using the product in this condition may lead to rise and result in the ventilation holes. This will cause the internal temperature to electrical shock or fire. Removing the Case Cover DO NOT remove the case cover. There are many high voltage parts inside and are to repair, modify or disassemble... or malfunction. - Air vents - This will change the flow of air through the air vents and cause the internal temperature to be easily unplugged. If anything abnormal should happen, turn OFF the power and unplug the power cord. This may result in Device DO NOT put...
...cord should fall in, using the product in this condition may lead to rise and result in the ventilation holes. This will cause the internal temperature to electrical shock or fire. Removing the Case Cover DO NOT remove the case cover. There are many high voltage parts inside and are to repair, modify or disassemble... or malfunction. - Air vents - This will change the flow of air through the air vents and cause the internal temperature to be easily unplugged. If anything abnormal should happen, turn OFF the power and unplug the power cord. This may result in Device DO NOT put...

User Manual
Page 10
... connected devices. - Use in contact with the plastic and metal edges. The device may get caught and cause injury. Additionally, do not place objects that are connected. The cable casing may cause injury and damage to the devices that generate heat near the stand when adjusting the LCD ...forward or back. DO NOT place your hand near the cables. If a cable is possible to 15 minutes. When adjusting the angle, hold the top left and right edges with both hands and move slowly. Continuously looking at the display while working, keep the work , ...
... connected devices. - Use in contact with the plastic and metal edges. The device may get caught and cause injury. Additionally, do not place objects that are connected. The cable casing may cause injury and damage to the devices that generate heat near the stand when adjusting the LCD ...forward or back. DO NOT place your hand near the cables. If a cable is possible to 15 minutes. When adjusting the angle, hold the top left and right edges with both hands and move slowly. Continuously looking at the display while working, keep the work , ...

User Manual
Page 12
... , the user is connected. - If this equipment does cause harmful interference to radio or television reception, which can radiate radio frequency energy and, if not installed and used . (2) Video inputs: The input signal amplitude must be determined by turning the equipment off and on a circuit different from that to radio communications. For the Customers in CANADA NOTICE: This Class B digital apparatus...
... , the user is connected. - If this equipment does cause harmful interference to radio or television reception, which can radiate radio frequency energy and, if not installed and used . (2) Video inputs: The input signal amplitude must be determined by turning the equipment off and on a circuit different from that to radio communications. For the Customers in CANADA NOTICE: This Class B digital apparatus...

User Manual
Page 13
... the pin face of the plug. Fuse covers are coloured in your dealer. If the fuse cover is detachable never use the plug with the cover omitted. If the plug fitted is not suitable for the power outlets in accordance with the following code: Green and Yellow = Earth, Blue = Neutral, Brown = Live. Should the fuse need to be replaced, an ASTA or BSI...
... the pin face of the plug. Fuse covers are coloured in your dealer. If the fuse cover is detachable never use the plug with the cover omitted. If the plug fitted is not suitable for the power outlets in accordance with the following code: Green and Yellow = Earth, Blue = Neutral, Brown = Live. Should the fuse need to be replaced, an ASTA or BSI...
User Manual
Page 14
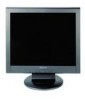
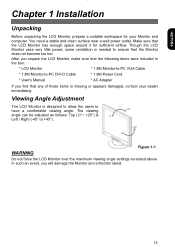
... viewing angle can be adjusted as stated above. Though the LCD Monitor uses very little power, some ventilation is designed to allow the users to -PC DVI-D Cable * 1.8M Power Cord * User's Manual * AC Adapter If you will damage the Monitor and a Monitor stand. 13 In such an event, you find that the following items were included in the box: * LCD Monitor * 1.8M Monitor-to-PC VGA Cable * 1.8M Monitor-to have a comfortable viewing...
... viewing angle can be adjusted as stated above. Though the LCD Monitor uses very little power, some ventilation is designed to allow the users to -PC DVI-D Cable * 1.8M Power Cord * User's Manual * AC Adapter If you will damage the Monitor and a Monitor stand. 13 In such an event, you find that the following items were included in the box: * LCD Monitor * 1.8M Monitor-to-PC VGA Cable * 1.8M Monitor-to have a comfortable viewing...

User Manual
Page 15
... LCD Monitor's VGA port or DVI port. (See Fig. 1-4) 3. Remove the back panel n from the rear of the signal cable to an off your computer. 2. Figure 1-3 Figure 1-4 ATTENTION This device must be in compliance with FCC regulations. Power off -the-shelf video cable in the LCD Monitor package. Connect one end of the monitor.(See Fig. 1.2,1-3) 2. A ferrite-loaded interface cable is used. 14 Make sure both connections are secure. ENGLISH Figure 1-2 Connecting the Display...
... LCD Monitor's VGA port or DVI port. (See Fig. 1-4) 3. Remove the back panel n from the rear of the signal cable to an off your computer. 2. Figure 1-3 Figure 1-4 ATTENTION This device must be in compliance with FCC regulations. Power off -the-shelf video cable in the LCD Monitor package. Connect one end of the monitor.(See Fig. 1.2,1-3) 2. A ferrite-loaded interface cable is used. 14 Make sure both connections are secure. ENGLISH Figure 1-2 Connecting the Display...

User Manual
Page 16
.... 1-6) 2. Connect the power cord to the AC adapter. (See Fig. 1-5) 2. signal. Setting Up the LCD Monitor 1. Sudden power surges may damage your monitor. Turn on the LCD Monitor's soft power switch, located on the back of the monitor. 3. When the LCD Monitor is in power saving mode, the monitor screen will be blank and the power LED indicator color shows. 15 For use only with the VESA DPMS (version 1.0) Power Management guidelines. Figure 1-6 Power Management System This LCD Monitor complies with power supply LINEARITY...
.... 1-6) 2. Connect the power cord to the AC adapter. (See Fig. 1-5) 2. signal. Setting Up the LCD Monitor 1. Sudden power surges may damage your monitor. Turn on the LCD Monitor's soft power switch, located on the back of the monitor. 3. When the LCD Monitor is in power saving mode, the monitor screen will be blank and the power LED indicator color shows. 15 For use only with the VESA DPMS (version 1.0) Power Management guidelines. Figure 1-6 Power Management System This LCD Monitor complies with power supply LINEARITY...

User Manual
Page 17
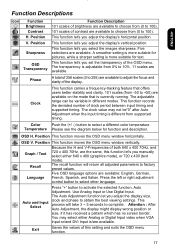
... on all LCD Monitor function controls and indicators: ENGLISH 1 Soft Power Switch 2 DC Power-On Indicator 3 Function Select Buttons Adjustment Control 4 Buttons Figure 2-1 Press the soft power switch to increase the value of the chosen OSD setting. LED displays Green color --- LED displays Dark color --- Press the left or right control button for one of the Function Select Control buttons, and the menu dialog box will pop up on the screen as Ver. 1.00 16 Chapter 2 Display Controls User Controls A brief description...
... on all LCD Monitor function controls and indicators: ENGLISH 1 Soft Power Switch 2 DC Power-On Indicator 3 Function Select Buttons Adjustment Control 4 Buttons Figure 2-1 Press the soft power switch to increase the value of the chosen OSD setting. LED displays Green color --- LED displays Dark color --- Press the left or right control button for one of the Function Select Control buttons, and the menu dialog box will pop up on the screen as Ver. 1.00 16 Chapter 2 Display Controls User Controls A brief description...
User Manual
Page 18
... adjustable range can be "0" after Auto Adjustment when the input timing is /are available. Because the H and V-Frequencies of the display. Position This function moves the OSD menu window vertically. You may not be variable in different modes. Five selections are available. Press the left or right adjustment control button to select a different color temperature. Press "+" button to complete. Position This function moves the OSD menu window horizontally. ENGLISH Function Descriptions Icon Function Brightness Contrast H. Exit Saves...
... adjustable range can be "0" after Auto Adjustment when the input timing is /are available. Because the H and V-Frequencies of the display. Position This function moves the OSD menu window vertically. You may not be variable in different modes. Five selections are available. Press the left or right adjustment control button to select a different color temperature. Press "+" button to complete. Position This function moves the OSD menu window horizontally. ENGLISH Function Descriptions Icon Function Brightness Contrast H. Exit Saves...
User Manual
Page 19
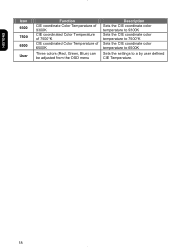
ENGLISH Icon 9300 7500 6500 User Function CIE coordinate Color Temperature of 9300K CIE coordinated Color Temperature of 7500°K CIE coordinated Color Temperature of 6500K Three colors (Red, Green, Blue) can be adjusted from the OSD menu Description Sets the CIE coordinate color temperature to 9300K Sets the CIE coordinate color temperature to 7500°K Sets the CIE coordinate color temperature to 6500K Sets the settings to a by user defined CIE Temperature. 18
ENGLISH Icon 9300 7500 6500 User Function CIE coordinate Color Temperature of 9300K CIE coordinated Color Temperature of 7500°K CIE coordinated Color Temperature of 6500K Three colors (Red, Green, Blue) can be adjusted from the OSD menu Description Sets the CIE coordinate color temperature to 9300K Sets the CIE coordinate color temperature to 7500°K Sets the CIE coordinate color temperature to 6500K Sets the settings to a by user defined CIE Temperature. 18
User Manual
Page 20
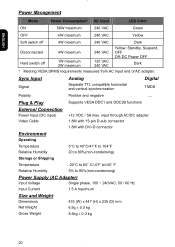
...Digital Digital Digital Digital Digital Digital Uses EEPROM to save settings in memory 19 ENGLISH Chapter 3 Technical Information Specifications LCD Panel Size Display Type Resolution Display Dot Display Area (mm) Display Color Brightness Contrast Ratio Response Time Lamp Voltage Lamp Current Viewing Angle ISO 13406-2 Video Input Signal Input Impedance Polarity Amplitude Multi-mode Supported Control Power switch (hard and soft types) OSD Brightness Contrast Horizontal Position Vertical Position Phase Clock Display Mode Setup 19" (48 cm) Active matrix color TFT LCD 1280 x 1024 1280 x (RGB...
...Digital Digital Digital Digital Digital Digital Uses EEPROM to save settings in memory 19 ENGLISH Chapter 3 Technical Information Specifications LCD Panel Size Display Type Resolution Display Dot Display Area (mm) Display Color Brightness Contrast Ratio Response Time Lamp Voltage Lamp Current Viewing Angle ISO 13406-2 Video Input Signal Input Impedance Polarity Amplitude Multi-mode Supported Control Power switch (hard and soft types) OSD Brightness Contrast Horizontal Position Vertical Position Phase Clock Display Mode Setup 19" (48 cm) Active matrix color TFT LCD 1280 x 1024 1280 x (RGB...
User Manual
Page 21
..., Suspend, OFF Off: DC Power OFF Dark * Meeting VESA DPMS requirements measured from AC Input end of AC adapter. Sync Input Signal Analog Separate TTL compatible horizontal and vertical synchronization Digital TMDS Polarity Positive and negative Plug & Play Supports VESA DDC1 and DDC2B functions External Connection Power Input (DC input) Video Cable +12 VDC / 5A max. input through AC/DC adapter 1.8M with 15-pin D-sub connector 1.8M with DVI-D connector Environment Operating Temperature Relative Humidity...
..., Suspend, OFF Off: DC Power OFF Dark * Meeting VESA DPMS requirements measured from AC Input end of AC adapter. Sync Input Signal Analog Separate TTL compatible horizontal and vertical synchronization Digital TMDS Polarity Positive and negative Plug & Play Supports VESA DDC1 and DDC2B functions External Connection Power Input (DC input) Video Cable +12 VDC / 5A max. input through AC/DC adapter 1.8M with 15-pin D-sub connector 1.8M with DVI-D connector Environment Operating Temperature Relative Humidity...
User Manual
Page 23
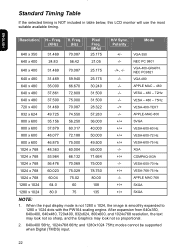
ENGLISH Resolution H - When the input display mode is not 1280 x 1024, the image is NOT included in table below, this LCD monitor will use the most suitable available timing. VGA-350 640 x 400 24.83 56.42 21.05 -/- VESA-600-70 Hz 1024 x 768 60.023 75.029 78.750 +/+ VESA-768-... 2. 640x400 56Hz, 1024x768 66Hz and 1280x1024 75Hz modes cannot be supported when Digital (TMDS) input. 22 Polarity Mode +/- NEC PC 9801 640 x 400 31.469 70.087 25.175 -/+, -/- APPLE MAC - 480 640 x 480 37.861 72.809 31.500 -/- APPLE MAC-768 1280 x 1024 64.0 60 108 +/+...
ENGLISH Resolution H - When the input display mode is not 1280 x 1024, the image is NOT included in table below, this LCD monitor will use the most suitable available timing. VGA-350 640 x 400 24.83 56.42 21.05 -/- VESA-600-70 Hz 1024 x 768 60.023 75.029 78.750 +/+ VESA-768-... 2. 640x400 56Hz, 1024x768 66Hz and 1280x1024 75Hz modes cannot be supported when Digital (TMDS) input. 22 Polarity Mode +/- NEC PC 9801 640 x 400 31.469 70.087 25.175 -/+, -/- APPLE MAC - 480 640 x 480 37.861 72.809 31.500 -/- APPLE MAC-768 1280 x 1024 64.0 60 108 +/+...
User Manual
Page 24
... this LCD Monitor. ENGLISH Troubleshooting This LCD Monitor has pre-adjusted using factory to see if any black vertical stripes appear. Due to the monitor, the monitor will display an "Input Signal Out of the LCD Monitor's synchronous range (Horizontal: 24 ~ 80 KHz and Vertical: 56 ~ 75 Hz), the OSD will display the message "Check Video Cable", and then go into POWER OFF mode. 23 Check the screen to standard VGA timings. PROBLEM Picture is unclear and unstable or new colorized The picture is selected. Turn...
... this LCD Monitor. ENGLISH Troubleshooting This LCD Monitor has pre-adjusted using factory to see if any black vertical stripes appear. Due to the monitor, the monitor will display an "Input Signal Out of the LCD Monitor's synchronous range (Horizontal: 24 ~ 80 KHz and Vertical: 56 ~ 75 Hz), the OSD will display the message "Check Video Cable", and then go into POWER OFF mode. 23 Check the screen to standard VGA timings. PROBLEM Picture is unclear and unstable or new colorized The picture is selected. Turn...


