User Manual
Page 1
...; emblem does not represent EPA endorsement of any product or service. For future reference, record the serial number of the monitor. SERIAL No. KEEP THIS USER MANUAL FOR FUTURE REFERENCE. This monitor is located on the rear of your colour monitor. COLOUR/COLOR LCD MONITOR USER MANUAL MANUEL D'UTILISATION BEDIENUNGSANLEITUNG MANUAL DE USUARIO CML175XW MANUALE DI ISTRUZIONI READ THE INSTRUCTIONS INSIDE CAREFULLY. has determined that this product meets the...
...; emblem does not represent EPA endorsement of any product or service. For future reference, record the serial number of the monitor. SERIAL No. KEEP THIS USER MANUAL FOR FUTURE REFERENCE. This monitor is located on the rear of your colour monitor. COLOUR/COLOR LCD MONITOR USER MANUAL MANUEL D'UTILISATION BEDIENUNGSANLEITUNG MANUAL DE USUARIO CML175XW MANUALE DI ISTRUZIONI READ THE INSTRUCTIONS INSIDE CAREFULLY. has determined that this product meets the...

User Manual
Page 2
..., repair or replace the monitor at no charge except as set forth below . IN ADDITION,THIS WARRANTY DOES NOT COVER PHOSPHOR BURN. INCLUDING ANY & ALL MANDATORY LABOR CHARGES TO REPLACE ANY COVERED PARTS - This is a natural process in brightness as they age. THIS WARRANTY EXCLUDES DECREASED IMAGE CLARITY OR REDUCED BRIGHTNESS DUE TO NATURAL AGING OF THE MONITOR/DISPLAY. warrants our "CM" Hitachi CRT color monitor models to...
..., repair or replace the monitor at no charge except as set forth below . IN ADDITION,THIS WARRANTY DOES NOT COVER PHOSPHOR BURN. INCLUDING ANY & ALL MANDATORY LABOR CHARGES TO REPLACE ANY COVERED PARTS - This is a natural process in brightness as they age. THIS WARRANTY EXCLUDES DECREASED IMAGE CLARITY OR REDUCED BRIGHTNESS DUE TO NATURAL AGING OF THE MONITOR/DISPLAY. warrants our "CM" Hitachi CRT color monitor models to...

User Manual
Page 3
...your expense. You must assume the risk of your monitor without a return authorization number or the shipment will be refused and returned to all dealers accept returns. ALL WARRANTIES SET FORTH IN THIS WARRANTY ARE LIMITED TO 12, ...Hitachi service center. NO WARRANTIES WHATSOEVER WILL COVER THIS MONITOR BEYOND THE STATED 12, 36 OR 60 MONTHS. BE LIABLE FOR INCIDENTAL OR CONSEQUENTIAL DAMAGES, INCLUDING ANY LOST SAVINGS, LOST PROFITS, OR ANY OTHER DAMAGES CAUSED BY THE USE OF THIS MONITOR OR INABILITY TO USE IT, EVEN IF THE DEALER OR HITACHI AMERICA, LTD. DO NOT OPEN THE MONITOR...
...your expense. You must assume the risk of your monitor without a return authorization number or the shipment will be refused and returned to all dealers accept returns. ALL WARRANTIES SET FORTH IN THIS WARRANTY ARE LIMITED TO 12, ...Hitachi service center. NO WARRANTIES WHATSOEVER WILL COVER THIS MONITOR BEYOND THE STATED 12, 36 OR 60 MONTHS. BE LIABLE FOR INCIDENTAL OR CONSEQUENTIAL DAMAGES, INCLUDING ANY LOST SAVINGS, LOST PROFITS, OR ANY OTHER DAMAGES CAUSED BY THE USE OF THIS MONITOR OR INABILITY TO USE IT, EVEN IF THE DEALER OR HITACHI AMERICA, LTD. DO NOT OPEN THE MONITOR...

User Manual
Page 4
... UK 12 Chapter 1 Installation 13 Unpacking ...13 Viewing Angle Adjustment 13 Connecting the Display to change without express written authority. The manufacturer assumes no responsibility for future reference. ENERGY STAR® is subject to your selection of this manual. * The reproduction, transmission or use of the HITACHI Colour Monitor. ENGLISH Colour/Color Monitor CML175SXW USER MANUAL Congratulations on your Computer 13 Connecting the AC Power 14 Connecting the Audio Cable 14 3
... UK 12 Chapter 1 Installation 13 Unpacking ...13 Viewing Angle Adjustment 13 Connecting the Display to change without express written authority. The manufacturer assumes no responsibility for future reference. ENERGY STAR® is subject to your selection of this manual. * The reproduction, transmission or use of the HITACHI Colour Monitor. ENGLISH Colour/Color Monitor CML175SXW USER MANUAL Congratulations on your Computer 13 Connecting the AC Power 14 Connecting the Audio Cable 14 3

User Manual
Page 5
ENGLISH Setting Up the LCD Monitor 14 Power Management System 14 Chapter 2 Display Controls 15 User Controls...15 Adjusting the Monitor's Display 15 Function Descriptions 16 Chapter 3 Technical Information 18 Specifications ...18 Standard Timing Table 21 Troubleshooting ...22 4
ENGLISH Setting Up the LCD Monitor 14 Power Management System 14 Chapter 2 Display Controls 15 User Controls...15 Adjusting the Monitor's Display 15 Function Descriptions 16 Chapter 3 Technical Information 18 Specifications ...18 Standard Timing Table 21 Troubleshooting ...22 4

User Manual
Page 6
... on the device and manual. ENGLISH Using this manual. - Handling and Operation Do not handle or operate in addition to indicate a hazard that should be taken. When operating the device, in ways other than what is a picture depicting " Unplug Power Cord from Socket In the (z) symbol is used to following safety precautions: - Make sure to instructions and procedures described in...
... on the device and manual. ENGLISH Using this manual. - Handling and Operation Do not handle or operate in addition to indicate a hazard that should be taken. When operating the device, in ways other than what is a picture depicting " Unplug Power Cord from Socket In the (z) symbol is used to following safety precautions: - Make sure to instructions and procedures described in...
User Manual
Page 7
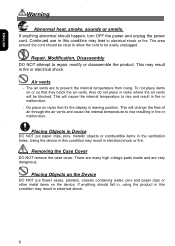
...so that fix the display in the ventilation holes. Removing the Case Cover DO NOT remove the case cover. Do place on racks that they block the air vents. If anything should fall in, using the product in this condition may result in racks where the air vents will change the ... will be easily unplugged. There are many high voltage parts inside and are to rise resulting in fire or malfunction. - The area around the cord should happen, turn OFF the power and unplug the power cord. This may lead to repair, modify or disassemble the product. Air vents - The air vents are ...
...so that fix the display in the ventilation holes. Removing the Case Cover DO NOT remove the case cover. Do place on racks that they block the air vents. If anything should fall in, using the product in this condition may result in racks where the air vents will change the ... will be easily unplugged. There are many high voltage parts inside and are to rise resulting in fire or malfunction. - The area around the cord should happen, turn OFF the power and unplug the power cord. This may lead to repair, modify or disassemble the product. Air vents - The air vents are ...
User Manual
Page 10
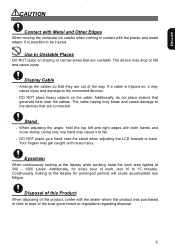
... cause it to the connected devices. - Using only one hand may cause injury and damage to fall and cause injury. Arrange the cables so that generate heat near the stand when adjusting the LCD forward or back. If a cable is possible to the devices that are out of work area lighted at the display while working, keep the work , rest 10 to laws...
... cause it to the connected devices. - Using only one hand may cause injury and damage to fall and cause injury. Arrange the cables so that generate heat near the stand when adjusting the LCD forward or back. If a cable is possible to the devices that are out of work area lighted at the display while working, keep the work , rest 10 to laws...
User Manual
Page 12
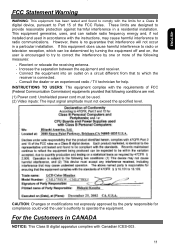
...radio frequency energy and, if not installed and used . (2) Video inputs: The input signal amplitude must be determined by turning the equipment off and on a circuit different from that interference will not occur in a residential installation. ...Power cord: Unshielded power cord must not exceed the specified level. This equipment generates, uses, and can be used in CANADA NOTICE: This Class B digital apparatus complies with the limits for help. INSTRUCTIONS TO USERS: This equipment complies with the instructions, may cause harmful interference to radio communications. ENGLISH...
...radio frequency energy and, if not installed and used . (2) Video inputs: The input signal amplitude must be determined by turning the equipment off and on a circuit different from that interference will not occur in a residential installation. ...Power cord: Unshielded power cord must not exceed the specified level. This equipment generates, uses, and can be used in CANADA NOTICE: This Class B digital apparatus complies with the limits for help. INSTRUCTIONS TO USERS: This equipment complies with the instructions, may cause harmful interference to radio communications. ENGLISH...
User Manual
Page 13
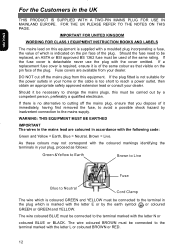
ENGLISH For the Customers in accordance with the following code: Green and Yellow = Earth, Blue = Neutral, Brown = Live. If a replacement fuse cover is required, ensure it is of the same colour as follows: The wire which is no alternative to be replaced, an ASTA or BSI approved BS 1362 fuse must be used of the plug. DO NOT cut off...
ENGLISH For the Customers in accordance with the following code: Green and Yellow = Earth, Blue = Neutral, Brown = Live. If a replacement fuse cover is required, ensure it is of the same colour as follows: The wire which is no alternative to be replaced, an ASTA or BSI approved BS 1362 fuse must be used of the plug. DO NOT cut off...
User Manual
Page 14
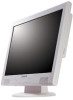
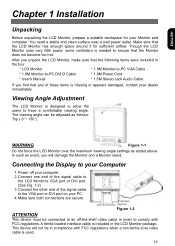
... the signal cable to -PC DVI-D Cable * 1.8M Power Cord * User's Manual * 1.5M Stereo Jack Audio Cable If you find that the LCD Monitor has enough space around it for your Monitor and computer. A ferrite-loaded interface cable is included in compliance with FCC regulations. The viewing angle can be connected to an off your Computer 1. Figure 1-2 ATTENTION This device must be adjusted as stated above. ENGLISH Chapter 1 Installation...
... the signal cable to -PC DVI-D Cable * 1.8M Power Cord * User's Manual * 1.5M Stereo Jack Audio Cable If you find that the LCD Monitor has enough space around it for your Monitor and computer. A ferrite-loaded interface cable is included in compliance with FCC regulations. The viewing angle can be connected to an off your Computer 1. Figure 1-2 ATTENTION This device must be adjusted as stated above. ENGLISH Chapter 1 Installation...
User Manual
Page 15
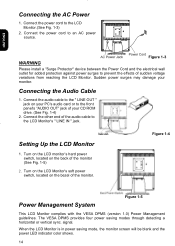
... VESA DPMS provides four power saving modes through detecting a horizontal or vertical sync. signal. Connect the power cord to prevent the effects of sudden voltage variations from reaching the LCD Monitor. Sudden power surges may damage your CD ROM drive. (See Fig. 1-4) 2. When the LCD Monitor is in power saving mode, the monitor screen will be blank and the power LED indicator color shows. 14 Connect the audio cable to the " LINE OUT " jack on your PC's audio card...
... VESA DPMS provides four power saving modes through detecting a horizontal or vertical sync. signal. Connect the power cord to prevent the effects of sudden voltage variations from reaching the LCD Monitor. Sudden power surges may damage your CD ROM drive. (See Fig. 1-4) 2. When the LCD Monitor is in power saving mode, the monitor screen will be blank and the power LED indicator color shows. 14 Connect the audio cable to the " LINE OUT " jack on your PC's audio card...

User Manual
Page 16
... functions shown on the screen as shown below: Continue pressing the Function Selection Control buttons to scroll through all menu items. ATTENTION Firmware revisions may have been updated to increase the value of the chosen OSD setting. The monitor speakers will be active. LED displays Dark color --- Turn knob counter clockwise Press the soft power switch to create an easy user-viewing environment. Turn knob clockwise. Power is OFF. Increase Volume - LED displays Green color ---
... functions shown on the screen as shown below: Continue pressing the Function Selection Control buttons to scroll through all menu items. ATTENTION Firmware revisions may have been updated to increase the value of the chosen OSD setting. The monitor speakers will be active. LED displays Dark color --- Turn knob counter clockwise Press the soft power switch to create an easy user-viewing environment. Turn knob clockwise. Power is OFF. Increase Volume - LED displays Green color ---

User Manual
Page 17
... (text mode). Position This function moves the OSD menu window horizontally. OSD V. Exit Saves the values of this function let's you adjust the display size, clock and phase to select other language. Press the left or right adjustment control button to obtain the best viewing settings. The Auto Adjustment function let you manually select either Analog or Digital Input video when VGA input or/and DVI Input is adjustable from 0 to +50) are available on the mode that offers users better stability...
... (text mode). Position This function moves the OSD menu window horizontally. OSD V. Exit Saves the values of this function let's you adjust the display size, clock and phase to select other language. Press the left or right adjustment control button to obtain the best viewing settings. The Auto Adjustment function let you manually select either Analog or Digital Input video when VGA input or/and DVI Input is adjustable from 0 to +50) are available on the mode that offers users better stability...
User Manual
Page 18
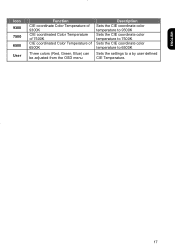
ENGLISH Icon 9300 7500 6500 User Function CIE coordinate Color Temperature of 9300K CIE coordinated Color Temperature of 7500K CIE coordinated Color Temperature of 6500K Three colors (Red, Green, Blue) can be adjusted from the OSD menu Description Sets the CIE coordinate color temperature to 9300K Sets the CIE coordinate color temperature to 7500K Sets the CIE coordinate color temperature to 6500K Sets the settings to a by user defined CIE Temperature. 17
ENGLISH Icon 9300 7500 6500 User Function CIE coordinate Color Temperature of 9300K CIE coordinated Color Temperature of 7500K CIE coordinated Color Temperature of 6500K Three colors (Red, Green, Blue) can be adjusted from the OSD menu Description Sets the CIE coordinate color temperature to 9300K Sets the CIE coordinate color temperature to 7500K Sets the CIE coordinate color temperature to 6500K Sets the settings to a by user defined CIE Temperature. 17

User Manual
Page 19
... Digital Digital Digital Uses EEPROM to save settings in memory 20 characters x 9 rows 18 ENGLISH Chapter 3 Technical Information Specifications LCD Panel Size Display Type Resolution Display Dot Display Area (mm) Display Color Brightness Contrast Ratio Response Time Lamp Voltage Lamp Current Viewing Angle (CR ≥ 5) ISO 13406-2 Video Input Signal Input Impedance Polarity Amplitude Multi-mode Supported Control Power switch (hard and soft types) OSD Brightness Contrast Horizontal Position Vertical Position Phase Clock Display Mode Setup OSD Format 17" (43 cm) Active matrix color TFT LCD...
... Digital Digital Digital Uses EEPROM to save settings in memory 20 characters x 9 rows 18 ENGLISH Chapter 3 Technical Information Specifications LCD Panel Size Display Type Resolution Display Dot Display Area (mm) Display Color Brightness Contrast Ratio Response Time Lamp Voltage Lamp Current Viewing Angle (CR ≥ 5) ISO 13406-2 Video Input Signal Input Impedance Polarity Amplitude Multi-mode Supported Control Power switch (hard and soft types) OSD Brightness Contrast Horizontal Position Vertical Position Phase Clock Display Mode Setup OSD Format 17" (43 cm) Active matrix color TFT LCD...

User Manual
Page 20
Sync Input Signal Analog Separate TTL compatible horizontal and vertical synchronization Digital TMDS Polarity Positive and negative Plug & Play Supports VESA DDC1 and DDC2B functions External Connection Power Input Video Cable Audio Cable Environment Operating AC socket 1.8M with 15-pin D-sub connector 1.8M with 24-pin DVI-D connector 1.5M with Stereo Jack Temperature Relative Humidity 5°C to 40°C/41°F to 104°F 20 to 80%(non-condensing) Storage or...
Sync Input Signal Analog Separate TTL compatible horizontal and vertical synchronization Digital TMDS Polarity Positive and negative Plug & Play Supports VESA DDC1 and DDC2B functions External Connection Power Input Video Cable Audio Cable Environment Operating AC socket 1.8M with 15-pin D-sub connector 1.8M with 24-pin DVI-D connector 1.5M with Stereo Jack Temperature Relative Humidity 5°C to 40°C/41°F to 104°F 20 to 80%(non-condensing) Storage or...
User Manual
Page 21
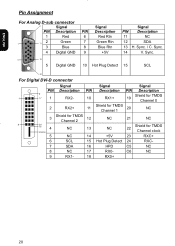
... NC 21 NC 22 +5V 23 Hot Plug Detect 24 HPD C5 RX0- Sync. 9 +5V 14 V. ENGLISH Pin Assignment For Analog D-sub connector 6 Signal PIN Description 1 Red 1 11 2 Green 3 Blue 4 Digital GND 5 15 5 Digital GND Signal Signal PIN Description PIN Description 6 Red Rtn 11 NC 7 Green Rtn 12 SDA 8 Blue Rtn 13 H. Sync. 10 Hot Plug Detect 15 SCL 10 For Digital DVI-D connector Signal PIN Description PIN 1 RX2- 10 2 RX2+ 11...
... NC 21 NC 22 +5V 23 Hot Plug Detect 24 HPD C5 RX0- Sync. 9 +5V 14 V. ENGLISH Pin Assignment For Analog D-sub connector 6 Signal PIN Description 1 Red 1 11 2 Green 3 Blue 4 Digital GND 5 15 5 Digital GND Signal Signal PIN Description PIN Description 6 Red Rtn 11 NC 7 Green Rtn 12 SDA 8 Blue Rtn 13 H. Sync. 10 Hot Plug Detect 15 SCL 10 For Digital DVI-D connector Signal PIN Description PIN 1 RX2- 10 2 RX2+ 11...

User Manual
Page 22
...640x400 56Hz and 1024x768 66Hz modes cannot be supported when Digital (TMDS) input. 21 Standard Timing Table If the selected timing is smoothly expanded to 1280 x 1024 dots with the GM5120 scaling engine. ENGLISH Resolution H - V. Mode VGA-350 640 x 400 24.83 56.42 21.05 -/- VESA-600-70 Hz 1024 x ... VESA-768-75 Hz 1024 x 768 60.04 75.02 80.00 -/- APPLE MAC-768 1280 x 1024 64.0 60 108 +/+ SXGA 1280 x 1024 80.0 75 135 +/+ SXGA NOTE: 1. When the input display mode is not 1280 x 1024, the image is NOT included in table below, this LCD monitor will use ...
...640x400 56Hz and 1024x768 66Hz modes cannot be supported when Digital (TMDS) input. 21 Standard Timing Table If the selected timing is smoothly expanded to 1280 x 1024 dots with the GM5120 scaling engine. ENGLISH Resolution H - V. Mode VGA-350 640 x 400 24.83 56.42 21.05 -/- VESA-600-70 Hz 1024 x ... VESA-768-75 Hz 1024 x 768 60.04 75.02 80.00 -/- APPLE MAC-768 1280 x 1024 64.0 60 108 +/+ SXGA 1280 x 1024 80.0 75 135 +/+ SXGA NOTE: 1. When the input display mode is not 1280 x 1024, the image is NOT included in table below, this LCD monitor will use ...

User Manual
Page 23
... new colorized The picture is supported by this LCD Monitor. If step 2 doesn't work, connect your PC system Functions properly with a CRT Monitor but it back on "Shut Down Windows" and return to the output timing differences among various VGA cards in OSD menu again and adjust the monitor screen to see if any black vertical stripes appear. If there is selected. ATTENTION This LCD Monitor Supports Multiple VGA Modes. Troubleshooting ENGLISH This LCD Monitor has pre-adjusted using factory to...
... new colorized The picture is supported by this LCD Monitor. If step 2 doesn't work, connect your PC system Functions properly with a CRT Monitor but it back on "Shut Down Windows" and return to the output timing differences among various VGA cards in OSD menu again and adjust the monitor screen to see if any black vertical stripes appear. If there is selected. ATTENTION This LCD Monitor Supports Multiple VGA Modes. Troubleshooting ENGLISH This LCD Monitor has pre-adjusted using factory to...


