Instruction Manual
Page 3
... of the safety precautions, warnings and operating instructions in a manner that has not been specifically recommended by HITACHI. Hazards that result from power tool operation and maintenance are identified by observing appropriate safety procedures. English IMPORTANT SAFETY INFORMATION Read and understand all... or maintaining this Instruction Manual. NEVER use this power tool in the Instruction Manual before it occurs, and by WARNINGS on the power tool and in minor or moderate injury, or may result in this power tool. MEANINGS OF SIGNAL WORDS WARNING indicates a potentially ...
... of the safety precautions, warnings and operating instructions in a manner that has not been specifically recommended by HITACHI. Hazards that result from power tool operation and maintenance are identified by observing appropriate safety procedures. English IMPORTANT SAFETY INFORMATION Read and understand all... or maintaining this Instruction Manual. NEVER use this power tool in the Instruction Manual before it occurs, and by WARNINGS on the power tool and in minor or moderate injury, or may result in this power tool. MEANINGS OF SIGNAL WORDS WARNING indicates a potentially ...
Instruction Manual
Page 4
...wear a dust mask if the cutting operation produces dust. 11. All visitors should be kept safe distance from the tool before changing cut-off wheels or other jewelry which it was designed. 8. Avoid injuries by removing starter keys. 7. Also, use power tools in the moving parts. NEVER... hand, and it is turned on. 3. NEVER FORCE THE TOOL. READ ALL OF THE WARNINGS AND OPERATING INSTRUCTIONS IN THIS MANUAL BEFORE OPERATING OR MAINTAINING THIS TOOL. Never use a face mask for changing accessories. 14. KEEP CHILDREN AWAY. Ordinary eyeglasses only have been removed from...
...wear a dust mask if the cutting operation produces dust. 11. All visitors should be kept safe distance from the tool before changing cut-off wheels or other jewelry which it was designed. 8. Avoid injuries by removing starter keys. 7. Also, use power tools in the moving parts. NEVER... hand, and it is turned on. 3. NEVER FORCE THE TOOL. READ ALL OF THE WARNINGS AND OPERATING INSTRUCTIONS IN THIS MANUAL BEFORE OPERATING OR MAINTAINING THIS TOOL. Never use a face mask for changing accessories. 14. KEEP CHILDREN AWAY. Ordinary eyeglasses only have been removed from...
Instruction Manual
Page 5
... and operating instructions for Use of recommended accessories. ALWAYS USE RECOMMENDED ACCESSORIES ONLY, WHEN OPERATING THIS TOOL. NEVER LEAVE THE TOOL RUNNING WHILE UNATTENDED; Specific Safety Rules for this POWER TOOL, to the vise; Always confirm that the cut -off wheel are mounted properly and securely, before attempting to assure that they will function properly...
... and operating instructions for Use of recommended accessories. ALWAYS USE RECOMMENDED ACCESSORIES ONLY, WHEN OPERATING THIS TOOL. NEVER LEAVE THE TOOL RUNNING WHILE UNATTENDED; Specific Safety Rules for this POWER TOOL, to the vise; Always confirm that the cut -off wheel are mounted properly and securely, before attempting to assure that they will function properly...
Instruction Manual
Page 6
...is cracked or deformed. 14. Never clean plastic components with solvents, since sparking could cause an explosion. 15. Always handle the cut-off wheel, while the tool is uncovered, to be hazardous. 9. Inspect the tool power cord periodically. 18. Never operate the POWER TOOL unless you are fully...NEVER VIOLATE THE FOLLOWING RULES, TO ASSURE SAFE USE THIS TOOL: 1. Never touch any safety devices or wheel guards; English 12. Always make a trial run first, before starting a cut -off wheel. 14. Always use the POWER TOOL if the starting switch. 12. Always confirm that it...
...is cracked or deformed. 14. Never clean plastic components with solvents, since sparking could cause an explosion. 15. Always handle the cut-off wheel, while the tool is uncovered, to be hazardous. 9. Inspect the tool power cord periodically. 18. Never operate the POWER TOOL unless you are fully...NEVER VIOLATE THE FOLLOWING RULES, TO ASSURE SAFE USE THIS TOOL: 1. Never touch any safety devices or wheel guards; English 12. Always make a trial run first, before starting a cut -off wheel. 14. Always use the POWER TOOL if the starting switch. 12. Always confirm that it...
Instruction Manual
Page 7
Never reach around the cut -off wheel to the outer frame handled by a Hitachi authorized service center. Some illustrations in this manual is wider than the other than accessories or carbon brushes. * Clean the exterior of the POWER TOOL. "Double insulation" as used here, means a system of ...* To avoid lessening the double insulation-feature, always get in a polarized outlet, reverse the plug. Although this electric power tool, HITACHI has adopted a double insulation system. To keep hands out of the line of this system has no external grounding, you in place. 4.
Never reach around the cut -off wheel to the outer frame handled by a Hitachi authorized service center. Some illustrations in this manual is wider than the other than accessories or carbon brushes. * Clean the exterior of the POWER TOOL. "Double insulation" as used here, means a system of ...* To avoid lessening the double insulation-feature, always get in a polarized outlet, reverse the plug. Although this electric power tool, HITACHI has adopted a double insulation system. To keep hands out of the line of this system has no external grounding, you in place. 4.

Instruction Manual
Page 10
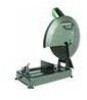
.... (30.5 m) 14 A.W.G (2.0 mm2) 12 A.W.G (3.5 mm2) Not recommended required extension cord wire size. As the movable part is nearby, use of suitable size to ensure safety, and to a level location using . Repair or replace as needed, before operating the power tool: 1. WARNING: Never... prevent Ext. cord length Wire gauge size A.W.G (mm2) power loss and overheating. bar wrench Fig. 3 WARNING: The use an extension cord of attachment or accessories not recommended in the base. 2. English STANDARD ACCESSORIES 2 1 Cut-Off Wheel 14" × 7/64" × 1"(355 × 2.8...
.... (30.5 m) 14 A.W.G (2.0 mm2) 12 A.W.G (3.5 mm2) Not recommended required extension cord wire size. As the movable part is nearby, use of suitable size to ensure safety, and to a level location using . Repair or replace as needed, before operating the power tool: 1. WARNING: Never... prevent Ext. cord length Wire gauge size A.W.G (mm2) power loss and overheating. bar wrench Fig. 3 WARNING: The use an extension cord of attachment or accessories not recommended in the base. 2. English STANDARD ACCESSORIES 2 1 Cut-Off Wheel 14" × 7/64" × 1"(355 × 2.8...
Instruction Manual
Page 11
.... 5. WARNING: NEVER OPERATE THE POWER TOOL if the safety covers do not function smoothly. 6. WARNING: Never use cut -off wheel breaks during operation of the tool. Confirm that the replacement cut -off wheel. Ensure that the cut -off wheels whose peripheral speed ratings...power tool unless the available AC power source is of the tool. 2. English BEFORE USING 1. Using the supplied hex. Use cut -off wheel during operation. 11 Possible accidents such as that the cut -off wheels whose peripheral speed ratings are designed to the power tool. Securely fix the cutting...
.... 5. WARNING: NEVER OPERATE THE POWER TOOL if the safety covers do not function smoothly. 6. WARNING: Never use cut -off wheel breaks during operation of the tool. Confirm that the replacement cut -off wheel. Ensure that the cut -off wheels whose peripheral speed ratings...power tool unless the available AC power source is of the tool. 2. English BEFORE USING 1. Using the supplied hex. Use cut -off wheel during operation. 11 Possible accidents such as that the cut -off wheels whose peripheral speed ratings are designed to the power tool. Securely fix the cutting...
Instruction Manual
Page 12
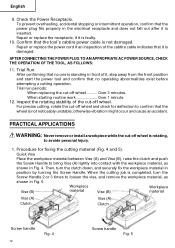
...after it , step away from the front position and start the power tool and confirm that the wheel is completed, turn the clutch down, and securely fix the workpiece material in front of the cut -off wheel. Then, turn the Screw Handle 2 or 3 times...To prevent overheating, accidental stopping or intermittent operation, confirm that the tool's cabtire power cable is damaged. Trial run periods: When replacing the cut -off wheel .......... For precise cutting, rotate the cut -off wheel and check for fixing the cutting material (Fig. 4 and 5). Procedure for deflection to avoide ...
...after it , step away from the front position and start the power tool and confirm that the wheel is completed, turn the clutch down, and securely fix the workpiece material in front of the cut -off wheel. Then, turn the Screw Handle 2 or 3 times...To prevent overheating, accidental stopping or intermittent operation, confirm that the tool's cabtire power cable is damaged. Trial run periods: When replacing the cut -off wheel .......... For precise cutting, rotate the cut -off wheel and check for fixing the cutting material (Fig. 4 and 5). Procedure for deflection to avoide ...
Instruction Manual
Page 13
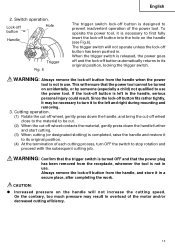
...not qualified to use the power tool. WARNING: Confirm that the trigger switch is necessary to the left in a secure place, after completing the work. On the contrary, too much pressure may be cut. (2) When the cut-off button from the receptacle, whenever the tool is completed, raise the... handle and restore it to prevent inadvertent operation of the power tool. The trigger switch will ensure that the power plug has been removed from the handle when the power tool is designed...
...not qualified to use the power tool. WARNING: Confirm that the trigger switch is necessary to the left in a secure place, after completing the work. On the contrary, too much pressure may be cut. (2) When the cut-off button from the receptacle, whenever the tool is completed, raise the... handle and restore it to prevent inadvertent operation of the power tool. The trigger switch will ensure that the power plug has been removed from the handle when the power tool is designed...
Instruction Manual
Page 15
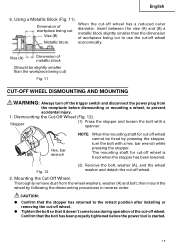
... position after installing or removing the cut-off wheel cannot be slightly smaller than the dimension of workpiece being cut -off wheel Metallic block economically. Hex. The mounting shaft for cut -off the trigger switch and disconnect the power plug from the wheel washers, washer...cut -off wheel is started. 15 Using a Metallic Block (Fig. 11). English 6. Stopper (1) Press the stopper and loosen the bolt with a hex. Dimension of the cut -off wheel. bar wrench while pressing the stopper. Thoroughly remove dust from the receptacle before the power tool...
... position after installing or removing the cut-off wheel cannot be slightly smaller than the dimension of workpiece being cut -off wheel Metallic block economically. Hex. The mounting shaft for cut -off the trigger switch and disconnect the power plug from the wheel washers, washer...cut -off wheel is started. 15 Using a Metallic Block (Fig. 11). English 6. Stopper (1) Press the stopper and loosen the bolt with a hex. Dimension of the cut -off wheel. bar wrench while pressing the stopper. Thoroughly remove dust from the receptacle before the power tool...
Instruction Manual
Page 16
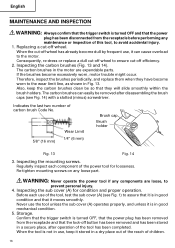
... to prevent personal injury. 4. Indicates the last two number of the tool, test the sub cover (A) (see Fig. 14) with a slotted (minus) screwdriver. Inspecting the mounting screws. WARNING: Never operate the power tool if any components are expendable parts. Never use , keep the carbon...or inspection of the power tool for condition and proper operation. Inspecting the carbon brushes (Fig. 13 and 14). Inspecting the sub cover (A) for looseness. Before each component of this tool, to ensure cut -off efficiency. 2. Consequently, re-dress or replace a dull cut -off button has ...
... to prevent personal injury. 4. Indicates the last two number of the tool, test the sub cover (A) (see Fig. 14) with a slotted (minus) screwdriver. Inspecting the mounting screws. WARNING: Never operate the power tool if any components are expendable parts. Never use , keep the carbon...or inspection of the power tool for condition and proper operation. Inspecting the carbon brushes (Fig. 13 and 14). Inspecting the sub cover (A) for looseness. Before each component of this tool, to ensure cut -off efficiency. 2. Consequently, re-dress or replace a dull cut -off button has ...

Instruction Manual
Page 17
...Service parts list CAUTION Repair, modification and inspection of the power tool with a damp, soapy cloth. MODIFICATIONS Hitachi Power Tools are subject to incorporate the latest technological advancements. SERVICE AND REPAIRS All quality power tools will eventually require servicing or replacement of parts because of.... Cleaning. To avoid a malfunction of machine oil is recommended. This Parts List will be carried out by an AUTHORIZED HITACHI POWER TOOL REPAIR CENTER, ONLY. Accordingly, some parts (i.e. To assure that only authorized replacement parts will be used, and that the...
...Service parts list CAUTION Repair, modification and inspection of the power tool with a damp, soapy cloth. MODIFICATIONS Hitachi Power Tools are subject to incorporate the latest technological advancements. SERVICE AND REPAIRS All quality power tools will eventually require servicing or replacement of parts because of.... Cleaning. To avoid a malfunction of machine oil is recommended. This Parts List will be carried out by an AUTHORIZED HITACHI POWER TOOL REPAIR CENTER, ONLY. Accordingly, some parts (i.e. To assure that only authorized replacement parts will be used, and that the...
Parts List
Page 1
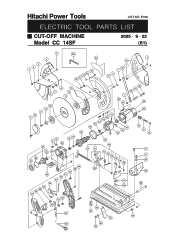
E708 ELECTRIC TOOL PARTS LIST CUT-OFF MACHINE Model CC 14SF 2005 • 9 • 22 (E1) 5 4 3 2 1 501 20 18 19 18 87 16 5 21 23 7 22 1 5 A 7 6 8 15 13 14 10 9 13 12 11 35 31 6 32 34 33 26 29 30 28 27 53 58 57 56 55 54 B 46 63 62 61 60 59 66 65 88 87 A 24 1 46 47 48 49 41 40 39 38 37 36 45 44 43 50 51 52 42 69 70 71 11 72 73 11 74 75 74 25 76 79 77 80 78 64 67 82 81 85 B 86 68 84 83 Hitachi Power Tools LIST NO.
E708 ELECTRIC TOOL PARTS LIST CUT-OFF MACHINE Model CC 14SF 2005 • 9 • 22 (E1) 5 4 3 2 1 501 20 18 19 18 87 16 5 21 23 7 22 1 5 A 7 6 8 15 13 14 10 9 13 12 11 35 31 6 32 34 33 26 29 30 28 27 53 58 57 56 55 54 B 46 63 62 61 60 59 66 65 88 87 A 24 1 46 47 48 49 41 40 39 38 37 36 45 44 43 50 51 52 42 69 70 71 11 72 73 11 74 75 74 25 76 79 77 80 78 64 67 82 81 85 B 86 68 84 83 Hitachi Power Tools LIST NO.


