Owners Guide
Page 2
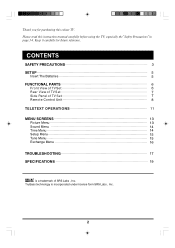
... a trademark of TV Set 7 Remote Control Unit 8 TELETEXT OPERATIONS 11 MENU SCREENS 13 Picture Menu 13 Sound Menu 14 Time Menu 14 Setup Menu 15 Tune Menu 15 Exchange Menu 16 TROUBLESHOOTING 17 SPECIFICATIONS 19 is incorporated under license form SRS Labs , Inc. 2 Thank you for future reference. Please read this colour TV. CONTENTS SAFETY PRECAUTIONS 3 SETUP 5 Insert The Batteries 5 FUNCTIONAL PARTS 6 Front View of TV Set 6 Rear View of TV Set 7 Side Panel of SRS Labs...
... a trademark of TV Set 7 Remote Control Unit 8 TELETEXT OPERATIONS 11 MENU SCREENS 13 Picture Menu 13 Sound Menu 14 Time Menu 14 Setup Menu 15 Tune Menu 15 Exchange Menu 16 TROUBLESHOOTING 17 SPECIFICATIONS 19 is incorporated under license form SRS Labs , Inc. 2 Thank you for future reference. Please read this colour TV. CONTENTS SAFETY PRECAUTIONS 3 SETUP 5 Insert The Batteries 5 FUNCTIONAL PARTS 6 Front View of TV Set 6 Rear View of TV Set 7 Side Panel of SRS Labs...
Owners Guide
Page 3
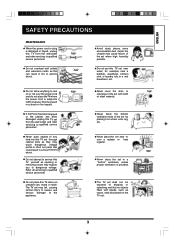
...power cord is provided. • The TV set . 3 SAFETY PRECAUTIONS MAINTENANCE • When the power cord or plug is damaged or frayed, unplug this TV from the wall outlet and refer servicing to qualified service personnel. • Never push objects of any kind into this TV set through cabinet slots as they may touch dangerous voltage points or short out parts... set when high humidity persists. • Do not use this TV set near water, for example, near a bathtub, washbowl, kitchen sink, or laundry tub, in a wet basement, etc. • Do not allow anything to rest on the TV set shall...
...power cord is provided. • The TV set . 3 SAFETY PRECAUTIONS MAINTENANCE • When the power cord or plug is damaged or frayed, unplug this TV from the wall outlet and refer servicing to qualified service personnel. • Never push objects of any kind into this TV set through cabinet slots as they may touch dangerous voltage points or short out parts... set when high humidity persists. • Do not use this TV set near water, for example, near a bathtub, washbowl, kitchen sink, or laundry tub, in a wet basement, etc. • Do not allow anything to rest on the TV set shall...
Owners Guide
Page 4
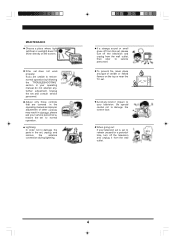
... in the operating manual as improper adjustment of other controls may result in damage, please ask your service personnel to restore the set to normal operation. • Lightning: In order not to damage the parts in the set, unplug and remove the antenna connection during lightning. • If a strange sound or smell gives off from this set, please turn off the television and unplug...
... in the operating manual as improper adjustment of other controls may result in damage, please ask your service personnel to restore the set to normal operation. • Lightning: In order not to damage the parts in the set, unplug and remove the antenna connection during lightning. • If a strange sound or smell gives off from this set, please turn off the television and unplug...
Owners Guide
Page 5
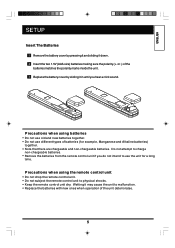
... batteries. Replace the batteries with new ones when operation of the batteries matches the polarity marks inside the unit. 3 Replace the battery cover by pressing it and sliding it down. 2 Insert the two 1.5V (AAA size) batteries making sure the polarity (+ or -) of the unit deteriorates. 5 Do not use old and new batteries together. Keep the remote control unit...
... batteries. Replace the batteries with new ones when operation of the batteries matches the polarity marks inside the unit. 3 Replace the battery cover by pressing it and sliding it down. 2 Insert the two 1.5V (AAA size) batteries making sure the polarity (+ or -) of the unit deteriorates. 5 Do not use old and new batteries together. Keep the remote control unit...
Owners Guide
Page 6
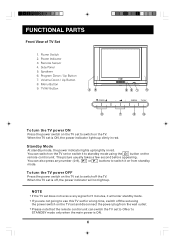
... the TV. The picture usually takes a few second before appearing. To turn the TV power ON Press the power switch on the TV set to STANDBY mode only when the main power is ON ,the power indicator lights up dimly in red. Please note that the remote control unit can also press any signal for a long time, switch off the set using the button on the remote control unit. FUNCTIONAL PARTS 45 PROG. 6 32 1 5 MENU TV...
... the TV. The picture usually takes a few second before appearing. To turn the TV power ON Press the power switch on the TV set to STANDBY mode only when the main power is ON ,the power indicator lights up dimly in red. Please note that the remote control unit can also press any signal for a long time, switch off the set using the button on the remote control unit. FUNCTIONAL PARTS 45 PROG. 6 32 1 5 MENU TV...

Owners Guide
Page 7
...) 2. AV OUT Terminals 6. S.VIDEO and AV IN 1 (VIDEO) inputs cannot be used at the same time. AV IN 2 Terminals 2. Headphone Jack AV IN 2 VIDEO LEFT 1 RIGHT 2 NOTE For Australia only - Switch off all power supplies to the equipment and TV set , please read the instruction manual of TV Set 1. Antenna Input Socket (75 Ohm) 3. Precautions when connecting to AS 1417.1 for safety purpose. S-Video In Terminals 4. Rear View of TV Set 1.
...) 2. AV OUT Terminals 6. S.VIDEO and AV IN 1 (VIDEO) inputs cannot be used at the same time. AV IN 2 Terminals 2. Headphone Jack AV IN 2 VIDEO LEFT 1 RIGHT 2 NOTE For Australia only - Switch off all power supplies to the equipment and TV set , please read the instruction manual of TV Set 1. Antenna Input Socket (75 Ohm) 3. Precautions when connecting to AS 1417.1 for safety purpose. S-Video In Terminals 4. Rear View of TV Set 1.
Owners Guide
Page 8
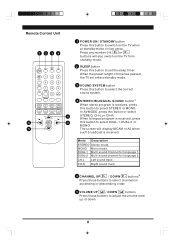
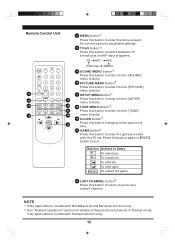
... sound track. 5 CHANNEL UP P+ / DOWN P - CH-L Left sound track. Mode Description STEREO Stereo mode. U.N.L SETUP TUNE HOLD SUBPAGE TV/TEXT MIX CLOCK GAME LST-CH TYPE SUBTITLE CANCEL P 5 6 MENU 6 INDEX 5 P CLE-9XX 1 POWER ON / STANDBY button Press this button or select STEREO, CH-L or CH-R. In AV MODE ,press this button to set enters standby mode. 3 SOUND SYSTEM button Press this button to select the correct sound system. 4 STEREO/BILINGUAL SOUND button*1 When stereo program is received, press this button to switch...
... sound track. 5 CHANNEL UP P+ / DOWN P - CH-L Left sound track. Mode Description STEREO Stereo mode. U.N.L SETUP TUNE HOLD SUBPAGE TV/TEXT MIX CLOCK GAME LST-CH TYPE SUBTITLE CANCEL P 5 6 MENU 6 INDEX 5 P CLE-9XX 1 POWER ON / STANDBY button Press this button or select STEREO, CH-L or CH-R. In AV MODE ,press this button to set enters standby mode. 3 SOUND SYSTEM button Press this button to select the correct sound system. 4 STEREO/BILINGUAL SOUND button*1 When stereo program is received, press this button to switch...
Owners Guide
Page 9
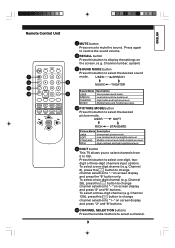
...Remote Control Unit 7 MUTE button Press once to select a channel. .. 9 Channel number, system) SOUND SLEEP SYS. USER SOFT MENU INDEX P RICH STANDARD Picture Mode Description CLE-9XX USER SOFT STANDARD RICH User preset picture mode. To select a three-digit channel (e.g. MODE TV/AV 10 0 --/--- 11 Sound Mode Description USER User preset sound mode. SPEECH Low treble and low bass level. MUSIC Middle treble and middle bass level. button to change channel selection to "--" on screen display and press "2" and "8" buttons. 12 CHANNEL SELECTION buttons Press the number...
...Remote Control Unit 7 MUTE button Press once to select a channel. .. 9 Channel number, system) SOUND SLEEP SYS. USER SOFT MENU INDEX P RICH STANDARD Picture Mode Description CLE-9XX USER SOFT STANDARD RICH User preset picture mode. To select a three-digit channel (e.g. MODE TV/AV 10 0 --/--- 11 Sound Mode Description USER User preset sound mode. SPEECH Low treble and low bass level. MUSIC Middle treble and middle bass level. button to change channel selection to "--" on screen display and press "2" and "8" buttons. 12 CHANNEL SELECTION buttons Press the number...
Owners Guide
Page 10
... optional adjustable settings. 14 TV/AV button *2 Press this button to switch between TV broadcasts and AV input programs. TV AV1 AV2 YCbCr S-VIDEO 15 SOUND MENU button*2 Press this button to enter into the [SOUND] menu directly. 16 PICTURE MENU button*2 Press this button to enter into the [PICTURE] menu directly. 17 SETUP MENU button*2 Press this button to enter into the [SETUP] menu directly. 18 TUNE MENU button*2 Press this button to enter into the [TUNE] menu directly. 19 CLOCK button*2 Press this button to...
... optional adjustable settings. 14 TV/AV button *2 Press this button to switch between TV broadcasts and AV input programs. TV AV1 AV2 YCbCr S-VIDEO 15 SOUND MENU button*2 Press this button to enter into the [SOUND] menu directly. 16 PICTURE MENU button*2 Press this button to enter into the [PICTURE] menu directly. 17 SETUP MENU button*2 Press this button to enter into the [SETUP] menu directly. 18 TUNE MENU button*2 Press this button to enter into the [TUNE] menu directly. 19 CLOCK button*2 Press this button to...
Owners Guide
Page 11
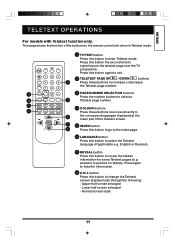
... the remote control unit when in Teletext mode. 1 TV/TEXT button SOUND SLEEP SYS. SETUP TUNE REVEAL U.N.L HOLD SUBPAGE 4 COLOUR buttons 1 TV/TEXT CLOCK GAME LST-CH MIX TYPE SUBTITLE CANCEL P 2 Press these buttons to enter Teletext mode. answers to select a 8 4 Teletext page number. 7 SOUND PIC. Press this button to increase or decrease SOUND MODE 789 the Teletext page number. MODE TV/AV 6 0 --/--- This page shows the function of the Teletext screen...
... the remote control unit when in Teletext mode. 1 TV/TEXT button SOUND SLEEP SYS. SETUP TUNE REVEAL U.N.L HOLD SUBPAGE 4 COLOUR buttons 1 TV/TEXT CLOCK GAME LST-CH MIX TYPE SUBTITLE CANCEL P 2 Press these buttons to enter Teletext mode. answers to select a 8 4 Teletext page number. 7 SOUND PIC. Press this button to increase or decrease SOUND MODE 789 the Teletext page number. MODE TV/AV 6 0 --/--- This page shows the function of the Teletext screen...
Owners Guide
Page 12
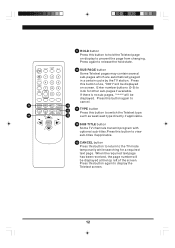
... screen. 9 HOLD button Press this button to hold state. MENU INDEX P 12 SUB TITLE button Some TV channels transmit program with optional sub-titles.Press this button again to switch the Teletext type 11 P 12 such as west/east type directly if applicable. Press this button to cancel. 9 SOUND PIC. SOUND SLEEP SYS. When the required text page has been received, the page number...
... screen. 9 HOLD button Press this button to hold state. MENU INDEX P 12 SUB TITLE button Some TV channels transmit program with optional sub-titles.Press this button again to switch the Teletext type 11 P 12 such as west/east type directly if applicable. Press this button to cancel. 9 SOUND PIC. SOUND SLEEP SYS. When the required text page has been received, the page number...
Owners Guide
Page 13
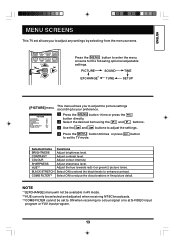
... TV set to ON when receiving no colour signal or is at S-VIDEO input program or YUV input program. 13 button directly. 2 Select the desired item using the P+ and P - BLACK STRETCH Select ON to extend the black levels to your preference. PICTURE SOUND TIME *1 EXCHANGE TUNE SETUP CLE-9XX This menu allows you to adjust the picture settings [PICTURE]menu according to enhance contrast. Selected Items Functions BRIGHTNESS Adjust brightness level. Adjust the hue towards red(+)or green(-) picture tones. U.N.L SETUP TUNE...
... TV set to ON when receiving no colour signal or is at S-VIDEO input program or YUV input program. 13 button directly. 2 Select the desired item using the P+ and P - BLACK STRETCH Select ON to extend the black levels to your preference. PICTURE SOUND TIME *1 EXCHANGE TUNE SETUP CLE-9XX This menu allows you to adjust the picture settings [PICTURE]menu according to enhance contrast. Selected Items Functions BRIGHTNESS Adjust brightness level. Adjust the hue towards red(+)or green(-) picture tones. U.N.L SETUP TUNE...
Owners Guide
Page 14
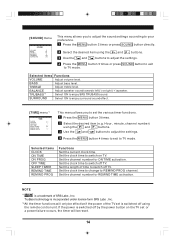
... the power of SRS Labs , Inc. buttons. 3 Use the + and buttons to adjust the settings. 4 Press the MENU button 5 times or press SOUND button to exit to switch off TV. REMIND PROG 1 This menu allows you to adjust the sound settings according to REMIND PROG channel. Set the clock time to set is a trademark of the TV set the various timer functions. 1 Press the MENU button 3 times. 2 Select the desired item (e.g. Hour , minute ,channel number) using the remote control unit...
... the power of SRS Labs , Inc. buttons. 3 Use the + and buttons to adjust the settings. 4 Press the MENU button 5 times or press SOUND button to exit to switch off TV. REMIND PROG 1 This menu allows you to adjust the sound settings according to REMIND PROG channel. Set the clock time to set is a trademark of the TV set the various timer functions. 1 Press the MENU button 3 times. 2 Select the desired item (e.g. Hour , minute ,channel number) using the remote control unit...
Owners Guide
Page 15
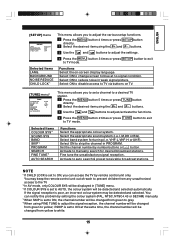
... is set a channel to yellow; BACKGROUND NOISE REDUCE CHILD LOCK*1 Functions Select the on TV. [TUNE] menu*2 TUNE COLOUR SYS SOUND SYS BAND SKIP PROGRAM SEARCH FINE TUNE AUTO SEARCH AUTO M VHF-L OFF 2 This menu allows you to set to reduce noise in PROGRAM. Select ON to ON at no signal condition. Select band system for desired broadcast stations. button. Select ON to change screen to blue at the same time, the channel number...
... is set a channel to yellow; BACKGROUND NOISE REDUCE CHILD LOCK*1 Functions Select the on TV. [TUNE] menu*2 TUNE COLOUR SYS SOUND SYS BAND SKIP PROGRAM SEARCH FINE TUNE AUTO SEARCH AUTO M VHF-L OFF 2 This menu allows you to set to reduce noise in PROGRAM. Select ON to ON at no signal condition. Select band system for desired broadcast stations. button. Select ON to change screen to blue at the same time, the channel number...
Owners Guide
Page 16
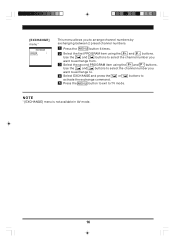
... PROGRAM item using the P+ and P - buttons. NOTE *1 [EXCHANGE] menu is not available in AV mode. 16 [EXCHANGE] menu *1 EXCHANGE PROGRAM 1 PROGRAM 1 EXCHANGE This menu allows you to TV mode. buttons. Use the + and buttons to select the channel number you want to exchange to. 4 Select EXCHANGE and press the + or buttons to activate the exchange command. 5 Press the MENU button to exit to arrange channel numbers by exchanging between 2 preset channel numbers. 1 Press the MENU button 6 times. 2 Select...
... PROGRAM item using the P+ and P - buttons. NOTE *1 [EXCHANGE] menu is not available in AV mode. 16 [EXCHANGE] menu *1 EXCHANGE PROGRAM 1 PROGRAM 1 EXCHANGE This menu allows you to TV mode. buttons. Use the + and buttons to select the channel number you want to exchange to. 4 Select EXCHANGE and press the + or buttons to activate the exchange command. 5 Press the MENU button to exit to arrange channel numbers by exchanging between 2 preset channel numbers. 1 Press the MENU button 6 times. 2 Select...
Owners Guide
Page 17
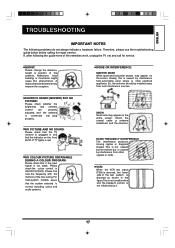
... of the remedies work, unplug the TV set and call for repair service. Therefore, please use the troubleshooting guide below before calling for service. •GHOST: Please change the direction, height or position of the test pattern is distorted as shown in and that the system selected is received, the lower side of the antenna. If, after following problems do not always indicate...
... of the remedies work, unplug the TV set and call for repair service. Therefore, please use the troubleshooting guide below before calling for service. •GHOST: Please change the direction, height or position of the test pattern is distorted as shown in and that the system selected is received, the lower side of the antenna. If, after following problems do not always indicate...
Owners Guide
Page 18
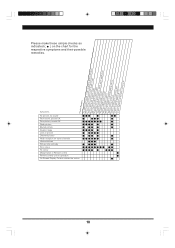
Symptoms No picture, no sound Poor sound, picture OK Poor picture, sound OK Weak picture Blurred picture Double image Lines in picture Distorted picture Weak reception on the chart for the respective symptoms and their possible remedies. Possible Remedies TPAAAARCCCCCCrreddddyhhhhhhjjjjo-...)uebtotrcgabohclcakaobullsonyofitaussrtneattaipopnlitarnocueble Please make these simple checks as indicated ( ) on some channels Horizontal bars Picture rolls vertically Poor colour No colour Misoperation of Remote control Remote control unit no operation On Screen Display Control outside the screen 18
Symptoms No picture, no sound Poor sound, picture OK Poor picture, sound OK Weak picture Blurred picture Double image Lines in picture Distorted picture Weak reception on the chart for the respective symptoms and their possible remedies. Possible Remedies TPAAAARCCCCCCrreddddyhhhhhhjjjjo-...)uebtotrcgabohclcakaobullsonyofitaussrtneattaipopnlitarnocueble Please make these simple checks as indicated ( ) on some channels Horizontal bars Picture rolls vertically Poor colour No colour Misoperation of Remote control Remote control unit no operation On Screen Display Control outside the screen 18
Owners Guide
Page 19
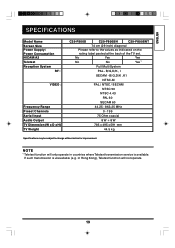
... in countries where Teletext transmission service is unavailable (e.g. SPECIFICATIONS Model Name Screen Size Power Supply / Power Consumption NICAM/A2 Teletext Reception System RF : VIDEO : Frequency Range Preset Channels Aerial Input Audio Output TV Dimension (W x D x H) TV Weight C29-F800S C29-F800SN C29-F800SNT 74 cm (29 inch) diagonal Please refer to change without notice for improvement. B/G,D/K... - 19 9 75 Ohm coaxial 8 W + 8 W 785 x 495 x 591 mm 44.5 kg Specifications may be subject to the values as indicated on the rating label pasted at the back of the TV set.
... in countries where Teletext transmission service is unavailable (e.g. SPECIFICATIONS Model Name Screen Size Power Supply / Power Consumption NICAM/A2 Teletext Reception System RF : VIDEO : Frequency Range Preset Channels Aerial Input Audio Output TV Dimension (W x D x H) TV Weight C29-F800S C29-F800SN C29-F800SNT 74 cm (29 inch) diagonal Please refer to change without notice for improvement. B/G,D/K... - 19 9 75 Ohm coaxial 8 W + 8 W 785 x 495 x 591 mm 44.5 kg Specifications may be subject to the values as indicated on the rating label pasted at the back of the TV set.


