Owners Guide
Page 1
LCD REAR PROJECTION TELEVISION Operating Guide for energy efficiency. has determined that this product meets the ENERGY STAR® guidelines for 50VX915, 60VX915, 70VX915 IMPORTANT SAFETY INSTRUCTIONS 2-3 FIRST TIME USE ...4-26 THE REMOTE CONTROL 27-50 ON-SCREEN DISPLAY...51-79 LAMP REPLACEMENT ...80-83 CARE OF YOUR HITACHI TV & REMOTE CONTROL 84 RECEPTION PROBLEMS ...85 USEFUL INFORMATION / INDEX 86-92 As an ENERGY STAR® Partner, Hitachi, Ltd.
LCD REAR PROJECTION TELEVISION Operating Guide for energy efficiency. has determined that this product meets the ENERGY STAR® guidelines for 50VX915, 60VX915, 70VX915 IMPORTANT SAFETY INSTRUCTIONS 2-3 FIRST TIME USE ...4-26 THE REMOTE CONTROL 27-50 ON-SCREEN DISPLAY...51-79 LAMP REPLACEMENT ...80-83 CARE OF YOUR HITACHI TV & REMOTE CONTROL 84 RECEPTION PROBLEMS ...85 USEFUL INFORMATION / INDEX 86-92 As an ENERGY STAR® Partner, Hitachi, Ltd.
Owners Guide
Page 4
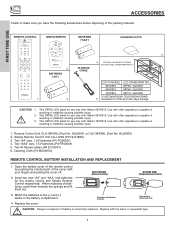
... instability causing possible injury. 1. FIRST TIME USE REMOTE CONTROL SIMPLE REMOTE CH + A/V NET BATTERIES ("AAA") CLEANING CLOTH VOL - MENU EXIT FAV CH INPUTS 6. OPTIONAL LCD REAR PTV STAND (NOT INCLUDED, ORDER SEPARATELY) LCD TV MODEL LCD STAND/PART NO. 50VX915 SPF50 / QJ01521 60VX915 SPF60 / QJ01581 70VX915 SPF70 / QJ01591 CUSTOM HITACHI TELEVISION STAND 1. 3. 5. Use with your fingers...
... instability causing possible injury. 1. FIRST TIME USE REMOTE CONTROL SIMPLE REMOTE CH + A/V NET BATTERIES ("AAA") CLEANING CLOTH VOL - MENU EXIT FAV CH INPUTS 6. OPTIONAL LCD REAR PTV STAND (NOT INCLUDED, ORDER SEPARATELY) LCD TV MODEL LCD STAND/PART NO. 50VX915 SPF50 / QJ01521 60VX915 SPF60 / QJ01581 70VX915 SPF70 / QJ01591 CUSTOM HITACHI TELEVISION STAND 1. 3. 5. Use with your fingers...

Owners Guide
Page 6
...In jack. Phono Connector Used on all standard video and audio cables which connect to the antenna jack on the rear panel so you can control some of your TV when using your digital television to an audio amplifier with shielded video and audio cables that sell audio/video products... "F" Type 75-Ohm Coaxial Antenna Connector For connecting RF signals (antenna or cable TV) to inputs and outputs located on camcorders, VCRs and laser- IEEE1394 Cable This cable is used to connect your external component's remote control. 6 IR Mouse Cable (Provided) Connect the IR Mouse Cable to 75-...
...In jack. Phono Connector Used on all standard video and audio cables which connect to the antenna jack on the rear panel so you can control some of your TV when using your digital television to an audio amplifier with shielded video and audio cables that sell audio/video products... "F" Type 75-Ohm Coaxial Antenna Connector For connecting RF signals (antenna or cable TV) to inputs and outputs located on camcorders, VCRs and laser- IEEE1394 Cable This cable is used to connect your external component's remote control. 6 IR Mouse Cable (Provided) Connect the IR Mouse Cable to 75-...

Owners Guide
Page 8
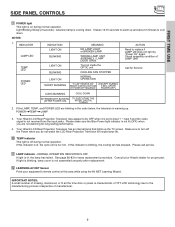
...at a volume level 31 or greater, the volume level will be displayed on the TV screen. When using the remote. These buttons also serve as the SELECT button when in the top right corner of the TV screen. When the TV power is turned ON. Press the INPUT/EXIT button on or off. 8 These... buttons also serve as the IR receiver (remote sensor). This button also serves as the cursor down (̄) and up from your Digital Camera to turn the TV on the front control panel until the desired channel appears in MENU mode. ብ VOLUME ...
...at a volume level 31 or greater, the volume level will be displayed on the TV screen. When using the remote. These buttons also serve as the SELECT button when in the top right corner of the TV screen. When the TV power is turned ON. Press the INPUT/EXIT button on or off. 8 These... buttons also serve as the IR receiver (remote sensor). This button also serves as the cursor down (̄) and up from your Digital Camera to turn the TV on the front control panel until the desired channel appears in MENU mode. ብ VOLUME ...
Owners Guide
Page 9
...long lasting performance. 4. POWER TEMP LAMP 3. Make sure to cool down . Please call service. ቭ LAMP indicator - Consult your equipment's remote control at this indicator is lit, the optic unit is warming up and about 2 minutes to turn off during normal operation. Light Blinking Slowly (2... or pixels is lit, the lamp has failed. Your Hitachi LCD Rear Projection Television may appear to be OFF when it is set to warm up . Your Hitachi LCD Rear Projection Television has an internal lamp that lights up the TV screen. NORMAL OPERATION INDICATOR IS OFF If light is characteristic...
...long lasting performance. 4. POWER TEMP LAMP 3. Make sure to cool down . Please call service. ቭ LAMP indicator - Consult your equipment's remote control at this indicator is lit, the optic unit is warming up and about 2 minutes to turn off during normal operation. Light Blinking Slowly (2... or pixels is lit, the lamp has failed. Your Hitachi LCD Rear Projection Television may appear to be OFF when it is set to warm up . Your Hitachi LCD Rear Projection Television has an internal lamp that lights up the TV screen. NORMAL OPERATION INDICATOR IS OFF If light is characteristic...

Owners Guide
Page 11
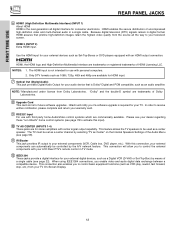
... output capability. ቦ Component: Y-PBPR Inputs Inputs 1 and 2 provide Y-PBPR jacks for recording. Input 1 and Input 2 (Y/VIDEO) can select each video source. REAR PANEL JACKS FIRST TIME USE ቢ ቦ ANT A CableCARD (Top of card faces right) ቯ ቤ ብ ANT B MONITOR OUT S-VIDEO INPUT 4...TV's PB input and the component CR output to Input 3, 4 or 5 at a time. ቤ MONITOR OUT These jacks provide fixed or variable audio and video signals which are available. ባ Audio/Video Inputs 1, 2, 3 and 4 By using the INPUTS button and CURSOR PAD of the remote...
... output capability. ቦ Component: Y-PBPR Inputs Inputs 1 and 2 provide Y-PBPR jacks for recording. Input 1 and Input 2 (Y/VIDEO) can select each video source. REAR PANEL JACKS FIRST TIME USE ቢ ቦ ANT A CableCARD (Top of card faces right) ቯ ቤ ብ ANT B MONITOR OUT S-VIDEO INPUT 4...TV's PB input and the component CR output to Input 3, 4 or 5 at a time. ቤ MONITOR OUT These jacks provide fixed or variable audio and video signals which are available. ባ Audio/Video Inputs 1, 2, 3 and 4 By using the INPUTS button and CURSOR PAD of the remote...
Owners Guide
Page 12
... The HDMI input is not intended for consumer electronics. In order to control the external components with your LCD Rear PTV's remote control in TV mode. ቮ IEEE1394 These jacks provide a digital interface for your audio device that pristine high-definition images ... connections, you to receive written notification, please complete and return your TV. Because digital television (DTV) signals remain in a single cable. This feature allows the TV speakers to your dealer regarding these "non Hitachi" home control systems (see your external components (VCR, Cable box...
... The HDMI input is not intended for consumer electronics. In order to control the external components with your LCD Rear PTV's remote control in TV mode. ቮ IEEE1394 These jacks provide a digital interface for your audio device that pristine high-definition images ... connections, you to receive written notification, please complete and return your TV. Because digital television (DTV) signals remain in a single cable. This feature allows the TV speakers to your dealer regarding these "non Hitachi" home control systems (see your external components (VCR, Cable box...
Owners Guide
Page 22
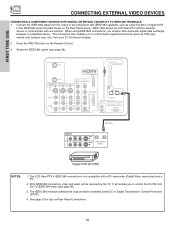
...enable video and audio digital data exchange between a compatible device. Press the INPUTS button on the Rear Panel below. and 6,381,747 licensed for tips on Rear Panel Connections. 22 FIRST TIME USE CONNECTING EXTERNAL VIDEO DEVICES CONNECTING A COMPONENT SOURCE WITH DIGITAL ...connections, you to the IEEE1394 input terminals shown on the Remote Control. 3. The IEEE1394 interface contains the copy protection standard called 5C or Digital Transmission Content Protection (DTCP). 4. Connect the IEEE1394 cable from your TV On-Screen Display. 2. See page 15 for limited viewing ...
...enable video and audio digital data exchange between a compatible device. Press the INPUTS button on the Rear Panel below. and 6,381,747 licensed for tips on Rear Panel Connections. 22 FIRST TIME USE CONNECTING EXTERNAL VIDEO DEVICES CONNECTING A COMPONENT SOURCE WITH DIGITAL ...connections, you to the IEEE1394 input terminals shown on the Remote Control. 3. The IEEE1394 interface contains the copy protection standard called 5C or Digital Transmission Content Protection (DTCP). 4. Connect the IEEE1394 cable from your TV On-Screen Display. 2. See page 15 for limited viewing ...

Owners Guide
Page 23
...Set Top Box, DVD, etc.). Patent Nos. 4,631,603; 4,577,216; 4,819,098; 4,907,093; The Rear Panel has two IR BLASTER outputs which can use your Hitachi LCD PTV Remote Control. This feature helps to a total of an AV Network setup between your IR Mouse connector to four components...1 VIDEO L AUDIO R AUDIO TO HI-FI PR PR (MONO) (MONO) (MONO) (MONO) TV AS CENTER HDMI 2 IEEE1394 IR BLASTER OPTICAL OUT Digital Audio Upgrade Card Apparatus Claims of the Rear Panel. 3. and 6,381,747 licensed for AV network are on the remote control. RS232C 1 2 345 6 789 OUTPUT Y PB/CB PR/CR R L V L R ...
...Set Top Box, DVD, etc.). Patent Nos. 4,631,603; 4,577,216; 4,819,098; 4,907,093; The Rear Panel has two IR BLASTER outputs which can use your Hitachi LCD PTV Remote Control. This feature helps to a total of an AV Network setup between your IR Mouse connector to four components...1 VIDEO L AUDIO R AUDIO TO HI-FI PR PR (MONO) (MONO) (MONO) (MONO) TV AS CENTER HDMI 2 IEEE1394 IR BLASTER OPTICAL OUT Digital Audio Upgrade Card Apparatus Claims of the Rear Panel. 3. and 6,381,747 licensed for AV network are on the remote control. RS232C 1 2 345 6 789 OUTPUT Y PB/CB PR/CR R L V L R ...

Owners Guide
Page 24
...CBL STB Custom Code 0490 Video INPUT 2 Not Setup Not Setup Not Setup Not Setup Not Setup Not Setup Not Setup Not Setup Audio Using TV Not Setup Not Setup Not Setup Not Setup Not Setup Not Setup Not Setup Not Setup EXIT SEL Select 1. Select DONE to quit. 6. ... example below to setup another code.) 1. Cursor down to which your equipment, found on pages 25 and 26. 2. Congratulations! Press the A/V Net button on the remote control. 1. Using the CURSOR PAD, set up. Use CURSOR PAD ̆, ̄ to view the list of devices that are setup. 1. Perform a Transmission ...
...CBL STB Custom Code 0490 Video INPUT 2 Not Setup Not Setup Not Setup Not Setup Not Setup Not Setup Not Setup Not Setup Audio Using TV Not Setup Not Setup Not Setup Not Setup Not Setup Not Setup Not Setup Not Setup EXIT SEL Select 1. Select DONE to quit. 6. ... example below to setup another code.) 1. Cursor down to which your equipment, found on pages 25 and 26. 2. Congratulations! Press the A/V Net button on the remote control. 1. Using the CURSOR PAD, set up. Use CURSOR PAD ̆, ̄ to view the list of devices that are setup. 1. Perform a Transmission ...
Owners Guide
Page 25
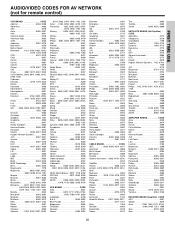
AUDIO/VIDEO CODES FOR AV NETWORK (not for remote control) FIRST TIME USE VCR BRAND CODE Admiral 0048...0432 GoldStar 0037, 0038, 1237 Gradiente 0000 HI-Q 0047 Harley Davidson 0000 Harman/Kardon 0038, 0081 Harwood 0072 Hitachi 0000, 0041, 0042 Hughes Network Systems 0042 JVC 0067, 0041 Jensen 0041 KEC 0037, 0278 KLH 0072 Kenwood...Crossdigital 1109 DishPro 1005, 0775 Echostar 1005, 0775 Expressvu 0775 GE 0566 GOI 0775 General Instrument 0869 HTS 0775 Hitachi 0819 Hughes Network Systems . 1142, 0749, 1749 JVC 0775 Magnavox 0724, 0722 Memorex 0724 Mitsubishi 0749 Motorola...
AUDIO/VIDEO CODES FOR AV NETWORK (not for remote control) FIRST TIME USE VCR BRAND CODE Admiral 0048...0432 GoldStar 0037, 0038, 1237 Gradiente 0000 HI-Q 0047 Harley Davidson 0000 Harman/Kardon 0038, 0081 Harwood 0072 Hitachi 0000, 0041, 0042 Hughes Network Systems 0042 JVC 0067, 0041 Jensen 0041 KEC 0037, 0278 KLH 0072 Kenwood...Crossdigital 1109 DishPro 1005, 0775 Echostar 1005, 0775 Expressvu 0775 GE 0566 GOI 0775 General Instrument 0869 HTS 0775 Hitachi 0819 Hughes Network Systems . 1142, 0749, 1749 JVC 0775 Magnavox 0724, 0722 Memorex 0724 Mitsubishi 0749 Motorola...

Owners Guide
Page 26
AUDIO/VIDEO CODES FOR AV NETWORK (not for remote control) FIRST TIME USE Anam 1074, 1609 Apex Digital 1257 Arcam 1120 Audiotronic 1189 Audiovox 1390 Bose 1229 Capetronic 0531 Carver. . 1089, 1189, 0008, 0042, ...
AUDIO/VIDEO CODES FOR AV NETWORK (not for remote control) FIRST TIME USE Anam 1074, 1609 Apex Digital 1257 Arcam 1120 Audiotronic 1189 Audiovox 1390 Bose 1229 Capetronic 0531 Carver. . 1089, 1189, 0008, 0042, ...
Owners Guide
Page 27
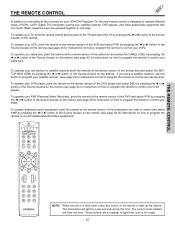
... In addition to controlling all the functions on your HITACHI Projection TV, the new remote control is too bright. 27 To operate your cable box). If you have a satellite receiver, use this time. A/V NET GUIDE NOTE: When you wish to ... the component you are grouped together in a dark room, press any button on the remote to control additional Audio/Video equipment). To operate your PVR (Personal Video Recorder), point the remote at the screen of the TV and select the TV by pressing the ̇ or ̈ button of the Source Access on how...
... In addition to controlling all the functions on your HITACHI Projection TV, the new remote control is too bright. 27 To operate your cable box). If you have a satellite receiver, use this time. A/V NET GUIDE NOTE: When you wish to ... the component you are grouped together in a dark room, press any button on the remote to control additional Audio/Video equipment). To operate your PVR (Personal Video Recorder), point the remote at the screen of the TV and select the TV by pressing the ̇ or ̈ button of the Source Access on how...

Owners Guide
Page 28
...). Press the EXIT button to return the picture to cycle through the three different freeze modes (see page 41). HOW TO USE THE REMOTE TO CONTROL YOUR LCD REAR PTV ቢ ባ ቤ ብ ቦ ቧ ቩ ቨ ቯ ቪ A/V NET ቭ ቮ...; ቫ ቱ GUIDE ተ ቲ ታ ታ ቴ ት THE REMOTE CONTROL ቢ POWER button Press this button to turn the TV set on or off when the remote is in TV...
...). Press the EXIT button to return the picture to cycle through the three different freeze modes (see page 41). HOW TO USE THE REMOTE TO CONTROL YOUR LCD REAR PTV ቢ ባ ቤ ብ ቦ ቧ ቩ ቨ ቯ ቪ A/V NET ቭ ቮ...; ቫ ቱ GUIDE ተ ቲ ታ ታ ቴ ት THE REMOTE CONTROL ቢ POWER button Press this button to turn the TV set on or off when the remote is in TV...
Owners Guide
Page 29
... 16:9 aspect ratio. 16:9 Zoom Use this aspect to quickly change the picture format ASPECT ratio. HOW TO USE THE REMOTE TO CONTROL YOUR LCD REAR PTV ቧ ASPECT button Press this button to Zoom-in once while in on the input signal format received, the picture...to fill it. 4:3 Zoom1/Zoom2 Use these aspect modes to zoom in 16:9 aspect. (1) NTSC/480i/480P Input 4:3 INPUT 4:3 STANDARD 4:3 EXPANDED 4:3 ZOOM1 THE REMOTE CONTROL 16:9 ZOOM (2) 480i/480P Input 16:9 INPUT 4:3 STANDARD 16:9 STANDARD 4:3 EXPANDED 4:3 ZOOM2 4:3 ZOOM1 16:9 ZOOM (3) HDMI/720P/1080i Input 16:9 INPUT...
... 16:9 aspect ratio. 16:9 Zoom Use this aspect to quickly change the picture format ASPECT ratio. HOW TO USE THE REMOTE TO CONTROL YOUR LCD REAR PTV ቧ ASPECT button Press this button to Zoom-in once while in on the input signal format received, the picture...to fill it. 4:3 Zoom1/Zoom2 Use these aspect modes to zoom in 16:9 aspect. (1) NTSC/480i/480P Input 4:3 INPUT 4:3 STANDARD 4:3 EXPANDED 4:3 ZOOM1 THE REMOTE CONTROL 16:9 ZOOM (2) 480i/480P Input 16:9 INPUT 4:3 STANDARD 16:9 STANDARD 4:3 EXPANDED 4:3 ZOOM2 4:3 ZOOM1 16:9 ZOOM (3) HDMI/720P/1080i Input 16:9 INPUT...
Owners Guide
Page 30
..., see Auto Channel Scan on page 62). Only scanned programs that are available at the present time will show in the Channel Guide (see page 70. ቩ PICTURE-IN-PICTURE button See separate section on the type of choice (example: KPBS-HD). Press the SELECT button to tune the subchannel ...of choice (example: 15-1). HOW TO USE THE REMOTE TO CONTROL YOUR LCD REAR PTV ቨ DAY/NIGHT button Press this button to access the Channel Guide. The CURSOR PAD will start the On-Screen Display. ቫ...
..., see Auto Channel Scan on page 62). Only scanned programs that are available at the present time will show in the Channel Guide (see page 70. ቩ PICTURE-IN-PICTURE button See separate section on the type of choice (example: KPBS-HD). Press the SELECT button to tune the subchannel ...of choice (example: 15-1). HOW TO USE THE REMOTE TO CONTROL YOUR LCD REAR PTV ቨ DAY/NIGHT button Press this button to access the Channel Guide. The CURSOR PAD will start the On-Screen Display. ቫ...
Owners Guide
Page 31
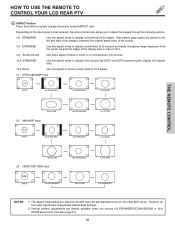
HOW TO USE THE REMOTE TO CONTROL YOUR LCD REAR PTV ቯ AV NET button Press this button to control external components with the...ORIGINAL MENU OF EQUIPMENT Move AV NET Return 2x DVD DVD2 VCR VCR2 AV Receiver POWER CH ̄ CH ̆ MENU TV/VCR b MORE Move SEL Select MORE.. 2x DVD DVD2 VCR VCR2 AV Receiver POWER CH ̄ CH ̆ AUDIO VOL...SEL Select ORIGINAL MENU OF EQUIPMENT Move AV NET Return THE REMOTE CONTROL PV Recorder Cable Box Set Top Box Custom Device Setup POWER CH ̄ CH ̆ MENU TV/VCR INFO GUIDE MORE Move SEL Select MORE.. The "Custom...
HOW TO USE THE REMOTE TO CONTROL YOUR LCD REAR PTV ቯ AV NET button Press this button to control external components with the...ORIGINAL MENU OF EQUIPMENT Move AV NET Return 2x DVD DVD2 VCR VCR2 AV Receiver POWER CH ̄ CH ̆ MENU TV/VCR b MORE Move SEL Select MORE.. 2x DVD DVD2 VCR VCR2 AV Receiver POWER CH ̄ CH ̆ AUDIO VOL...SEL Select ORIGINAL MENU OF EQUIPMENT Move AV NET Return THE REMOTE CONTROL PV Recorder Cable Box Set Top Box Custom Device Setup POWER CH ̄ CH ̆ MENU TV/VCR INFO GUIDE MORE Move SEL Select MORE.. The "Custom...
Owners Guide
Page 32
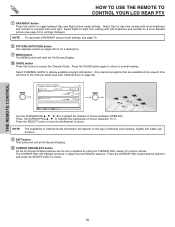
... just has to follow the steps below. TV Softkeys POWER CH CH TV/VCR MENU BACK Move SEL Select SELECT EXIT 1. Press and hold desired button to transfer the command to AV NET. HOW TO USE THE REMOTE TO CONTROL YOUR LCD REAR PTV AV NET LEARNING WIZARD This function of...button to select DEVICE SETUP, press the SELECT button. 3. VCR3). 4. HITACHI AV NET WIZARD (Learning) Press and hold the ̈̈ button of the VCR remote control while pointing directly at the learning AV NET sensor of the LCD Rear PTV (see pages 8-9) at a distance of the programmed equipment can ...
... just has to follow the steps below. TV Softkeys POWER CH CH TV/VCR MENU BACK Move SEL Select SELECT EXIT 1. Press and hold desired button to transfer the command to AV NET. HOW TO USE THE REMOTE TO CONTROL YOUR LCD REAR PTV AV NET LEARNING WIZARD This function of...button to select DEVICE SETUP, press the SELECT button. 3. VCR3). 4. HITACHI AV NET WIZARD (Learning) Press and hold the ̈̈ button of the VCR remote control while pointing directly at the learning AV NET sensor of the LCD Rear PTV (see pages 8-9) at a distance of the programmed equipment can ...
Owners Guide
Page 33
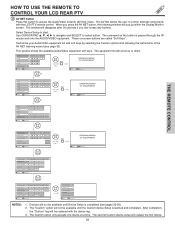
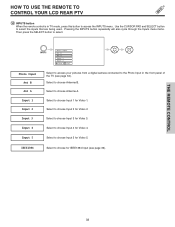
...1. Select to choose Input 4 for Video 3. Select to choose Input 3 for Video 4. HOW TO USE THE REMOTE TO CONTROL YOUR LCD REAR PTV ተ INPUTS button When the remote control is in the front panel of the TV (see page 36). Photo Input Ant B Ant A Input 1 Input 2 Input 3 Input 4 Input 5 IEEE1394... press the SELECT button to choose Antenna B. Select to the Photo Input in TV mode, press this button to choose Antenna A. Select to select the inputs that are being used. Select to select. THE REMOTE CONTROL 33 Use the CURSOR PAD and SELECT button to choose Input 5 for ...
...1. Select to choose Input 4 for Video 3. Select to choose Input 3 for Video 4. HOW TO USE THE REMOTE TO CONTROL YOUR LCD REAR PTV ተ INPUTS button When the remote control is in the front panel of the TV (see page 36). Photo Input Ant B Ant A Input 1 Input 2 Input 3 Input 4 Input 5 IEEE1394... press the SELECT button to choose Antenna B. Select to the Photo Input in TV mode, press this button to choose Antenna A. Select to select the inputs that are being used. Select to select. THE REMOTE CONTROL 33 Use the CURSOR PAD and SELECT button to choose Input 5 for ...

Owners Guide
Page 34
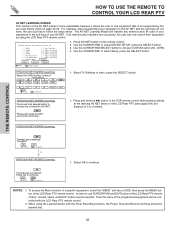
... low battery power may show "Input device not detected" if the digital camera's large capacity memory is fully loaded. HOW TO USE THE REMOTE TO CONTROL YOUR LCD REAR PTV PHOTO INPUT This feature is useful for viewing digital still pictures from your photos in this input. 6. Please wait 1 or 2 minutes ...your digital camera using the Photo Input in the side panel of digital Photos that can be displayed is 999. 2. The maximum number of the TV. Date Resolution File Name JUMP Select this menu item to slow access time on a DVD-RAM disc may not work with this Photo Input. 4.
... low battery power may show "Input device not detected" if the digital camera's large capacity memory is fully loaded. HOW TO USE THE REMOTE TO CONTROL YOUR LCD REAR PTV PHOTO INPUT This feature is useful for viewing digital still pictures from your photos in this input. 6. Please wait 1 or 2 minutes ...your digital camera using the Photo Input in the side panel of digital Photos that can be displayed is 999. 2. The maximum number of the TV. Date Resolution File Name JUMP Select this menu item to slow access time on a DVD-RAM disc may not work with this Photo Input. 4.


