Owners Guide
Page 16
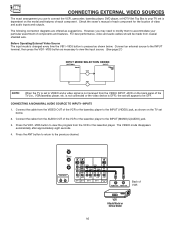
...panel of the VCR or the laserdisc player to the previous channel. For best performance, video and audio cables should be OFF. Check the owner's manual of components and features. Press the VID1~VID5 button to the INPUT (VIDEO) jack, as shown on the model and features of each component ...for the location of VCR VCR Hitachi Model or Similar Model 16 The following connection diagrams are offered as necessary to view the input source. (See page 27) INPUT MODE SELECTION ORDER...
...panel of the VCR or the laserdisc player to the previous channel. For best performance, video and audio cables should be OFF. Check the owner's manual of components and features. Press the VID1~VID5 button to the INPUT (VIDEO) jack, as shown on the model and features of each component ...for the location of VCR VCR Hitachi Model or Similar Model 16 The following connection diagrams are offered as necessary to view the input source. (See page 27) INPUT MODE SELECTION ORDER...
Owners Guide
Page 27
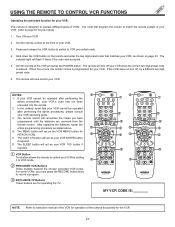
...the unlikely event that matches your VCR operating guide. 3. After replacing the batteries repeat the entire programming procedure as your VCR. (refer to instruction manual of the VCR for operation of your VCR ENTER button if required. 6. ANT 0 LAST CH HELP ASPECT MODE ቤ MENU EXIT ቤ... programmed until the batteries are for pre-codes) 1. NOTES: 1. USING THE REMOTE TO CONTROL VCR FUNCTIONS Operating the precoded function for HITACHI VCRs. 5. This remote is programmed for the VCR. 27 Press and release the VCR button to switch to control your VCR. Hold...
...the unlikely event that matches your VCR operating guide. 3. After replacing the batteries repeat the entire programming procedure as your VCR. (refer to instruction manual of the VCR for operation of your VCR ENTER button if required. 6. ANT 0 LAST CH HELP ASPECT MODE ቤ MENU EXIT ቤ... programmed until the batteries are for pre-codes) 1. NOTES: 1. USING THE REMOTE TO CONTROL VCR FUNCTIONS Operating the precoded function for HITACHI VCRs. 5. This remote is programmed for the VCR. 27 Press and release the VCR button to switch to control your VCR. Hold...
Owners Guide
Page 28
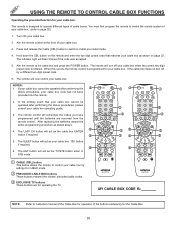
... remote to match the remote system of the buttons exclusively for the Cable Box. 28 When this occurs, the remote control is designed to instruction manual of the Cable Box for operation of your cable box. If the cable box does not turn off , try a different two digit preset code. 6. The...
... remote to match the remote system of the buttons exclusively for the Cable Box. 28 When this occurs, the remote control is designed to instruction manual of the Cable Box for operation of your cable box. If the cable box does not turn off , try a different two digit preset code. 6. The...

Owners Guide
Page 29
... on page 32. This remote is designed to operate different types of set-top-box/satellite systems. You must first program the remote to instruction manual of the set-top-box/satellite receiver for operation of the buttons exclusively for your set -top-box/satellite receiver. Turn ON your set-top...
... on page 32. This remote is designed to operate different types of set-top-box/satellite systems. You must first program the remote to instruction manual of the set-top-box/satellite receiver for operation of the buttons exclusively for your set -top-box/satellite receiver. Turn ON your set-top...
Owners Guide
Page 30
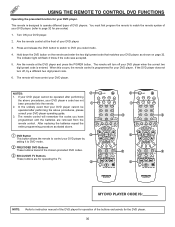
... FREEZE PIP MODE PIP ACCESS SWAP PROG TV/VCR SLOW REC ቤ CLU-5711TSI CLU-5713TSI MY DVD PLAYER CODE IS: NOTE: Refer to instruction manual of the DVD player for operation of your DVD player. (refer to control your DVD player when the correct two digit preset code is entered...
... FREEZE PIP MODE PIP ACCESS SWAP PROG TV/VCR SLOW REC ቤ CLU-5711TSI CLU-5713TSI MY DVD PLAYER CODE IS: NOTE: Refer to instruction manual of the DVD player for operation of your DVD player. (refer to control your DVD player when the correct two digit preset code is entered...
Owners Guide
Page 31
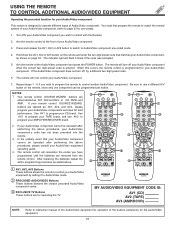
... AV1, AV2 or AV3 button to switch to program your Audio/Video component s code has not been precoded into the remote. 3. Be sure to instruction manual of the Audio/Video equipment for operation of Audio/Video component. Use AV1 to Audio/Video component pre-coded mode. 4. After replacing the batteries repeat...
... AV1, AV2 or AV3 button to switch to program your Audio/Video component s code has not been precoded into the remote. 3. Be sure to instruction manual of the Audio/Video equipment for operation of Audio/Video component. Use AV1 to Audio/Video component pre-coded mode. 4. After replacing the batteries repeat...
Owners Guide
Page 34
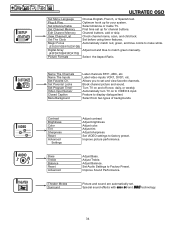
... time set . Magic Focus Automatically match red, green, and blue colors to make white. (53UDX10B/61UDX10B) Digital Array Adjust red and blue to display dialogue/text. Turn TV on to Factory Preset. Feature to match green manually. (43FDX10B/43FDX11B) Picture Formats Select the Aspect Ratio. Adjust Bass. Special sound effects with SRS...
... time set . Magic Focus Automatically match red, green, and blue colors to make white. (53UDX10B/61UDX10B) Digital Array Adjust red and blue to display dialogue/text. Turn TV on to Factory Preset. Feature to match green manually. (43FDX10B/43FDX11B) Picture Formats Select the Aspect Ratio. Adjust Bass. Special sound effects with SRS...


