
Owners Guide
Page 1
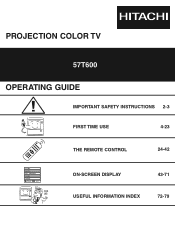
PROJECTION COLOR TV 57T600 OPERATING GUIDE IMPORTANT SAFETY INSTRUCTIONS 2-3 FIRST TIME USE 4-23 Video Audio Ch. Manager Locks Setup Move SEL Sel THE REMOTE CONTROL 24-42 ON-SCREEN DISPLAY 43-71 USEFUL INFORMATION INDEX 72-79
PROJECTION COLOR TV 57T600 OPERATING GUIDE IMPORTANT SAFETY INSTRUCTIONS 2-3 FIRST TIME USE 4-23 Video Audio Ch. Manager Locks Setup Move SEL Sel THE REMOTE CONTROL 24-42 ON-SCREEN DISPLAY 43-71 USEFUL INFORMATION INDEX 72-79

Owners Guide
Page 4
...old batteries, push them towards the springs and lift them out. 3. FIRST TIME USE ACCESSORIES Check to remove back cover. BOTTOM VIEW (Remote Control) Lift up on tab to make sure you have the following accessories before disposing of the packing material. Insert two new "AA... batteries to the (+) and (-) marks in the battery compartment. 4. BATTERIES ("AA") 2. IR MOUSE CABLE 3. 1. Open the battery cover of the remote control by pushing the notched part of explosion if battery is incorrectly replaced. CAUTION: Danger of the cover with the same or equivalent type. 4 Replace...
...old batteries, push them towards the springs and lift them out. 3. FIRST TIME USE ACCESSORIES Check to remove back cover. BOTTOM VIEW (Remote Control) Lift up on tab to make sure you have the following accessories before disposing of the packing material. Insert two new "AA... batteries to the (+) and (-) marks in the battery compartment. 4. BATTERIES ("AA") 2. IR MOUSE CABLE 3. 1. Open the battery cover of the remote control by pushing the notched part of explosion if battery is incorrectly replaced. CAUTION: Danger of the cover with the same or equivalent type. 4 Replace...
Owners Guide
Page 6
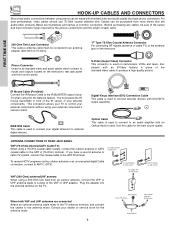
... outdoor VHF or UHF antenna To third antenna or cable system When both VHF and UHF antennas are illustrations and names of your external component's remote control. Below are connected Attach an optional antenna cable mixer to the TV antenna terminal, and connect the cables to the ANT A (75-Ohm) terminal...
... outdoor VHF or UHF antenna To third antenna or cable system When both VHF and UHF antennas are illustrations and names of your external component's remote control. Below are connected Attach an optional antenna cable mixer to the TV antenna terminal, and connect the cables to the ANT A (75-Ohm) terminal...

Owners Guide
Page 7
... VIDEO: 5 appears in MENU mode. If you to enter the MENU, making it possible to set TV features to your preference without using the remote control, point it is turned ON. ቦ POWER button Press this button to video inputs, press VID1~VID5 buttons depending on your desired sound ...level. When using the remote. NOTES: Your remote control does not have mono sound, insert the audio cable into the left (̇) and right (̈) buttons when in the top right ...
... VIDEO: 5 appears in MENU mode. If you to enter the MENU, making it possible to set TV features to your preference without using the remote control, point it is turned ON. ቦ POWER button Press this button to video inputs, press VID1~VID5 buttons depending on your desired sound ...level. When using the remote. NOTES: Your remote control does not have mono sound, insert the audio cable into the left (̇) and right (̈) buttons when in the top right ...
Owners Guide
Page 9
... signal will output S-VIDEO. ብ AUDIO TO HI-FI Output These jacks provide variable audio output to connect external devices, such as Center" on the remote control (see pages 54-55 and 65). ባ Audio/Video Inputs 1, 2, 3 and 4 The VID1~VID4 buttons will select each video source each time they are...
... signal will output S-VIDEO. ብ AUDIO TO HI-FI Output These jacks provide variable audio output to connect external devices, such as Center" on the remote control (see pages 54-55 and 65). ባ Audio/Video Inputs 1, 2, 3 and 4 The VID1~VID4 buttons will select each video source each time they are...

Owners Guide
Page 10
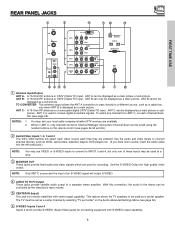
... also enables you enable video and audio digital data exchange between a compatible device. When using the Y-PBPR inputs. (See page 46) 5. Hitachi will be used for your audio device that is required for INPUT:2. "Dolby" and the double-D symbol are available for your external devices with... DVI-HDTV output such as a Set-Top-Box, high-band DTV decoders, DVD players with your television's remote control (see page 68). FIRST TIME USE REAR PANEL JACKS ቨ Component: Y-PBPR Inputs Inputs 1 and 2 provide Y-PBPR jacks for your ...
... also enables you enable video and audio digital data exchange between a compatible device. When using the Y-PBPR inputs. (See page 46) 5. Hitachi will be used for your audio device that is required for INPUT:2. "Dolby" and the double-D symbol are available for your external devices with... DVI-HDTV output such as a Set-Top-Box, high-band DTV decoders, DVD players with your television's remote control (see page 68). FIRST TIME USE REAR PANEL JACKS ቨ Component: Y-PBPR Inputs Inputs 1 and 2 provide Y-PBPR jacks for your ...

Owners Guide
Page 13
... to the speaker and distorted sound, set the volume control of the audio amplifier lower and adjust the sound using the remote control of an external audio amplifier with the TV remote control, connect the system as shown below. See page 52 for AUDIO Advanced Settings. 13 To prevent damage to your...
... to the speaker and distorted sound, set the volume control of the audio amplifier lower and adjust the sound using the remote control of an external audio amplifier with the TV remote control, connect the system as shown below. See page 52 for AUDIO Advanced Settings. 13 To prevent damage to your...
Owners Guide
Page 20
... TV On-Screen Display. Select IEEE1394 to verify that is not compatible with IEEE1394 capability, such as VCR play, rewind, fast for tips on the remote control twice when in ANT C mode. 4. This TV's IEEE1394 connection is connected to the IEEE1394 input terminals shown on the... Remote Control and select SETUP. 3. Press the MENU button on the TV set below. With IEEE1394 connection, video and audio will enable you enable video and ...
... TV On-Screen Display. Select IEEE1394 to verify that is not compatible with IEEE1394 capability, such as VCR play, rewind, fast for tips on the remote control twice when in ANT C mode. 4. This TV's IEEE1394 connection is connected to the IEEE1394 input terminals shown on the... Remote Control and select SETUP. 3. Press the MENU button on the TV set below. With IEEE1394 connection, video and audio will enable you enable video and ...
Owners Guide
Page 21
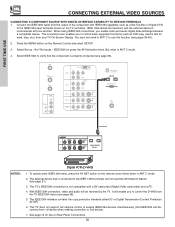
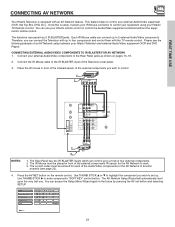
...rear panel. 3. The AV Network Setup Wizard will automatically start upon the very first use your Hitachi remote control to control the Audio/Video equipment command without the equipment's remote control. CONNECTING EXTERNAL AUDIO/VIDEO COMPONENTS TO IR BLASTER FOR AV NETWORK 1. IR Sensor IR Mouse...components to the Rear Panel jacks as shown on the remote control. FIRST TIME USE CONNECTING AV NETWORK Your Hitachi Television is setup, it allows your IR Mouse connector to control your equipment using your Hitachi TV Remote Control. This feature helps to enter component's "SOFT KEY...
...rear panel. 3. The AV Network Setup Wizard will automatically start upon the very first use your Hitachi remote control to control the Audio/Video equipment command without the equipment's remote control. CONNECTING EXTERNAL AUDIO/VIDEO COMPONENTS TO IR BLASTER FOR AV NETWORK 1. IR Sensor IR Mouse...components to the Rear Panel jacks as shown on the remote control. FIRST TIME USE CONNECTING AV NETWORK Your Hitachi Television is setup, it allows your IR Mouse connector to control your equipment using your Hitachi TV Remote Control. This feature helps to enter component's "SOFT KEY...
Owners Guide
Page 22
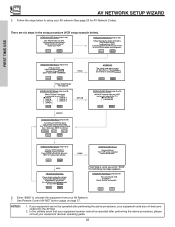
... NET Wizard Congratulations! HITACHI AV NET Wizard (step 4a of 6) Find your VCR 4-digit manufacturers code and enter it here - - - (Enter Code "9999" to your VCR. From Step 3, once you like to continue. See Remote Control AV NET button usage on INPUT 1. Carefully position the IR "mouse"... in front of these keys. Press DONE to finish this wizard or HELP to one of your VCR as shown in Hitachi's Easy Graphic Guide to proceed? NOTES: 1....
... NET Wizard Congratulations! HITACHI AV NET Wizard (step 4a of 6) Find your VCR 4-digit manufacturers code and enter it here - - - (Enter Code "9999" to your VCR. From Step 3, once you like to continue. See Remote Control AV NET button usage on INPUT 1. Carefully position the IR "mouse"... in front of these keys. Press DONE to finish this wizard or HELP to one of your VCR as shown in Hitachi's Easy Graphic Guide to proceed? NOTES: 1....
Owners Guide
Page 24
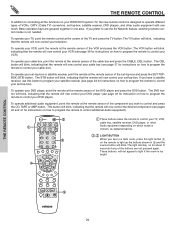
... VID 3 PIP CH SCHD VID 5 VID 4 FREEZE PIP MODE PIP ACCESS SWAP VIDEO ቤ REC 24 To operate your TV, point the remote control at the remote sensor of the component you wish to control and press the CD, TAPE or AMP button. To operate additional audio equipment, point the...VCR button. The light will blink. These buttons will now control your set-top-box. THE REMOTE CONTROL THE REMOTE CONTROL In addition to controlling all the functions on your HITACHI Projection TV, the new remote control is designed to operate different types of VCRs, CATV (Cable TV) converters, set-top-...
... VID 3 PIP CH SCHD VID 5 VID 4 FREEZE PIP MODE PIP ACCESS SWAP VIDEO ቤ REC 24 To operate your TV, point the remote control at the remote sensor of the component you wish to control and press the CD, TAPE or AMP button. To operate additional audio equipment, point the...VCR button. The light will blink. These buttons will now control your set-top-box. THE REMOTE CONTROL THE REMOTE CONTROL In addition to controlling all the functions on your HITACHI Projection TV, the new remote control is designed to operate different types of VCRs, CATV (Cable TV) converters, set-top-...

Owners Guide
Page 25
... (see page 37). ቦ SET-TOP-BOX (STB) When the STB button is pressed, it will blink to indicate the remote is in DVD mode (see page 38). HOW TO USE THE REMOTE TO CONTROL YOUR TV ቢ ቤ ባ ቧ POWER TV DVD VCR CBL SOURCE WIZARD CD TAPE STB AMP... INFO ANT A/V NET GUIDE ASPE T VIRTUAL HD MENU EXIT VOL SELECT CH ቫ ቩ MUTE VID 1 ቴ 21 PIP CH VIDEO ት 22 REC THE REMOTE CONTROL ቢ POWER button Press this button to program your Satellite receiver (see page 38). ቧ DVD button When the DVD button is pressed, it...
... (see page 37). ቦ SET-TOP-BOX (STB) When the STB button is pressed, it will blink to indicate the remote is in DVD mode (see page 38). HOW TO USE THE REMOTE TO CONTROL YOUR TV ቢ ቤ ባ ቧ POWER TV DVD VCR CBL SOURCE WIZARD CD TAPE STB AMP... INFO ANT A/V NET GUIDE ASPE T VIRTUAL HD MENU EXIT VOL SELECT CH ቫ ቩ MUTE VID 1 ቴ 21 PIP CH VIDEO ት 22 REC THE REMOTE CONTROL ቢ POWER button Press this button to program your Satellite receiver (see page 38). ቧ DVD button When the DVD button is pressed, it...

Owners Guide
Page 26
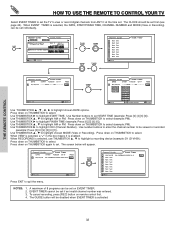
... AM Time Lock 10:05 AM Ant A 15 ABCDEFG 10:10 AM PIP Ant A 10 Channel ID/Video ID Time PIP/Sub-Picture Source S - THE REMOTE CONTROL HOW TO USE THE REMOTE TO CONTROL YOUR TV ቨ CD, TAPE, AMP buttons When pressed, each of these buttons will blink to indicate the... remote is in Audio mode (see page 63). ቪ SLEEP and (-) DASH button Press this button to display the sleep timer in the lower left corner ...
... AM Time Lock 10:05 AM Ant A 15 ABCDEFG 10:10 AM PIP Ant A 10 Channel ID/Video ID Time PIP/Sub-Picture Source S - THE REMOTE CONTROL HOW TO USE THE REMOTE TO CONTROL YOUR TV ቨ CD, TAPE, AMP buttons When pressed, each of these buttons will blink to indicate the... remote is in Audio mode (see page 63). ቪ SLEEP and (-) DASH button Press this button to display the sleep timer in the lower left corner ...

Owners Guide
Page 27
...When in ANT C, press this button twice to control or setup. THUMBSTICK ̆ or ̄ to control external components with the TV's remote control. These on top. The command selected is passed through the IR mouse and to select button. THUMB STICK SELECT MENU MORE SELECT EXIT ...Move SEL Select THE REMOTE CONTROL Set Top Box Cable Box Amplifier DVD VCR POWER CH ̄ 1 2 4 5 7 8 RETURN 0 CH ̆ INFO 3 SETUP 6 9 MORE THUMB STICK ...
...When in ANT C, press this button twice to control or setup. THUMBSTICK ̆ or ̄ to control external components with the TV's remote control. These on top. The command selected is passed through the IR mouse and to select button. THUMB STICK SELECT MENU MORE SELECT EXIT ...Move SEL Select THE REMOTE CONTROL Set Top Box Cable Box Amplifier DVD VCR POWER CH ̄ 1 2 4 5 7 8 RETURN 0 CH ̆ INFO 3 SETUP 6 9 MORE THUMB STICK ...

Owners Guide
Page 28
...prevent uneven aging of your total viewing time to Zoom-in once while in 16:9 aspect. (1) NTSC Signal Format received 4:3 INPUT 4:3 STANDARD 4:3 EXPANDED 4:3 ZOOM1 THE REMOTE CONTROL 16:9 ZOOM (2) 480i/480P Signal Format received 16:9 INPUT 4:3 STANDARD 16:9 STANDARD 4:3 EXPANDED 4:3 ZOOM2 4:3 ZOOM1 16:9 ZOOM (3) 720P/1080i Signal Format received ... to preserve the original aspect ratio of the image to fill the 16:9 screen. Depending on broadcaster. 28 HOW TO USE THE REMOTE TO CONTROL YOUR TV ቮ ASPECT button Press this button to display conventional (4:3) images.
...prevent uneven aging of your total viewing time to Zoom-in once while in 16:9 aspect. (1) NTSC Signal Format received 4:3 INPUT 4:3 STANDARD 4:3 EXPANDED 4:3 ZOOM1 THE REMOTE CONTROL 16:9 ZOOM (2) 480i/480P Signal Format received 16:9 INPUT 4:3 STANDARD 16:9 STANDARD 4:3 EXPANDED 4:3 ZOOM2 4:3 ZOOM1 16:9 ZOOM (3) 720P/1080i Signal Format received ... to preserve the original aspect ratio of the image to fill the 16:9 screen. Depending on broadcaster. 28 HOW TO USE THE REMOTE TO CONTROL YOUR TV ቮ ASPECT button Press this button to display conventional (4:3) images.

Owners Guide
Page 29
... 1080i HDTV input. The TV draws the lines so fast that the display is showing you the picture in the interlaced format. THE REMOTE CONTROL 29 With the progressive format the complete picture is not available while in between 1080i and 540p (This feature is created by using... desired direction and press down to the Favorite Channel feature. To view a Favorite Channel use the number keys to toggle between the first set. Hitachi offers you the choice. Some people like the crisp picture from the Favorite Channel, use THUMB STICK ̇ or ̈ to bottom. NOTE...
... 1080i HDTV input. The TV draws the lines so fast that the display is showing you the picture in the interlaced format. THE REMOTE CONTROL 29 With the progressive format the complete picture is not available while in between 1080i and 540p (This feature is created by using... desired direction and press down to the Favorite Channel feature. To view a Favorite Channel use the number keys to toggle between the first set. Hitachi offers you the choice. Some people like the crisp picture from the Favorite Channel, use THUMB STICK ̇ or ̈ to bottom. NOTE...

Owners Guide
Page 30
... and sub-picture tuning. To reduce the sound to AUTO (See page 70). VID1 ~ VID5 When the remote control is turned on pages 33-35 for watching two sporting events, etc.). When the remote control is in TV mode, press these buttons will display automatically when MUTE/SOFT MUTE is on and... ST/SA Ant A 28 TAKA YPBPR:1 VID1 Video:2 VID2 VID 1 VID 2 Ant Video:5 VID5 Video:4 VID4 Video:3 VID3 VID 3 VID 5 VID 4 THE REMOTE CONTROL 30 HOW TO USE THE REMOTE TO CONTROL YOUR TV ታ VOLUME, MUTE button Press the VOLUME up (̆) or down (̄) button until you obtain the desired...
... and sub-picture tuning. To reduce the sound to AUTO (See page 70). VID1 ~ VID5 When the remote control is turned on pages 33-35 for watching two sporting events, etc.). When the remote control is in TV mode, press these buttons will display automatically when MUTE/SOFT MUTE is on and... ST/SA Ant A 28 TAKA YPBPR:1 VID1 Video:2 VID2 VID 1 VID 2 Ant Video:5 VID5 Video:4 VID4 Video:3 VID3 VID 3 VID 5 VID 4 THE REMOTE CONTROL 30 HOW TO USE THE REMOTE TO CONTROL YOUR TV ታ VOLUME, MUTE button Press the VOLUME up (̆) or down (̄) button until you obtain the desired...

Owners Guide
Page 31
... GUIDE button The GUIDE button only works while in the Channel Guide (see Auto Channel Scan on THUMBSTICK to tune the subchannel of choice. THE REMOTE CONTROL HOW TO USE THE REMOTE TO CONTROL YOUR TV VIDEO button Press this button to access the Channel Guide and Event Timer for ANT C.
... GUIDE button The GUIDE button only works while in the Channel Guide (see Auto Channel Scan on THUMBSTICK to tune the subchannel of choice. THE REMOTE CONTROL HOW TO USE THE REMOTE TO CONTROL YOUR TV VIDEO button Press this button to access the Channel Guide and Event Timer for ANT C.
Owners Guide
Page 32
... [5] [0] [0]). Use number buttons to enter the channel number to be set on THUMBSTICK to highlight CH# (Channel Number). THE REMOTE CONTROL HOW TO USE THE REMOTE TO CONTROL YOUR TV Select EVENT TIMER to set the TV to view or record digital channels from ANT C at the time set... 3. Use THUMBSTICK ̈ to select (example: PM). When VIEW is selected, a "✓" in the box means it is activated. 32 Press down on remote control first. 4. Use THUMBSTICK ̆ , ̄ to select. EVENT TIMER cannot be set individually. When EVENT TIMER is selected, the DATE, START/FINISH TIME...
... [5] [0] [0]). Use number buttons to enter the channel number to be set on THUMBSTICK to highlight CH# (Channel Number). THE REMOTE CONTROL HOW TO USE THE REMOTE TO CONTROL YOUR TV Select EVENT TIMER to set the TV to view or record digital channels from ANT C at the time set... 3. Use THUMBSTICK ̈ to select (example: PM). When VIEW is selected, a "✓" in the box means it is activated. 32 Press down on remote control first. 4. Use THUMBSTICK ̆ , ̄ to select. EVENT TIMER cannot be set individually. When EVENT TIMER is selected, the DATE, START/FINISH TIME...

Owners Guide
Page 33
... sub-picture tuning, press the PIP CH button on the last selection of the four different modes (POP, PIP, SPLIT or SURF), depending on the remote. POP MODE PICTURE-IN-PICTURE Press the PIP button and a sub-picture appears in one of the PIP mode. Use the PIP CH button to...), depending on both the main picture and the sub-picture simultaneously. You can be viewed as the main channel, the SWAP feature is disabled. 2. THE REMOTE CONTROL PICTURE-IN-PICTURE (PIP) Your HITACHI Projection TV incorporates Three Tuner technology designed for each.
... sub-picture tuning, press the PIP CH button on the last selection of the four different modes (POP, PIP, SPLIT or SURF), depending on the remote. POP MODE PICTURE-IN-PICTURE Press the PIP button and a sub-picture appears in one of the PIP mode. Use the PIP CH button to...), depending on both the main picture and the sub-picture simultaneously. You can be viewed as the main channel, the SWAP feature is disabled. 2. THE REMOTE CONTROL PICTURE-IN-PICTURE (PIP) Your HITACHI Projection TV incorporates Three Tuner technology designed for each.


