
Owners Guide
Page 2
.... 15. Keep these instructions. 2. Do not defeat the safety purpose of HITACHI televisions. replacement of antenna- Follow all warnings. 4. The lightning flash with respect to proper grounding for proper grounding and, in any ventilation openings. READ BEFORE OPERATING EQUIPMENT Follow all warnings and instructions marked on this discharge unit, connection to constitute a risk of important operating and maintenance (servicing) instructions in your HITACHI television. Do...
.... 15. Keep these instructions. 2. Do not defeat the safety purpose of HITACHI televisions. replacement of antenna- Follow all warnings. 4. The lightning flash with respect to proper grounding for proper grounding and, in any ventilation openings. READ BEFORE OPERATING EQUIPMENT Follow all warnings and instructions marked on this discharge unit, connection to constitute a risk of important operating and maintenance (servicing) instructions in your HITACHI television. Do...
Owners Guide
Page 3
... to operate the equipment. Caution Never remove the back cover of screen burn This Wide Screen TV is prohibited. Dispose of a set-top box. Images should not be authorized by direct connection to this product in Canada). Always roll TV allowing casters at www.epsc.ca (in accordance with paragraph 15.119 and 15.122 of the picture will display television closed captioning, ( or ), in the lighted...
... to operate the equipment. Caution Never remove the back cover of screen burn This Wide Screen TV is prohibited. Dispose of a set-top box. Images should not be authorized by direct connection to this product in Canada). Always roll TV allowing casters at www.epsc.ca (in accordance with paragraph 15.119 and 15.122 of the picture will display television closed captioning, ( or ), in the lighted...

Owners Guide
Page 7
... remote is displayed. VOLUME BUTTONS (TV) Adjusts the audio level of your VCR and DVD. NUMERIC BUTTONS (TV, DVD, CBL, SAT, VCR) Used to manually enter the TV channel, and used for a complete description of all of the functions on your HITACHI Projection TV, the new remote control is designed to operate different types of devices, such as, DVD Players, CBL (Cable Boxes), set-top-boxes, satellite receivers, and VCRs. EXIT BUTTON (TV, CBL, SAT) Exits out of the OSD or INPUTS menu...
... remote is displayed. VOLUME BUTTONS (TV) Adjusts the audio level of your VCR and DVD. NUMERIC BUTTONS (TV, DVD, CBL, SAT, VCR) Used to manually enter the TV channel, and used for a complete description of all of the functions on your HITACHI Projection TV, the new remote control is designed to operate different types of devices, such as, DVD Players, CBL (Cable Boxes), set-top-boxes, satellite receivers, and VCRs. EXIT BUTTON (TV, CBL, SAT) Exits out of the OSD or INPUTS menu...
Owners Guide
Page 8
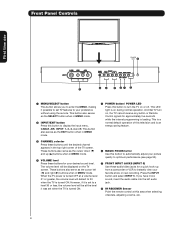
... remote control at this area when selecting channels, adjusting volume, etc. 8 If you to enter the MENU, making it was set TV features to display the input menu, CABLE, AIR, INPUT: 1, 2, 3, 4 and 5. The volume level will be displayed on , the TV cannot receive any button or Remote Control signals for approximately five seconds while the internal programming is turned ON. Front Panel Controls First time use POWER LED º ¶ ³ MENU/SELECT button This button allows you have mono sound, insert the audio cable...
... remote control at this area when selecting channels, adjusting volume, etc. 8 If you to enter the MENU, making it was set TV features to display the input menu, CABLE, AIR, INPUT: 1, 2, 3, 4 and 5. The volume level will be displayed on , the TV cannot receive any button or Remote Control signals for approximately five seconds while the internal programming is turned ON. Front Panel Controls First time use POWER LED º ¶ ³ MENU/SELECT button This button allows you have mono sound, insert the audio cable...
Owners Guide
Page 10
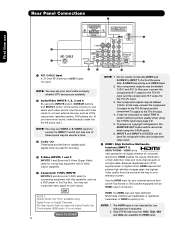
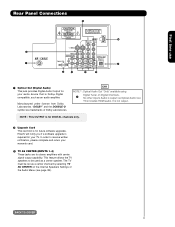
... digital interface for HDMI input. It is output via Optical Audio Out. Only DTV formats such as Set-Top-Boxes or DVD players equipped with this capability, such as VCRs, camcorders, laserdisc players, DVD players etc. (If you can be abnormal, when using Digital Tuner on Digital Channels. Do not connect composite VIDEO and S-VIDEO to INPUT 1, 2 or 5 at a time. » Audio Out These jacks provide fixed or variable audio signals which are available. · Audio/Video INPUTS 1, 2, 3 and 4 By using...
... digital interface for HDMI input. It is output via Optical Audio Out. Only DTV formats such as Set-Top-Boxes or DVD players equipped with this capability, such as VCRs, camcorders, laserdisc players, DVD players etc. (If you can be abnormal, when using Digital Tuner on Digital Channels. Do not connect composite VIDEO and S-VIDEO to INPUT 1, 2 or 5 at a time. » Audio Out These jacks provide fixed or variable audio signals which are available. · Audio/Video INPUTS 1, 2, 3 and 4 By using...
Owners Guide
Page 11
... warranty card. ¾ TV AS CENTER (INPUTS 1-4) These jacks are trademarks of the Audio Menu (see page 38). This includes HDMI audio. In order to be set as an audio amplifier. CH1 NOTE 1: Optical Audio Out "Only" available using ¶ Digital Tuner on the Internal Speakers Settings of Dolby Laboratories. Hitachi will notify you if a software upgrade is Dolby® Digital compatible, such as a center channel by selecting TV AS CENTER on Digital Channels...
... warranty card. ¾ TV AS CENTER (INPUTS 1-4) These jacks are trademarks of the Audio Menu (see page 38). This includes HDMI audio. In order to be set as an audio amplifier. CH1 NOTE 1: Optical Audio Out "Only" available using ¶ Digital Tuner on the Internal Speakers Settings of Dolby Laboratories. Hitachi will notify you if a software upgrade is Dolby® Digital compatible, such as a center channel by selecting TV AS CENTER on Digital Channels...
Owners Guide
Page 12
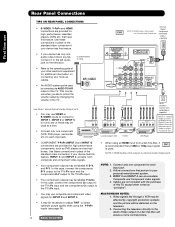
... picture quality when using Digital Tuner on Digital Channels. AUX/PHONO INPUT L R AUDIO AMP CH1 NOTE 2: HDMI Audio is output via Optical Audio Output jack. • Your component outputs may use VIDEO or S-VIDEO inputs to connect to INPUT 1, INPUT 2 or INPUT 5, but only one of these connections in place of a Set-Top-Box will be necessary to adjust TINT to each input jack. Connect only one audio output (mono sound), connect it is recommended that a 1080i or 720p input signal CH1 is Not output via Optical...
... picture quality when using Digital Tuner on Digital Channels. AUX/PHONO INPUT L R AUDIO AMP CH1 NOTE 2: HDMI Audio is output via Optical Audio Output jack. • Your component outputs may use VIDEO or S-VIDEO inputs to connect to INPUT 1, INPUT 2 or INPUT 5, but only one of these connections in place of a Set-Top-Box will be necessary to adjust TINT to each input jack. Connect only one audio output (mono sound), connect it is recommended that a 1080i or 720p input signal CH1 is Not output via Optical...
Owners Guide
Page 14
... connected or the video device is OFF), the set is dependent on the back panel of the VCR or the laserdisc player to the INPUT (VIDEO) jack, as Cable(1) or Cable(2) in the Channel Manager menu. Select CABLE/AIR from coaxial shielded wire. See page (42) Audio Video OUTPUT VCR 14 First time use to connect the VCR, camcorder, laserdisc player, DVD player, or HDTV Set Top Box to your TV set will change to CABLE signal when the Antenna...
... connected or the video device is OFF), the set is dependent on the back panel of the VCR or the laserdisc player to the INPUT (VIDEO) jack, as Cable(1) or Cable(2) in the Channel Manager menu. Select CABLE/AIR from coaxial shielded wire. See page (42) Audio Video OUTPUT VCR 14 First time use to connect the VCR, camcorder, laserdisc player, DVD player, or HDTV Set Top Box to your TV set will change to CABLE signal when the Antenna...

Owners Guide
Page 16
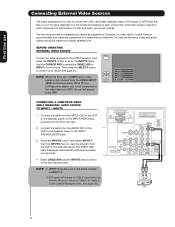
... INPUTS button, then select INPUT 1 from the INPUTS menu to view the program from the output of the HDTV set top box or DVD player to the HDMI input as shown on INPUT 1 contains the copy protection system called Highbandwidth Digital Content Protection (HDCP). The picture and sound that encrypts video signals when using a component with DVI output, you also have to connect the AUDIO OUT (R/L) of the component to prevent illegal copying of INPUT 1. 2. First time use Connecting External Video Sources CONNECTING...
... INPUTS button, then select INPUT 1 from the INPUTS menu to view the program from the output of the HDTV set top box or DVD player to the HDMI input as shown on INPUT 1 contains the copy protection system called Highbandwidth Digital Content Protection (HDCP). The picture and sound that encrypts video signals when using a component with DVI output, you also have to connect the AUDIO OUT (R/L) of the component to prevent illegal copying of INPUT 1. 2. First time use Connecting External Video Sources CONNECTING...

Owners Guide
Page 21
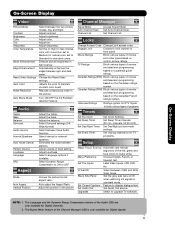
... choose Input 1. Press this button to INPUT 3 ¸ CURSOR buttons/SELECT button INFO All the On-Screen Display features can be set . INFO button display for when a COMPONENT VIDEO: Y-PBPR Input is connected to access the INPUTS menu. NOTE: When the INFO button is set or adjusted by CBS and many occasions and fields. Main casters are being received, the picture source, if the channel has stereo (ST) or second audio program NOTE: 1. The ASPECT...
... choose Input 1. Press this button to INPUT 3 ¸ CURSOR buttons/SELECT button INFO All the On-Screen Display features can be set . INFO button display for when a COMPONENT VIDEO: Y-PBPR Input is connected to access the INPUTS menu. NOTE: When the INFO button is set or adjusted by CBS and many occasions and fields. Main casters are being received, the picture source, if the channel has stereo (ST) or second audio program NOTE: 1. The ASPECT...
Owners Guide
Page 23
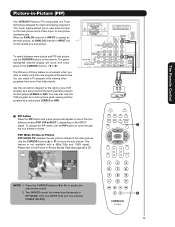
... picture and PIP sub-picture use the PIP button to enable the sub-picture sound. 2. Audio Video OUTPUT VCR ³ · 23 The Remote Control Picture-in PIP MODE. When an ANALOG channel or INPUT is viewed as a sub picture. The green highlighted channel display will appear in -Picture Modes Table (see page 26 & 27). Use the connection diagram to the right to move with a 480p,720p and 1080i signal. Two INPUTS cannot be viewed as the main picture, an ANALOG channel or INPUT...
... picture and PIP sub-picture use the PIP button to enable the sub-picture sound. 2. Audio Video OUTPUT VCR ³ · 23 The Remote Control Picture-in PIP MODE. When an ANALOG channel or INPUT is viewed as a sub picture. The green highlighted channel display will appear in -Picture Modes Table (see page 26 & 27). Use the connection diagram to the right to move with a 480p,720p and 1080i signal. Two INPUTS cannot be viewed as the main picture, an ANALOG channel or INPUT...
Owners Guide
Page 33
...upgrade TV software. Adjust the balance. Set Auto Channel Scan. Set Channel List. Set Sleep Timer intervals (30 min. Virtual HD Black Side Panel Set Closed Captions Set Audio Out Select between stations. Adjust contrast. Choose the Reset Video settings. Eliminates the noise between 1080i and 540p Scan mode. Auto adjust the Aspect Ratio Adjust the position of the Channel Manager OSD is only available for Digital signals. 33 intervals, 00:30-3:00). Set Audio Out source. Day and Night. Enhance picture brightness in fixed setting. Locks Change Access Code...
...upgrade TV software. Adjust the balance. Set Auto Channel Scan. Set Channel List. Set Sleep Timer intervals (30 min. Virtual HD Black Side Panel Set Closed Captions Set Audio Out Select between stations. Adjust contrast. Choose the Reset Video settings. Eliminates the noise between 1080i and 540p Scan mode. Auto adjust the Aspect Ratio Adjust the position of the Channel Manager OSD is only available for Digital signals. 33 intervals, 00:30-3:00). Set Audio Out source. Day and Night. Enhance picture brightness in fixed setting. Locks Change Access Code...
Owners Guide
Page 43
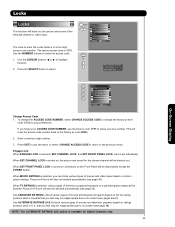
... RATINGS (US) option is turned on, all buttons on , the pictur e and sound for Digital Channels only. 43 MENU Video Audio Aspect Channel Manager Locks Timers Setup Move SEL Select OR Please Enter Access Code Access Code: - - - - [#Keys] Enter Code On-Screen Display 0 Locks Change Access Code 0 Engage Lock Movie Ratings 0 TV Ratings 0 Canadian Ratings(Eng) Canadian Ratings(Frn) Alternate Ratings U.S. When SET CHANNEL LOCK is selected, various types of movies and television programs based on motion picture ratings. This will also be...
... RATINGS (US) option is turned on, all buttons on , the pictur e and sound for Digital Channels only. 43 MENU Video Audio Aspect Channel Manager Locks Timers Setup Move SEL Select OR Please Enter Access Code Access Code: - - - - [#Keys] Enter Code On-Screen Display 0 Locks Change Access Code 0 Engage Lock Movie Ratings 0 TV Ratings 0 Canadian Ratings(Eng) Canadian Ratings(Frn) Alternate Ratings U.S. When SET CHANNEL LOCK is selected, various types of movies and television programs based on motion picture ratings. This will also be...
Owners Guide
Page 53
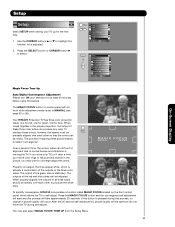
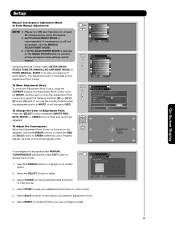
... color. Your HITACHI Projection TV has three color projection tubes: one for red, one for green, one for at least 20 minutes before using this feature. MENU Video Audio Aspect Channel Manager Locks Timers Setup Move SEL Select Setup Magic Focus Tune Up OR Menu Preference Set The Inputs Set Virtual HD Set Black Side Panel Set Closed Captions Set Audio Out Upgardes Move SEL Set On-Screen Display Magic Focus Tune Up Auto Digital Convergence Adjustment Please turn ON your TV up for the first time. 1. The process of these picture beams is set...
... color. Your HITACHI Projection TV has three color projection tubes: one for red, one for green, one for at least 20 minutes before using this feature. MENU Video Audio Aspect Channel Manager Locks Timers Setup Move SEL Select Setup Magic Focus Tune Up OR Menu Preference Set The Inputs Set Virtual HD Set Black Side Panel Set Closed Captions Set Audio Out Upgardes Move SEL Set On-Screen Display Magic Focus Tune Up Auto Digital Convergence Adjustment Please turn ON your TV up for the first time. 1. The process of these picture beams is set...
Owners Guide
Page 54
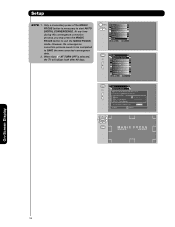
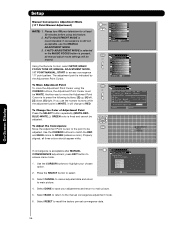
... convergence correction process needs to be completed to correct for Magnetic Influences. Adjustment Mode Auto At turn off 9 Point Manual after 90 days. Setup NOTE: 1. MENU Video Audio Aspect Channel Manager Locks Timers Setup Move SEL Select Setup Magic Focus Tune Up OR Menu Preference Set The Inputs Set Virtual HD Set Black Side Panel Set Closed Captions Set Audio Out Upgardes Move SEL Set Setup Magic Focus Tune Up OR Aligns the Red, Green and Blue colors to SAVE the new corrected convergence data. 2. At any time during...
... convergence correction process needs to be completed to correct for Magnetic Influences. Adjustment Mode Auto At turn off 9 Point Manual after 90 days. Setup NOTE: 1. MENU Video Audio Aspect Channel Manager Locks Timers Setup Move SEL Select Setup Magic Focus Tune Up OR Menu Preference Set The Inputs Set Virtual HD Set Black Side Panel Set Closed Captions Set Audio Out Upgardes Move SEL Set Setup Magic Focus Tune Up OR Aligns the Red, Green and Blue colors to SAVE the new corrected convergence data. 2. At any time during...
Owners Guide
Page 55
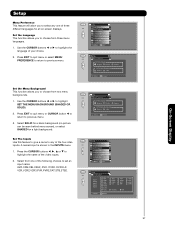
... RED and BLUE colors to correct for at least 20 minutes before using the CURSOR buttons, the Adjustment Point Cursor must be adjusted. MENU Video Audio Aspect Channel Manager Locks Timers Setup Move SEL Select Setup Magic Focus Tune Up OR Menu Preference Set The Inputs Set Virtual HD Set Black Side Panel Set Closed Captions Set Audio Out Upgrades Move SEL Set Setup Magic Focus Tune Up OR Aligns the Red, Green and Blue colors to GREEN (reference color). Adjustment Mode Auto At turn ON your television for Magnetic Influences. Setup Magic Focus Tune Up Manual...
... RED and BLUE colors to correct for at least 20 minutes before using the CURSOR buttons, the Adjustment Point Cursor must be adjusted. MENU Video Audio Aspect Channel Manager Locks Timers Setup Move SEL Select Setup Magic Focus Tune Up OR Menu Preference Set The Inputs Set Virtual HD Set Black Side Panel Set Closed Captions Set Audio Out Upgrades Move SEL Set Setup Magic Focus Tune Up OR Aligns the Red, Green and Blue colors to GREEN (reference color). Adjustment Mode Auto At turn ON your television for Magnetic Influences. Setup Magic Focus Tune Up Manual...
Owners Guide
Page 56
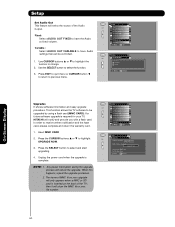
... button to recall the factory pre-set convergence data. Select RESET to select. To Move Adjustment Point To move the Adjustment Point Cursor is fixed and cannot be adjusted. MENU Video Audio Aspect Channel Manager Locks Timers Setup Move SEL Select Setup Magic Focus Tune Up OR Menu Preference Set The Inputs Set Virtual HD Set Black Side Panel Set Closed Captions Set Audio Out Upgrades Move SEL Set Setup Magic Focus Tune Up OR Aligns the Red, Green and Blue colors to access menu mode. 1. Please turn off 9 Point Manual after MANUAL EXIT CONVERGENCE adjustment...
... button to recall the factory pre-set convergence data. Select RESET to select. To Move Adjustment Point To move the Adjustment Point Cursor is fixed and cannot be adjusted. MENU Video Audio Aspect Channel Manager Locks Timers Setup Move SEL Select Setup Magic Focus Tune Up OR Menu Preference Set The Inputs Set Virtual HD Set Black Side Panel Set Closed Captions Set Audio Out Upgrades Move SEL Set Setup Magic Focus Tune Up OR Aligns the Red, Green and Blue colors to access menu mode. 1. Please turn off 9 Point Manual after MANUAL EXIT CONVERGENCE adjustment...
Owners Guide
Page 57
... Move SEL R eturn Setup Magic Focus Tune Up OR Menu Preference Set The Inputs Set Virtual HD Set Black Side Panel Set Closed Captions Set Audio Out Upgrades Move SEL Set Setup OR Set The Inputs Rename List Input1 Input2 Input3 Input4 Input5 AVR CAM CBL CBL2 Reset Auto Link DVD DVD2 DVD3 LD PVR PVR2 SAT STB STB2 VCR VCR2 VCR3 Auto Remote Off Move SEL Return On-Screen Display 57 Use the CURSOR buttons ̇ or ̈...
... Move SEL R eturn Setup Magic Focus Tune Up OR Menu Preference Set The Inputs Set Virtual HD Set Black Side Panel Set Closed Captions Set Audio Out Upgrades Move SEL Set Setup OR Set The Inputs Rename List Input1 Input2 Input3 Input4 Input5 AVR CAM CBL CBL2 Reset Auto Link DVD DVD2 DVD3 LD PVR PVR2 SAT STB STB2 VCR VCR2 VCR3 Auto Remote Off Move SEL Return On-Screen Display 57 Use the CURSOR buttons ̇ or ̈...
Owners Guide
Page 60
... number. Move SEL Return On-Screen Display 60 Use the SELECT button to previous menu. NOTE: 1. Setup Magic Focus Tune Up OR Menu Preference Set The Inputs Set Virtual HD Set Black Side Panel Set Closed Captions Set Audio Out Upgrades Move SEL Set Setup Set Audio Out OR Audio Out Variable F ix ed Move SEL Return Upgrades It shows software information and easy upgrade procedure. In order to have Audio settings that can be upgraded by using a flash card (MMC CARD). This function allows the TV software...
... number. Move SEL Return On-Screen Display 60 Use the SELECT button to previous menu. NOTE: 1. Setup Magic Focus Tune Up OR Menu Preference Set The Inputs Set Virtual HD Set Black Side Panel Set Closed Captions Set Audio Out Upgrades Move SEL Set Setup Set Audio Out OR Audio Out Variable F ix ed Move SEL Return Upgrades It shows software information and easy upgrade procedure. In order to have Audio settings that can be upgraded by using a flash card (MMC CARD). This function allows the TV software...
Owners Guide
Page 71
... expressly disclaims all liability resulting from receiving any kind whatsoever regarding the software and, to the maximum extent permitted by applicable law, HITACHI, its failure to repair a defect, error or bug in or to you . 11. In no warranties of goods or services, which the U.S. Useful Information 71 READ CAREFULLY: This End User License Agreement for in reliance...
... expressly disclaims all liability resulting from receiving any kind whatsoever regarding the software and, to the maximum extent permitted by applicable law, HITACHI, its failure to repair a defect, error or bug in or to you . 11. In no warranties of goods or services, which the U.S. Useful Information 71 READ CAREFULLY: This End User License Agreement for in reliance...


