Owners Guide
Page 5
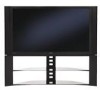
...best stereo separation, place the external speakers at least four feet from the TV cabinet, it is due to the TV's cabinet expanding and contracting due to place it at its large viewing screen. Picture brightness decreases as possible to 18 feet from the perforated back cover of air...good signal area that the location selected allows a free flow of the set up your new HITACHI Projection Television ANTENNA Unless your LCD Rear PTV against a wall, keep it on the screen. If the TV's audio output will be connected to a Hi-Fi system's external speakers, the best audio ...
...best stereo separation, place the external speakers at least four feet from the TV cabinet, it is due to the TV's cabinet expanding and contracting due to place it at its large viewing screen. Picture brightness decreases as possible to 18 feet from the perforated back cover of air...good signal area that the location selected allows a free flow of the set up your new HITACHI Projection Television ANTENNA Unless your LCD Rear PTV against a wall, keep it on the screen. If the TV's audio output will be connected to a Hi-Fi system's external speakers, the best audio ...
Owners Guide
Page 6
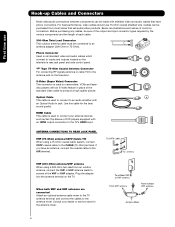
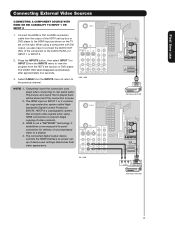
...jack on camcorders, VCRs and laserdisc players with an Optical Audio In jack. HDMI Cable This cable is used to produce a high quality picture. When both VHF and UHF antennas are illustrations and names of the standard video cable to connect your dealer or service store for the ...sound quality. "F" Type 75-Ohm Coaxial Antenna Connector For connecting RF signals (antenna or cable TV) to inputs and outputs located on the TV. ANTENNA CONNECTIONS TO REAR JACK PANEL VHF (75-Ohm) antenna/CATV (Cable TV) When using a 300-Ohm twin lead from most stores that have an antenna, connect the...
...jack on camcorders, VCRs and laserdisc players with an Optical Audio In jack. HDMI Cable This cable is used to produce a high quality picture. When both VHF and UHF antennas are illustrations and names of the standard video cable to connect your dealer or service store for the ...sound quality. "F" Type 75-Ohm Coaxial Antenna Connector For connecting RF signals (antenna or cable TV) to inputs and outputs located on the TV. ANTENNA CONNECTIONS TO REAR JACK PANEL VHF (75-Ohm) antenna/CATV (Cable TV) When using a 300-Ohm twin lead from most stores that have an antenna, connect the...
Owners Guide
Page 7
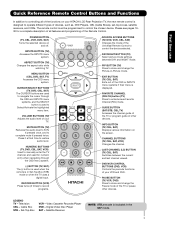
... device on the screen. INPUTS BUTTON (TV) Accesses the INPUTS menu system. NUMERIC BUTTONS (TV, DVD, CBL, SAT, VCR) Used to manually enter the TV channel, and used for a complete description of all of the functions on your HITACHI LCD Rear Projection TV, the new remote control is included in...), set-top-boxes, satellite receivers, and VCRs. Television CBL - PIP BUTTON (TV) Press to show and change the Picture-in-Picture mode. DVD/VCR CONTROL BUTTONS (DVD, VCR) Controls the precode functions of your TV. Press it a third time to restore audio level. Cable Box STB - Please...
... device on the screen. INPUTS BUTTON (TV) Accesses the INPUTS menu system. NUMERIC BUTTONS (TV, DVD, CBL, SAT, VCR) Used to manually enter the TV channel, and used for a complete description of all of the functions on your HITACHI LCD Rear Projection TV, the new remote control is included in...), set-top-boxes, satellite receivers, and VCRs. Television CBL - PIP BUTTON (TV) Press to show and change the Picture-in-Picture mode. DVD/VCR CONTROL BUTTONS (DVD, VCR) Controls the precode functions of your TV. Press it a third time to restore audio level. Cable Box STB - Please...
Owners Guide
Page 10
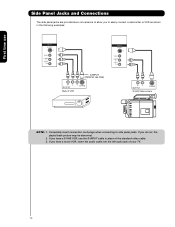
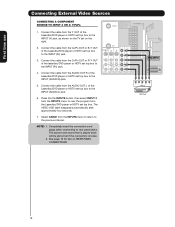
If you have a S-VHS VCR, use Side Panel Jacks and Connections The side panel jacks are provided as shown in place of your TV. 10 If you have a mono VCR, insert the audio cable into the left audio jack of the standard video cable. 3. If you to side panel ... AUDIO R NOTE: 1. Completely insert connection cord plugs when connecting to easily connect a camcorder or VCR as a convenience to allow you do not, the played back picture may be abnormal. 2.
If you have a S-VHS VCR, use Side Panel Jacks and Connections The side panel jacks are provided as shown in place of your TV. 10 If you have a mono VCR, insert the audio cable into the left audio jack of the standard video cable. 3. If you to side panel ... AUDIO R NOTE: 1. Completely insert connection cord plugs when connecting to easily connect a camcorder or VCR as a convenience to allow you do not, the played back picture may be abnormal. 2.
Owners Guide
Page 11
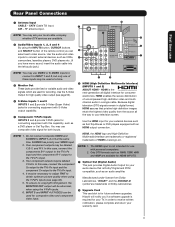
...INPUTS. ¶ Optical Out (Digital Audio) This jack provides Digital Audio Output for your TV. CATV (Cable TV) input. Patent Nos. 4,631,603; 4,577,216; 4,819,098; 4,907,093;...183; Audio/Video Inputs 1, 2, 3 and 4 By using the Y-PBPR jacks. 6. Hitachi will be abnormal, when using the INPUTS button, CURSOR buttons and SELECT button of U.S. To... laserdisc players, DVD players etc. (If you can be necessary to adjust TINT to obtain optimum picture quality when using the Y-PBPR inputs (see page 52). ¿ S-Video Inputs 1 and 2 ...Rear Panel Connections ³ Antenna Input CABLE -
...INPUTS. ¶ Optical Out (Digital Audio) This jack provides Digital Audio Output for your TV. CATV (Cable TV) input. Patent Nos. 4,631,603; 4,577,216; 4,819,098; 4,907,093;...183; Audio/Video Inputs 1, 2, 3 and 4 By using the Y-PBPR jacks. 6. Hitachi will be abnormal, when using the INPUTS button, CURSOR buttons and SELECT button of U.S. To... laserdisc players, DVD players etc. (If you can be necessary to adjust TINT to obtain optimum picture quality when using the Y-PBPR inputs (see page 52). ¿ S-Video Inputs 1 and 2 ...Rear Panel Connections ³ Antenna Input CABLE -
Owners Guide
Page 13
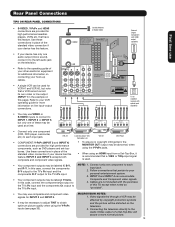
...with HDMI output capability HDMI OUT • If your device has this feature. Composite and Component video signals. 4. Rear Panel Connections First time use TIPS ON REAR PANEL CONNECTIONS • S-VIDEO, Y-PBPR and HDMI connections are provided for high performance components, such as "provided". ... a Set-Top-Box, it to the left audio jack on the television. • Refer to obtain optimum picture quality when using the Y-PBPR inputs (see page 33). Refer to the TV's PR input. VCR #1 DVD Player • COMPONENT: Y-PBPR (INPUT 3 and INPUT 4) connections are provided...
...with HDMI output capability HDMI OUT • If your device has this feature. Composite and Component video signals. 4. Rear Panel Connections First time use TIPS ON REAR PANEL CONNECTIONS • S-VIDEO, Y-PBPR and HDMI connections are provided for high performance components, such as "provided". ... a Set-Top-Box, it to the left audio jack on the television. • Refer to obtain optimum picture quality when using the Y-PBPR inputs (see page 33). Refer to the TV's PR input. VCR #1 DVD Player • COMPONENT: Y-PBPR (INPUT 3 and INPUT 4) connections are provided...
Owners Guide
Page 16
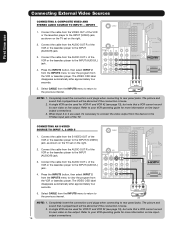
...OSD label disappears automatically after approximately four seconds. 5. Completely insert the connection cord plugs when connecting to rear panel jacks. Refer to the INPUT (VIDEO) jack, as shown on the TV set on the right. 2. INPUT5 1. Connect the cable from the VIDEO OUT of the VCR or...is played back will be used , it's necessary to the INPUT (AUDIO/L) jack. 4. Select CABLE from the VCR or laserdisc player. The picture and sound that is loose. 2. First time use Connecting External Video Sources CONNECTING A COMPOSITE VIDEO AND STEREO AUDIO SOURCE TO INPUT1 - and ...
...OSD label disappears automatically after approximately four seconds. 5. Completely insert the connection cord plugs when connecting to rear panel jacks. Refer to the INPUT (VIDEO) jack, as shown on the TV set on the right. 2. INPUT5 1. Connect the cable from the VIDEO OUT of the VCR or...is played back will be used , it's necessary to the INPUT (AUDIO/L) jack. 4. Select CABLE from the VCR or laserdisc player. The picture and sound that is loose. 2. First time use Connecting External Video Sources CONNECTING A COMPOSITE VIDEO AND STEREO AUDIO SOURCE TO INPUT1 - and ...
Owners Guide
Page 17
... technology. The VIDEO OSD label disappears automatically after approximately four seconds. 3. The picture and sound that encrypts video signals when using a component with DVI output, you... OUT S I V I D E O V I D E O (MONO) (MONO) Y/ VIDEO PB PR (MONO) A U D TV AS CENTER I O R AUDIO TO HI-FI INPUT 1 INPUT 2 INPUT 3 INPUT 4 OPTICAL OUT Digital Audio DVI - NOTE: 1. The...631,603; 4,577,216; 4,819,098; 4,907,093; HDMI Upgrade Card HDMI INPUT 1 OR HDMI INPUT 2 DVI to rear panel jacks. CableCARD™ (Top of card faces right) Top faces AIR MONITOR OUT S I V I D E O V ...
... technology. The VIDEO OSD label disappears automatically after approximately four seconds. 3. The picture and sound that encrypts video signals when using a component with DVI output, you... OUT S I V I D E O V I D E O (MONO) (MONO) Y/ VIDEO PB PR (MONO) A U D TV AS CENTER I O R AUDIO TO HI-FI INPUT 1 INPUT 2 INPUT 3 INPUT 4 OPTICAL OUT Digital Audio DVI - NOTE: 1. The...631,603; 4,577,216; 4,819,098; 4,907,093; HDMI Upgrade Card HDMI INPUT 1 OR HDMI INPUT 2 DVI to rear panel jacks. CableCARD™ (Top of card faces right) Top faces AIR MONITOR OUT S I V I D E O V ...
Owners Guide
Page 18
... the AUDIO OUT R of the Laserdisc/DVD player or HDTV set top box to the INPUT (Y) jack, as shown on the TV set top box to rear panel jacks. The picture and sound that is played back will be abnormal if the connection is loose. 2. See page 13 for limited viewing uses only...
... the AUDIO OUT R of the Laserdisc/DVD player or HDTV set top box to the INPUT (Y) jack, as shown on the TV set top box to rear panel jacks. The picture and sound that is played back will be abnormal if the connection is loose. 2. See page 13 for limited viewing uses only...
Owners Guide
Page 20
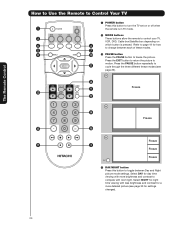
...time viewing with more detailed picture (see page 25). ƹ ¾ Freeze Ƹ ¹ ƹ ƺ ƻ Freeze Ƽ » Freeze Freeze Freeze EXIT ¿ DAY/NIGHT button Press this button to turn the TV set on or off when ³ the remote is in TV mode. · MODE... buttons allow the remote to control your TV, VCR, DVD, Cable box/Satellite box depending on ² ¿ which button is pressed. Select NIGHT for a more brightness and contrast to ¸ motion. Press the EXIT button to return the picture to compete with less brightness and contrast ...
...time viewing with more detailed picture (see page 25). ƹ ¾ Freeze Ƹ ¹ ƹ ƺ ƻ Freeze Ƽ » Freeze Freeze Freeze EXIT ¿ DAY/NIGHT button Press this button to turn the TV set on or off when ³ the remote is in TV mode. · MODE... buttons allow the remote to control your TV, VCR, DVD, Cable box/Satellite box depending on ² ¿ which button is pressed. Select NIGHT for a more brightness and contrast to ¸ motion. Press the EXIT button to return the picture to compete with less brightness and contrast ...
Owners Guide
Page 21
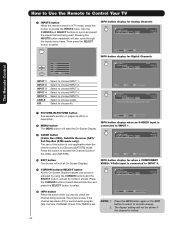
... ratio allows you to adjust the images through the following options. 4:3 STANDARD Use this button to quickly change the picture format ASPECT ratio. How to Use the Remote to Control Your TV The Remote Control ´ ASPECT button Press this aspect mode to display conventional (4:3) images. The Aspect Style setting you choose...
... ratio allows you to adjust the images through the following options. 4:3 STANDARD Use this button to quickly change the picture format ASPECT ratio. How to Use the Remote to Control Your TV The Remote Control ´ ASPECT button Press this aspect mode to display conventional (4:3) images. The Aspect Style setting you choose...
Owners Guide
Page 22
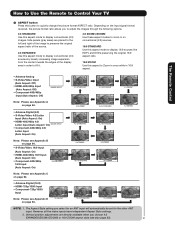
... 16:9 Standard NOTE: 1. 2. Use the CURSOR and SELECT buttons to normal viewing. The Remote Control ¶ PICTURE-IN-PICTURE button See separate section on pages 24-26 for Digital Channels INFO Show Name 3:00PM-̈3:30PM TV-G 1080i Cable 8 KXYZ-HD 3:17PM INPUT 1 INPUT 2 INPUT 3 INPUT 4 INPUT 5 CABLE AIR Select to choose INPUT...
... 16:9 Standard NOTE: 1. 2. Use the CURSOR and SELECT buttons to normal viewing. The Remote Control ¶ PICTURE-IN-PICTURE button See separate section on pages 24-26 for Digital Channels INFO Show Name 3:00PM-̈3:30PM TV-G 1080i Cable 8 KXYZ-HD 3:17PM INPUT 1 INPUT 2 INPUT 3 INPUT 4 INPUT 5 CABLE AIR Select to choose INPUT...
Owners Guide
Page 24
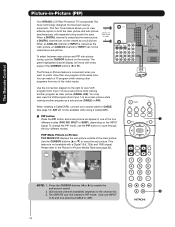
... through the four different modes. POP Mode Picture-in -Picture (PIP) Your HITACHI LCD Rear Projection TV incorporates Two Tuner technology designed for improved viewing enjoyment. Please refer to enable the sub-picture sound. 2. Press the CURSOR buttons (̇ or ̈) to the Picture-in -Picture feature is viewed as the main picture, a DIGITAL channel can watch more than one...
... through the four different modes. POP Mode Picture-in -Picture (PIP) Your HITACHI LCD Rear Projection TV incorporates Two Tuner technology designed for improved viewing enjoyment. Please refer to enable the sub-picture sound. 2. Press the CURSOR buttons (̇ or ̈) to the Picture-in -Picture feature is viewed as the main picture, a DIGITAL channel can watch more than one...

Owners Guide
Page 25
.../Video SPLIT 1080i ANT Digital 16x9 - - Press the SELECT button to navigate the Thumbnail. ANT Analog 16x9/4x3 YES YES - - - - - Picture-in-Picture (PIP) PIP Mode Picture-in memory) and displays them as PIP subpictures or Thumbnail channels. YES - - - - - 480p/480i 16x9/4x3 - - - - - -... - Use the remote CURSOR buttons and ̄) to stop the Surf mode or channel scan. PICTURE-IN-PICTURE (PIP) MODES PIP Scan Sub Aspect Digital Tuner 1080i 720p 480p Analog Tuner Mode Mode Video/S-Video 480i Main 16x9 4x3 16x9 16x9 16x9/4x3...
.../Video SPLIT 1080i ANT Digital 16x9 - - Press the SELECT button to navigate the Thumbnail. ANT Analog 16x9/4x3 YES YES - - - - - Picture-in-Picture (PIP) PIP Mode Picture-in memory) and displays them as PIP subpictures or Thumbnail channels. YES - - - - - 480p/480i 16x9/4x3 - - - - - -... - Use the remote CURSOR buttons and ̄) to stop the Surf mode or channel scan. PICTURE-IN-PICTURE (PIP) MODES PIP Scan Sub Aspect Digital Tuner 1080i 720p 480p Analog Tuner Mode Mode Video/S-Video 480i Main 16x9 4x3 16x9 16x9 16x9/4x3...
Owners Guide
Page 26
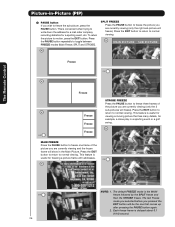
...recording statistics for a sporting event, etc. This is convenient when trying to freeze the sub-picture, press the PAUSE button. This feature is useful for example, a close play in the Main Picture. EXIT EXIT 26 NOTE: 1. SPLIT FREEZE Press the PAUSE button to normal viewing. Press ... with addresses. Press the PAUSE button repeatedly to freeze three frames of the picture you are currently viewing and the frozen frame will freeze). MAIN PICTURE SUB PICTURE Freeze EXIT Freeze Freeze Freeze STROBE FREEZE Press the PAUSE button to toggle between FREEZE modes (Main Freeze, ...
...recording statistics for a sporting event, etc. This is convenient when trying to freeze the sub-picture, press the PAUSE button. This feature is useful for example, a close play in the Main Picture. EXIT EXIT 26 NOTE: 1. SPLIT FREEZE Press the PAUSE button to normal viewing. Press ... with addresses. Press the PAUSE button repeatedly to freeze three frames of the picture you are currently viewing and the frozen frame will freeze). MAIN PICTURE SUB PICTURE Freeze EXIT Freeze Freeze Freeze STROBE FREEZE Press the PAUSE button to toggle between FREEZE modes (Main Freeze, ...
Owners Guide
Page 32
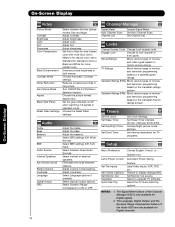
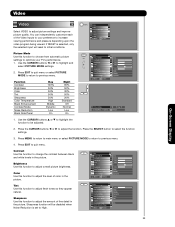
... 4:3 signals in fixed setting. Adjust volume in standard mode. Adjust Loudness. Locks Change Access Code Change Lock access code. TV Ratings Block various types of movies and television programming based on a parental guide ratings. Canadian Ratings (FRN) Block various types...the Canadian ratings system. Eliminates the noise between three Audio Sources. NOTES: 1. On-Screen Display On-Screen Display Video Picture Mode Contrast Brightness Color Tint Sharpness Color Temperature Black Enhancement Contrast Mode Noise Reduction Auto Movie Mode Aspect Black Side Panel...
... 4:3 signals in fixed setting. Adjust volume in standard mode. Adjust Loudness. Locks Change Access Code Change Lock access code. TV Ratings Block various types of movies and television programming based on a parental guide ratings. Canadian Ratings (FRN) Block various types...the Canadian ratings system. Eliminates the noise between three Audio Sources. NOTES: 1. On-Screen Display On-Screen Display Video Picture Mode Contrast Brightness Color Tint Sharpness Color Temperature Black Enhancement Contrast Mode Noise Reduction Auto Movie Mode Aspect Black Side Panel...
Owners Guide
Page 33
... the CURSOR buttons ̇ or ̈ to adjust the level of the Video Inputs to your TV's performance. 1. Color Use this function to adjust the function. Press MENU to return to main menu or select PICTURE MODE to return to quit menu. Press EXIT to previous menu. 4. If RESET is set to... Panel Day 100% 50% 50% 50% 50% High Middle Dynamic Low On Night 90% 50% 30% 50% 20% Standard Off Normal Low On Video OR Picture Mode Contrast Day 100% Brightness Color Tint 50% 50% Sharpness 50% Color Temperature High Black Enhancement Middle Contrast Mode Dynamic Move SEL Select...
... the CURSOR buttons ̇ or ̈ to adjust the level of the Video Inputs to your TV's performance. 1. Color Use this function to adjust the function. Press MENU to return to main menu or select PICTURE MODE to return to quit menu. Press EXIT to previous menu. 4. If RESET is set to... Panel Day 100% 50% 50% 50% 50% High Middle Dynamic Low On Night 90% 50% 30% 50% 20% Standard Off Normal Low On Video OR Picture Mode Contrast Day 100% Brightness Color Tint 50% 50% Sharpness 50% Color Temperature High Black Enhancement Middle Contrast Mode Dynamic Move SEL Select...
Owners Guide
Page 34
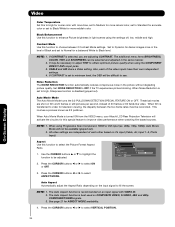
...film based sources. This involves a process known as 3:2 pulldown. NOTE: 1. Press the CURSOR buttons ̇ or ̈ to OFF if the TV experiences picture blocking. The Auto Aspect function is disabled (grayed out). Press the CURSOR buttons ̇ or ̈ to select ASPECT MODE. Auto Movie Mode... Set this to High for cooler color with VIDEO ID. 2. NOTE: 1. If CONTRAST is turned ON from the VIDEO menu, your Hitachi LCD Rear Projection Television will not be reconciled. NOTE: 1. Set to Dynamic for darker images more natural color, set to Standard for accurate color or ...
...film based sources. This involves a process known as 3:2 pulldown. NOTE: 1. Press the CURSOR buttons ̇ or ̈ to OFF if the TV experiences picture blocking. The Auto Aspect function is disabled (grayed out). Press the CURSOR buttons ̇ or ̈ to select ASPECT MODE. Auto Movie Mode... Set this to High for cooler color with VIDEO ID. 2. NOTE: 1. If CONTRAST is turned ON from the VIDEO menu, your Hitachi LCD Rear Projection Television will not be reconciled. NOTE: 1. Set to Dynamic for darker images more natural color, set to Standard for accurate color or ...
Owners Guide
Page 35
...to increase viewing performance and pleasure, depending upon the video program being viewed. The top/bottom gray bar will be useful for centering the picture area at Power OFF. It is selected in 4:3 STANDARD and 16:9 STANDARD MODES. 5. Reset Video Settings This function allows you to ...Side Panel - If RESET is powered "OFF". Vertical position can customize each of screen). NOTE: To maximize operating life of the TV's picture tubes when watching 4:3 signal, Black Side Panel is selected, the VIDEO MENU SETTINGS will always return to the initial conditions as explained above. ...
...to increase viewing performance and pleasure, depending upon the video program being viewed. The top/bottom gray bar will be useful for centering the picture area at Power OFF. It is selected in 4:3 STANDARD and 16:9 STANDARD MODES. 5. Reset Video Settings This function allows you to ...Side Panel - If RESET is powered "OFF". Vertical position can customize each of screen). NOTE: To maximize operating life of the TV's picture tubes when watching 4:3 signal, Black Side Panel is selected, the VIDEO MENU SETTINGS will always return to the initial conditions as explained above. ...

Owners Guide
Page 41
... be set . Engage Lock When ENGAGE LOCK is turned on the two rating systems used to keep the TV from being viewed for a scheduled time period that you set individually. Picture-in -Picture will reset the access code number back to enter the access code. 1. The factory preset code is selected... Use CANADIAN RATINGS to its content (see page 43). NOTE: If MOVIE/TV RATINGS LOCK function settings are ON, SURF will be blocked out. It can block various types of movies and video tapes based on motion picture ratings. Press EXIT to quit the menu or select CHANGE ACCESS CODE to...
... be set . Engage Lock When ENGAGE LOCK is turned on the two rating systems used to keep the TV from being viewed for a scheduled time period that you set individually. Picture-in -Picture will reset the access code number back to enter the access code. 1. The factory preset code is selected... Use CANADIAN RATINGS to its content (see page 43). NOTE: If MOVIE/TV RATINGS LOCK function settings are ON, SURF will be blocked out. It can block various types of movies and video tapes based on motion picture ratings. Press EXIT to quit the menu or select CHANGE ACCESS CODE to...


