

Owners Guide
Page 1
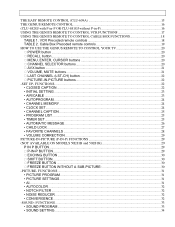
HITACHI PROJECTION COLOR TV 55EX7K 50EX6K 50ES1B/K 46EX3B/4K OPERATING GUIDE Your new HITACHI PROJECTION COLOR TV incorporates a host of features designed to Hi-Fi ...13 S-Video ...13 Rear Speaker Terminals ...14 Speaker Matrix Surround Switch ...- 1 - TABLE OF CONTENTS IMPORTANT SAFEGUARDS ...3 ACCESSORIES ...8 REMOTE CONTROL BATTERY INSTALLATION AND REPLACEMENT 9 PICTURE CAUTIONS ...9 HOW TO SET UP YOUR NEW HITACHI PROJECTION TV 9 ANTENNA ...10 LOCATION...10 VIEWING ...10 HOOK-UP CABLES AND CONNECTORS 10 ANTENNA CONNECTIONS ...11 FRONT PANEL CONTROLS...12 AVX (Audio/Video) selector ......
HITACHI PROJECTION COLOR TV 55EX7K 50EX6K 50ES1B/K 46EX3B/4K OPERATING GUIDE Your new HITACHI PROJECTION COLOR TV incorporates a host of features designed to Hi-Fi ...13 S-Video ...13 Rear Speaker Terminals ...14 Speaker Matrix Surround Switch ...- 1 - TABLE OF CONTENTS IMPORTANT SAFEGUARDS ...3 ACCESSORIES ...8 REMOTE CONTROL BATTERY INSTALLATION AND REPLACEMENT 9 PICTURE CAUTIONS ...9 HOW TO SET UP YOUR NEW HITACHI PROJECTION TV 9 ANTENNA ...10 LOCATION...10 VIEWING ...10 HOOK-UP CABLES AND CONNECTORS 10 ANTENNA CONNECTIONS ...11 FRONT PANEL CONTROLS...12 AVX (Audio/Video) selector ......
Owners Guide
Page 2
... FREEZE BUTTON ...30 FREEZE BUTTON WITHOUT A SUB-PICTURE 30 -PICTURE- Cable Box Precoded remote controls 19 HOW TO USE THE GENIUS REMOTE TO CONTROL YOUR TV 20 POWER button ...20 RECALL button...20 MENU, ENTER, CURSOR buttons 20 CHANNEL SELECTOR buttons 20 AVX button ...21 VOLUME, MUTE buttons ...21 LAST CHANNEL...
... FREEZE BUTTON ...30 FREEZE BUTTON WITHOUT A SUB-PICTURE 30 -PICTURE- Cable Box Precoded remote controls 19 HOW TO USE THE GENIUS REMOTE TO CONTROL YOUR TV 20 POWER button ...20 RECALL button...20 MENU, ENTER, CURSOR buttons 20 CHANNEL SELECTOR buttons 20 AVX button ...21 VOLUME, MUTE buttons ...21 LAST CHANNEL...
Owners Guide
Page 3
...user serviceable parts inside the receiver. • Model number and serial number are indicated on this television receiver. NEVER CONNECT THE TV TO 50 Hz, DIRECT CURRENT, OR ANYTHING OTHER THAN THE SPECIFIED VOLTAGE. REFER SERVICING TO QUALIFIED SERVICE PERSONNEL. Insert power cord ...Hz, AC household current. SPEAKERS ...34 CARE OF YOUR PROJECTION TV AND REMOTE CONTROLS 34 TROUBLESHOOTING ...35 RECEPTION PROBLEMS (EXTERNAL TO THE TV 35 BEFORE CALLING FOR SERVICE 36 SPECIFICATIONS ...36 HITACHI SERVICE HOTLINE...38 IMPORTANT SAFEGUARDS Follow all warnings and instructions marked ...
...user serviceable parts inside the receiver. • Model number and serial number are indicated on this television receiver. NEVER CONNECT THE TV TO 50 Hz, DIRECT CURRENT, OR ANYTHING OTHER THAN THE SPECIFIED VOLTAGE. REFER SERVICING TO QUALIFIED SERVICE PERSONNEL. Insert power cord ...Hz, AC household current. SPEAKERS ...34 CARE OF YOUR PROJECTION TV AND REMOTE CONTROLS 34 TROUBLESHOOTING ...35 RECEPTION PROBLEMS (EXTERNAL TO THE TV 35 BEFORE CALLING FOR SERVICE 36 SPECIFICATIONS ...36 HITACHI SERVICE HOTLINE...38 IMPORTANT SAFEGUARDS Follow all warnings and instructions marked ...
Owners Guide
Page 5
... a cart or stand recommended by the manufacturer, or sold with the television set on or roll over the power cord, and do not place the TV where the power cord is subject to traffic or abuse. Use a damp cloth for cleaning. 11-1 Do not place this television set . Refer all servicing...
... a cart or stand recommended by the manufacturer, or sold with the television set on or roll over the power cord, and do not place the TV where the power cord is subject to traffic or abuse. Use a damp cloth for cleaning. 11-1 Do not place this television set . Refer all servicing...
Owners Guide
Page 8
... the television set "off . ACCESSORIES - 8 - 21 When going on or off " and unplug it checked by a professional service technician. 24 It is normal for some TV sets to restore normal operation by following the detailed procedure in your dealer or service technician.
... the television set "off . ACCESSORIES - 8 - 21 When going on or off " and unplug it checked by a professional service technician. 24 It is normal for some TV sets to restore normal operation by following the detailed procedure in your dealer or service technician.
Owners Guide
Page 9
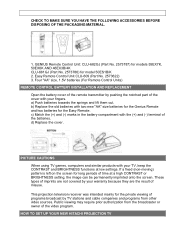
...of the cover with two new "AA" size batteries for the Genius Remote and two batteries for model 50ES1B/K 2. HOW TO SET UP YOUR NEW HITACHI PROJECTION TV These types of imprints are the result of time at low settings. d) Replace the cover. If a fixed (non-moving) pattern is left on ... MAKE SURE YOU HAVE THE FOLLOWING ACCESSORIES BEFORE DISPOSING OF THE PACKAGING MATERIAL. 1. GENIUS Remote Control Unit: CLU-682GJ (Part No. 2573787) for models 55EX7K, 50EX6K AND 46EX3B/4K CLU-681GJ (Part No. 2573786) for the Easy Remote. a) Push batteries towards the springs and lift them out.
...of the cover with two new "AA" size batteries for the Genius Remote and two batteries for model 50ES1B/K 2. HOW TO SET UP YOUR NEW HITACHI PROJECTION TV These types of imprints are the result of time at low settings. d) Replace the cover. If a fixed (non-moving) pattern is left on ... MAKE SURE YOU HAVE THE FOLLOWING ACCESSORIES BEFORE DISPOSING OF THE PACKAGING MATERIAL. 1. GENIUS Remote Control Unit: CLU-682GJ (Part No. 2573787) for models 55EX7K, 50EX6K AND 46EX3B/4K CLU-681GJ (Part No. 2573786) for the Easy Remote. a) Push batteries towards the springs and lift them out.
Owners Guide
Page 10
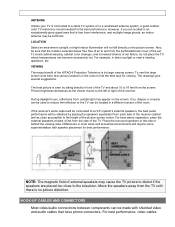
...best stereo separation, place the external speakers at its large viewing screen. To see this large screen at least 4 feet from the TV until there is recommended for viewing. Picture brightness decreases as possible to the side or behind the viewing area. During daylight hours, reflections...For best performance, video cables HOOK-UP CABLES AND CONNECTORS - 10 - VIEWING The major benefit of the HITACHI Projection Television is free from outside light may cause the TV picture to distort if the speakers are located in a different section of the receiver cabinet and as close...
...best stereo separation, place the external speakers at its large viewing screen. To see this large screen at least 4 feet from the TV until there is recommended for viewing. Picture brightness decreases as possible to the side or behind the viewing area. During daylight hours, reflections...For best performance, video cables HOOK-UP CABLES AND CONNECTORS - 10 - VIEWING The major benefit of the HITACHI Projection Television is free from outside light may cause the TV picture to distort if the speakers are located in a different section of the receiver cabinet and as close...

Owners Guide
Page 11
... and input connector types required by the various components. ANTENNA CONNECTIONS - 11 - For connecting RF signals (antenna or cable TV) to produce a high-quality picture. ANTENNA CONNECTIONS VHF (75- ) antenna/CATV(cable TV) When using a 300-ohm twin lead from an outdoor antenna, disconnect the VHF or UHF indoor antenna leads from...
... and input connector types required by the various components. ANTENNA CONNECTIONS - 11 - For connecting RF signals (antenna or cable TV) to produce a high-quality picture. ANTENNA CONNECTIONS VHF (75- ) antenna/CATV(cable TV) When using a 300-ohm twin lead from an outdoor antenna, disconnect the VHF or UHF indoor antenna leads from...
Owners Guide
Page 12
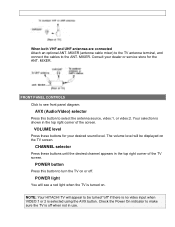
... is off " if there is no video input when VIDEO:1 or 2 is turned on the TV screen. FRONT PANEL CONTROLS - 12 - The volume level will appear to the ANT. Consult your desired sound level. NOTE: Your HITACHI TV will be turned "off when not in the top right corner of the... TV screen. CHANNEL selector Press these buttons for your dealer or service store for the ANT. MIXER (antenna cable ...
... is off " if there is no video input when VIDEO:1 or 2 is turned on the TV screen. FRONT PANEL CONTROLS - 12 - The volume level will appear to the ANT. Consult your desired sound level. NOTE: Your HITACHI TV will be turned "off when not in the top right corner of the... TV screen. CHANNEL selector Press these buttons for your dealer or service store for the ANT. MIXER (antenna cable ...

Owners Guide
Page 13
... AUDIO SYSTEM SET-UP • Match the numbers below to the diagram for speaker placement and refer to the Rear Speaker 8 output on the TV. S-Video See page 34. REMOTE CONTROL sensor Point your Genius Remote at this rear panel jack. These speakers are used for the surround sound requirements...sensor This "Artificial Intelligence" sensor will step through each video source and the input each time it is needed to Hi-Fi" output on the TV. REAR PANEL JACKS Click to this area when selecting channels, adjusting volume, etc. Antenna Input Use an "F" type coaxial cable to connect an ...
... AUDIO SYSTEM SET-UP • Match the numbers below to the diagram for speaker placement and refer to the Rear Speaker 8 output on the TV. S-Video See page 34. REMOTE CONTROL sensor Point your Genius Remote at this rear panel jack. These speakers are used for the surround sound requirements...sensor This "Artificial Intelligence" sensor will step through each video source and the input each time it is needed to Hi-Fi" output on the TV. REAR PANEL JACKS Click to this area when selecting channels, adjusting volume, etc. Antenna Input Use an "F" type coaxial cable to connect an ...
Owners Guide
Page 14
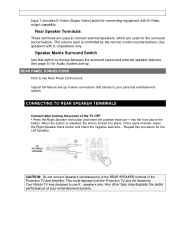
...only. CONNECTING TO REAR SPEAKER TERMINALS Connect after turning the power of the TV OFF. • Press the Right Speaker red button and insert the positive lead wire + into place. Your Hitachi TV was designed to connect external speakers, which are used for the Left ... external speaker features. Speaker Matrix Surround Switch Use this procedure for the surround sound feature. This could damage both the Projection TV and the Speakers. Follow connections that pertain to the REAR SPEAKER terminal of your personal entertainment system. REAR PANEL CONNECTIONS - ...
...only. CONNECTING TO REAR SPEAKER TERMINALS Connect after turning the power of the TV OFF. • Press the Right Speaker red button and insert the positive lead wire + into place. Your Hitachi TV was designed to connect external speakers, which are used for the Left ... external speaker features. Speaker Matrix Surround Switch Use this procedure for the surround sound feature. This could damage both the Projection TV and the Speakers. Follow connections that pertain to the REAR SPEAKER terminal of your personal entertainment system. REAR PANEL CONNECTIONS - ...

Owners Guide
Page 15
... button. THE EASY REMOTE CONTROL (CLU-609A) • To operate your other electronic equipment for additional information on pg. 12). MUTE BUTTON To turn the TV set on "line" input-output connections. Use this connection in the example on connecting your VCR operating guide for more information on or off instantly... VCR#2, but note that have this feature. • If your device has only one audio output, connect it to the left audio jack on the TV. • Refer to turn the sound off . POWER BUTTON Press the "POWER" button to the operating guide of your...
... button. THE EASY REMOTE CONTROL (CLU-609A) • To operate your other electronic equipment for additional information on pg. 12). MUTE BUTTON To turn the TV set on "line" input-output connections. Use this connection in the example on connecting your VCR operating guide for more information on or off instantly... VCR#2, but note that have this feature. • If your device has only one audio output, connect it to the left audio jack on the TV. • Refer to turn the sound off . POWER BUTTON Press the "POWER" button to the operating guide of your...

Owners Guide
Page 16
... that can be controlled • To operate your TV, point the Genius remote at the remote sensor of the TV. • To operate your VCR, point the remote at the remote sensor of the VCR. • To operate your Hitachi Projection TV, the new Genius Remote control is selected. Button layout... when "TV" is designed to select the next lower channel. All other controls are separated from them and arranged in -P)...
... that can be controlled • To operate your TV, point the Genius remote at the remote sensor of the TV. • To operate your VCR, point the remote at the remote sensor of the VCR. • To operate your Hitachi Projection TV, the new Genius Remote control is selected. Button layout... when "TV" is designed to select the next lower channel. All other controls are separated from them and arranged in -P)...
Owners Guide
Page 17
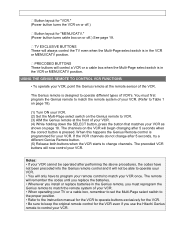
...VCR's. USING THE GENIUS REMOTE TO CONTROL VCR FUNCTIONS Button layout for "MENU/CATV." (Power button turns cable box on or off .) - 17 - TV EXCLUSIVE BUTTONS These will control a VCR or a cable box when the Multi-Page select switch is pressed. The Genius remote is programmed for the VCR... will remember the codes until you replace the batteries. • Whenever you install or replace batteries in the Genius remote, you use the Hitachi Genius remote to change channels. When this happens the Genius Remote control is designed to keep the original remote control for your VCR.
...VCR's. USING THE GENIUS REMOTE TO CONTROL VCR FUNCTIONS Button layout for "MENU/CATV." (Power button turns cable box on or off .) - 17 - TV EXCLUSIVE BUTTONS These will control a VCR or a cable box when the Multi-Page select switch is pressed. The Genius remote is programmed for the VCR... will remember the codes until you replace the batteries. • Whenever you install or replace batteries in the Genius remote, you use the Hitachi Genius remote to change channels. When this happens the Genius Remote control is designed to keep the original remote control for your VCR.

Owners Guide
Page 18
... box, point the Genius remote at the front of your cable box. • When operating your cable box. The Genius remote is programmed for your TV or VCR, remember to set the Multi-Page select switch to the proper position. • Be sure to keep the original remote control for the.... • You will remember the codes until you replace the batteries. • Whenever you install or replace batteries in the Genius remote, you use the Hitachi Genius remote to MENU/CATV. (3) AIM the Genius remote at the remote sensor of cable boxes. If the cable box channels do not change channels...
... box, point the Genius remote at the front of your cable box. • When operating your cable box. The Genius remote is programmed for your TV or VCR, remember to set the Multi-Page select switch to the proper position. • Be sure to keep the original remote control for the.... • You will remember the codes until you replace the batteries. • Whenever you install or replace batteries in the Genius remote, you use the Hitachi Genius remote to MENU/CATV. (3) AIM the Genius remote at the remote sensor of cable boxes. If the cable box channels do not change channels...

Owners Guide
Page 20
... to your preference. CHANNEL SELECTOR buttons HOW TO USE THE GENIUS REMOTE TO CONTROL YOUR TV - 20 - HOW TO USE THE GENIUS REMOTE TO CONTROL YOUR TV CLU-682GJ Illustration POWER button Press this button to turn the TV set on -screen display features can be set . (These functions are explained in the...
... to your preference. CHANNEL SELECTOR buttons HOW TO USE THE GENIUS REMOTE TO CONTROL YOUR TV - 20 - HOW TO USE THE GENIUS REMOTE TO CONTROL YOUR TV CLU-682GJ Illustration POWER button Press this button to turn the TV set on -screen display features can be set . (These functions are explained in the...

Owners Guide
Page 21
.... The word "MUTE" will select between the antenna signal and the two sets of video input jacks each time the button is pressed. NOTE: THE TV MAY NOT RECEIVE SOME CHANNELS IF YOU ARE NOT IN THE CORRECT AIR/CABLE MODE. VOLUME, MUTE buttons Press the "VOLUME" up ( ) button to select... channels. HOW TO USE THE GENIUS REMOTE TO CONTROL YOUR TV - 21 - AVX button The AVX (Auxiliary Video) button will remain displayed if the CLOSED CAPTION feature is on.
.... The word "MUTE" will select between the antenna signal and the two sets of video input jacks each time the button is pressed. NOTE: THE TV MAY NOT RECEIVE SOME CHANNELS IF YOU ARE NOT IN THE CORRECT AIR/CABLE MODE. VOLUME, MUTE buttons Press the "VOLUME" up ( ) button to select... channels. HOW TO USE THE GENIUS REMOTE TO CONTROL YOUR TV - 21 - AVX button The AVX (Auxiliary Video) button will remain displayed if the CLOSED CAPTION feature is on.

Owners Guide
Page 22
... display: LAST CHANNEL (LST-CH) button Use this button to practice using the remote control, press and hold the POWER button on the TV again to end the autodemonstration. • CLOSED CAPTION When CLOSED CAPTION is highlighted in purple can be selected by pressing ENTER. To exit...31 for approximately 5 seconds. FUNCTIONS - 22 - FUNCTIONS Press MENU, 1, and ENTER to highlight a function. Functions. Functions. Press the POWER button on the TV set for a description. -SET UP- There are a total of the on-screen display and to select between the last two channels viewed. (Good for ...
... display: LAST CHANNEL (LST-CH) button Use this button to practice using the remote control, press and hold the POWER button on the TV again to end the autodemonstration. • CLOSED CAPTION When CLOSED CAPTION is highlighted in purple can be selected by pressing ENTER. To exit...31 for approximately 5 seconds. FUNCTIONS - 22 - FUNCTIONS Press MENU, 1, and ENTER to highlight a function. Functions. Functions. Press the POWER button on the TV set for a description. -SET UP- There are a total of the on-screen display and to select between the last two channels viewed. (Good for ...

Owners Guide
Page 23
... exit. Use the CURSOR UP or DOWN to highlight the function to change, press ENTER to change between regular VHF/UHF broadcasting (AIR) and cable TV (CATV1 or CATV2) Press the CURSOR buttons to highlight the correct AIR/CABLE mode and press MENU to turn the display on the... is not possible. CHANNEL: 1 is for each mode are shown at the right. Your local TV program guide denotes these programs as news reports or a TV program guide. This information covers the entire screen and viewing the TV program is to exit. If you are displayed on or off. -SET UP- and -INITIAL...
... exit. Use the CURSOR UP or DOWN to highlight the function to change, press ENTER to change between regular VHF/UHF broadcasting (AIR) and cable TV (CATV1 or CATV2) Press the CURSOR buttons to highlight the correct AIR/CABLE mode and press MENU to turn the display on the... is not possible. CHANNEL: 1 is for each mode are shown at the right. Your local TV program guide denotes these programs as news reports or a TV program guide. This information covers the entire screen and viewing the TV program is to exit. If you are displayed on or off. -SET UP- and -INITIAL...

Owners Guide
Page 24
... certain CATV channels are poor or not possible in the CATV1 mode, set -AIR/CABLEselect to CATV2. • AUTOPROGRAM This feature will automatically store active TV channels in previous examples to skip over unused channels when using the CURSOR , buttons. • CLOCK SET Use the same remote control buttons as shown... MEMORY to add or erase additional channels. • CHANNEL MEMORY Use this function after AUTOPROGRAM to add or erase additional channels to your cable or TV guide for channel identification standards. - 24 -
... certain CATV channels are poor or not possible in the CATV1 mode, set -AIR/CABLEselect to CATV2. • AUTOPROGRAM This feature will automatically store active TV channels in previous examples to skip over unused channels when using the CURSOR , buttons. • CLOCK SET Use the same remote control buttons as shown... MEMORY to add or erase additional channels. • CHANNEL MEMORY Use this function after AUTOPROGRAM to add or erase additional channels to your cable or TV guide for channel identification standards. - 24 -


