
Owners Guide
Page 3
...an outside antenna is connected to the receiver be connected to the grounding system of the building, as close to call "1-800-HITACHI." ed to the point of programs broadcast by the manufacturer. 17. For product recycling and disposal information, contact your outlet, ...consult an electrician for wall, shelf or ceiling mounting as recommended by TV stations and cable companies, as well as practical. Read these instructions. 3. IMPORTANT SAFETY INSTRUCTIONS Read before operating equipment Follow all ...
...an outside antenna is connected to the receiver be connected to the grounding system of the building, as close to call "1-800-HITACHI." ed to the point of programs broadcast by the manufacturer. 17. For product recycling and disposal information, contact your outlet, ...consult an electrician for wall, shelf or ceiling mounting as recommended by TV stations and cable companies, as well as practical. Read these instructions. 3. IMPORTANT SAFETY INSTRUCTIONS Read before operating equipment Follow all ...
Owners Guide
Page 4
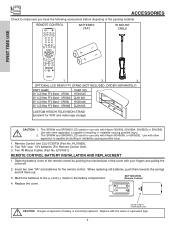
...("AA") IR MOUSE CABLE REC CLU-5729TSI 1. 2. 3. SP60WS PART NO. This SP50W and SP50WS LCD stand for VCR and video tape storage. Use with Hitachi 50V500, 50V500A, 50V500G or 50V500E. Remote Control Unit CLU-5729TSI (Part No. BOTTOM VIEW (Remote Control) 4. CAUTION:... Danger of the packing material. REMOTE CONTROL POWER TV DVD VCR CBL SOURCE WIZARD CD PVR STB AMP 1 2 3 4 5 6 7 8 9 SLEEP C.C. SP60W 60" LCD Rear PTV Stand...
...("AA") IR MOUSE CABLE REC CLU-5729TSI 1. 2. 3. SP60WS PART NO. This SP50W and SP50WS LCD stand for VCR and video tape storage. Use with Hitachi 50V500, 50V500A, 50V500G or 50V500E. Remote Control Unit CLU-5729TSI (Part No. BOTTOM VIEW (Remote Control) 4. CAUTION:... Danger of the packing material. REMOTE CONTROL POWER TV DVD VCR CBL SOURCE WIZARD CD PVR STB AMP 1 2 3 4 5 6 7 8 9 SLEEP C.C. SP60W 60" LCD Rear PTV Stand...
Owners Guide
Page 5
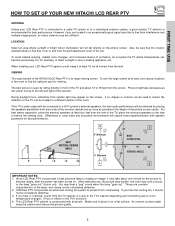
...Make sure to room temperature changes. To avoid cabinet warping, cabinet color changes, and increased chance of the picture screen center. If the TV's audio output will be connected to a Hi-Fi system's external speakers, the best audio performance will be considered defective. 3. FIRST TIME ...(burns out). If you are common characteristics of the lamp, and should not be obtained by sitting directly in front of the HITACHI LCD Rear PTV is free from the wall. LOCATION Select an area where sunlight or bright indoor illumination will require some experimentation with all ...
...Make sure to room temperature changes. To avoid cabinet warping, cabinet color changes, and increased chance of the picture screen center. If the TV's audio output will be connected to a Hi-Fi system's external speakers, the best audio performance will be considered defective. 3. FIRST TIME ...(burns out). If you are common characteristics of the lamp, and should not be obtained by sitting directly in front of the HITACHI LCD Rear PTV is free from the wall. LOCATION Select an area where sunlight or bright indoor illumination will require some experimentation with all ...

Owners Guide
Page 6
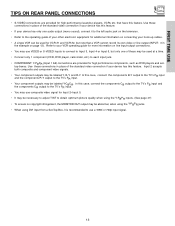
... the IR BLASTER output of the VHF or UHF adapter. ANTENNA CONNECTIONS TO REAR JACK PANEL VHF (75-Ohm) antenna/CATV (Cable TV) When using a 75-Ohm coaxial cable system, connect the outdoor antenna or CATV coaxial cable to screws of your external component's remote control. VHF (... to the antenna jack on the television's rear jack panel and front control panel. S-Video (Super Video) Connector This connector is used on the TV. If you have phono connectors. Consult your external components. "F" Type 75-Ohm Coaxial Antenna Connector For connecting RF signals (antenna or cable...
... the IR BLASTER output of the VHF or UHF adapter. ANTENNA CONNECTIONS TO REAR JACK PANEL VHF (75-Ohm) antenna/CATV (Cable TV) When using a 75-Ohm coaxial cable system, connect the outdoor antenna or CATV coaxial cable to screws of your external component's remote control. VHF (... to the antenna jack on the television's rear jack panel and front control panel. S-Video (Super Video) Connector This connector is used on the TV. If you have phono connectors. Consult your external components. "F" Type 75-Ohm Coaxial Antenna Connector For connecting RF signals (antenna or cable...

Owners Guide
Page 7
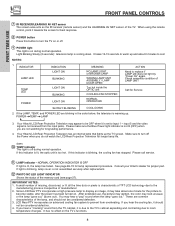
... MENU/SELECT button ቧቮ ቦ ብ ቤ ባቢ This button allows you to enter the MENU, making it was set TV features to view the digital still pictures (see page 33). To change for improvement. in MENU mode. The volume level will be at a volume level...MENU mode. ብ VOLUME level Press these audio/video jacks for your favorite show or new recording. Press the INPUT/EXIT button on the TV screen. St ewchuircehDmigietaml (oSrDy)card you have been tested with your television. Memory Stick (MS) SanDisk 4 in the top right corner of ...
... MENU/SELECT button ቧቮ ቦ ብ ቤ ባቢ This button allows you to enter the MENU, making it was set TV features to view the digital still pictures (see page 33). To change for improvement. in MENU mode. The volume level will be at a volume level...MENU mode. ብ VOLUME level Press these audio/video jacks for your favorite show or new recording. Press the INPUT/EXIT button on the TV screen. St ewchuircehDmigietaml (oSrDy)card you have been tested with your television. Memory Stick (MS) SanDisk 4 in the top right corner of ...
Owners Guide
Page 8
...If the LAMP, TEMP, and POWER LED are blinking in the order below, the television is set to room temperature changes. Your Hitachi LCD Rear Projection Television has an internal lamp that lights up . down . These are not watching for longer lamp life. If you hear the ...video signal is on . Please call service. ቭ LAMP indicator - When using the remote control, point it is warming up the TV screen. Your Hitachi LCD Rear Projection Television may hear a "pop" sound when the lamp "goes out." Please make sure the Blue Power light indicator is blinking, the...
...If the LAMP, TEMP, and POWER LED are blinking in the order below, the television is set to room temperature changes. Your Hitachi LCD Rear Projection Television has an internal lamp that lights up . down . These are not watching for longer lamp life. If you hear the ...video signal is on . Please call service. ቭ LAMP indicator - When using the remote control, point it is warming up the TV screen. Your Hitachi LCD Rear Projection Television may hear a "pop" sound when the lamp "goes out." Please make sure the Blue Power light indicator is blinking, the...

Owners Guide
Page 9
... back picture may be abnormal. 2. FIRST TIME USE FRONT PANEL JACKS AND CONNECTORS The front panel jacks are provided as shown in place of your TV. 9
... back picture may be abnormal. 2. FIRST TIME USE FRONT PANEL JACKS AND CONNECTORS The front panel jacks are provided as shown in place of your TV. 9

Owners Guide
Page 10
...center channel by the television's main volume. ቦ CENTER IN (Input) This jack is for connecting equipment with center signal capability. The TV must be controlled by selecting "TV as Center" on the Internal Speakers Settings of the Audio Menu (see page 50). ቧ S-VIDEO Inputs 3 and 4 Inputs 3... with S-VIDEO output capability. 10 Use the audio and video inputs to be used for high quality video output. This feature allows the TV speakers to connect external devices, such as a main picture. Use the S-VIDEO Output for recording. ANT A can only be displayed as...
...center channel by the television's main volume. ቦ CENTER IN (Input) This jack is for connecting equipment with center signal capability. The TV must be controlled by selecting "TV as Center" on the Internal Speakers Settings of the Audio Menu (see page 50). ቧ S-VIDEO Inputs 3 and 4 Inputs 3... with S-VIDEO output capability. 10 Use the audio and video inputs to be used for high quality video output. This feature allows the TV speakers to connect external devices, such as a main picture. Use the S-VIDEO Output for recording. ANT A can only be displayed as...

Owners Guide
Page 11
... composite video signal for DVI-HDTV input. 2. S-VIDEO has priority over VIDEO input. 2. In this case, connect the components B-Y output to the TV's PB input and the components R-Y output to control the external components with your television's remote control (see page 20). ቪ DVI-HDTV Input ... and S-VIDEO to obtain optimum picture quality when using the Y-PBPR jacks. 6. In this case, connect the component CB output to the TV's PB input and the component CR output to your external components can automatically be labeled Y, B-Y, and R-Y. With this capability, such as ...
... composite video signal for DVI-HDTV input. 2. S-VIDEO has priority over VIDEO input. 2. In this case, connect the components B-Y output to the TV's PB input and the components R-Y output to control the external components with your television's remote control (see page 20). ቪ DVI-HDTV Input ... and S-VIDEO to obtain optimum picture quality when using the Y-PBPR jacks. 6. In this case, connect the component CB output to the TV's PB input and the component CR output to your external components can automatically be labeled Y, B-Y, and R-Y. With this capability, such as ...

Owners Guide
Page 12
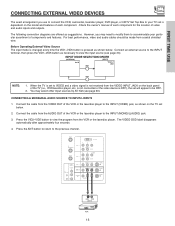
...12 Connect only 1 component to Input2~Input5. 4. FIRST TIME USE REAR PANEL CONNECTIONS TYPICAL FULL-FEATURE SETUP Outside antenna or cable TV coaxial cable 2-Way signal splitter CONNECT TO IR BLASTER IR Sensor (Provided) DVD Player OUTPUT Y PB/CB PR/CR L R...4 MONITOR OUT R (MONO)/L VIDEO R (MONO)/L VIDEO R L VIDEO AUDIO S-VIDEO S-VIDEO S-VIDEO VCR #1 ANT OUTPUT IN S-VIDEO V L R OUTPUT INPUT Cable TV Box LR INPUT CENTER OUTPUT Stereo System Amplifier IR Sensor S-VIDEO V L R INPUT S-VIDEO V L R OUTPUT CONNECT TO IR BLASTER VCR #2 (Provided) Laserdisc player, VCR...
...12 Connect only 1 component to Input2~Input5. 4. FIRST TIME USE REAR PANEL CONNECTIONS TYPICAL FULL-FEATURE SETUP Outside antenna or cable TV coaxial cable 2-Way signal splitter CONNECT TO IR BLASTER IR Sensor (Provided) DVD Player OUTPUT Y PB/CB PR/CR L R...4 MONITOR OUT R (MONO)/L VIDEO R (MONO)/L VIDEO R L VIDEO AUDIO S-VIDEO S-VIDEO S-VIDEO VCR #1 ANT OUTPUT IN S-VIDEO V L R OUTPUT INPUT Cable TV Box LR INPUT CENTER OUTPUT Stereo System Amplifier IR Sensor S-VIDEO V L R INPUT S-VIDEO V L R OUTPUT CONNECT TO IR BLASTER VCR #2 (Provided) Laserdisc player, VCR...
Owners Guide
Page 13
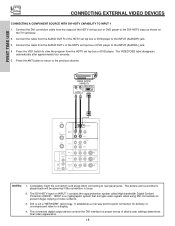
... infringement, the MONITOR OUT output may be used at a time. • Connect only 1 component (VCR, DVD player, camcorder, etc.) to the TV's PR input. • Your component outputs may use composite video signal for VCR #1 and VCR #2, but note that have this case, connect the ...components B-Y output to the TV's PB input and the components R-Y output to each input jack. • COMPONENT: Y-PBPR (Input 1 &2) connections are provided for high performance components,...
... infringement, the MONITOR OUT output may be used at a time. • Connect only 1 component (VCR, DVD player, camcorder, etc.) to the TV's PR input. • Your component outputs may use composite video signal for VCR #1 and VCR #2, but note that have this case, connect the ...components B-Y output to the TV's PB input and the components R-Y output to each input jack. • COMPONENT: Y-PBPR (Input 1 &2) connections are provided for high performance components,...

Owners Guide
Page 14
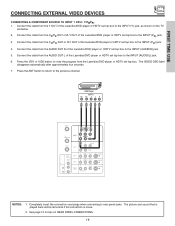
... sound, set the volume control of the audio amplifier lower and adjust the sound using the remote control of an external audio amplifier with the TV remote control, connect the system as shown below. To prevent damage to your personal entertainment system. 3. REAR PANEL OF TELEVISION ANT A TO CONVERTER ANT B INPUT... R L VIDEO AUDIO S-VIDEO S-VIDEO S-VIDEO LR INPUT Stereo System Amplifier NOTES: 1. FIRST TIME USE CONNECTING EXTERNAL AUDIO DEVICES To control the audio level of the TV set. 2.
... sound, set the volume control of the audio amplifier lower and adjust the sound using the remote control of an external audio amplifier with the TV remote control, connect the system as shown below. To prevent damage to your personal entertainment system. 3. REAR PANEL OF TELEVISION ANT A TO CONVERTER ANT B INPUT... R L VIDEO AUDIO S-VIDEO S-VIDEO S-VIDEO LR INPUT Stereo System Amplifier NOTES: 1. FIRST TIME USE CONNECTING EXTERNAL AUDIO DEVICES To control the audio level of the TV set. 2.
Owners Guide
Page 15
...performance, video and audio cables should be OFF. 2. Connect the cable from the VIDEO OUT of each component for the location of the TV (i.e., VCR/laserdisc player, etc. Connect the cable from coaxial shielded wire. However, you use to connect the VCR, camcorder, laserdisc player...your particular assortment of the VCR or the laserdisc player to be made from the AUDIO OUT of components and features. When the TV is pressed as suggestions. The VIDEO OSD label disappears automatically after approximately four seconds. 4. CONNECTING A MONAURAL AUDIO SOURCE TO INPUT2~...
...performance, video and audio cables should be OFF. 2. Connect the cable from the VIDEO OUT of each component for the location of the TV (i.e., VCR/laserdisc player, etc. Connect the cable from coaxial shielded wire. However, you use to connect the VCR, camcorder, laserdisc player...your particular assortment of the VCR or the laserdisc player to be made from the AUDIO OUT of components and features. When the TV is pressed as suggestions. The VIDEO OSD label disappears automatically after approximately four seconds. 4. CONNECTING A MONAURAL AUDIO SOURCE TO INPUT2~...

Owners Guide
Page 16
... to the previous channel. Press the ANT button to return to the INPUT (AUDIO/R) jack. 3. A single VCR can be used for more information on the TV set below. 2. Refer to your VCR operating guide for VCR #1 and VCR #2 (see page 12), but note that is played back will be abnormal if...
... to the previous channel. Press the ANT button to return to the INPUT (AUDIO/R) jack. 3. A single VCR can be used for more information on the TV set below. 2. Refer to your VCR operating guide for VCR #1 and VCR #2 (see page 12), but note that is played back will be abnormal if...

Owners Guide
Page 17
... from the VCR or laserdisc player. A single VCR can be abnormal if the connection is played back will be used for more information on the TV set below. 2. Connect the cable from the S-VIDEO OUT of the VCR or the laserdisc player to view the program from the AUDIO OUT L of...
... from the VCR or laserdisc player. A single VCR can be abnormal if the connection is played back will be used for more information on the TV set below. 2. Connect the cable from the S-VIDEO OUT of the VCR or the laserdisc player to view the program from the AUDIO OUT L of...
Owners Guide
Page 18
... the HDTV set top box or DVD player. Connect the cable from the output of the HDTV set below. 2. The DVI-HDTV input on the TV set top box or DVD player to the DVI-HDTV input as shown on INPUT 1 contains the copy protection system called High-bandwidth Digital Content...
... the HDTV set top box or DVD player. Connect the cable from the output of the HDTV set below. 2. The DVI-HDTV input on the TV set top box or DVD player to the DVI-HDTV input as shown on INPUT 1 contains the copy protection system called High-bandwidth Digital Content...
Owners Guide
Page 19
... the Laserdisc/DVD player or HDTV set below. 2. The VIDEO OSD label disappears automatically after approximately four seconds. 7. See page 13 for tips on the TV set top box to the INPUT (PR) jack. 4. Completely insert the connection cord plugs when connecting to the previous channel. Connect the cable from the...
... the Laserdisc/DVD player or HDTV set below. 2. The VIDEO OSD label disappears automatically after approximately four seconds. 7. See page 13 for tips on the TV set top box to the INPUT (PR) jack. 4. Completely insert the connection cord plugs when connecting to the previous channel. Connect the cable from the...

Owners Guide
Page 20
...you can connect the Television with up . Connect the IR Mouse cable to the IR BLASTER input of an AV Network setup between your Hitachi LCD TV and external Audio/Video equipment (VCR and DVD Player). You can use . Please see page 22). 4. Place the IR mouse in...components IR sensor for the AV Network to 2 external Audio/Video components. FIRST TIME USE CONNECTING AV NETWORK Your Hitachi LCD TV is equipped with the TV remote control. Connect your Hitachi TV Remote Control. The correct codes must be entered for each of four external components. 2. Press the A/V NET ...
...you can connect the Television with up . Connect the IR Mouse cable to the IR BLASTER input of an AV Network setup between your Hitachi LCD TV and external Audio/Video equipment (VCR and DVD Player). You can use . Please see page 22). 4. Place the IR mouse in...components IR sensor for the AV Network to 2 external Audio/Video components. FIRST TIME USE CONNECTING AV NETWORK Your Hitachi LCD TV is equipped with the TV remote control. Connect your Hitachi TV Remote Control. The correct codes must be entered for each of four external components. 2. Press the A/V NET ...

Owners Guide
Page 21
... Select THUMB STICK CH UP Enter the device (equipment) code listed on page 22. HITACHI AV NET SET UP DVD Device Code Video Input Audio Input 0 6 7 2 (Enter code "9999" to uninstall) Input 1 Using TV Transmission Test BACK POWER OK PLAY EXIT Move Set Input SEL Select THUMB STICK (x2)...OK Input PLAY EXIT CH UP THUMB STICK Proper Code Entered from your AV network. HITACHI AV NET SET UP DVD Device Code Video Input Audio Input 0 6 7 2 (Enter code "9999" to uninstall) Input 1 Using TV Transmission Test BACK POWER OK PLAY EXIT Move Set Input SEL Select CH UP THUMB STICK...
... Select THUMB STICK CH UP Enter the device (equipment) code listed on page 22. HITACHI AV NET SET UP DVD Device Code Video Input Audio Input 0 6 7 2 (Enter code "9999" to uninstall) Input 1 Using TV Transmission Test BACK POWER OK PLAY EXIT Move Set Input SEL Select THUMB STICK (x2)...OK Input PLAY EXIT CH UP THUMB STICK Proper Code Entered from your AV network. HITACHI AV NET SET UP DVD Device Code Video Input Audio Input 0 6 7 2 (Enter code "9999" to uninstall) Input 1 Using TV Transmission Test BACK POWER OK PLAY EXIT Move Set Input SEL Select CH UP THUMB STICK...
Owners Guide
Page 23
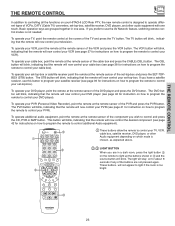
... not needed. To operate your PVR (see page 42 for instructions on how to program the remote to control additional Audio equipment). ቢ POWER ባ TV DVD VCR CBL SOURCE WIZARD CD PVR STB AMP 1 2 3 4 5 6 ቤ 7 8 9 SLEEP C.C. THE REMOTE CONTROL THE REMOTE CONTROL In addition to ... at the remote sensor of the TV and press the TV button. This button will blink, indicating that the remote will stay on your TV, point the remote control at the screen of the PVR and press the PVR button. To operate your HITACHI LCD Rear PTV, the new remote control...
... not needed. To operate your PVR (see page 42 for instructions on how to program the remote to control additional Audio equipment). ቢ POWER ባ TV DVD VCR CBL SOURCE WIZARD CD PVR STB AMP 1 2 3 4 5 6 ቤ 7 8 9 SLEEP C.C. THE REMOTE CONTROL THE REMOTE CONTROL In addition to ... at the remote sensor of the TV and press the TV button. This button will blink, indicating that the remote will stay on your TV, point the remote control at the screen of the PVR and press the PVR button. To operate your HITACHI LCD Rear PTV, the new remote control...


