
Owners Guide
Page 2
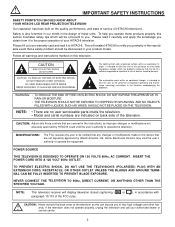
...USER SERVICEABLE PARTS INSIDE. MODIFICATIONS: The FCC requires the user to be of benefit to very high voltages and other hazards. IMPORTANT SAFETY INSTRUCTIONS SAFETY POINTS YOU SHOULD KNOW ABOUT YOUR HITACHI LCD REAR PROJECTION TELEVISION Our reputation has been built on back side of the television. INSERT THE POWER... TELEVISION. Home Electronics Division may be discovered in the instructions, as this device that a safety problem should be of a sufficient magnitude to persons. REFER SERVICING TO QUALIFIED SERVICE PERSONNEL. NEVER CONNECT THE TELEVISION TO 50Hz, DIRECT ...
...USER SERVICEABLE PARTS INSIDE. MODIFICATIONS: The FCC requires the user to be of benefit to very high voltages and other hazards. IMPORTANT SAFETY INSTRUCTIONS SAFETY POINTS YOU SHOULD KNOW ABOUT YOUR HITACHI LCD REAR PROJECTION TELEVISION Our reputation has been built on back side of the television. INSERT THE POWER... TELEVISION. Home Electronics Division may be discovered in the instructions, as this device that a safety problem should be of a sufficient magnitude to persons. REFER SERVICING TO QUALIFIED SERVICE PERSONNEL. NEVER CONNECT THE TELEVISION TO 50Hz, DIRECT ...
Owners Guide
Page 3
... of time. 14. Unplug this product and its lamp in wire to an antenna discharge unit, size of grounding connectors, location of antenna-discharge unit, connection to grounding electrodes and requirements for replacement of the lead-in accordance with respect to proper grounding for wall, shelf or ceiling mounting as recommended by TV stations and cable companies...
... of time. 14. Unplug this product and its lamp in wire to an antenna discharge unit, size of grounding connectors, location of antenna-discharge unit, connection to grounding electrodes and requirements for replacement of the lead-in accordance with respect to proper grounding for wall, shelf or ceiling mounting as recommended by TV stations and cable companies...
Owners Guide
Page 7
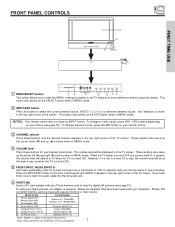
...new recording. These buttons also serve as the SELECT button when in MENU mode. ብ VOLUME level Press these buttons for a quick hook-up (̆) buttons when in MENU mode. ባ INPUT/EXIT button Press this button to change antenna source, press the ANT button on the front control panel...of the screen. Memory Stick (MS) 3. If you have been tested with your digital pictures, an adapter is shown in 1 (SDDR-6507) 3. Memory Card Tested Sample 1. VOL+ CH- When the TV power is turned ON. ቦ FRONT INPUT JACKS (INPUT 5) Use these buttons until VIDEO: 5 ...
...new recording. These buttons also serve as the SELECT button when in MENU mode. ብ VOLUME level Press these buttons for a quick hook-up (̆) buttons when in MENU mode. ባ INPUT/EXIT button Press this button to change antenna source, press the ANT button on the front control panel...of the screen. Memory Stick (MS) 3. If you have been tested with your digital pictures, an adapter is shown in 1 (SDDR-6507) 3. Memory Card Tested Sample 1. VOL+ CH- When the TV power is turned ON. ቦ FRONT INPUT JACKS (INPUT 5) Use these buttons until VIDEO: 5 ...

Owners Guide
Page 8
... effect on . Check assembly condition of the lamp, and should not be considered defective. 3. Your Hitachi LCD Rear Projection Television has an internal lamp that lights up . If this indicator is lit, the optic unit is lit, the lamp has failed. After extended use, the picture may darken, the color may hear a "pop" sound when the lamp "goes out." POWER TEMP LAMP 3. Make sure to...
... effect on . Check assembly condition of the lamp, and should not be considered defective. 3. Your Hitachi LCD Rear Projection Television has an internal lamp that lights up . If this indicator is lit, the optic unit is lit, the lamp has failed. After extended use, the picture may darken, the color may hear a "pop" sound when the lamp "goes out." POWER TEMP LAMP 3. Make sure to...
Owners Guide
Page 10
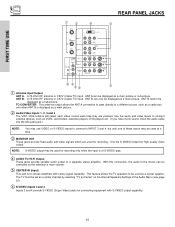
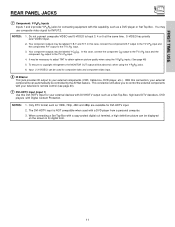
...picture. Use the audio and video inputs to INPUT 3 and 4, but only one of these inputs may be set as a center channel by the television's main volume. ቦ CENTER IN (Input) This jack is for high quality video output. This feature allows the TV speakers to be displayed as a main picture or sub-picture...may use VIDEO or S-VIDEO inputs to connect to connect external devices, such as a center speaker. Use the S-VIDEO Output for stereo amplifiers with S-VIDEO output capability. 10 ANT B cannot be controlled by selecting "TV as a main picture. FIRST TIME USE REAR PANEL ...
...picture. Use the audio and video inputs to INPUT 3 and 4, but only one of these inputs may be set as a center channel by the television's main volume. ቦ CENTER IN (Input) This jack is for high quality video output. This feature allows the TV speakers to be displayed as a main picture or sub-picture...may use VIDEO or S-VIDEO inputs to connect to connect external devices, such as a center speaker. Use the S-VIDEO Output for stereo amplifiers with S-VIDEO output capability. 10 ANT B cannot be controlled by selecting "TV as a main picture. FIRST TIME USE REAR PANEL ...
Owners Guide
Page 11
... outputs may use composite video signal for composite video and component video input. ቩ IR Blaster This jack provides IR output to the TV's PR input. 4. Only DTV format such as a DVD player or Set Top Box. You may be necessary to adjust TINT to control... or 5 at the same time. S-VIDEO has priority over VIDEO input. 2. Input 2 (Y/VIDEO) can be used with a copy-protect digital out terminal, a high definition picture can automatically be displayed on the screen in its digital form. 11 NOTES: 1. It may be abnormal, when using the Y-PBPR inputs. (See page 48...
... outputs may use composite video signal for composite video and component video input. ቩ IR Blaster This jack provides IR output to the TV's PR input. 4. Only DTV format such as a DVD player or Set Top Box. You may be necessary to adjust TINT to control... or 5 at the same time. S-VIDEO has priority over VIDEO input. 2. Input 2 (Y/VIDEO) can be used with a copy-protect digital out terminal, a high definition picture can automatically be displayed on the screen in its digital form. 11 NOTES: 1. It may be abnormal, when using the Y-PBPR inputs. (See page 48...
Owners Guide
Page 15
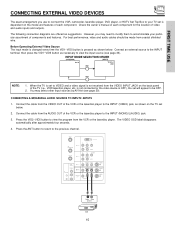
... Check the owner's manual of the VCR or the laserdisc player to be made from the VCR or the laserdisc player. Before Operating External Video Source The input mode is changed every time the VID1~VID5 button is OFF), the set below . is not connected or the video device is .... However, you use to connect the VCR, camcorder, laserdisc player, DVD player, or HDTV Set Top Box to the INPUT terminal, then press the VID1~VID5 button as suggestions. The following connection diagrams are offered as necessary to VIDEO and a video signal is dependent on the back panel of the VCR ...
... Check the owner's manual of the VCR or the laserdisc player to be made from the VCR or the laserdisc player. Before Operating External Video Source The input mode is changed every time the VID1~VID5 button is OFF), the set below . is not connected or the video device is .... However, you use to connect the VCR, camcorder, laserdisc player, DVD player, or HDTV Set Top Box to the INPUT terminal, then press the VID1~VID5 button as suggestions. The following connection diagrams are offered as necessary to VIDEO and a video signal is dependent on the back panel of the VCR ...
Owners Guide
Page 18
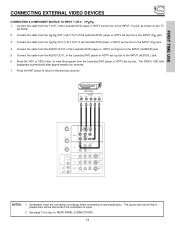
...picture and sound that encrypts video signals when using DVI connections to prevent illegal copying of the HDTV set top box or DVD player to the DVI-HDTV input as shown on INPUT 1 contains the copy protection system called High-bandwidth Digital Content Protection (HDCP). Press the ANT button to return to rear panel jacks. FIRST TIME USE...interface so proper set below. 2. The DVI-HDTV input on the TV set -up of uncompressed video to -point connection for delivery of device user settings determines final video appearance. 18 DVI is loose. 2. The VIDEO OSD label disappears...
...picture and sound that encrypts video signals when using DVI connections to prevent illegal copying of the HDTV set top box or DVD player to the DVI-HDTV input as shown on INPUT 1 contains the copy protection system called High-bandwidth Digital Content Protection (HDCP). Press the ANT button to return to rear panel jacks. FIRST TIME USE...interface so proper set below. 2. The DVI-HDTV input on the TV set -up of uncompressed video to -point connection for delivery of device user settings determines final video appearance. 18 DVI is loose. 2. The VIDEO OSD label disappears...
Owners Guide
Page 19
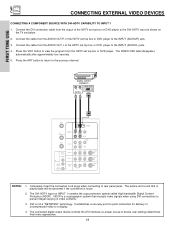
...the Laserdisc/DVD player or HDTV set top box to the INPUT (Y) jack, as shown on REAR PANEL CONNECTIONS. 19 Connect the cable from the CB/PB OUT or B-Y OUT of the Laserdisc/DVD player or HDTV set top box to the INPUT (PB) jack. 3. The picture and sound that is played back... of the Laserdisc/DVD player or HDTV set top box to the INPUT (AUDIO/R) jack. 5. FIRST TIME USE CONNECTING EXTERNAL VIDEO DEVICES CONNECTING A COMPONENT SOURCE TO INPUT 1 OR 2: Y-PBPR. 1. Connect the cable from the AUDIO OUT R of the laserdisc/DVD player or HDTV set top box to the INPUT (AUDIO/L) jack. 6....
...the Laserdisc/DVD player or HDTV set top box to the INPUT (Y) jack, as shown on REAR PANEL CONNECTIONS. 19 Connect the cable from the CB/PB OUT or B-Y OUT of the Laserdisc/DVD player or HDTV set top box to the INPUT (PB) jack. 3. The picture and sound that is played back... of the Laserdisc/DVD player or HDTV set top box to the INPUT (AUDIO/R) jack. 5. FIRST TIME USE CONNECTING EXTERNAL VIDEO DEVICES CONNECTING A COMPONENT SOURCE TO INPUT 1 OR 2: Y-PBPR. 1. Connect the cable from the AUDIO OUT R of the laserdisc/DVD player or HDTV set top box to the INPUT (AUDIO/L) jack. 6....

Owners Guide
Page 26
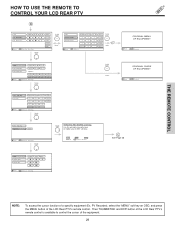
... you press the AV NET button, the following the instructions of the AV NET learning wizard (see page 20-22). The AV Net allows the user to access the Audio/Video network (AV Net) menu. VCR PV Recorder AV Receiver POWER CH ̄ CH ̆ MENU THUMB STICK 1...Video equipment list and soft keys by selecting the "Custom" icon and following window will scroll up within the Display Monitor screen. DVD Cable Box Photo MC POWER MENU MORE.. Move INFO Device Setting THUMB STICK THUMB STICK SELECT MORE.. THE REMOTE CONTROL HOW TO USE THE REMOTE TO CONTROL YOUR LCD REAR...
... you press the AV NET button, the following the instructions of the AV NET learning wizard (see page 20-22). The AV Net allows the user to access the Audio/Video network (AV Net) menu. VCR PV Recorder AV Receiver POWER CH ̄ CH ̆ MENU THUMB STICK 1...Video equipment list and soft keys by selecting the "Custom" icon and following window will scroll up within the Display Monitor screen. DVD Cable Box Photo MC POWER MENU MORE.. Move INFO Device Setting THUMB STICK THUMB STICK SELECT MORE.. THE REMOTE CONTROL HOW TO USE THE REMOTE TO CONTROL YOUR LCD REAR...
Owners Guide
Page 29
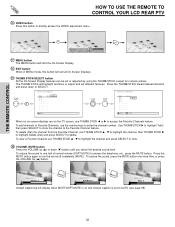
...of the equipment. 29 MENU INFO GUIDE THUMB STICK Set Top Box Custom SETUP Move INFO Device Setting THUMB STICK THUMB STICK HITACHI AV NET WIZARD (Learning) Use this wizard to control the cursor of the LCD Rear PTV's remote control is available to manually learn or modify your AV NET ... button of a specific equipment (Ex. BACK Move Learn Modify SEL Start Wizard C See Page 30 DVD Cable Box Photo MC POWER MENU MORE.. VCR PV Recorder AV Receiver POWER CH ̄ CH ̆ MENU THUMB STICK 1 2 3 TV/VCR SELECT 4 5 7 8 LAST CH 0 6 INFO 9 GUIDE MENU MENU - THUMB...
...of the equipment. 29 MENU INFO GUIDE THUMB STICK Set Top Box Custom SETUP Move INFO Device Setting THUMB STICK THUMB STICK HITACHI AV NET WIZARD (Learning) Use this wizard to control the cursor of the LCD Rear PTV's remote control is available to manually learn or modify your AV NET ... button of a specific equipment (Ex. BACK Move Learn Modify SEL Start Wizard C See Page 30 DVD Cable Box Photo MC POWER MENU MORE.. VCR PV Recorder AV Receiver POWER CH ̄ CH ̆ MENU THUMB STICK 1 2 3 TV/VCR SELECT 4 5 7 8 LAST CH 0 6 INFO 9 GUIDE MENU MENU - THUMB...
Owners Guide
Page 32
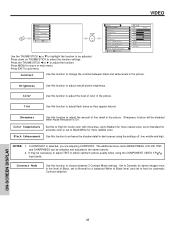
...) to directly access the VIDEO adjustment menu. Volume 8 MUTE Soft Mute 8 MUTE Mute 8 Closed Captioning will display when MUTE/SOFT MUTE is on the TV screen, use the number keys to access the Favorite Channels feature. THUMB STICK 8 Favorite Channels Ant A 8 A6 A3 - - - - - - - - - - - - - - - - - - - - - - - - - THE REMOTE CONTROL HOW TO USE THE REMOTE TO CONTROL YOUR LCD REAR PTV ቲ VIDEO button...
...) to directly access the VIDEO adjustment menu. Volume 8 MUTE Soft Mute 8 MUTE Mute 8 Closed Captioning will display when MUTE/SOFT MUTE is on the TV screen, use the number keys to access the Favorite Channels feature. THUMB STICK 8 Favorite Channels Ant A 8 A6 A3 - - - - - - - - - - - - - - - - - - - - - - - - - THE REMOTE CONTROL HOW TO USE THE REMOTE TO CONTROL YOUR LCD REAR PTV ቲ VIDEO button...

Owners Guide
Page 33
... button to automatically scan all active channel numbers (those set in memory) and display them as PIP subpictures. Stereo ST/SA Ant A 28 TAKA VID 1 YPBPR:1 VID1 VID 2 Video:2 VID2 Ant Video:5 VID5 Video:4 VID4 Video:3 VID3 VID 3 VID 5 VID 4...PICTURE-IN-PICTURE buttons See separate section on a chosen channel. THE REMOTE CONTROL HOW TO USE THE REMOTE TO CONTROL YOUR LCD REAR PTV 1 LAST CHANNEL (LAST CH) button Use this button to toggle between Day and Night picture mode settings. Press the SURF button a second time to remove the sub-pictures from the screen...
... button to automatically scan all active channel numbers (those set in memory) and display them as PIP subpictures. Stereo ST/SA Ant A 28 TAKA VID 1 YPBPR:1 VID1 VID 2 Video:2 VID2 Ant Video:5 VID5 Video:4 VID4 Video:3 VID3 VID 3 VID 5 VID 4...PICTURE-IN-PICTURE buttons See separate section on a chosen channel. THE REMOTE CONTROL HOW TO USE THE REMOTE TO CONTROL YOUR LCD REAR PTV 1 LAST CHANNEL (LAST CH) button Use this button to toggle between Day and Night picture mode settings. Press the SURF button a second time to remove the sub-pictures from the screen...

Owners Guide
Page 39
... receiver by setting it to instruction manual of the set-top-box/satellite receiver for operation of your set -top-box/satellite receiver as stated above procedures, please consult your set -topbox/satellite receiver. 39 After replacing the batteries ...removed from the remote control. THE REMOTE CONTROL USING THE REMOTE TO CONTROL SET-TOP-BOX/SATELLITE RECEIVER FUNCTIONS Operating the precoded function for your set -top-box/satellite receiver does not turn off , try a different two digit preset code. 6. If the set -top-box/satellite receiver. NOTES: 1. If your set-top-box...
... receiver by setting it to instruction manual of the set-top-box/satellite receiver for operation of your set -top-box/satellite receiver as stated above procedures, please consult your set -topbox/satellite receiver. 39 After replacing the batteries ...removed from the remote control. THE REMOTE CONTROL USING THE REMOTE TO CONTROL SET-TOP-BOX/SATELLITE RECEIVER FUNCTIONS Operating the precoded function for your set -top-box/satellite receiver does not turn off , try a different two digit preset code. 6. If the set -top-box/satellite receiver. NOTES: 1. If your set-top-box...

Owners Guide
Page 46
... or Black/White for natural color, set before using the Lock feature. Adjust shadow detail in antenna B. Select TV's internal speakers On/Off or use as center speaker. Mode Choose the picture format aspect ratio. Block various types of movies and television programming based on motion picture ratings. Block various types of movies and video types based on the Canadian ratings system. Set the...
... or Black/White for natural color, set before using the Lock feature. Adjust shadow detail in antenna B. Select TV's internal speakers On/Off or use as center speaker. Mode Choose the picture format aspect ratio. Block various types of movies and television programming based on motion picture ratings. Block various types of movies and video types based on the Canadian ratings system. Set the...
Owners Guide
Page 48
... be adjusted. NOTES: 1. ON-SCREEN DISPLAY 48 VIDEO Video Audio Aspect Chan. Set to choose between black and white levels in dark scenes using the COMPONENT VIDEO Y-PBPR input jacks. Color Temperature Black Enhancement Set this function to adjust flesh tones so they appear natural. Contrast Mode Use this function to adjust overall picture brightness. Manager Locks MENU Setup Move SEL Sel THUMB STICK SELECT Video Picture...
... be adjusted. NOTES: 1. ON-SCREEN DISPLAY 48 VIDEO Video Audio Aspect Chan. Set to choose between black and white levels in dark scenes using the COMPONENT VIDEO Y-PBPR input jacks. Color Temperature Black Enhancement Set this function to adjust flesh tones so they appear natural. Contrast Mode Use this function to adjust overall picture brightness. Manager Locks MENU Setup Move SEL Sel THUMB STICK SELECT Video Picture...

Owners Guide
Page 49
... viewed. THUMB STICK SELECT Video Picture Mode Contrast Brightness Color Tint Sharpness Color Temperature Black Enhancement Contrast Mode Reset Video Settings Move SEL Select ANT A/B Day 100% 50% 50% Night 50% High High Dynamic THUMB STICK SELECT Video Picture Mode Select "Reset" to Return the Video menu Settings on this function to adjust and balance the listed individual colors to make...
... viewed. THUMB STICK SELECT Video Picture Mode Contrast Brightness Color Tint Sharpness Color Temperature Black Enhancement Contrast Mode Reset Video Settings Move SEL Select ANT A/B Day 100% 50% 50% Night 50% High High Dynamic THUMB STICK SELECT Video Picture Mode Select "Reset" to Return the Video menu Settings on this function to adjust and balance the listed individual colors to make...
Owners Guide
Page 50
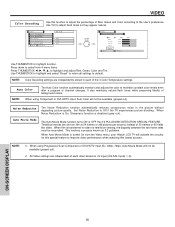
... to video for this function to adjust the percentage of the 4 Color Temperature settings. ON-SCREEN DISPLAY 50 Use THUMBSTICK to highlight and select "Reset" to return all settings to adjust flesh tones so they appear natural. Noise Reduction The Noise Reduction function automatically reduces conspicuous noise in each other based on film at 24 frames or still pictures...
... to video for this function to adjust the percentage of the 4 Color Temperature settings. ON-SCREEN DISPLAY 50 Use THUMBSTICK to highlight and select "Reset" to return all settings to adjust flesh tones so they appear natural. Noise Reduction The Noise Reduction function automatically reduces conspicuous noise in each other based on film at 24 frames or still pictures...

Owners Guide
Page 70
... picture turns dark, the color looks unusual or LAMP INDICATOR light turns on the TV set. Do not touch glass surface of the lamp. For Recycling and Disposal information, contact your authorized service center (see page 78-79). WARNING: The lamp gets very hot! Dispose of properly in accordance with a new lamp. CAUTION! TYPE NAME: LP500 PART NUMBER: UX21511 • When replacing...
... picture turns dark, the color looks unusual or LAMP INDICATOR light turns on the TV set. Do not touch glass surface of the lamp. For Recycling and Disposal information, contact your authorized service center (see page 78-79). WARNING: The lamp gets very hot! Dispose of properly in accordance with a new lamp. CAUTION! TYPE NAME: LP500 PART NUMBER: UX21511 • When replacing...

Owners Guide
Page 81
... MC Usage, 27~28 Picture Mode, 47 Picture-in-Picture (PIP), 34 - 36 Picture-outside-Picture (POP), 36 R Remote Control Functions, 23 - 42 Programming Codes, 37 - 44 Installing Batteries, 4 S Sharpness, 48 Simple Remote Control, 43 Sound Enhancement, 52 Speakers, 51 Connecting External Speakers, 5, 12 - 13 T Temperature Indicator, 8 Time, 63 Tint, 48 Treble, 51 V Vertical Position, 53 Video Settings, 47-50 Virtual...
... MC Usage, 27~28 Picture Mode, 47 Picture-in-Picture (PIP), 34 - 36 Picture-outside-Picture (POP), 36 R Remote Control Functions, 23 - 42 Programming Codes, 37 - 44 Installing Batteries, 4 S Sharpness, 48 Simple Remote Control, 43 Sound Enhancement, 52 Speakers, 51 Connecting External Speakers, 5, 12 - 13 T Temperature Indicator, 8 Time, 63 Tint, 48 Treble, 51 V Vertical Position, 53 Video Settings, 47-50 Virtual...


