Owners Guide
Page 5
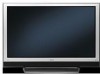
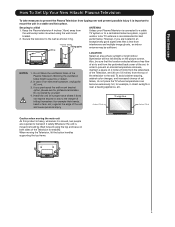
... on both sides of the Television for example their hands, head or face, etc.) against the edge of the set failure, do not place the TV where temperatures can become excessively hot, for example, in direct sunlight or near a heating appliance, etc. 4 inches (10cm) 12 inches (30cm) 4 inches (...of the Television, and 30 cm (12 inches) from the wall except when mounted using the top and base on the picture screen. First time use How To Set Up Your New Hitachi Plasma Television To take measures to prevent the Plasma Television from tipping over and prevent possible injury it safely.
... on both sides of the Television for example their hands, head or face, etc.) against the edge of the set failure, do not place the TV where temperatures can become excessively hot, for example, in direct sunlight or near a heating appliance, etc. 4 inches (10cm) 12 inches (30cm) 4 inches (...of the Television, and 30 cm (12 inches) from the wall except when mounted using the top and base on the picture screen. First time use How To Set Up Your New Hitachi Plasma Television To take measures to prevent the Plasma Television from tipping over and prevent possible injury it safely.
Owners Guide
Page 6
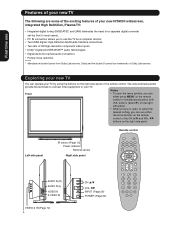
... buttons on the right side panel. Dolby and the double-D symbol are some of the exciting features of your new HITACHI widescreen, integrated High Definition, Plasma TV: • Integrated digital tuning (8VSB ATSC and QAM) eliminates the need for a separate digital converter set-top box... the TV as a computer monitor. • Two HDMI digital, High-Definition Multimedia Interface connections. • Two sets of HD high-resolution component video inputs. • Dolby* Digital and SRS WOW™ audio technologies. • Digital Audio Out optical audio connection. • Picture noise ...
... buttons on the right side panel. Dolby and the double-D symbol are some of the exciting features of your new HITACHI widescreen, integrated High Definition, Plasma TV: • Integrated digital tuning (8VSB ATSC and QAM) eliminates the need for a separate digital converter set-top box... the TV as a computer monitor. • Two HDMI digital, High-Definition Multimedia Interface connections. • Two sets of HD high-resolution component video inputs. • Dolby* Digital and SRS WOW™ audio technologies. • Digital Audio Out optical audio connection. • Picture noise ...
Owners Guide
Page 7
...audio cable is the standard cable that the terminals are color coded in the same manner as the cables. • S-video cables provide better picture performance than S-video cables. Coaxial cables use with component video compatible components. ANTENNA Coaxial Cable AUDIO Cables VIDEO Cable S-Video Cable Component video ...the floor or on a sturdy platform in a location where light does not directly hit the screen. • Place the TV far enough from your new TV Back of the TV, you will see page 13.) • IR blaster cable is for use with video device with built-in from the ...
...audio cable is the standard cable that the terminals are color coded in the same manner as the cables. • S-video cables provide better picture performance than S-video cables. Coaxial cables use with component video compatible components. ANTENNA Coaxial Cable AUDIO Cables VIDEO Cable S-Video Cable Component video ...the floor or on a sturdy platform in a location where light does not directly hit the screen. • Place the TV far enough from your new TV Back of the TV, you will see page 13.) • IR blaster cable is for use with video device with built-in from the ...
Owners Guide
Page 8
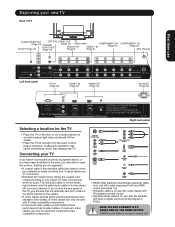
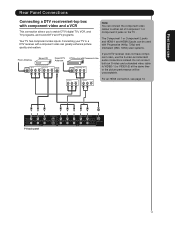
For better picture quality, if your VCR has S-video, you can tune most cable channels...standard video cable. Follow the connections shown below . Option 3: For Subscribers to Unscrambled Basic Cable with your TV. Follow the connections shown below . With the switch in which basic cable channels are unscrambled and premium channels...Laws of the United States and other materials is generally provided by the cable company. From Cable Option 1: Option 2: Cable Box TV back panel Cable Box Splitter A / B Switch A B Option 3: COMPONENT 2 COMPONENT 1 8 First time use Rear Panel ...
For better picture quality, if your VCR has S-video, you can tune most cable channels...standard video cable. Follow the connections shown below . Option 3: For Subscribers to Unscrambled Basic Cable with your TV. Follow the connections shown below . With the switch in which basic cable channels are unscrambled and premium channels...Laws of the United States and other materials is generally provided by the cable company. From Cable Option 1: Option 2: Cable Box TV back panel Cable Box Splitter A / B Switch A B Option 3: COMPONENT 2 COMPONENT 1 8 First time use Rear Panel ...
Owners Guide
Page 9
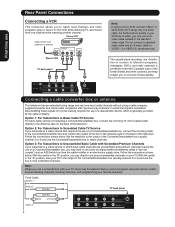
...the same time or the picture performance will decrease. First time use Rear Panel Connections Connecting a DVD player/satellite receiver and a VCR This connection allows you use a standard video cable instead of the S-video cable, but remove the standard video cable. TV back panel 9 Do not ...Svideo and a standard video cable to watch DVD/satellite, VCR, or TV programs. You can use an S-video cable between the TV and DVD player/satellite receiver, make the audio connections but the picture quality will be unacceptable. DVD Player/Satellite receiver Stereo VCR From satellite...
...the same time or the picture performance will decrease. First time use Rear Panel Connections Connecting a DVD player/satellite receiver and a VCR This connection allows you use a standard video cable instead of the S-video cable, but remove the standard video cable. TV back panel 9 Do not ...Svideo and a standard video cable to watch DVD/satellite, VCR, or TV programs. You can use an S-video cable between the TV and DVD player/satellite receiver, make the audio connections but the picture quality will be unacceptable. DVD Player/Satellite receiver Stereo VCR From satellite...
Owners Guide
Page 10
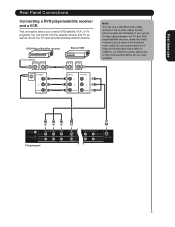
...Stereo VCR DVD player with Progressive (480p, 720p) and Interlaced (480i, 1080i) scan systems. A 1080i signal will provide the best picture performance. Connecting your TV to either set of using component video. First time use Rear Panel Connections Connecting a DVD player with component video and a VCR This... connection allows you to watch DVD, VCR, or TV programs and record TV programs. You can connect the component video cables to a component video compatible DVD player, such as a HITACHI DVD player with Component video, can be used with Component video RF IN ...
...Stereo VCR DVD player with Progressive (480p, 720p) and Interlaced (480i, 1080i) scan systems. A 1080i signal will provide the best picture performance. Connecting your TV to either set of using component video. First time use Rear Panel Connections Connecting a DVD player with component video and a VCR This... connection allows you to watch DVD, VCR, or TV programs and record TV programs. You can connect the component video cables to a component video compatible DVD player, such as a HITACHI DVD player with Component video, can be used with Component video RF IN ...
Owners Guide
Page 11
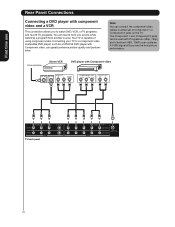
Note: You can connect the component video cables to VIDEO-1 (or VIDEO-2) at the same time or the picture performance will be used with Progressive (480p, 720p) and Interlaced (480i, 1080i) scan systems. From Antenna Stereo VCR From DTV Antenna RF IN INPUT R ... connection allows you to a DTV receiver with Component video RF IN COMPONENT OUT Pr Pb Y If your TV to watch DTV (digital TV), VCR, and TV programs, and record DTV and TV programs. Your TV has component video inputs. First time use the S-video and standard audio connections instead. Connecting your DTV receiver...
Note: You can connect the component video cables to VIDEO-1 (or VIDEO-2) at the same time or the picture performance will be used with Progressive (480p, 720p) and Interlaced (480i, 1080i) scan systems. From Antenna Stereo VCR From DTV Antenna RF IN INPUT R ... connection allows you to a DTV receiver with Component video RF IN COMPONENT OUT Pr Pb Y If your TV to watch DTV (digital TV), VCR, and TV programs, and record DTV and TV programs. Your TV has component video inputs. First time use the S-video and standard audio connections instead. Connecting your DTV receiver...
Owners Guide
Page 12
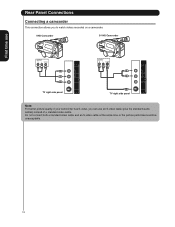
Do not connect both a standard video cable and an S-video cable at the same time or the picture performance will be unacceptable. 12 First time use Rear Panel Connections Connecting a camcorder This connection allows you can use an S-video cable (plus the standard audio cables) instead of a standard video cable. VHS Camcorder S-VHS Camcorder OUTPUT R L VIDEO OUTPUT R L S-VIDEO TV right side panel TV right side panel Note: For better picture quality, if your camcorder has S-video, you to watch videos recorded on a camcorder.
Do not connect both a standard video cable and an S-video cable at the same time or the picture performance will be unacceptable. 12 First time use Rear Panel Connections Connecting a camcorder This connection allows you can use an S-video cable (plus the standard audio cables) instead of a standard video cable. VHS Camcorder S-VHS Camcorder OUTPUT R L VIDEO OUTPUT R L S-VIDEO TV right side panel TV right side panel Note: For better picture quality, if your camcorder has S-video, you to watch videos recorded on a camcorder.
Owners Guide
Page 16
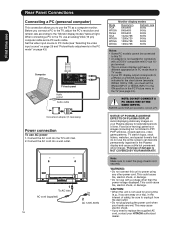
... a PC to the TV, use the VGA port... replace the supplied AC cord, contact your Plasma display for extended periods of time. ALWAYS... ON PLASMA DISPLAY Avoid displaying stationary images on page 43.) Computer TV back panel...This connection allows you to use the TV as indicated in the chart above (... the PC Picture menu in the interest of safety, be connected to this TV. •... TV (see "Selecting the video input source" on page 29 and "Picture/Audio adjustments in the Plasma...TV mode. • If your PC display output corresponds to PIP/ POP windows, closed captions, video game patterns, TV...
... a PC to the TV, use the VGA port... replace the supplied AC cord, contact your Plasma display for extended periods of time. ALWAYS... ON PLASMA DISPLAY Avoid displaying stationary images on page 43.) Computer TV back panel...This connection allows you to use the TV as indicated in the chart above (... the PC Picture menu in the interest of safety, be connected to this TV. •... TV (see "Selecting the video input source" on page 29 and "Picture/Audio adjustments in the Plasma...TV mode. • If your PC display output corresponds to PIP/ POP windows, closed captions, video game patterns, TV...
Owners Guide
Page 17
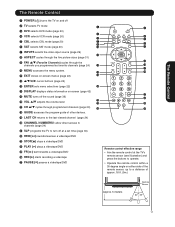
... as favorite channels (page 24) $ * & 0 MENU accesses the menu system. % ( ! The Remote Control The Remote Control 1 POWER ( ) turns the TV on and off 2 TV selects TV mode 1 2 3 DVD selects DVD mode (page 20) 3 4 VCR selects VCR mode (page 20) 4 6 5 5 CBL selects CBL mode (page 20)... 7 8 9 6 SAT selects SAT mode (page 20) 0 ! 7 INPUTS selects the video input source (page 29) @ 8 ASPECT cycles through the five picture sizes (...
... as favorite channels (page 24) $ * & 0 MENU accesses the menu system. % ( ! The Remote Control The Remote Control 1 POWER ( ) turns the TV on and off 2 TV selects TV mode 1 2 3 DVD selects DVD mode (page 20) 3 4 VCR selects VCR mode (page 20) 4 6 5 5 CBL selects CBL mode (page 20)... 7 8 9 6 SAT selects SAT mode (page 20) 0 ! 7 INPUTS selects the video input source (page 29) @ 8 ASPECT cycles through the five picture sizes (...
Owners Guide
Page 26
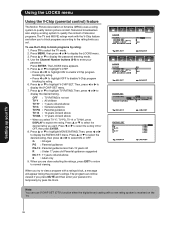
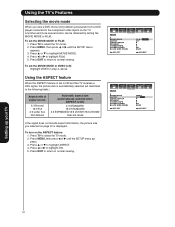
... the Channel Number buttons (0-9) to qualify motion picture content. The LOCKS menu appears. 5. Press ▲ or ▼ to highlight MOVIE RATING. Press ENTER. OFF : TV RATING is received on the TV. 26 Press ▲ or ▼ to highlight TV RATING. When you select TV-Y7, TV-PG, TV-14 or TV-MA, press DISPLAY to block programs by...
... the Channel Number buttons (0-9) to qualify motion picture content. The LOCKS menu appears. 5. Press ▲ or ▼ to highlight MOVIE RATING. Press ENTER. OFF : TV RATING is received on the TV. 26 Press ▲ or ▼ to highlight TV RATING. When you select TV-Y7, TV-PG, TV-14 or TV-MA, press DISPLAY to block programs by...

Owners Guide
Page 31
...are viewing. Using these functions to its originally formatted proportion. Press ASPECT on your Plasma display for extended periods of damage is displayed close to change the picture size by selecting PICTURE SIZE in the SETUP menu. This type of time. however, this mode cannot... some program formats (such as described below and on the format of picture sizes-4:3 STANDARD, 4:3 EXPANDED, 16:9 ZOOM1, 16:9 ZOOM2, 16:9 STANDARD. Selecting the picture size 1. Using the TV's Features Viewing the wide-screen picture formats (480i and 480p signals only) You can view 480i and 480p...
...are viewing. Using these functions to its originally formatted proportion. Press ASPECT on your Plasma display for extended periods of damage is displayed close to change the picture size by selecting PICTURE SIZE in the SETUP menu. This type of time. however, this mode cannot... some program formats (such as described below and on the format of picture sizes-4:3 STANDARD, 4:3 EXPANDED, 16:9 ZOOM1, 16:9 ZOOM2, 16:9 STANDARD. Selecting the picture size 1. Using the TV's Features Viewing the wide-screen picture formats (480i and 480p signals only) You can view 480i and 480p...

Owners Guide
Page 32
...the top and bottom edges of the picture may be hidden. Using the TV's Features 16:9 ZOOM1 (for letter box programs) • The picture is stretched the same amount both wider and taller (retains its original proportion. • If receiving a 4:3 format program, the picture is stretched wider to fill the ...(for letter box programs with subtitles) • The picture is stretched wider to fill the width of the screen, but only slightly stretched taller. • The top and bottom edges of the picture may be hidden. Setting up your TV 32 To view the hidden areas, see "Scrolling the...
...the top and bottom edges of the picture may be hidden. Using the TV's Features 16:9 ZOOM1 (for letter box programs) • The picture is stretched the same amount both wider and taller (retains its original proportion. • If receiving a 4:3 format program, the picture is stretched wider to fill the ...(for letter box programs with subtitles) • The picture is stretched wider to fill the width of the screen, but only slightly stretched taller. • The top and bottom edges of the picture may be hidden. Setting up your TV 32 To view the hidden areas, see "Scrolling the...

Owners Guide
Page 33
... ADJUSTMENT +20 : ADJUST SCROLL ADJUSTMENT -10 : ADJUST Note: You can scroll the picture in 16:9 ZOOM1 and 2 only. Video Audio Setup Customize Locks SETUP CLOSED CAPTION CC ADVANCED PICTURE SIZE V E R T. Using the TV's Features Scrolling the 16:9 ZOOM picture (16:9 ZOOM1 and 2 only) 1. The scroll amounts are as follows: • 480i/480p signal source...
... ADJUSTMENT +20 : ADJUST SCROLL ADJUSTMENT -10 : ADJUST Note: You can scroll the picture in 16:9 ZOOM1 and 2 only. Video Audio Setup Customize Locks SETUP CLOSED CAPTION CC ADVANCED PICTURE SIZE V E R T. Using the TV's Features Scrolling the 16:9 ZOOM picture (16:9 ZOOM1 and 2 only) 1. The scroll amounts are as follows: • 480i/480p signal source...
Owners Guide
Page 34
...when ASPECT is set mode If the signal does not include aspect information, the picture size you view a DVD movie (3:2 pulldown processed) from a DVD player connected to the component video inputs on the TV, smoother and more natural motion can be obtained by setting the MOVIE MODE to... 16:9 STANDARD 4:3 EXPANDED/16:9 ZOOM1/16:9 ZOOM2 User-set to select the TV mode. 2. Press TV to ON and the TV receives a 480i signal, the picture size is automatically selected (as described in step 4, above. Setting up your TV 34 Press ▲ or ▼ to normal viewing. Press EXIT to return to...
...when ASPECT is set mode If the signal does not include aspect information, the picture size you view a DVD movie (3:2 pulldown processed) from a DVD player connected to the component video inputs on the TV, smoother and more natural motion can be obtained by setting the MOVIE MODE to... 16:9 STANDARD 4:3 EXPANDED/16:9 ZOOM1/16:9 ZOOM2 User-set to select the TV mode. 2. Press TV to ON and the TV receives a 480i signal, the picture size is automatically selected (as described in step 4, above. Setting up your TV 34 Press ▲ or ▼ to normal viewing. Press EXIT to return to...
Owners Guide
Page 35
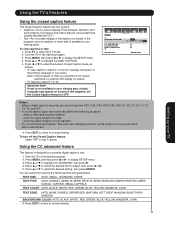
...or stock data (if available in your viewing area.) To view captions or text: 1. SERIF, MONO W/O SERIF, PROP. Setting up your TV Using the TV's Features Using the closed caption feature The Closed Caption feature has two options: • Captions-An on-screen display of the dialogue, narration,... and "Background Color" as the same color or you selected is designed to normal viewing. Video Audio Setup Customize Locks SETUP CLOSED CAPTION CC ADVANCED PICTURE SIZE V E R T. To turn off the Closed Caption feature: Select OFF in your viewing area, a black rectangle may not be able to...
...or stock data (if available in your viewing area.) To view captions or text: 1. SERIF, MONO W/O SERIF, PROP. Setting up your TV Using the TV's Features Using the closed caption feature The Closed Caption feature has two options: • Captions-An on-screen display of the dialogue, narration,... and "Background Color" as the same color or you selected is designed to normal viewing. Video Audio Setup Customize Locks SETUP CLOSED CAPTION CC ADVANCED PICTURE SIZE V E R T. To turn off the Closed Caption feature: Select OFF in your viewing area, a black rectangle may not be able to...

Owners Guide
Page 36
... to reduce the risk of phosphor burn-in of the plasma screen. Screen Saver With Screen Saver set the sidebar to GRAY in of phosphor burn-in PC input mode. 36 Press TV to select the TV mode. 2. Reverse The picture is also recommended when you want to listen to reduce the.... 2. Press TV to the normal picture: Press any button. Note: To reduce the risk of darkness. Black Side Panel The gray level feature will help in the recovery of the plasma screen. Press ▲ or ▼ to display the SETUP menu. 3. Press MENU, then press or to highlight REVERSE, and then ...
... to reduce the risk of phosphor burn-in of the plasma screen. Screen Saver With Screen Saver set the sidebar to GRAY in of phosphor burn-in PC input mode. 36 Press TV to select the TV mode. 2. Reverse The picture is also recommended when you want to listen to reduce the.... 2. Press TV to the normal picture: Press any button. Note: To reduce the risk of darkness. Black Side Panel The gray level feature will help in the recovery of the plasma screen. Press ▲ or ▼ to display the SETUP menu. 3. Press MENU, then press or to highlight REVERSE, and then ...

Owners Guide
Page 37
... Press EXIT to return to select the TV mode. 2. Press TV to normal viewing. Press MENU, then press or to adjust the level. Video Audio Setup Customize Locks VIDEO PICTURE MODE SPORTS SPORTS / STANDARD / MOVIE / MEMORY BRIGHTNESS 25 CONTRAST 50 COLOR 25 TINT 0 SHARPNESS 25 :SELECT ... CONTRAST COLOR TINT SHARPNESS :SELECT SPORTS 25 50 25 0 25 :ADJUST Setting up your personal preferences, including the brightness, contrast, color, tint, and sharpness. Press or to highlight the mode you want to your TV 37 To adjust the picture quality: 1. Press ▲ or ▼...
... Press EXIT to return to select the TV mode. 2. Press TV to normal viewing. Press MENU, then press or to adjust the level. Video Audio Setup Customize Locks VIDEO PICTURE MODE SPORTS SPORTS / STANDARD / MOVIE / MEMORY BRIGHTNESS 25 CONTRAST 50 COLOR 25 TINT 0 SHARPNESS 25 :SELECT ... CONTRAST COLOR TINT SHARPNESS :SELECT SPORTS 25 50 25 0 25 :ADJUST Setting up your personal preferences, including the brightness, contrast, color, tint, and sharpness. Press or to highlight the mode you want to your TV 37 To adjust the picture quality: 1. Press ▲ or ▼...

Owners Guide
Page 38
...above. Press or to highlight COLOR TEMPERATURE. 4. Press EXIT to return to select the TV mode. 2. Press TV to normal viewing. center (25) Sharpness ......... high Color center (25) To reset your TV picture. Press TV to highlight RESET, and then press . Press ▲ or ▼ to select the...temperature: 1. Press or to select the TV mode. 2. Press TV to highlight ON. 5. Press MENU, then press or to display the VIDEO menu. 3. Press MENU, then press or to display the VIDEO menu. 3. center (25) Contrast max (50) Color temperature ....... Press MENU, then ...
...above. Press or to highlight COLOR TEMPERATURE. 4. Press EXIT to return to select the TV mode. 2. Press TV to normal viewing. center (25) Sharpness ......... high Color center (25) To reset your TV picture. Press TV to highlight RESET, and then press . Press ▲ or ▼ to select the...temperature: 1. Press or to select the TV mode. 2. Press TV to highlight ON. 5. Press MENU, then press or to display the VIDEO menu. 3. Press MENU, then press or to display the VIDEO menu. 3. center (25) Contrast max (50) Color temperature ....... Press MENU, then ...

Owners Guide
Page 42
...Stereo or SAP (second audio program) audio status • Content rating • On timer, Sleep timer (if set) • Picture size, Picture format Digital channel: • Clock • Channel number, station name, program name • Remaining time • Audio language &#...8226; Content rating • HD or SD mark • Closed Caption mark • V-Chip mark 51-3 CITYHD Moon Star SUN Jan 01 12:00 PM Remaining Time 0:20 TV...
...Stereo or SAP (second audio program) audio status • Content rating • On timer, Sleep timer (if set) • Picture size, Picture format Digital channel: • Clock • Channel number, station name, program name • Remaining time • Audio language &#...8226; Content rating • HD or SD mark • Closed Caption mark • V-Chip mark 51-3 CITYHD Moon Star SUN Jan 01 12:00 PM Remaining Time 0:20 TV...

