Owners Guide
Page 1
IMPORTANT PROJECTION COLOR TV 46GX01B 50GX20B OPERATING GUIDE TABLE OF CONTENTS IMPORTANT ...2 SAFETY TIPS...4 PICTURE CAUTIONS ...8 ACCESSORIES...8 REMOTE CONTROL BATTERY INSTALLATION AND REPLACEMENT 8 HOW TO SET UP YOUR NEW HITACHI PROJECTION TV 10 HOOK-UP CABLES AND CONNECTORS ...12 FRONT PANEL CONTROLS ...14 FIRST TIME USE ...16 REAR SPEAKER TERMINAL CONNECTIONS ...... ...40 DVD BRAND...40 ULTRATEC OSD...40 SET UP...43 CUSTOM ...52 VIDEO...60 THEATER ...64 INFO ...65 CARE OF YOUR HITACHI PROJECTION TV AND YOUR REMOTE CONTROL 67 RECEPTION PROBLEMS...68 USEFUL INFO ...69 NOTES ...72 1
IMPORTANT PROJECTION COLOR TV 46GX01B 50GX20B OPERATING GUIDE TABLE OF CONTENTS IMPORTANT ...2 SAFETY TIPS...4 PICTURE CAUTIONS ...8 ACCESSORIES...8 REMOTE CONTROL BATTERY INSTALLATION AND REPLACEMENT 8 HOW TO SET UP YOUR NEW HITACHI PROJECTION TV 10 HOOK-UP CABLES AND CONNECTORS ...12 FRONT PANEL CONTROLS ...14 FIRST TIME USE ...16 REAR SPEAKER TERMINAL CONNECTIONS ...... ...40 DVD BRAND...40 ULTRATEC OSD...40 SET UP...43 CUSTOM ...52 VIDEO...60 THEATER ...64 INFO ...65 CARE OF YOUR HITACHI PROJECTION TV AND YOUR REMOTE CONTROL 67 RECEPTION PROBLEMS...68 USEFUL INFO ...69 NOTES ...72 1
Owners Guide
Page 2
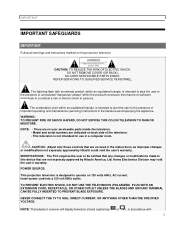
... to the presence of important operating and maintenance (servicing) instructions in the instructions, as improper changes or modifications not expressly approved by Hitachi America, Ltd. The lightning flash with 2 NOTE: • There are no user serviceable parts inside the television. • Model...Division may be notified that any changes or modifications made to operate on 120 volts 60Hz, AC current. NEVER CONNECT THE TV TO 50Hz, DIRECT CURRENT, OR ANYTHING OTHER THAN THE SPECIFIED VOLTAGE. IMPORTANT IMPORTANT SAFEGUARDS IMPORTANT Follow all warnings and instructions ...
... to the presence of important operating and maintenance (servicing) instructions in the instructions, as improper changes or modifications not expressly approved by Hitachi America, Ltd. The lightning flash with 2 NOTE: • There are no user serviceable parts inside the television. • Model...Division may be notified that any changes or modifications made to operate on 120 volts 60Hz, AC current. NEVER CONNECT THE TV TO 50Hz, DIRECT CURRENT, OR ANYTHING OTHER THAN THE SPECIFIED VOLTAGE. IMPORTANT IMPORTANT SAFEGUARDS IMPORTANT Follow all warnings and instructions ...

Owners Guide
Page 8
... USE ACCESSORIES Check to projection television receivers. Remote Control Unit CLU-436UI (Part No. Open the battery cover of the remote control by TV stations and cable companies, as well as video games, stock market quotations, computer generated graphics, and other sources, may develop over a...For Remote Control Unit). Public Viewing of Copyrighted Material Public viewing of programs broadcast by pushing the notched part of the cover with your HITACHI Factory Warranty. • When using Picture-in-Picture function, the sub-picture should not be left permanently in one corner of the ...
... USE ACCESSORIES Check to projection television receivers. Remote Control Unit CLU-436UI (Part No. Open the battery cover of the remote control by TV stations and cable companies, as well as video games, stock market quotations, computer generated graphics, and other sources, may develop over a...For Remote Control Unit). Public Viewing of Copyrighted Material Public viewing of programs broadcast by pushing the notched part of the cover with your HITACHI Factory Warranty. • When using Picture-in-Picture function, the sub-picture should not be left permanently in one corner of the ...
Owners Guide
Page 10
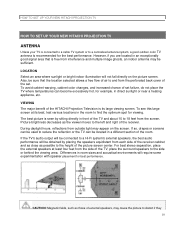
... will be located in direct sunlight or near a heating appliance, etc. VIEWING The major benefit of the HITACHI Projection Television is its best, test various locations in front of the TV and about 10 to find the optimum spot for example, in a different section of the room. The ...the best performance. During daylight hours, reflections from the screen. HOW TO SET UP YOUR NEW HITACHI PROJECTION TV HOW TO SET UP YOUR NEW HITACHI PROJECTION TV ANTENNA Unless your TV is connected to a cable TV system or to the height of the picture screen center. To see this large screen at ...
... will be located in direct sunlight or near a heating appliance, etc. VIEWING The major benefit of the HITACHI Projection Television is its best, test various locations in front of the TV and about 10 to find the optimum spot for example, in a different section of the room. The ...the best performance. During daylight hours, reflections from the screen. HOW TO SET UP YOUR NEW HITACHI PROJECTION TV HOW TO SET UP YOUR NEW HITACHI PROJECTION TV ANTENNA Unless your TV is connected to a cable TV system or to the height of the picture screen center. To see this large screen at ...

Owners Guide
Page 11
Move the magnetic field source away from the television until there is no picture distortion. 11 HOW TO SET UP YOUR NEW HITACHI PROJECTION TV are placed too close to the television.
Move the magnetic field source away from the television until there is no picture distortion. 11 HOW TO SET UP YOUR NEW HITACHI PROJECTION TV are placed too close to the television.

Owners Guide
Page 12
... place of the rear jack panel and front control panel. "F" Type 75-Ohm Coaxial Antenna Connector For connecting RF signals (antenna or cable TV) to screws of common connectors. Phono Connector S-Video (Super Video) Connector Used on all standard video and audio cables which This connector is...must be connected to an antenna adaptor (300-Ohm to produce a high-quality picture. Plug the adapter into the antenna terminal on the TV. HOOK-UP CABLES AND CONNECTORS HOOK-UP CABLES AND CONNECTORS Most video/audio connections between components can be purchased from an outdoor antenna, ...
... place of the rear jack panel and front control panel. "F" Type 75-Ohm Coaxial Antenna Connector For connecting RF signals (antenna or cable TV) to screws of common connectors. Phono Connector S-Video (Super Video) Connector Used on all standard video and audio cables which This connector is...must be connected to an antenna adaptor (300-Ohm to produce a high-quality picture. Plug the adapter into the antenna terminal on the TV. HOOK-UP CABLES AND CONNECTORS HOOK-UP CABLES AND CONNECTORS Most video/audio connections between components can be purchased from an outdoor antenna, ...
Owners Guide
Page 14
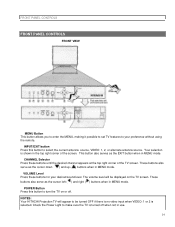
FRONT PANEL CONTROLS FRONT PANEL CONTROLS FRONT VIEW MENU Button This button allows you to enter the MENU, making it possible to set TV features to be displayed on or off when not in MENU mode. This button also serves as the EXIT button when in MENU mode. VOLUME ...Level Press these buttons until the desired channel appears at the top right corner of the screen. NOTES: Your HITACHI Projection TV will be turned OFF if there is no video input when VIDEO: 1 or 2 is selected. Your selection is turned off . These buttons also serve...
FRONT PANEL CONTROLS FRONT PANEL CONTROLS FRONT VIEW MENU Button This button allows you to enter the MENU, making it possible to set TV features to be displayed on or off when not in MENU mode. This button also serves as the EXIT button when in MENU mode. VOLUME ...Level Press these buttons until the desired channel appears at the top right corner of the screen. NOTES: Your HITACHI Projection TV will be turned OFF if there is no video input when VIDEO: 1 or 2 is selected. Your selection is turned off . These buttons also serve...
Owners Guide
Page 15
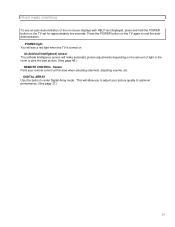
... page 48.) REMOTE CONTROL Sensor Point your remote control at this button to end the autodemonstration. FRONT PANEL CONTROLS To see a red light when the TV is turned on. AI (Artificial Intelligence) sensor The artificial Intelligence sensor will see an auto-demonstration of light in the room to optimum performance. (See... make automatic picture adjustments depending on the amount of the on-screen displays with HELP text displayed, press and hold the POWER button on the TV again to enter Digital Array mode. Press the POWER button on the...
... page 48.) REMOTE CONTROL Sensor Point your remote control at this button to end the autodemonstration. FRONT PANEL CONTROLS To see a red light when the TV is turned on. AI (Artificial Intelligence) sensor The artificial Intelligence sensor will see an auto-demonstration of light in the room to optimum performance. (See... make automatic picture adjustments depending on the amount of the on-screen displays with HELP text displayed, press and hold the POWER button on the TV again to enter Digital Array mode. Press the POWER button on the...

Owners Guide
Page 16
... 2 Inputs 1 and 2 provide S-Video (Super Video) jacks for connecting equipment with this case, connect the components B-Y output to the TV's CB input and the components R-Y output to the TV's CR input. 16 Your component outputs may be labeled Y, B-Y, and R-Y. In this capability, such as a main picture. ANT B ...: DO NOT connect standard VIDEO or S-VIDEO to INPUT 2 when using the Y-CB-CR input jacks, connect your components audio output to the TV's INPUT 2 Left and Right Audio input jacks. Use the audio and video inputs to connect external devices, such as a main picture or sub...
... 2 Inputs 1 and 2 provide S-Video (Super Video) jacks for connecting equipment with this case, connect the components B-Y output to the TV's CB input and the components R-Y output to the TV's CR input. 16 Your component outputs may be labeled Y, B-Y, and R-Y. In this capability, such as a main picture. ANT B ...: DO NOT connect standard VIDEO or S-VIDEO to INPUT 2 when using the Y-CB-CR input jacks, connect your components audio output to the TV's INPUT 2 Left and Right Audio input jacks. Use the audio and video inputs to connect external devices, such as a main picture or sub...

Owners Guide
Page 17
is controlled by the television's main volume buttons. The TV's Internal Speakers will be abnormal, when using the Y-CB-CR jacks. Use speaker with 8-Ohm impedance only. Follow connections that pertain to choose between the ...
is controlled by the television's main volume buttons. The TV's Internal Speakers will be abnormal, when using the Y-CB-CR jacks. Use speaker with 8-Ohm impedance only. Follow connections that pertain to choose between the ...

Owners Guide
Page 18
... its own video or line output. (INPUT 1 in place, pull the red button back to original position and the wire is in example on the TV. CAUTION: Do not short speaker terminal, (do not connect a wire directly across any two terminals). Any other type may degrade the audio performance of your... TV. Once the wire is locked into the hole next to use VIDEO or COMPONENT: Y-CB-CR inputs to connect to INPUT 2, but note that have ...
... its own video or line output. (INPUT 1 in place, pull the red button back to original position and the wire is in example on the TV. CAUTION: Do not short speaker terminal, (do not connect a wire directly across any two terminals). Any other type may degrade the audio performance of your... TV. Once the wire is locked into the hole next to use VIDEO or COMPONENT: Y-CB-CR inputs to connect to INPUT 2, but note that have ...

Owners Guide
Page 19
.... 19 In this feature. When using the Y-CB-CR input jacks, connect your device has this case, connect the components B-Y output to the TV's CB input and the components R-Y output to each input jack. When using Y-CB-CR jacks. Use these connections in place of the standard video... control the audio level of an external audio amplifier with the remote control, connect the system as DVD players. NOTE: To prevent damage to the TV's INPUT 2 Left and Right Audio input jacks. It may be abnormal, when using the Y-CB-CR jacks, INPUT 2 will be labeled Y, B-Y, and R-Y. COMPONENT: Y-CB...
.... 19 In this feature. When using the Y-CB-CR input jacks, connect your device has this case, connect the components B-Y output to the TV's CB input and the components R-Y output to each input jack. When using Y-CB-CR jacks. Use these connections in place of the standard video... control the audio level of an external audio amplifier with the remote control, connect the system as DVD players. NOTE: To prevent damage to the TV's INPUT 2 Left and Right Audio input jacks. It may be abnormal, when using the Y-CB-CR jacks, INPUT 2 will be labeled Y, B-Y, and R-Y. COMPONENT: Y-CB...
Owners Guide
Page 20
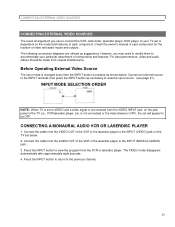
Connect the cable from the AUDIO OUT of the TV (i.e., VCR/laserdisc player, etc. CONNECTING A MONAURAL AUDIO VCR OR LASERDISC PLAYER 1. The VIDEO mode disappears automatically after approximately... the INPUT button as necessary to view the input source. (see page 21.) INPUT MODE SELECTION ORDER NOTE: When TV is not received from the VIDEO INPUT jack on the jack panel of the VCR or the laserdisc player to be made... Video Source The input mode is changed every time the INPUT button is dependent on the TV set is pressed as suggestions. Press the INPUT button to accommodate your...
Connect the cable from the AUDIO OUT of the TV (i.e., VCR/laserdisc player, etc. CONNECTING A MONAURAL AUDIO VCR OR LASERDISC PLAYER 1. The VIDEO mode disappears automatically after approximately... the INPUT button as necessary to view the input source. (see page 21.) INPUT MODE SELECTION ORDER NOTE: When TV is not received from the VIDEO INPUT jack on the jack panel of the VCR or the laserdisc player to be made... Video Source The input mode is changed every time the INPUT button is dependent on the TV set is pressed as suggestions. Press the INPUT button to accommodate your...

Owners Guide
Page 21
... INPUT (AUDIO/R) jack. 3. The mode VIDEO disappears automatically after approximately eight seconds. 5. Press the INPUT button to return to the INPUT (VIDEO) jack on the TV set below. 2. Connect the cable from the AUDIO OUT L of the VCR or the laserdisc player to view the program from the AUDIO OUT R of...
... INPUT (AUDIO/R) jack. 3. The mode VIDEO disappears automatically after approximately eight seconds. 5. Press the INPUT button to return to the INPUT (VIDEO) jack on the TV set below. 2. Connect the cable from the AUDIO OUT L of the VCR or the laserdisc player to view the program from the AUDIO OUT R of...

Owners Guide
Page 23
... below . 3. Connect the cable from the AUDIO OUT R of the Laserdisc or DVD player to the INPUT 2 (CB) jack, as shown on the TV set below . 2. Connect the cable from the CR or R-Y OUT or B-Y OUT of the Laserdisc or the DVD player to the INPUT 2 (AUDIO/R) jack. 5. The ... the DVD player to view the program from the AUDIO OUT L of the Laserdisc or DVD player to the INPUT 2 (Y) jack as shown on the TV set below. 4. NOTE: Completely insert the connection cord plugs when connecting to the previous channel. Press the INPUT button until VIDEO:2 appears, to the INPUT...
... below . 3. Connect the cable from the AUDIO OUT R of the Laserdisc or DVD player to the INPUT 2 (CB) jack, as shown on the TV set below . 2. Connect the cable from the CR or R-Y OUT or B-Y OUT of the Laserdisc or the DVD player to the INPUT 2 (AUDIO/R) jack. 5. The ... the DVD player to view the program from the AUDIO OUT L of the Laserdisc or DVD player to the INPUT 2 (Y) jack as shown on the TV set below. 4. NOTE: Completely insert the connection cord plugs when connecting to the previous channel. Press the INPUT button until VIDEO:2 appears, to the INPUT...

Owners Guide
Page 24
Use the "AUDIO TO HI-FI" output on the TV. Matrix Surround Sp. This feature turns off the TV's internal speakers. 24 SURROUND FEATURE OFF MATRIX EXTERNAL SPEAKERS SURROUND SWITCH* Sp. The television's internal speakers. These speakers ...are connected to the table for speaker placement and refer to the rear speaker 8 Ohm output on the TV. (3) These speakers are connected to a separate audio amplifier. REQUIRED CONNECTION (1) (1) (3) (2) OPTIONAL CONNECTION (2) (2) (3) EFFECT Receive mono and stereo sound Receive...
Use the "AUDIO TO HI-FI" output on the TV. Matrix Surround Sp. This feature turns off the TV's internal speakers. 24 SURROUND FEATURE OFF MATRIX EXTERNAL SPEAKERS SURROUND SWITCH* Sp. The television's internal speakers. These speakers ...are connected to the table for speaker placement and refer to the rear speaker 8 Ohm output on the TV. (3) These speakers are connected to a separate audio amplifier. REQUIRED CONNECTION (1) (1) (3) (2) OPTIONAL CONNECTION (2) (2) (3) EFFECT Receive mono and stereo sound Receive...

Owners Guide
Page 26
...See page 25 for instructions on how to program the remote to control your cable/satellite box.) (1) These buttons allow the remote to control your TV, VCR, or cable/satellite box depending on which mode is chosen, as explained above. (2), (3) LIGHT BUTTON When you are grouped together in the...-436UI) THE GENIUS REMOTE CONTROL (CLU-436UI) In addition to controlling all the functions on your HITACHI Projection TV, the new remote is designed to operate different types of VCRs, CATV (Cable TV) satellite converters with one area. The light will not appear to control your VCR.) To operate your...
...See page 25 for instructions on how to program the remote to control your cable/satellite box.) (1) These buttons allow the remote to control your TV, VCR, or cable/satellite box depending on which mode is chosen, as explained above. (2), (3) LIGHT BUTTON When you are grouped together in the...-436UI) THE GENIUS REMOTE CONTROL (CLU-436UI) In addition to controlling all the functions on your HITACHI Projection TV, the new remote is designed to operate different types of VCRs, CATV (Cable TV) satellite converters with one area. The light will not appear to control your VCR.) To operate your...

Owners Guide
Page 27
If a Special Event Reminder is set on pages 22 for a description. (3) PIP CH Button Use the PIP CH button to turn the TV set , it will be displayed when the TV is first turned on. (See page 52). (2) PICTURE-IN-PICTURE buttons See separate section on or off when the remote is being controlled. (4) HELP Button 27 The channel number which is highlighted indicates which channel is in TV mode. HOW TO USE THE GENIUS REMOTE TO CONTROL YOUR TV HOW TO USE THE GENIUS REMOTE TO CONTROL YOUR TV (1) POWER Button Press this button to select between main picture and sub-picture tuning.
If a Special Event Reminder is set on pages 22 for a description. (3) PIP CH Button Use the PIP CH button to turn the TV set , it will be displayed when the TV is first turned on. (See page 52). (2) PICTURE-IN-PICTURE buttons See separate section on or off when the remote is being controlled. (4) HELP Button 27 The channel number which is highlighted indicates which channel is in TV mode. HOW TO USE THE GENIUS REMOTE TO CONTROL YOUR TV HOW TO USE THE GENIUS REMOTE TO CONTROL YOUR TV (1) POWER Button Press this button to select between main picture and sub-picture tuning.

Owners Guide
Page 28
... want to check the channel being received, the picture source, or if the channel has stereo (ST) or second audio (SAP). NOTE: The TV may also be displayed every time a MENU is displayed, until you obtain the desired sound level. Enter two or three numbers to the channel display... on your TV, then enter the remaining two numbers using the number buttons. Press the MUTE button again to 9 . Enter "0" first for watching two sporting evens, etc.). ...
... want to check the channel being received, the picture source, or if the channel has stereo (ST) or second audio (SAP). NOTE: The TV may also be displayed every time a MENU is displayed, until you obtain the desired sound level. Enter two or three numbers to the channel display... on your TV, then enter the remaining two numbers using the number buttons. Press the MUTE button again to 9 . Enter "0" first for watching two sporting evens, etc.). ...

Owners Guide
Page 29
If the Picture-in the lower left corner of the screen. HOW TO USE THE GENIUS REMOTE TO CONTROL YOUR TV When an S-VIDEO Input is connected to view time remaining. Every subsequent press of this button will add 15 minutes to this button to the ...
If the Picture-in the lower left corner of the screen. HOW TO USE THE GENIUS REMOTE TO CONTROL YOUR TV When an S-VIDEO Input is connected to view time remaining. Every subsequent press of this button will add 15 minutes to this button to the ...


