
Owners Guide
Page 1
has determined that this product meets the Energy Star® guidelines for 42HDT79, 55HDT79 42HDX99 and 55HDX99 IMPORTANT SAFETY INSTRUCTIONS 2-3 FIRST TIME USE ...4-24 THE REMOTE CONTROL...25-44 ON-SCREEN DISPLAY ...45-80 USEFUL INFORMATION...81-88 END USER LICENSE AGREEMENT FOR HITACHI DTV SOFTWARE 89-97 APPENDIXES...98-99 INDEX...100 As an Energy Star® Partner, Hitachi, Ltd. PLASMA TELEVISION Operating Guide for energy efficiency.
has determined that this product meets the Energy Star® guidelines for 42HDT79, 55HDT79 42HDX99 and 55HDX99 IMPORTANT SAFETY INSTRUCTIONS 2-3 FIRST TIME USE ...4-24 THE REMOTE CONTROL...25-44 ON-SCREEN DISPLAY ...45-80 USEFUL INFORMATION...81-88 END USER LICENSE AGREEMENT FOR HITACHI DTV SOFTWARE 89-97 APPENDIXES...98-99 INDEX...100 As an Energy Star® Partner, Hitachi, Ltd. PLASMA TELEVISION Operating Guide for energy efficiency.
Owners Guide
Page 2
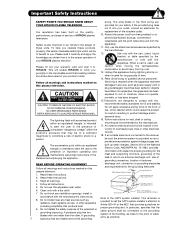
...the cart/apparatus combination to the CATV system installer: This reminder is intended to alert the user to overturn resulting in the vicinity of HITACHI plasma televisions. Follow all warnings. 4. Install in wire to a person. 16. Do not install near water. 6. Do not defeat ...NEC National Electric Code 2. Do not block any heat sources such as recommended by the manufacturer. 12. This will be of your HITACHI plasma television. built up static charges. When a cart is damaged, liquid has been spilled or objects CAUTION have fallen into your safety. ...
...the cart/apparatus combination to the CATV system installer: This reminder is intended to alert the user to overturn resulting in the vicinity of HITACHI plasma televisions. Follow all warnings. 4. Install in wire to a person. 16. Do not install near water. 6. Do not defeat ...NEC National Electric Code 2. Do not block any heat sources such as recommended by the manufacturer. 12. This will be of your HITACHI plasma television. built up static charges. When a cart is damaged, liquid has been spilled or objects CAUTION have fallen into your safety. ...
Owners Guide
Page 3
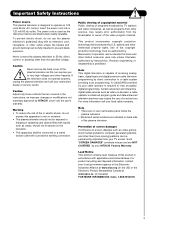
... used as the disconnect device and shall remain readily operable. For more information call your HITACHI Factory Warranty. Note • There are no user serviceable parts inside the plasma television. • Model and serial numbers are NOT COVERED by direct connection to operate on...by Macrovision. Lead Notice This product contains lead. FOR MORE INFORMATION, CALL 1-800-HITACHI. 3 The power cord is prohibited. If the television does not operate properly, unplug the plasma television and call your local government agency or the Electronic Industries Alliance at www.eiae...
... used as the disconnect device and shall remain readily operable. For more information call your HITACHI Factory Warranty. Note • There are no user serviceable parts inside the plasma television. • Model and serial numbers are NOT COVERED by direct connection to operate on...by Macrovision. Lead Notice This product contains lead. FOR MORE INFORMATION, CALL 1-800-HITACHI. 3 The power cord is prohibited. If the television does not operate properly, unplug the plasma television and call your local government agency or the Electronic Industries Alliance at www.eiae...
Owners Guide
Page 4
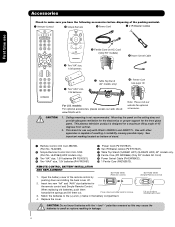
... (42" models only) µ 1 Ferrite Core (see page 14) For U.S. Press down and sliding the back cover off. 2. This plasma television product is not recommended. Open the battery cover of the packing material. ³ Remote Control · Simple Remote ´ Power Cord ...) (Only 55" models AC Cord) ¾ Power Swivel Cable (P# EW08432). µ 1 Ferrite Core (P#2169513). CAUTION: 1. Use with Hitachi 42HDX99 and 42HDT79. CAUTION: Do not insert batteries with the '+'and '-' polarities reversed as this may cause the batteries to remove back cover. When replacing...
... (42" models only) µ 1 Ferrite Core (see page 14) For U.S. Press down and sliding the back cover off. 2. This plasma television product is not recommended. Open the battery cover of the packing material. ³ Remote Control · Simple Remote ´ Power Cord ...) (Only 55" models AC Cord) ¾ Power Swivel Cable (P# EW08432). µ 1 Ferrite Core (P#2169513). CAUTION: 1. Use with Hitachi 42HDX99 and 42HDT79. CAUTION: Do not insert batteries with the '+'and '-' polarities reversed as this may cause the batteries to remove back cover. When replacing...
Owners Guide
Page 5
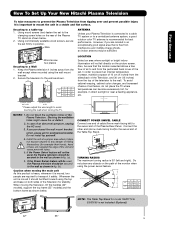
...system, a good outdoor color TV antenna is free from the wall except when mounted using the top and base on the rear of the Plasma Rear Panel. Blocking the ventilation holes might cause fire or defect. 2. Using commercially available wood screws, secure the set . However, if ... this product is heavy, whenever it is moved, two people are located in fig. (b). In case of the Plasma Television. First time use How To Set Up Your New Hitachi Plasma Television To take measures to prevent the Plasma Television from tipping over and prevent possible injury it safely.
...system, a good outdoor color TV antenna is free from the wall except when mounted using the top and base on the rear of the Plasma Rear Panel. Blocking the ventilation holes might cause fire or defect. 2. Using commercially available wood screws, secure the set . However, if ... this product is heavy, whenever it is moved, two people are located in fig. (b). In case of the Plasma Television. First time use How To Set Up Your New Hitachi Plasma Television To take measures to prevent the Plasma Television from tipping over and prevent possible injury it safely.
Owners Guide
Page 6
... the size of the TV . so it needs to be remove to the back cover. Please access our web site at: www.hitachi.us/tv for recommended accessories for the Plasma TV depending on the back of your tv. 6 How to hold the TV and the Base ; Now the 4 screws that holds...
... the size of the TV . so it needs to be remove to the back cover. Please access our web site at: www.hitachi.us/tv for recommended accessories for the Plasma TV depending on the back of your tv. 6 How to hold the TV and the Base ; Now the 4 screws that holds...
Owners Guide
Page 7
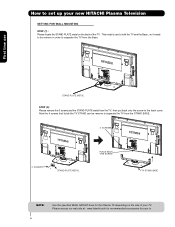
... area. Differences in a different section of the room. Or if you have an antenna, connect the coaxial cable to the antenna mixer. Consult your new HITACHI Plasma Television VIEWING The best picture is recommended. 7 For best stereo separation, place the external speakers at least four feet from outside light may cause interference...
... area. Differences in a different section of the room. Or if you have an antenna, connect the coaxial cable to the antenna mixer. Consult your new HITACHI Plasma Television VIEWING The best picture is recommended. 7 For best stereo separation, place the external speakers at least four feet from outside light may cause interference...

Owners Guide
Page 8
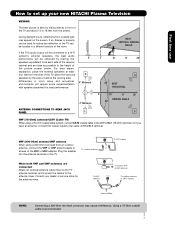
... and outputs located on all standard video and audio cables which connect to an audio amplifier with an S-Video feature in the side of the Plasma Television. Stereo Cable (3.8mm plug to 3.5mm plug) Used on the rear jack panel and side control panel. You must place the IR mouse in... an HDMI output connection to the Photo Input in place of the standard video cable to the rear panel of the Plasma television. Below are illustrations and names of your Plasma Television when AV Network is used to connect your cable box and VCR. IR Blaster Cable (Provided) Connect the IR Mouse...
... and outputs located on all standard video and audio cables which connect to an audio amplifier with an S-Video feature in the side of the Plasma Television. Stereo Cable (3.8mm plug to 3.5mm plug) Used on the rear jack panel and side control panel. You must place the IR mouse in... an HDMI output connection to the Photo Input in place of the standard video cable to the rear panel of the Plasma television. Below are illustrations and names of your Plasma Television when AV Network is used to connect your cable box and VCR. IR Blaster Cable (Provided) Connect the IR Mouse...
Owners Guide
Page 9
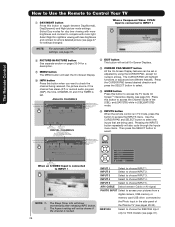
... screen. Cable Box STB - POWER BUTTON (TV, DVD, CBL, STB, PVR/VCR, AMP/CD) Turns the selected device on the right bottom portion of your HITACHI Plasma TV, the new remote control is only available for best results. 2. LAST CHANNEL BUTTON (TV, CBL, STB, PVR) Switches between DAY and NIGHT mode. Television...
... screen. Cable Box STB - POWER BUTTON (TV, DVD, CBL, STB, PVR/VCR, AMP/CD) Turns the selected device on the right bottom portion of your HITACHI Plasma TV, the new remote control is only available for best results. 2. LAST CHANNEL BUTTON (TV, CBL, STB, PVR) Switches between DAY and NIGHT mode. Television...

Owners Guide
Page 10
... the remote. It can also be displayed on the broadside bottom, under the label "MAIN POWER". ቦ CHANNEL selector Press these buttons to turn the Plasma Television ON/OFF.
... the remote. It can also be displayed on the broadside bottom, under the label "MAIN POWER". ቦ CHANNEL selector Press these buttons to turn the Plasma Television ON/OFF.
Owners Guide
Page 11
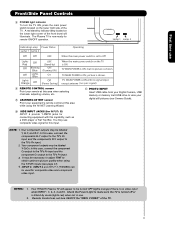
... power switch located on the TV is now ready for connecting equipment with no signal input except antenna (no video input when INPUT : 1, 2, 3, 4 and 5. Your HITACHI Plasma TV will illuminate. Remote Control can be turned OFF (lights orange) if there is ON ; picture is ON ; Your component outputs may be labeled Y-CBCR... labeled Y, B-Y, and R-Y. First time use Front/Side Panel Controls ቩ POWER light indicator To turn ON/OFF the "MAIN POWER" of the TV. 11 The Plasma TV is ON. It may use composite video signal for composite video and component video input.
... power switch located on the TV is now ready for connecting equipment with no signal input except antenna (no video input when INPUT : 1, 2, 3, 4 and 5. Your HITACHI Plasma TV will illuminate. Remote Control can be turned OFF (lights orange) if there is ON ; picture is ON ; Your component outputs may be labeled Y-CBCR... labeled Y, B-Y, and R-Y. First time use Front/Side Panel Controls ቩ POWER light indicator To turn ON/OFF the "MAIN POWER" of the TV. 11 The Plasma TV is ON. It may use composite video signal for composite video and component video input.
Owners Guide
Page 12
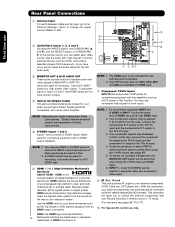
... VIDEO or S-VIDEO inputs to connect to INPUT 1 and 2, but only one of these inputs may be labeled Y, B-Y, and R-Y. Use the HDMI input for your Plasma Television's remote control in TV mode. (For reference see page 47). 5. Only DTV formats such as 1080i, 720p, 480i and 480p are available for HDMI...
... VIDEO or S-VIDEO inputs to connect to INPUT 1 and 2, but only one of these inputs may be labeled Y, B-Y, and R-Y. Use the HDMI input for your Plasma Television's remote control in TV mode. (For reference see page 47). 5. Only DTV formats such as 1080i, 720p, 480i and 480p are available for HDMI...
Owners Guide
Page 15
... Cable Note : Special device cables will need to modify them to the own device specifications. The exact arrangement you may be according to accommodate your Plasma TV is dependent on the model and features of each component for the location of your choice (see page 28). The following examples (When connecting...
... Cable Note : Special device cables will need to modify them to the own device specifications. The exact arrangement you may be according to accommodate your Plasma TV is dependent on the model and features of each component for the location of your choice (see page 28). The following examples (When connecting...

Owners Guide
Page 21
... or DVD Player Optional 2. Press the INPUTS button, then select INPUT 2 from the INPUTS menu to view the program from the VIDEO INPUT of the Plasma TV to the OUTPUT (AUDIO/R) jack on the right. Connecting External Audio/Video Devices First time use CONNECTING A VIDEO AND MONAURAL AUDIO SOURCE TO INPUT... OUT terminal outputs all audio sources with Optical IN capability. Connect the cable from the Rear Panel is controlled by the amplifier, not by the Plasma Television.
... or DVD Player Optional 2. Press the INPUTS button, then select INPUT 2 from the INPUTS menu to view the program from the VIDEO INPUT of the Plasma TV to the OUTPUT (AUDIO/R) jack on the right. Connecting External Audio/Video Devices First time use CONNECTING A VIDEO AND MONAURAL AUDIO SOURCE TO INPUT... OUT terminal outputs all audio sources with Optical IN capability. Connect the cable from the Rear Panel is controlled by the amplifier, not by the Plasma Television.

Owners Guide
Page 22
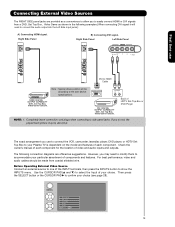
... with an AV Network feature. The IR Blaster must be chosen for each of an AV Network setup between your HITACHI Plasma TV Remote Control. You can connect up to four components. Therefore, you wish to control your external Audio/Video equipment (VCR, Set Top Box, DVD, ... properly. 22 Once this is equipped with up to a total of the Rear Panel. 3. Each IR Blaster cable can use Connecting External Video Sources Your HITACHI Plasma Television is setup, it allows your IR Blaster cable to hold the IR Blaster in front of the infrared sensor of the external components infrared...
... with an AV Network feature. The IR Blaster must be chosen for each of an AV Network setup between your HITACHI Plasma TV Remote Control. You can connect up to four components. Therefore, you wish to control your external Audio/Video equipment (VCR, Set Top Box, DVD, ... properly. 22 Once this is equipped with up to a total of the Rear Panel. 3. Each IR Blaster cable can use Connecting External Video Sources Your HITACHI Plasma Television is setup, it allows your IR Blaster cable to hold the IR Blaster in front of the infrared sensor of the external components infrared...
Owners Guide
Page 23
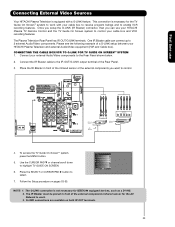
...Rear Panel shown below. 2. Video Audio TV Guide On Screen Channel Manager Locks Timers Setup Power Swivel Move SEL Select NOTE: 1. Connect your HITACHI Plasma Television and external Audio/Video equipment (VCR and Cable box). Connect the IR Blaster cable to the IR OUT/G-LINK output terminal of the ...external components you can connect up to control your HITACHI Plasma TV Remote Control and the TV Guide On Screen system to 2 external Audio/Video components. To access the TV Guide On-ScreenTM system,...
...Rear Panel shown below. 2. Video Audio TV Guide On Screen Channel Manager Locks Timers Setup Power Swivel Move SEL Select NOTE: 1. Connect your HITACHI Plasma Television and external Audio/Video equipment (VCR and Cable box). Connect the IR Blaster cable to the IR OUT/G-LINK output terminal of the ...external components you can connect up to control your HITACHI Plasma TV Remote Control and the TV Guide On Screen system to 2 external Audio/Video components. To access the TV Guide On-ScreenTM system,...
Owners Guide
Page 24
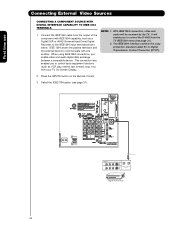
... Connecting External Video Sources CONNECTING A COMPONENT SOURCE WITH DIGITAL INTERFACE CAPABILITY TO IEEE1394 TERMINALS. 1. Select the IEEE1394 option (see page 31). 2. IEEE 1394 allows the plasma television and the external device to the IEEE1394 input terminals shown below. Connect the IEEE1394 cable from your TV On-Screen Display. NOTE: 1. With IEEE1394...
... Connecting External Video Sources CONNECTING A COMPONENT SOURCE WITH DIGITAL INTERFACE CAPABILITY TO IEEE1394 TERMINALS. 1. Select the IEEE1394 option (see page 31). 2. IEEE 1394 allows the plasma television and the external device to the IEEE1394 input terminals shown below. Connect the IEEE1394 cable from your TV On-Screen Display. NOTE: 1. With IEEE1394...
Owners Guide
Page 25
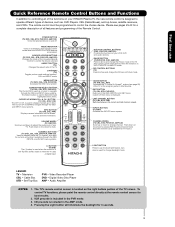
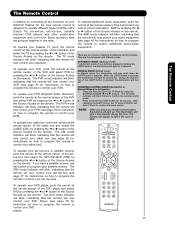
... DVD players, and other audio/video equipment with one area. The Remote Control The Remote Control In addition to controlling all the functions on your HITACHI Plasma TV, the new remote control is designed to operate different types of VCRs, CATV (Cable TV) converters, set -top-box or satellite receiver point...Access on the remote. MANUAL MODE (Default mode) In Manual mode, the illumination will blink 3 times to confirm the mode switch. To operate your Plasma TV, point the remote control at the remote sensor of the television and select the TV by using the SOURCE ACCESS ̇ and ̈ ...
... DVD players, and other audio/video equipment with one area. The Remote Control The Remote Control In addition to controlling all the functions on your HITACHI Plasma TV, the new remote control is designed to operate different types of VCRs, CATV (Cable TV) converters, set -top-box or satellite receiver point...Access on the remote. MANUAL MODE (Default mode) In Manual mode, the illumination will blink 3 times to confirm the mode switch. To operate your Plasma TV, point the remote control at the remote sensor of the television and select the TV by using the SOURCE ACCESS ̇ and ̈ ...
Owners Guide
Page 28
...), the time, CHANNEL ID and if the TIMER is locked. ANALOG CHANNELS ቯ GUIDE button Press this button to access the Channel Guide of the Plasma TV (see page 65. Pressing the INPUTS Closed Caption setting Audio Source Selection DIGITAL CHANNELS Digital Closed Caption This icon will appear only when receiving...
...), the time, CHANNEL ID and if the TIMER is locked. ANALOG CHANNELS ቯ GUIDE button Press this button to access the Channel Guide of the Plasma TV (see page 65. Pressing the INPUTS Closed Caption setting Audio Source Selection DIGITAL CHANNELS Digital Closed Caption This icon will appear only when receiving...
Owners Guide
Page 33
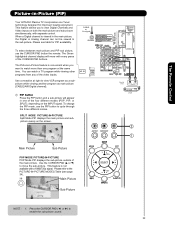
... picture and subpicture evenly on both the main picture and sub picture simultaneously, with every press of the video inputs. Picture-in-Picture (PIP) Your HITACHI Plasma TV incorporates one program at right to view VCR program as a subpicture while viewing another program as main picture (CABLE/AIR Digital channel). ቢ PIP...
... picture and subpicture evenly on both the main picture and sub picture simultaneously, with every press of the video inputs. Picture-in-Picture (PIP) Your HITACHI Plasma TV incorporates one program at right to view VCR program as a subpicture while viewing another program as main picture (CABLE/AIR Digital channel). ቢ PIP...


