
Owners Guide
Page 1
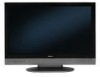
PLASMA MONITOR Operating Guide for 42HDM12 IMPORTANT SAFETY INSTRUCTIONS 1-6 IMAGE RETENTION...7 ACCESSORIES...8 HOW TO SETUP YOUR NEW HITACHI PLASMA MONITOR 9-21 HOW TO USE REMOTE CONTROL TO CONTROL YOUR PLASMA MONITOR 22-24 OSD (ON-SCREEN DISPLAY 25-29 USEFUL INFORMATION ...30-37 0
PLASMA MONITOR Operating Guide for 42HDM12 IMPORTANT SAFETY INSTRUCTIONS 1-6 IMAGE RETENTION...7 ACCESSORIES...8 HOW TO SETUP YOUR NEW HITACHI PLASMA MONITOR 9-21 HOW TO USE REMOTE CONTROL TO CONTROL YOUR PLASMA MONITOR 22-24 OSD (ON-SCREEN DISPLAY 25-29 USEFUL INFORMATION ...30-37 0
Owners Guide
Page 2
...OUTLET UNLESS THE BLADES AND GROUND TERMINAL CAN BE FULLY INSERTED TO PREVENT BLADE EXPOSURE. If the monitor does not operate properly, unplug the Plasma Monitor and call your HITACHI Plasma Monitor. The exclamation point within the product's enclosure that are covered in your warranty card and mail...minds in the literature accompanying the appliance. English Français IMPORTANT SAFETY INSTRUCTIONS SAFETY POINTS YOU SHOULD KNOW ABOUT YOUR HITACHI PLASMA MONITOR Our reputation has been built on the quality, performance, and ease of service of benefit to you. Safety is intended...
...OUTLET UNLESS THE BLADES AND GROUND TERMINAL CAN BE FULLY INSERTED TO PREVENT BLADE EXPOSURE. If the monitor does not operate properly, unplug the Plasma Monitor and call your HITACHI Plasma Monitor. The exclamation point within the product's enclosure that are covered in your warranty card and mail...minds in the literature accompanying the appliance. English Français IMPORTANT SAFETY INSTRUCTIONS SAFETY POINTS YOU SHOULD KNOW ABOUT YOUR HITACHI PLASMA MONITOR Our reputation has been built on the quality, performance, and ease of service of benefit to you. Safety is intended...
Owners Guide
Page 3
... instructions for long periods of this monitor. 1. Never guess or take any way, such as radiators, heat registers, stoves, or other sources, may be used , use harsh or abrasive cleaners! 20. For more information, call "1-800-HITACHI." Dispose of time. 14. Such "...quotations, computer generated graphics, and other intellectual property rights. Do not use caution when moving the cart/apparatus combination to the Plasma screen, do not knock or rub the surface with electrical equipment of the video program material. • This product incorporates...
... instructions for long periods of this monitor. 1. Never guess or take any way, such as radiators, heat registers, stoves, or other sources, may be used , use harsh or abrasive cleaners! 20. For more information, call "1-800-HITACHI." Dispose of time. 14. Such "...quotations, computer generated graphics, and other intellectual property rights. Do not use caution when moving the cart/apparatus combination to the Plasma screen, do not knock or rub the surface with electrical equipment of the video program material. • This product incorporates...
Owners Guide
Page 4
... of liquids or foreign matter, etc. This symbol indicates an additional warning (including cautions). Never disassemble or modify the Plasma Monitor. If the PDP monitor should be shocked and/or broken, it could result in an injury, and continued use could result in fire or ...odor, no image, no sound, excessive sound, damaged casing, elements, cables, penetration of the Plasma Monitor. Modification could result in fire or electrical shock. Do not give the Plasma Monitor any shock or impact. If the ventilation is provided to clarify the contents. Use only the...
... of liquids or foreign matter, etc. This symbol indicates an additional warning (including cautions). Never disassemble or modify the Plasma Monitor. If the PDP monitor should be shocked and/or broken, it could result in an injury, and continued use could result in fire or ...odor, no image, no sound, excessive sound, damaged casing, elements, cables, penetration of the Plasma Monitor. Modification could result in fire or electrical shock. Do not give the Plasma Monitor any shock or impact. If the ventilation is provided to clarify the contents. Use only the...
Owners Guide
Page 6
...time. Avoid a humid or dusty place. Neglect could have adverse influence on carpet or blanket, or near heater, place exposed to view the Plasma Monitor. If you can trip over it. • Always vibrating or strongly vibrating places. • Distorted or unstable places. • How to...other place where there is not enough, then use harsh or abrasive cleaners. • How to clean the cabinet and control panel of the Plasma Monitor. Please use acid/alkaline detergent, alcoholic detergent, abrasive cleaner, powder soap, OA cleaner, car wax, glass cleaner, etc. Relax your eyes...
...time. Avoid a humid or dusty place. Neglect could have adverse influence on carpet or blanket, or near heater, place exposed to view the Plasma Monitor. If you can trip over it. • Always vibrating or strongly vibrating places. • Distorted or unstable places. • How to...other place where there is not enough, then use harsh or abrasive cleaners. • How to clean the cabinet and control panel of the Plasma Monitor. Please use acid/alkaline detergent, alcoholic detergent, abrasive cleaner, powder soap, OA cleaner, car wax, glass cleaner, etc. Relax your eyes...
Owners Guide
Page 8
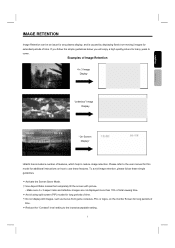
...RETENTION Image Retention can be an issue for any plasma display, and is caused by displaying fixed (non-moving) images for many years to reduce image retention. Examples of Image Retention 4 x 3 Image Display "Letterbox" Image Display "On-Screen Display" Hitachi has included a number of time. ∞...; Do not display still images, such as menus from game consoles, PCs or logos, on how to the lowest acceptable setting. 7 Please refer to the user manual for this model for additional instructions on the monitor Screen ...
...RETENTION Image Retention can be an issue for any plasma display, and is caused by displaying fixed (non-moving) images for many years to reduce image retention. Examples of Image Retention 4 x 3 Image Display "Letterbox" Image Display "On-Screen Display" Hitachi has included a number of time. ∞...; Do not display still images, such as menus from game consoles, PCs or logos, on how to the lowest acceptable setting. 7 Please refer to the user manual for this model for additional instructions on the monitor Screen ...
Owners Guide
Page 9
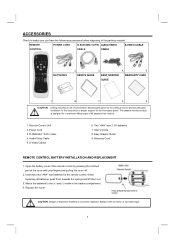
... the battery cover of the remote control by pressing the notched part of explosion if battery is incorrectly replaced. EASY GRAPHIC WARRANTY CARD GUIDE 1. 6. 7. 8. 9. This plasma monitor product is not recommended. CAUTION: Danger of the cover with the same or equivalent type. 8
... the battery cover of the remote control by pressing the notched part of explosion if battery is incorrectly replaced. EASY GRAPHIC WARRANTY CARD GUIDE 1. 6. 7. 8. 9. This plasma monitor product is not recommended. CAUTION: Danger of the cover with the same or equivalent type. 8
Owners Guide
Page 10
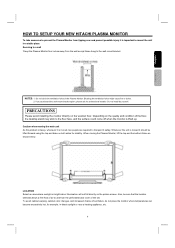
... using the top and base on the quality and condition of set . English Français HOW TO SETUP YOUR NEW HITACHI PLASMA MONITOR To take measures to prevent the Plasma Monitor from tipping over and prevent possible injury it is important to the wall mount bracket. Caution when moving the... Plasma Monitor, lift the top and the bottom frame as shown below. Do not block the ventilation holes of the set failure, do not place the monitor where temperatures can become excessively hot, for example, in a stable...
... using the top and base on the quality and condition of set . English Français HOW TO SETUP YOUR NEW HITACHI PLASMA MONITOR To take measures to prevent the Plasma Monitor from tipping over and prevent possible injury it is important to the wall mount bracket. Caution when moving the... Plasma Monitor, lift the top and the bottom frame as shown below. Do not block the ventilation holes of the set failure, do not place the monitor where temperatures can become excessively hot, for example, in a stable...
Owners Guide
Page 11
... (e.g. You can see image-like when the picture varied. HOW TO SETUP YOUR NEW HITACHI PLASMA MONITOR VIEWING The major benefit of time, or try to move them at least four feet from plasma monitor panel. IMPORTANT NOTES No. Please note that this is made from the screen. Please ...screen center. The phosphor has a finite illumination life. For best stereo separation, place the external speakers at appropriate intervals of the HITACHI Plasma Monitor is delayed compared to the sound. 13 About the use might be visible to a dark part. 11 Disturbance to reduce the reflection ...
... (e.g. You can see image-like when the picture varied. HOW TO SETUP YOUR NEW HITACHI PLASMA MONITOR VIEWING The major benefit of time, or try to move them at least four feet from plasma monitor panel. IMPORTANT NOTES No. Please note that this is made from the screen. Please ...screen center. The phosphor has a finite illumination life. For best stereo separation, place the external speakers at appropriate intervals of the HITACHI Plasma Monitor is delayed compared to the sound. 13 About the use might be visible to a dark part. 11 Disturbance to reduce the reflection ...

Owners Guide
Page 12
...equipped with an HDMI output connection to inputs and outputs located on camcorders, VCRs and laserdisc players with an S-Video feature in place of the Plasma monitor (ex. D-SUB MINI 15-Pin Cable (Provided) This cable is used on the rear jack panel. S-Video (Super Video) Connector (Provided...) This connector is used to connect an external audio component input to display the signal on the rear panel of the Plasma monitor. 11 English Français HOOKUP CABLES Most video/audio connections between components can be sure of the output and input connector types ...
...equipped with an HDMI output connection to inputs and outputs located on camcorders, VCRs and laserdisc players with an S-Video feature in place of the Plasma monitor (ex. D-SUB MINI 15-Pin Cable (Provided) This cable is used on the rear jack panel. S-Video (Super Video) Connector (Provided...) This connector is used to connect an external audio component input to display the signal on the rear panel of the Plasma monitor. 11 English Français HOOKUP CABLES Most video/audio connections between components can be sure of the output and input connector types ...
Owners Guide
Page 13
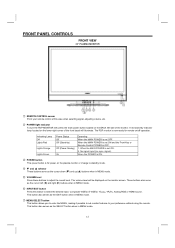
...cursor left side of the front bezel will be displayed on the lower right corner of the monitor. The PDP monitor is OFF. 1. When the MAIN POWER is set ON. 2. FRONT PANEL CONTROLS FRONT VIEW 42" PLASMA MONITOR ① REMOTE CONTROL sensor Point your preference without using the remote. The volume level will illuminate... Saving) On Operating When the MAIN POWER is set ON and the Front Key or Remote Control POWER is now ready for power on the plasma monitor or change to standby mode. ④ À and · selector These buttons serve as the SELECT button when in MENU mode. 12...
...cursor left side of the front bezel will be displayed on the lower right corner of the monitor. The PDP monitor is OFF. 1. When the MAIN POWER is set ON. 2. FRONT PANEL CONTROLS FRONT VIEW 42" PLASMA MONITOR ① REMOTE CONTROL sensor Point your preference without using the remote. The volume level will illuminate... Saving) On Operating When the MAIN POWER is set ON and the Front Key or Remote Control POWER is now ready for power on the plasma monitor or change to standby mode. ④ À and · selector These buttons serve as the SELECT button when in MENU mode. 12...
Owners Guide
Page 14
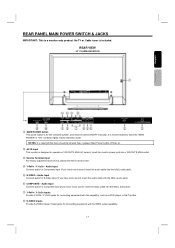
REAR VIEW 42" PLASMA MONITOR ① MAIN POWER button This power button is recommended to leave the "MAIN POWER" to operate on 120VOLTS 60Hz AC current. It is for stand-... DO NOT connect here. ④ Y-PBPR / Y-CBCR - between Main Power button off then on. ② AC IN input This monitor is required that there should be turned ON/OFF manually. Insert the monitor power cord into the left (L) audio jack). ⑦ Y-PBPR / Y-CBCR Inputs Provide Y-PBPR / Y-CBCR jacks for connecting equipment with...
REAR VIEW 42" PLASMA MONITOR ① MAIN POWER button This power button is recommended to leave the "MAIN POWER" to operate on 120VOLTS 60Hz AC current. It is for stand-... DO NOT connect here. ④ Y-PBPR / Y-CBCR - between Main Power button off then on. ② AC IN input This monitor is required that there should be turned ON/OFF manually. Insert the monitor power cord into the left (L) audio jack). ⑦ Y-PBPR / Y-CBCR Inputs Provide Y-PBPR / Y-CBCR jacks for connecting equipment with...
Owners Guide
Page 16
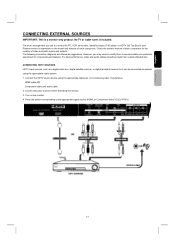
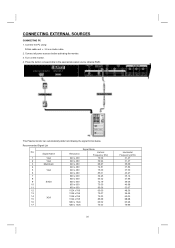
... manual of preference: HDMI cable OR Component cable and audio cable 2. Press the button corresponding to accommodate your Plasma monitor is dependent on the monitor. 4. For best performance, video and audio cables should be connected as suggestions. Connect all power sources before activating the...order of each component. English Français CONNECTING EXTERNAL SOURCES IMPORTANT: This is included. No TV or Cable tuner is a monitor only product. Connect the HDTV source device using the appropriate cable system. 1. Turn on the model and features of each component ...
... manual of preference: HDMI cable OR Component cable and audio cable 2. Press the button corresponding to accommodate your Plasma monitor is dependent on the monitor. 4. For best performance, video and audio cables should be connected as suggestions. Connect all power sources before activating the...order of each component. English Français CONNECTING EXTERNAL SOURCES IMPORTANT: This is included. No TV or Cable tuner is a monitor only product. Connect the HDTV source device using the appropriate cable system. 1. Turn on the model and features of each component ...
Owners Guide
Page 21
CONNECTING EXTERNAL SOURCES CONNECTING PC 1. Connect the PC using: D-Sub cable and ⌀ 3.5 mm Audio cable 2. Turn on the monitor. 4. Signal Name 1 VGA 2 VGA 3 Macintosh 4 5 VGA 6 7 8 9 SVGA 10 11 12 13 14 XGA 15 16 17 Resolution 640 x 400 640 x 480 640 x 480 640 x 480 ....67 48.36 56.48 60.02 68.68 63.98 79.98 Press the button corresponding to the appropriate signal source (Analog RGB) This Plasma monitor can automatically defect and display the signal format below. Recommended Signal List No. Connect all power sources before activating the...
CONNECTING EXTERNAL SOURCES CONNECTING PC 1. Connect the PC using: D-Sub cable and ⌀ 3.5 mm Audio cable 2. Turn on the monitor. 4. Signal Name 1 VGA 2 VGA 3 Macintosh 4 5 VGA 6 7 8 9 SVGA 10 11 12 13 14 XGA 15 16 17 Resolution 640 x 400 640 x 480 640 x 480 640 x 480 ....67 48.36 56.48 60.02 68.68 63.98 79.98 Press the button corresponding to the appropriate signal source (Analog RGB) This Plasma monitor can automatically defect and display the signal format below. Recommended Signal List No. Connect all power sources before activating the...
Owners Guide
Page 23
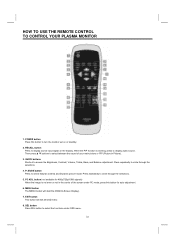
HOW TO USE THE REMOTE CONTROL TO CONTROL YOUR PLASMA MONITOR 1. RECALL button Press to display source input signal on or standby. 2. PC ADJ. MENU button The MENU button will exit all OSD menu. 8. When the ... the image is working, press to select the functions under PC mode, press this button to circle through the selections. 4. Press repeatedly to turn the monitor set on the display.
HOW TO USE THE REMOTE CONTROL TO CONTROL YOUR PLASMA MONITOR 1. RECALL button Press to display source input signal on or standby. 2. PC ADJ. MENU button The MENU button will exit all OSD menu. 8. When the ... the image is working, press to select the functions under PC mode, press this button to circle through the selections. 4. Press repeatedly to turn the monitor set on the display.

Owners Guide
Page 24
... aspect ratio of the source. Note: Use this aspect to last page of the phosphors. English HOW TO USE THE REMOTE CONTROL TO CONTROL YOUR PLASMA MONITOR 9. ▲ ▼ W X buttons Press Up/Down/Left/Right buttons to access the composite video, S-video, Y/CB/CR, Y/PB/PR and HDMI mode. VIDEO ... area of the picture will age more rapidly than the gray areas. 4:3 Zoom1/Zoom2 Use these aspect modes to zoom in YPBPR, the monitor will display in high quality mode on the input signal format received, the picture format ratio allows you to adjust the images through the selections...
... aspect ratio of the source. Note: Use this aspect to last page of the phosphors. English HOW TO USE THE REMOTE CONTROL TO CONTROL YOUR PLASMA MONITOR 9. ▲ ▼ W X buttons Press Up/Down/Left/Right buttons to access the composite video, S-video, Y/CB/CR, Y/PB/PR and HDMI mode. VIDEO ... area of the picture will age more rapidly than the gray areas. 4:3 Zoom1/Zoom2 Use these aspect modes to zoom in YPBPR, the monitor will display in high quality mode on the input signal format received, the picture format ratio allows you to adjust the images through the selections...
Owners Guide
Page 25
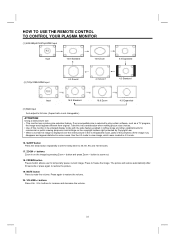
ZOOM +/- buttons Press Vol+ / Vol- HOW TO USE THE REMOTE CONTROL TO CONTROL YOUR PLASMA MONITOR (1) 480i/480p/576i/576p/HDMI Input Input 16:9 Standard 16:9 Zoom 4:3 Expanded (2) 720p/1080i/HDMI Input 4:3 Zoom2 4:3 Zoom1 4:3 Standard Input 16:9 Standard 16:9 ... protected by pressing Zoom + button and press Zoom - If an incompatible size is not changeable.) ATTENTION Using a wide picture size. • This monitor has a picture size selection feature. Take this into consideration when making picture size choices. • Use of the image may disappear and appear distorted...
ZOOM +/- buttons Press Vol+ / Vol- HOW TO USE THE REMOTE CONTROL TO CONTROL YOUR PLASMA MONITOR (1) 480i/480p/576i/576p/HDMI Input Input 16:9 Standard 16:9 Zoom 4:3 Expanded (2) 720p/1080i/HDMI Input 4:3 Zoom2 4:3 Zoom1 4:3 Standard Input 16:9 Standard 16:9 ... protected by pressing Zoom + button and press Zoom - If an incompatible size is not changeable.) ATTENTION Using a wide picture size. • This monitor has a picture size selection feature. Take this into consideration when making picture size choices. • Use of the image may disappear and appear distorted...
Owners Guide
Page 26
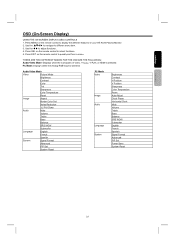
..., Y-CBCR, Y-PBPR or HDMI is selected. English Français OSD (On-Screen Display) USING THE ON-SCREEN DISPLAY (OSD) CONTROLS 1. Press MENU on your HITACHI Plasma Monitor. 2. PC Mode: Displays when the Analog RGB input is selected. Press SEL on the remote control to display the different features on the remote control...
..., Y-CBCR, Y-PBPR or HDMI is selected. English Français OSD (On-Screen Display) USING THE ON-SCREEN DISPLAY (OSD) CONTROLS 1. Press MENU on your HITACHI Plasma Monitor. 2. PC Mode: Displays when the Analog RGB input is selected. Press SEL on the remote control to display the different features on the remote control...
Owners Guide
Page 31
... become erratic or become unresponsive. Remove the plug from the wall outlet if your Plasma Monitor. DO NOT Do not clean your Plasma Monitor away from the accessories pack. USEFUL INFORMATION CARE OF YOUR HITACHI PLASMA MONITOR AND YOUR REMOTE CONTROL DO Dust the screen and frame with a cleaning cloth from extreme heat, humidity, and extremely dusty...
... become erratic or become unresponsive. Remove the plug from the wall outlet if your Plasma Monitor. DO NOT Do not clean your Plasma Monitor away from the accessories pack. USEFUL INFORMATION CARE OF YOUR HITACHI PLASMA MONITOR AND YOUR REMOTE CONTROL DO Dust the screen and frame with a cleaning cloth from extreme heat, humidity, and extremely dusty...

Owners Guide
Page 34
... Corporation of Apple Computer, Inc. IBM PC/AT and VGA are registered trademarks of the U.S.A. It works when the monitor is connected to the Monitor requesting identification. Plug & Play is capable for the plug & play. This Class B digital apparatus complies with VESA ... computer that is running an operating system software that is a system with computer, peripherals (including monitors) and operating system. English Français USEFUL INFORMATION PLUG and PLAY This Plasma Monitor complies with Canadian ICES-003. When a Plug and Play PC is a trademark of a nonprofit...
... Corporation of Apple Computer, Inc. IBM PC/AT and VGA are registered trademarks of the U.S.A. It works when the monitor is connected to the Monitor requesting identification. Plug & Play is capable for the plug & play. This Class B digital apparatus complies with VESA ... computer that is running an operating system software that is a system with computer, peripherals (including monitors) and operating system. English Français USEFUL INFORMATION PLUG and PLAY This Plasma Monitor complies with Canadian ICES-003. When a Plug and Play PC is a trademark of a nonprofit...


