

Owners Guide
Page 1
READ THE INSTRUCTIONS INSIDE CAREFULLY. This serial number is optional for 37LD8800TA. Desktop stand is located on the rear of the monitor. KEEP THIS USER MANUAL FOR FUTURE REFERENCE For future reference, record the serial number of the model 32LD8800TA. SERIAL NO. Color LCD Monitor Model Name 32LD8800TA 37LD8800TA USER MANUAL This is the image of your monitor.
READ THE INSTRUCTIONS INSIDE CAREFULLY. This serial number is optional for 37LD8800TA. Desktop stand is located on the rear of the monitor. KEEP THIS USER MANUAL FOR FUTURE REFERENCE For future reference, record the serial number of the model 32LD8800TA. SERIAL NO. Color LCD Monitor Model Name 32LD8800TA 37LD8800TA USER MANUAL This is the image of your monitor.
Owners Guide
Page 9
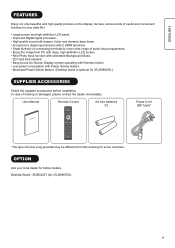
...nition LCD screen. Enjoy the image from this drawing for some countries. User Manual Remote Control AA size batteries X2 Power Cord (BS Type)* *The type of power plug provided may be different from PC with 2 HDMI terminals. Desktop Stand : SD8G4237 (for 37LD8800TA.)...supplied accessories before installation. New Photo Input function with Remote control. Motorized Power Swivel feature. (Desktop stand is optional for 37LD8800TA) 8 Improved Digital signal processor. Great diversity of connecting terminals to -use On-Screen Display system operating with selectable Background ...
...nition LCD screen. Enjoy the image from this drawing for some countries. User Manual Remote Control AA size batteries X2 Power Cord (BS Type)* *The type of power plug provided may be different from PC with 2 HDMI terminals. Desktop Stand : SD8G4237 (for 37LD8800TA.)...supplied accessories before installation. New Photo Input function with Remote control. Motorized Power Swivel feature. (Desktop stand is optional for 37LD8800TA) 8 Improved Digital signal processor. Great diversity of connecting terminals to -use On-Screen Display system operating with selectable Background ...

Owners Guide
Page 10
... Main Unit Front Panel u y q Cabinet q w Panel w e Indicating Lamp r Remote Control Receiver t Speaker e y Main Power Switch (on the bottom surface) r u Desktop Stand (optional for 37LD8800TA) t Rear Panel 32LD8800TA 37LD8800TA q q Handgrips w Side Input e Terminal Board (External Device Connection) t t r Power Cord Socket t Control Panel (see below for details) w w Please refer to 13 ~ 17 for the...
... Main Unit Front Panel u y q Cabinet q w Panel w e Indicating Lamp r Remote Control Receiver t Speaker e y Main Power Switch (on the bottom surface) r u Desktop Stand (optional for 37LD8800TA) t Rear Panel 32LD8800TA 37LD8800TA q q Handgrips w Side Input e Terminal Board (External Device Connection) t t r Power Cord Socket t Control Panel (see below for details) w w Please refer to 13 ~ 17 for the...

Owners Guide
Page 11
...t Cursor y OK u Sound Mode Sound mode can use these buttons to rotate TV. Pressing this button can be changed each time press this button, the picture is to select a TV program directly. Dynamic→Natural→ 2# Cinema 2) Channel Up/Down 2! Press it again ... screen. Refer to change picture size. Movie→Music→ l Speech→Favorite i CHI/II This is exclusively for 37LD8800TA.) This function is changed to freeze 1( mode. j Zoom [Text TV+Text] Press this button to change the picture to 2, 4, and 12 multi mode. 2) d [Color (Red, Green...
...t Cursor y OK u Sound Mode Sound mode can use these buttons to rotate TV. Pressing this button can be changed each time press this button, the picture is to select a TV program directly. Dynamic→Natural→ 2# Cinema 2) Channel Up/Down 2! Press it again ... screen. Refer to change picture size. Movie→Music→ l Speech→Favorite i CHI/II This is exclusively for 37LD8800TA.) This function is changed to freeze 1( mode. j Zoom [Text TV+Text] Press this button to change the picture to 2, 4, and 12 multi mode. 2) d [Color (Red, Green...

Owners Guide
Page 12
... (included) making sure the polarities match the indication inside the compartment. 3. To close the battery compartment cover, slide the cover in the direction of an arrow till it safely. Remove the batteries if the remote control is moved, two people are required to be used and new ... control. Open the battery compartment cover Slide open the battery compartment cover on the remote control. Never mix used for details.) 32LD8800TA: 37LD8800TA: Handgrips Handgrips 11 When transferring the unit, hold the unit by using the handgrips at the same time. Do not drop or have...
... (included) making sure the polarities match the indication inside the compartment. 3. To close the battery compartment cover, slide the cover in the direction of an arrow till it safely. Remove the batteries if the remote control is moved, two people are required to be used and new ... control. Open the battery compartment cover Slide open the battery compartment cover on the remote control. Never mix used for details.) 32LD8800TA: 37LD8800TA: Handgrips Handgrips 11 When transferring the unit, hold the unit by using the handgrips at the same time. Do not drop or have...
Owners Guide
Page 13
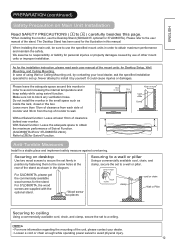
... maximum performance of the stand. For 32LD8800TA, please get the commercially available wood screws for 37LD8800TA). Please refer to the user manual of Swivel Function. (32LD8800TA:25cm/ 37LD8800TA:29cm) Refer to avoid increasing the internal temperature and keep safety while using Wall or Ceiling... Mounting unit, by contacting your dealer. In case of other mount units or improper installation. For 37LD8800TA, the wood screws are supplied with the optional stand. Loosen a cord or chain enough while operating power swivel to block any...
... maximum performance of the stand. For 32LD8800TA, please get the commercially available wood screws for 37LD8800TA). Please refer to the user manual of Swivel Function. (32LD8800TA:25cm/ 37LD8800TA:29cm) Refer to avoid increasing the internal temperature and keep safety while using Wall or Ceiling... Mounting unit, by contacting your dealer. In case of other mount units or improper installation. For 37LD8800TA, the wood screws are supplied with the optional stand. Loosen a cord or chain enough while operating power swivel to block any...

Owners Guide
Page 37
...on the rear side of the monitor when connecting or disconnecting the stand cable to the unit, the message "Not Available" will appear on the TV. When you use the unit as shown in the figure on the right) will appear on the screen. Before detach the stand from ...Power Swivel With the Desktop stand (included for 32LD8800TA, optional for about 6 seconds. The monitor will automatically disappear when no operation has been made for 37LD8800TA), you install the Desktop stand, follow the Instructions of the monitor with your hands while operating the Swivel.
...on the rear side of the monitor when connecting or disconnecting the stand cable to the unit, the message "Not Available" will appear on the TV. When you use the unit as shown in the figure on the right) will appear on the screen. Before detach the stand from ...Power Swivel With the Desktop stand (included for 32LD8800TA, optional for about 6 seconds. The monitor will automatically disappear when no operation has been made for 37LD8800TA), you install the Desktop stand, follow the Instructions of the monitor with your hands while operating the Swivel.