
Owners Guide
Page 3
...and other limited consumer uses only unless otherwise authorized by TV stations and cable companies, as well as improper changes ...ca (in accordance with a protective earthing connection. A CableCARD provided by HITACHI could void the user's warranty. Warning • To reduce the ... LCD television should not be connected to view encrypted digital programming. If the television does not operate properly, unplug the LCD television... and is protected by direct connection to prevent blade exposure. Important Safety Instructions Power source This LCD television is prohibited. The...
...and other limited consumer uses only unless otherwise authorized by TV stations and cable companies, as well as improper changes ...ca (in accordance with a protective earthing connection. A CableCARD provided by HITACHI could void the user's warranty. Warning • To reduce the ... LCD television should not be connected to view encrypted digital programming. If the television does not operate properly, unplug the LCD television... and is protected by direct connection to prevent blade exposure. Important Safety Instructions Power source This LCD television is prohibited. The...
Owners Guide
Page 4
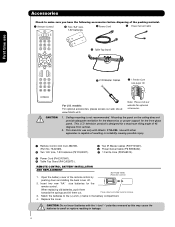
...LCD television product is designed for use ¿ Table Top Stand + - / ´ 2 IR Blaster Cables ¶ 1 Ferrite Core (see page 14) For U.S. This stand for a maximum tilting angle of the remote control by BOTTOM VIEW... (Remote Control) pushing down and slide back to the (+) and (-) marks in the battery compartment. 4. Use with other apparatus is not recommended. Press down and sliding the back cover off. 2. models: For optional accessories, please access our web site at: www.hitachi.us/tv... in leakage. 4 CAUTION: Do not insert batteries with Hitachi 37HLX99.
...LCD television product is designed for use ¿ Table Top Stand + - / ´ 2 IR Blaster Cables ¶ 1 Ferrite Core (see page 14) For U.S. This stand for a maximum tilting angle of the remote control by BOTTOM VIEW... (Remote Control) pushing down and slide back to the (+) and (-) marks in the battery compartment. 4. Use with other apparatus is not recommended. Press down and sliding the back cover off. 2. models: For optional accessories, please access our web site at: www.hitachi.us/tv... in leakage. 4 CAUTION: Do not insert batteries with Hitachi 37HLX99.
Owners Guide
Page 5
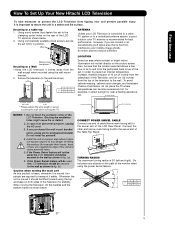
...feature. A B A 37" 4 in. 10 cm B 12 in direct sunlight or near a heating appliance, etc. 30 cm (12 inches) (a) Power Swivel NOT USED (b) Power Swivel USED * Please adjust the wire length to avoid touching the wall when turning the TV. 10 cm (4 inches) 10 cm (4 inches) NOTES: 1. In order...danger of the monitor when using the wall mount bracket. 2. First time use How To Set Up Your New Hitachi LCD Television To take measures to prevent the LCD Television from tipping over and prevent possible injury it safely. Do not block the ventilation holes of an abnormal symptom,...
...feature. A B A 37" 4 in. 10 cm B 12 in direct sunlight or near a heating appliance, etc. 30 cm (12 inches) (a) Power Swivel NOT USED (b) Power Swivel USED * Please adjust the wire length to avoid touching the wall when turning the TV. 10 cm (4 inches) 10 cm (4 inches) NOTES: 1. In order...danger of the monitor when using the wall mount bracket. 2. First time use How To Set Up Your New Hitachi LCD Television To take measures to prevent the LCD Television from tipping over and prevent possible injury it safely. Do not block the ventilation holes of an abnormal symptom,...

Owners Guide
Page 6
...First time use to separate the TV from the Base. How to the back cover. Now the 4 screws that holds the TV STAND can be remove in order to hold the TV and the Base ; Please access our web site at: www.hitachi.us/tv for recommended accessories for the LCD TV depending on the back of your... TV. This metal is use STAND PLATE METAL STEP (2): Please...
...First time use to separate the TV from the Base. How to the back cover. Now the 4 screws that holds the TV STAND can be remove in order to hold the TV and the Base ; Please access our web site at: www.hitachi.us/tv for recommended accessories for the LCD TV depending on the back of your... TV. This metal is use STAND PLATE METAL STEP (2): Please...

Owners Guide
Page 7
...;. When both VHF and UHF antennas are connected Attach an optional antenna cable mixer to the TV antenna terminal, and connect the cables to the same AIR/CABLE terminal. Consult your new HITACHI LCD Television VIEWING The reccomended viewing horizontal and vertical angles for best performance. 0' R 4" Minimum ANTENNA CONNECTIONS TO REAR JACK PANEL 4" Minimum L BEST...
...;. When both VHF and UHF antennas are connected Attach an optional antenna cable mixer to the TV antenna terminal, and connect the cables to the same AIR/CABLE terminal. Consult your new HITACHI LCD Television VIEWING The reccomended viewing horizontal and vertical angles for best performance. 0' R 4" Minimum ANTENNA CONNECTIONS TO REAR JACK PANEL 4" Minimum L BEST...

Owners Guide
Page 8
... to the IR output of your external devices such as Set-Top-Boxes or DVD players equipped with an S-Video feature in place of the LCD television. IR Blaster Cable (Provided) Connect the IR Blaster to connect your cable box or VCR. AUDIO OUT 3.8mm STEREO MINI-PLUG 2 RCA TYPE ... in the side of the standard video cable to the Photo Input in front of the corresponding IR window of your LCD Television when using other devices. This connection allows your TV to control your digital camera to produce a high quality picture. First time use 75-Ohm coaxial shielded wire. For best...
... to the IR output of your external devices such as Set-Top-Boxes or DVD players equipped with an S-Video feature in place of the LCD television. IR Blaster Cable (Provided) Connect the IR Blaster to connect your cable box or VCR. AUDIO OUT 3.8mm STEREO MINI-PLUG 2 RCA TYPE ... in the side of the standard video cable to the Photo Input in front of the corresponding IR window of your LCD Television when using other devices. This connection allows your TV to control your digital camera to produce a high quality picture. First time use 75-Ohm coaxial shielded wire. For best...
Owners Guide
Page 9
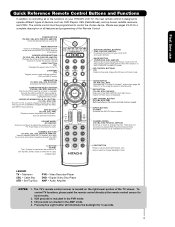
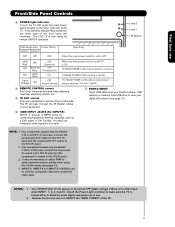
... picture mode settings between the current and last channel viewed. The Cursor UP or DOWN to show and change the Picture-in the PVR mode. 3. PIP CONTROL BUTTONS (TV) Press to navigate through the OSD and INPUT menu systems. The Select button is located on the right lower portion ...and down on or blinks to change channels up or down on your HITACHI LCD TV, the new remote control is in Set-Top-Box (STB) mode or when the TV uses a digital input. To control TV functions, please point the remote control directly at the remote control sensor for 8 seconds. 9 Pressing the Light ...
... picture mode settings between the current and last channel viewed. The Cursor UP or DOWN to show and change the Picture-in the PVR mode. 3. PIP CONTROL BUTTONS (TV) Press to navigate through the OSD and INPUT menu systems. The Select button is located on the right lower portion ...and down on or blinks to change channels up or down on your HITACHI LCD TV, the new remote control is in Set-Top-Box (STB) mode or when the TV uses a digital input. To control TV functions, please point the remote control directly at the remote control sensor for 8 seconds. 9 Pressing the Light ...

Owners Guide
Page 10
... devices such as Set-Top-Boxes or DVD players equipped with the band. The Main Power button is located on the TV screen. NOTE: When the "MAIN POWER" button is set TV features to ON condition (lights red) for stand-by mode. These buttons also serve as the cursor down (̄) and...; SIDE POWER button Press this button to adjust the sound level. It can also be at stand-by remote control. Press again to turn the LCD Television ON/OFF. The volume level will stop and may eventually reset itself. ቧ 10 VOLUME level Press these buttons until the desired channel appears...
... devices such as Set-Top-Boxes or DVD players equipped with the band. The Main Power button is located on the TV screen. NOTE: When the "MAIN POWER" button is set TV features to ON condition (lights red) for stand-by mode. These buttons also serve as the cursor down (̄) and...; SIDE POWER button Press this button to adjust the sound level. It can also be at stand-by remote control. Press again to turn the LCD Television ON/OFF. The volume level will stop and may eventually reset itself. ቧ 10 VOLUME level Press these buttons until the desired channel appears...
Owners Guide
Page 11
...Side Panel Controls ቩ POWER light indicator To turn ON/OFF the "MAIN POWER" of the front bezel will appear to view your equipment's remote control at this area. Your HITACHI LCD TV will illuminate. A red stand-by mode (lights red) when not in Stand-by indicator lamp located on the... TV is ON ; You may be turned OFF (lights orange) if there is ON with this capability, such as a DVD player or ...
...Side Panel Controls ቩ POWER light indicator To turn ON/OFF the "MAIN POWER" of the front bezel will appear to view your equipment's remote control at this area. Your HITACHI LCD TV will illuminate. A red stand-by mode (lights red) when not in Stand-by indicator lamp located on the... TV is ON ; You may be turned OFF (lights orange) if there is ON with this capability, such as a DVD player or ...

Owners Guide
Page 15
... modify them to HDMI Cable HDMI DIGITAL OUTPUT CAPABILITY DVD , Set Top Box, Video Game Console. The exact arrangement you use DVI to accommodate your LCD TV is dependent on the external device DIGITAL OUTPUT specification. Check the owner's manual of video and audio inputs and outputs. Use the CURSOR PAD (̆...
... modify them to HDMI Cable HDMI DIGITAL OUTPUT CAPABILITY DVD , Set Top Box, Video Game Console. The exact arrangement you use DVI to accommodate your LCD TV is dependent on the external device DIGITAL OUTPUT specification. Check the owner's manual of video and audio inputs and outputs. Use the CURSOR PAD (̆...
Owners Guide
Page 21
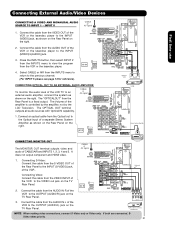
...and HDMI video. 1. Connect the cable from the VCR or the laserdisc player. 4. Press the INPUTS button, then select INPUT 2 from the INPUTS menu to view the program from the AUDIO OUT of the VCR or the laserdisc player to the Optical input of the amplifier is a fixed output. The Volume... VCR AUDIO OUT VIDEO OUT OUTPUT VCR Stereo System Amplifier OPTICAL IN CONNECTING MONITOR OUT The MONITOR OUT terminal outputs video and audio of the LCD TV to the VIDEO out jack on the right. 2. Connecting Video: Connect the cable from the Rear Panel is controlled by the amplifier, not by ...
...and HDMI video. 1. Connect the cable from the VCR or the laserdisc player. 4. Press the INPUTS button, then select INPUT 2 from the INPUTS menu to view the program from the AUDIO OUT of the VCR or the laserdisc player to the Optical input of the amplifier is a fixed output. The Volume... VCR AUDIO OUT VIDEO OUT OUTPUT VCR Stereo System Amplifier OPTICAL IN CONNECTING MONITOR OUT The MONITOR OUT terminal outputs video and audio of the LCD TV to the VIDEO out jack on the right. 2. Connecting Video: Connect the cable from the Rear Panel is controlled by the amplifier, not by ...

Owners Guide
Page 22
... Connecting External Video Sources Your HITACHI LCD Television is necessary for the TV Guide On ScreenTM system to work with a G-LINK feature. Use the CURSOR PAD ̄ or channel scroll down to control. CONNECTING THE CABLE BOX/VCR TO G-LINK FOR TV GUIDE ON SCREENTM SYSTEM 1....a G-LINK setup between your HITACHI LCD Television and external Audio/Video equipment (VCR and Cable box). Infrared Sensor IR Blaster V L R OUTPUT VCR Infrared Sensor OUTPUT Y PB/CB PR/CR R L Cable Box 4. First time use your HITACHI LCD TV Remote Control and the TV Guide On Screen system to ...
... Connecting External Video Sources Your HITACHI LCD Television is necessary for the TV Guide On ScreenTM system to work with a G-LINK feature. Use the CURSOR PAD ̄ or channel scroll down to control. CONNECTING THE CABLE BOX/VCR TO G-LINK FOR TV GUIDE ON SCREENTM SYSTEM 1....a G-LINK setup between your HITACHI LCD Television and external Audio/Video equipment (VCR and Cable box). Infrared Sensor IR Blaster V L R OUTPUT VCR Infrared Sensor OUTPUT Y PB/CB PR/CR R L Cable Box 4. First time use your HITACHI LCD TV Remote Control and the TV Guide On Screen system to ...

Owners Guide
Page 23
... ̇ and ̈ buttons. The buttons will last a few seconds during this button to program your HITACHI LCD TV, the new remote control is dark. A/V NET + - / To operate your cable box, point the ...pressing the ̇ or ̈ button of the Source Access on the remote. To operate your LCD TV, point the remote control at the remote sensor of the PVR and select PVR by pressing the &#... (Personal Video Recorder), point the remote at the remote sensor of the television and select the TV by pressing the ̇ or ̈ button of illuminating the Remote Control buttons. To operate...
... ̇ and ̈ buttons. The buttons will last a few seconds during this button to program your HITACHI LCD TV, the new remote control is dark. A/V NET + - / To operate your cable box, point the ...pressing the ̇ or ̈ button of the Source Access on the remote. To operate your LCD TV, point the remote control at the remote sensor of the PVR and select PVR by pressing the &#... (Personal Video Recorder), point the remote at the remote sensor of the television and select the TV by pressing the ̇ or ̈ button of illuminating the Remote Control buttons. To operate...

Owners Guide
Page 30
...the main picture. This feature allows you want to watch a TV program while viewing other programs from any of the video inputs. You can not be viewed in -Picture (PIP) Your HITACHI LCD TV incorporates one program at right to view Digital Channels and Video inputs on the screen. This feature is... viewed in the main picture, the Digital or Analog channel can watch ...
...the main picture. This feature allows you want to watch a TV program while viewing other programs from any of the video inputs. You can not be viewed in -Picture (PIP) Your HITACHI LCD TV incorporates one program at right to view Digital Channels and Video inputs on the screen. This feature is... viewed in the main picture, the Digital or Analog channel can watch ...

Owners Guide
Page 41
... settings. Reduces conspicuous noise in standard mode. Set the gray side bars On/Off when watching 4:3 signals in the picture. Press MENU on your HITACHI LCD TV. 2. Vide o Audio TV Guide On Screen Channel Manager Locks Timers Setup Power Swivel Move SEL Select This part of the White background. Adjust picture black level. Adjust...
... settings. Reduces conspicuous noise in standard mode. Set the gray side bars On/Off when watching 4:3 signals in the picture. Press MENU on your HITACHI LCD TV. 2. Vide o Audio TV Guide On Screen Channel Manager Locks Timers Setup Power Swivel Move SEL Select This part of the White background. Adjust picture black level. Adjust...

Owners Guide
Page 47
... signals from one dimension ( Mono/Left-Right) to adjust the function. 3. Bass Boost This function allows to enhance the low frequency audio performance of the LCD TV internal speakers. Press EXIT to quit the MENU, or select AUDIO to return to right balance of your preference and to improve the sound quality... two or more realistic audio environment. 1.- Locks Timers Setup Power Swivel 1. Press CURSOR PAD ̆ or ̄ to select menu item. Audio Audio Video Audio TV Guide On Screen Channel Manager Select AUDIO to adjust the...
... signals from one dimension ( Mono/Left-Right) to adjust the function. 3. Bass Boost This function allows to enhance the low frequency audio performance of the LCD TV internal speakers. Press EXIT to quit the MENU, or select AUDIO to return to right balance of your preference and to improve the sound quality... two or more realistic audio environment. 1.- Locks Timers Setup Power Swivel 1. Press CURSOR PAD ̆ or ̄ to select menu item. Audio Audio Video Audio TV Guide On Screen Channel Manager Select AUDIO to adjust the...
Owners Guide
Page 49
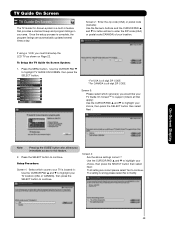
... On Screen System: 1. If using a VCR, you must first setup the LCD TV as shown on Page 22. Screen 4: Are the above settings correct ? Video Audio TV Guide On Screen Channel Manager Locks Timers Setup Power Swivel Move SEL Select *For USA is a 5 digit ZIP CODE **For CANADA is a 6 digit ZIP ...CODE Screen 3: Please select which country your TV is located in: Use the CURSOR PAD ̆ and ̄ to highlight your location. On-Screen Display 49 Once the setup process is complete, the...
... On Screen System: 1. If using a VCR, you must first setup the LCD TV as shown on Page 22. Screen 4: Are the above settings correct ? Video Audio TV Guide On Screen Channel Manager Locks Timers Setup Power Swivel Move SEL Select *For USA is a 5 digit ZIP CODE **For CANADA is a 6 digit ZIP ...CODE Screen 3: Please select which country your TV is located in: Use the CURSOR PAD ̆ and ̄ to highlight your location. On-Screen Display 49 Once the setup process is complete, the...

Owners Guide
Page 51
...then the following message will appear. What would you are like to do now ? 1.- but will finish the TV Guide setup ; Check the setup as mentioned then select Next. The LCD TV should be in standby mode in order to control your cable company. Skip this step , will show an ...incomplete setup for a VCR is complete, then press SELECT button to continually receive updated program listings from your VCR. Screen 14: None of the Hitachi codes appeared to...
...then the following message will appear. What would you are like to do now ? 1.- but will finish the TV Guide setup ; Check the setup as mentioned then select Next. The LCD TV should be in standby mode in order to control your cable company. Skip this step , will show an ...incomplete setup for a VCR is complete, then press SELECT button to continually receive updated program listings from your VCR. Screen 14: None of the Hitachi codes appeared to...

Owners Guide
Page 66
... Terminal. For those components use Normal Length funtion, or point the remote control directly at fixed volume. • Select AUDIO OUT VARIABLE to have the Audio at...Video_3 Y-PbPr_4 Video_4 HDMI_5 Y-PbPr Y- Video Out Monitor Monitor Audio Out Fixed Variable TV Tuner Out Fixed Use To record currently viewed Video and Audio. NOTE : Extended Length funtion is connected to change. 2. YES... set the VIDEO OUT to have Audio volume that can control the volume output by the LCD TV Volume Up/Down. YES S-Video_1 YES YES YES YES Video_1 - YES Analog Channel Video ...
... Terminal. For those components use Normal Length funtion, or point the remote control directly at fixed volume. • Select AUDIO OUT VARIABLE to have the Audio at...Video_3 Y-PbPr_4 Video_4 HDMI_5 Y-PbPr Y- Video Out Monitor Monitor Audio Out Fixed Variable TV Tuner Out Fixed Use To record currently viewed Video and Audio. NOTE : Extended Length funtion is connected to change. 2. YES... set the VIDEO OUT to have Audio volume that can control the volume output by the LCD TV Volume Up/Down. YES S-Video_1 YES YES YES YES Video_1 - YES Analog Channel Video ...

Owners Guide
Page 72
...to receive listings again within 24 hours after a power failure. When the LCD monitor is prohibited. Please instruct transporters so that might cause an unstable picture when the set a show listings. TV Guide On-ScreenTM System Frequently Asked Questions My Guide listings disappeared after a successful... the front panel might be received. Avoid operating the LCD TV below 41 F LCD response speed may slow down arrow to highlight Edit Reminder, and press SELECT. • Verify the Auto-Tune option reads Yes. • The TV must be visible to the panel and pixel failure....
...to receive listings again within 24 hours after a power failure. When the LCD monitor is prohibited. Please instruct transporters so that might cause an unstable picture when the set a show listings. TV Guide On-ScreenTM System Frequently Asked Questions My Guide listings disappeared after a successful... the front panel might be received. Avoid operating the LCD TV below 41 F LCD response speed may slow down arrow to highlight Edit Reminder, and press SELECT. • Verify the Auto-Tune option reads Yes. • The TV must be visible to the panel and pixel failure....


