Owners Guide
Page 2
...14 Terminal Positions 14 Connecting Procedure 14 BASIC OPERATION 19 POWER On/Off 19 Volume UP/DOWN 20 Mute 20 Input Switching to TV/AV1~4, HDMI, and RGB......... 21 Input Signal Screen Display 21 MENU OPERATION 22 How to the unit that may shorten its service...( 36 ~ 38 ) to determine the symptoms when problems occur during installation or operation of LCD Panel 8 FEATURES 9 SUPPLIED ACCESSORIES 9 COMPONENT NAMES 10 Main Unit 10 Remote Control 11 PREPARATION 12 Remote Control Batteries Installation 12 Caution When Moving the Main Unit 12 Safety Precaution on the Screen.... 36...
...14 Terminal Positions 14 Connecting Procedure 14 BASIC OPERATION 19 POWER On/Off 19 Volume UP/DOWN 20 Mute 20 Input Switching to TV/AV1~4, HDMI, and RGB......... 21 Input Signal Screen Display 21 MENU OPERATION 22 How to the unit that may shorten its service...( 36 ~ 38 ) to determine the symptoms when problems occur during installation or operation of LCD Panel 8 FEATURES 9 SUPPLIED ACCESSORIES 9 COMPONENT NAMES 10 Main Unit 10 Remote Control 11 PREPARATION 12 Remote Control Batteries Installation 12 Caution When Moving the Main Unit 12 Safety Precaution on the Screen.... 36...
Owners Guide
Page 9
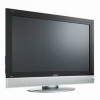
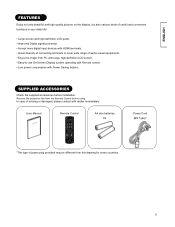
...quality pictures on the display, but also various kinds of useful and convenient functions in your daily life! • Large-screen and high-definition LCD panel. • Improved Digital signal processor. • Accept more digital input devices with HDMI terminals. • Great diversity of connecting terminals... to cover wide range of audio-visual equipments. • Enjoy the image from PC with large, high-definition LCD screen. • Easy-to-use On-Screen Display system operating with Remote control. • Low power consumption with dealer immediately.
...quality pictures on the display, but also various kinds of useful and convenient functions in your daily life! • Large-screen and high-definition LCD panel. • Improved Digital signal processor. • Accept more digital input devices with HDMI terminals. • Great diversity of connecting terminals... to cover wide range of audio-visual equipments. • Enjoy the image from PC with large, high-definition LCD screen. • Easy-to-use On-Screen Display system operating with Remote control. • Low power consumption with dealer immediately.

Owners Guide
Page 10
... to 14 ~ 18 for the detailed information for the connections. 26LD9000TA 4 32LD9000TA 4 3 2 1 ! Control Panel These buttons are located on the left side) 3! 4 5 Rear Panel 1. Program DOWN/ T button 5. Side Input 2. Terminal Board (External Device Connection) 4. Sub Power button 2. Program UP/ S button 4. Remote Control Receiver 5. Volume UP /f button 6. Power Cord Socket 3. Volume DOWN /ebutton...
... to 14 ~ 18 for the detailed information for the connections. 26LD9000TA 4 32LD9000TA 4 3 2 1 ! Control Panel These buttons are located on the left side) 3! 4 5 Rear Panel 1. Program DOWN/ T button 5. Side Input 2. Terminal Board (External Device Connection) 4. Sub Power button 2. Program UP/ S button 4. Remote Control Receiver 5. Volume UP /f button 6. Power Cord Socket 3. Volume DOWN /ebutton...

Owners Guide
Page 11
... 8. OK 11 20 17. Channel Up/Down[P+/ P-] 19. ENGLISH COMPONENT NAMES (Continued) Remote Control 1. Program Select 4 Press these buttons to "About Teletext" on 31 . 11 Cursor 9. Refer to select a TV program directly. 6. Freeze [Hold] Press this button to change the picture to change picture size. 8 13. Recall 17 Pressing this button to freeze...
... 8. OK 11 20 17. Channel Up/Down[P+/ P-] 19. ENGLISH COMPONENT NAMES (Continued) Remote Control 1. Program Select 4 Press these buttons to "About Teletext" on 31 . 11 Cursor 9. Refer to select a TV program directly. 6. Freeze [Hold] Press this button to change the picture to change picture size. 8 13. Recall 17 Pressing this button to freeze...

Owners Guide
Page 12
... Open the battery compartment cover. Ɣ Slide opens the battery compartment cover on the wet object. Ɣ Do not place the remote control under the direct sunlight or near sources of an arrow. 2. Caution When Moving the Main Unit As this product is heavy, whenever it is not going... to transport it clicks shut. When moving the unit, hold it by the top and bottom frame of the LCD screen. (See the figures below for an extended period of an arrow till it safely. PREPARATION Remote Control Batteries Installation This remote control operates on 2 "AA" batteries. 1.
... Open the battery compartment cover. Ɣ Slide opens the battery compartment cover on the wet object. Ɣ Do not place the remote control under the direct sunlight or near sources of an arrow. 2. Caution When Moving the Main Unit As this product is heavy, whenever it is not going... to transport it clicks shut. When moving the unit, hold it by the top and bottom frame of the LCD screen. (See the figures below for an extended period of an arrow till it safely. PREPARATION Remote Control Batteries Installation This remote control operates on 2 "AA" batteries. 1.

Owners Guide
Page 19
... the unit before you to completely turn Off the power of the television: 1. Press Sub Power button either on the control panel or on the remote control. Ɣ The color of the Indicating Lamp turns into Green, and the image will illuminates in a short period of time. Press Main Power ...power ШOn Sub Power button ШOn Main power ШOn Sub Power button ШOn * About Power Save mode, see TROUBLESHOOTING on the remote control. Ɣ The image disappears from the screen and the Indicating Lamp turns into the wall socket. NOTE Ɣ If the image does not appear...
... the unit before you to completely turn Off the power of the television: 1. Press Sub Power button either on the control panel or on the remote control. Ɣ The color of the Indicating Lamp turns into Green, and the image will illuminates in a short period of time. Press Main Power ...power ШOn Sub Power button ШOn Main power ШOn Sub Power button ШOn * About Power Save mode, see TROUBLESHOOTING on the remote control. Ɣ The image disappears from the screen and the Indicating Lamp turns into the wall socket. NOTE Ɣ If the image does not appear...

Owners Guide
Page 20
... Mute button Mute 1. To decrease the sound volume, press button on the remote control or Volume Down button on the control panel. Ɣ The Volume Indicator value on the remote control. Ɣ The sound of the TV. 2. To mute the sound, press button on the screen will shift right...BASIC OPERATION (continued) Volume UP/DOWN 1.To increase the sound volume, press button on the remote control, or Volume Up button on the control panel. Ɣ The Volume Indicator value on either remote control or the control panel. Volume Down button Volume Up button NOTE You can decrease the...
... Mute button Mute 1. To decrease the sound volume, press button on the remote control or Volume Down button on the control panel. Ɣ The Volume Indicator value on the remote control. Ɣ The sound of the TV. 2. To mute the sound, press button on the screen will shift right...BASIC OPERATION (continued) Volume UP/DOWN 1.To increase the sound volume, press button on the remote control, or Volume Up button on the control panel. Ɣ The Volume Indicator value on either remote control or the control panel. Volume Down button Volume Up button NOTE You can decrease the...

Owners Guide
Page 21
...Input Mode Input horizontal frequency of Input vertical frequency of the remote control. • The display will go back to TV mode, pressing channel Up/Down buttons on remote control or pressing Program UP/Down on the remote control. Ɣ To display the image outputting from the ... be also switched by using Input Select button on the remote control. TV AV1 AV2 AV3 RGB HDMI AV4 3. ENGLISH BASIC OPERATION (continued) Input Switching to each terminal (AV1~4, HDMI and RGB), select corresponding mode. 1. To directly go out in approximately 5 seconds. Each time this button...
...Input Mode Input horizontal frequency of Input vertical frequency of the remote control. • The display will go back to TV mode, pressing channel Up/Down buttons on remote control or pressing Program UP/Down on the remote control. Ɣ To display the image outputting from the ... be also switched by using Input Select button on the remote control. TV AV1 AV2 AV3 RGB HDMI AV4 3. ENGLISH BASIC OPERATION (continued) Input Switching to each terminal (AV1~4, HDMI and RGB), select corresponding mode. 1. To directly go out in approximately 5 seconds. Each time this button...
Owners Guide
Page 22
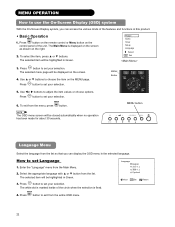
... selection. The Main Menu is marked inside of the features and functions in Green. 3. To exit from the menu, press button. Press button on the remote control or Menu button on the screen. 4.
... selection. The Main Menu is marked inside of the features and functions in Green. 3. To exit from the menu, press button. Press button on the remote control or Menu button on the screen. 4.
Owners Guide
Page 31
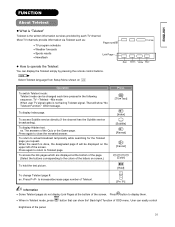
... "Teletext" Teletext is the written information services provided by pressing the remote control buttons. NOTE Select Teletext language from Setup Menu shown on screen.) To hold the text picture. To access Subtitle service directly (if the channel has the Subtitle service broadcasting). To return to Teletext... search is not having Teletext signal. To access the link pages which are displayed at the bottom of the Quiz or the Game page. Press [TV Text] [Index] [Subtitle] ? [Reveal] X [Cancel] [Color] [Hold] P+ P [P+/ P-] Information z Some Teletext pages do not display Link Pages at the ...
... "Teletext" Teletext is the written information services provided by pressing the remote control buttons. NOTE Select Teletext language from Setup Menu shown on screen.) To hold the text picture. To access Subtitle service directly (if the channel has the Subtitle service broadcasting). To return to Teletext... search is not having Teletext signal. To access the link pages which are displayed at the bottom of the Quiz or the Game page. Press [TV Text] [Index] [Subtitle] ? [Reveal] X [Cancel] [Color] [Hold] P+ P [P+/ P-] Information z Some Teletext pages do not display Link Pages at the ...

Owners Guide
Page 32
...screen mode is selected to view the image reflecting original intention. 32 Information Aspect ratio represents horizontal : vertical ratio on the current output image as shown below. FUNCTION (continued) Size Switching Each time button of the remote control is pressed, the ... CAUTION Using a wide-screen television z This television has a screen mode selection feature. Use 4:3 mode to play certain software, such as a TV program, the image would appear different form the original. Blanking occurs on both sides. (4:3 Signal) Panoramic Play a 4:3 image which enlarges horizontal ...
...screen mode is selected to view the image reflecting original intention. 32 Information Aspect ratio represents horizontal : vertical ratio on the current output image as shown below. FUNCTION (continued) Size Switching Each time button of the remote control is pressed, the ... CAUTION Using a wide-screen television z This television has a screen mode selection feature. Use 4:3 mode to play certain software, such as a TV program, the image would appear different form the original. Blanking occurs on both sides. (4:3 Signal) Panoramic Play a 4:3 image which enlarges horizontal ...

Owners Guide
Page 34
...: Bilingual/Dual Sound broadcast and Stereo broadcast. These can make optimum use of available audio by pressing bottom of remote control. z ϯrepresents the Mono broadcast. 34 FUNCTION (continued) Audio Switching Sound Multiplex (TV mode) You can be switched only if receiving sound multiplex signals; for example, some sports programs contain broadcast...
...: Bilingual/Dual Sound broadcast and Stereo broadcast. These can make optimum use of available audio by pressing bottom of remote control. z ϯrepresents the Mono broadcast. 34 FUNCTION (continued) Audio Switching Sound Multiplex (TV mode) You can be switched only if receiving sound multiplex signals; for example, some sports programs contain broadcast...

Owners Guide
Page 35
sync or press the Sub Power button of the control panel or the remote control to reduce power consumption by this unit. ENGLISH FUNCTION (continued) Power Save Mode When the RGB input is selected z When this unit is connected ...
sync or press the Sub Power button of the control panel or the remote control to reduce power consumption by this unit. ENGLISH FUNCTION (continued) Power Save Mode When the RGB input is selected z When this unit is connected ...
Owners Guide
Page 36
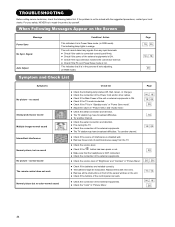
... that the headphone is NOT connected. z Check the connection of the external equipments. z Check the aerial connection and direction. z Try another channel. z The TV station may have broadcast difficulties. z Check the volume level. z Check the volume level of the sensor window on ..., 35 14 ~ 19 25 Symptoms No picture - z The TV station may have broadcast difficulties. z Check the aerial connection and direction. z Check if the buttons of auto adjusting. (in "Picture Menu". normal sound The remote control does not work . z Remove all the obstructions in Power...
... that the headphone is NOT connected. z Check the connection of the external equipments. z Check the aerial connection and direction. z Try another channel. z The TV station may have broadcast difficulties. z Check the volume level. z Check the volume level of the sensor window on ..., 35 14 ~ 19 25 Symptoms No picture - z The TV station may have broadcast difficulties. z Check the aerial connection and direction. z Check if the buttons of auto adjusting. (in "Picture Menu". normal sound The remote control does not work . z Remove all the obstructions in Power...

Owners Guide
Page 37
...picture The Indicating lamp ĺ Orange It means that this is fixed at all the cables of the unit for long hours. z Check if the TV/AV mode has been selected correctly. z Image cannot be displayed in "Power Save mode". z Cannot be switched correctly. z The display size is ...not malfunction. z (Please refer to "Power Save mode" and "When following messages appears on the remote z Check if the cables are 1080i/60Hz, 1080i/50Hz, 720p/60Hz, or 720p/50Hz. z Try Composite output or S-video output and check the picture...
...picture The Indicating lamp ĺ Orange It means that this is fixed at all the cables of the unit for long hours. z Check if the TV/AV mode has been selected correctly. z Image cannot be displayed in "Power Save mode". z Cannot be switched correctly. z The display size is ...not malfunction. z (Please refer to "Power Save mode" and "When following messages appears on the remote z Check if the cables are 1080i/60Hz, 1080i/50Hz, 720p/60Hz, or 720p/50Hz. z Try Composite output or S-video output and check the picture...

Owners Guide
Page 38
... z Try "Auto Adjust". TROUBLESHOOTING(continued) Symptom and Check List (continued) Symptoms z The image on the screen is moving in an oblique direction. (in RGB mode only) z The coarse horizontal stripes could happen when the image with more than 70Hz, adjust its level higher (up ..." till you get clearest image. abcdefgABCDEFGabcd abcdefgABCDEFGabcd z Try "Auto Adjust". z Check the Signal status of the PC by pressing on the remote control. AAAAA z Try "Auto Adjust". z If the condition is not improved with Auto Adjust, adjust "Clock Phase" till you gets flicker-free ...
... z Try "Auto Adjust". TROUBLESHOOTING(continued) Symptom and Check List (continued) Symptoms z The image on the screen is moving in an oblique direction. (in RGB mode only) z The coarse horizontal stripes could happen when the image with more than 70Hz, adjust its level higher (up ..." till you get clearest image. abcdefgABCDEFGabcd abcdefgABCDEFGabcd z Try "Auto Adjust". z Check the Signal status of the PC by pressing on the remote control. AAAAA z Try "Auto Adjust". z If the condition is not improved with Auto Adjust, adjust "Clock Phase" till you gets flicker-free ...


