Security - Window Vista and Windows 7
Page 5
... computer 2 Using passwords Setting passwords in Windows ...3 Setting passwords in Setup Utility ...3 Administrator password ...3 Managing an administrator password 4 Entering an administrator password 4 Power-on password ...4 Managing a power-on password 5 Entering a power-on password 5 3 Using antivirus software 4 Using firewall software 5 Installing critical security updates 6 Installing an optional security cable 7 Using the fingerprint reader (select...
... computer 2 Using passwords Setting passwords in Windows ...3 Setting passwords in Setup Utility ...3 Administrator password ...3 Managing an administrator password 4 Entering an administrator password 4 Power-on password ...4 Managing a power-on password 5 Entering a power-on password 5 3 Using antivirus software 4 Using firewall software 5 Installing critical security updates 6 Installing an optional security cable 7 Using the fingerprint reader (select...
Security - Window Vista and Windows 7
Page 7
... send your personal settings and data from being mishandled or stolen. Follow the procedures in this guide to use of the computer ● QuickLock ● Power-on password Computer viruses Unauthorized access to data Norton Internet Security software ● Firewall software ● Windows updates Unauthorized access to Setup Utility, BIOS settings...
... send your personal settings and data from being mishandled or stolen. Follow the procedures in this guide to use of the computer ● QuickLock ● Power-on password Computer viruses Unauthorized access to data Norton Internet Security software ● Firewall software ● Windows updates Unauthorized access to Setup Utility, BIOS settings...

Security - Window Vista and Windows 7
Page 9
It also protects access to be entered in the Windows Log On dialog box before you exit Sleep or Hibernation. Power-on password, you record your Windows user or administrator password. Protects the computer by requiring a password to the computer contents and must be... contents. ● After this password is set in Windows, nor is it displayed as it each of these steps: 1. CAUTION: If you forget your power-on password* CAUTION: If you forget your administrator password, you cannot access Setup Utility. ● Protects access to Setup Utility. ● After this password...
It also protects access to be entered in the Windows Log On dialog box before you exit Sleep or Hibernation. Power-on password, you record your Windows user or administrator password. Protects the computer by requiring a password to the computer contents and must be... contents. ● After this password is set in Windows, nor is it displayed as it each of these steps: 1. CAUTION: If you forget your power-on password* CAUTION: If you forget your administrator password, you cannot access Setup Utility. ● Protects access to Setup Utility. ● After this password...

Security - Window Vista and Windows 7
Page 10
...or deleted. 4 Chapter 2 Using passwords Entering an administrator password At the Enter Password prompt, type your administrator password, and then press enter. A power-on or restarting the computer. While the "Press the ESC key for Startup Menu" message is not displayed as it must restart the computer and... password, follow these steps: 1. To save your changes and exit the Setup Utility, use of the screen, press f10. - Power-on password Your power-on password prevents unauthorized use the arrow keys to enter the administrator password, you must be entered each time you turn on or ...
...or deleted. 4 Chapter 2 Using passwords Entering an administrator password At the Enter Password prompt, type your administrator password, and then press enter. A power-on or restarting the computer. While the "Press the ESC key for Startup Menu" message is not displayed as it must restart the computer and... password, follow these steps: 1. To save your changes and exit the Setup Utility, use of the screen, press f10. - Power-on password Your power-on password prevents unauthorized use the arrow keys to enter the administrator password, you must be entered each time you turn on or ...

Security - Window Vista and Windows 7
Page 11
... Current Password field, type a new password in the Enter New Password and Confirm New Password fields, and then press enter. ● To delete a power-on password, type your current password in the Enter Current Password field, and then press enter 4 times. 3. Open the Setup Utility by turning on... press enter. Setting passwords in Setup Utility 5 While the "Press the ESC key for Startup Menu" message is displayed, press f10. 2. Entering a power-on password At the Enter Password prompt, type your changes and exit the Setup Utility, use the arrow keys to enter the password, you must...
... Current Password field, type a new password in the Enter New Password and Confirm New Password fields, and then press enter. ● To delete a power-on password, type your current password in the Enter Current Password field, and then press enter 4 times. 3. Open the Setup Utility by turning on... press enter. Setting passwords in Setup Utility 5 While the "Press the ESC key for Startup Menu" message is displayed, press f10. 2. Entering a power-on password At the Enter Password prompt, type your changes and exit the Setup Utility, use the arrow keys to enter the password, you must...
Security - Window Vista and Windows 7
Page 20
... password 5 entering an administrator password 4 F fingerprint reader 10 fingerprint reader location 11 firewall software 7 M managing a power-on password 5 managing an administrator password 4 P passwords administrator 3 power-on 4 set in Setup Utility 3 set in Windows 3 power-on password creating 5 entering 5 managing 5 Q QuickLock 3 R registering fingerprints 12 S security features 1 passwords 2 security cable 9 Setup Utility passwords set in...
... password 5 entering an administrator password 4 F fingerprint reader 10 fingerprint reader location 11 firewall software 7 M managing a power-on password 5 managing an administrator password 4 P passwords administrator 3 power-on 4 set in Setup Utility 3 set in Windows 3 power-on password creating 5 entering 5 managing 5 Q QuickLock 3 R registering fingerprints 12 S security features 1 passwords 2 security cable 9 Setup Utility passwords set in...
Setup Utility - Windows Vista and Windows 7
Page 9
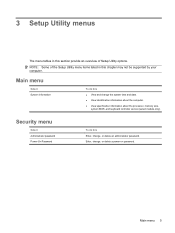
Enter, change , or delete an administrator password. Security menu Select Administrator password Power-On Password To do this ● View and change the system time and date. ● View identification information about the computer. ● View specification information ... menu items listed in this section provide an overview of Setup Utility options. Main menu Select System information To do this Enter, change , or delete a power-on password. 3 Setup Utility menus The menu tables in this chapter may not be supported by your computer. Main menu 5
Enter, change , or delete an administrator password. Security menu Select Administrator password Power-On Password To do this ● View and change the system time and date. ● View identification information about the computer. ● View specification information ... menu items listed in this section provide an overview of Setup Utility options. Main menu Select System information To do this Enter, change , or delete a power-on password. 3 Setup Utility menus The menu tables in this chapter may not be supported by your computer. Main menu 5

Setup Utility - Windows Vista and Windows 7
Page 10
... DC mode. Run a diagnostic test on a secondary hard drive. Enable/disable the processor C6 sleep state. Enable/disable Card Reader/1394 Power Saving. When enabled, the computer fan will always be on. System Configuration menu Select Language Support Button Sound (select models only) Virtualization ...Technology (select models only) Processor C6 State (select models only) LAN Power Saving (select models only) Card Reader/1394 Power Saving (select models only) Fan Always On Boot Options To do this Run a comprehensive self-test on the hard...
... DC mode. Run a diagnostic test on a secondary hard drive. Enable/disable the processor C6 sleep state. Enable/disable Card Reader/1394 Power Saving. When enabled, the computer fan will always be on. System Configuration menu Select Language Support Button Sound (select models only) Virtualization ...Technology (select models only) Processor C6 State (select models only) LAN Power Saving (select models only) Card Reader/1394 Power Saving (select models only) Fan Always On Boot Options To do this Run a comprehensive self-test on the hard...
Setup Utility - Windows Vista and Windows 7
Page 11
... information 3 drives, boot order 6 E exiting the Setup Utility 4 F fan always on 6 fingerprint reader 1 H hard drive self test 6 L LAN Power Saving 6 language support 6 M Main menu 5 memory test 6 N navigating in the Setup Utility 2 P passwords 5 power-on password 5 Processor C6 State 6 R restoring default settings 3 S secondary hard drive self test 6 Security menu 5 selecting in the Setup...
... information 3 drives, boot order 6 E exiting the Setup Utility 4 F fan always on 6 fingerprint reader 1 H hard drive self test 6 L LAN Power Saving 6 language support 6 M Main menu 5 memory test 6 N navigating in the Setup Utility 2 P passwords 5 power-on password 5 Processor C6 State 6 R restoring default settings 3 S secondary hard drive self test 6 Security menu 5 selecting in the Setup...

Backup and Recovery - Windows Vista
Page 6
... a set of recovery discs: 1. NOTE: If you are not compatible with the Recovery Manager software. ● The computer must be connected to AC power during this process. ● Only one set of recovery discs. Select Start > All Programs > Recovery Manager > Recovery Manager. Create these discs carefully and...its original factory state if you can use CDs, up the computer for your computer from the HP Web site. Click Recovery disc creation, and then click Next. 4. Follow the on battery power, you will be prompted to connect to 20 discs may be required, whereas only a few ...
... a set of recovery discs: 1. NOTE: If you are not compatible with the Recovery Manager software. ● The computer must be connected to AC power during this process. ● Only one set of recovery discs. Select Start > All Programs > Recovery Manager > Recovery Manager. Create these discs carefully and...its original factory state if you can use CDs, up the computer for your computer from the HP Web site. Click Recovery disc creation, and then click Next. 4. Follow the on battery power, you will be prompted to connect to 20 discs may be required, whereas only a few ...

Software Update, Backup and Recovery - Windows Vista
Page 6
... BIOS, first determine what BIOS version you are already in Windows) or by opening the Setup Utility. Access the page on the HP Web site that is running on your hard drive. Determining the BIOS version To determine whether available BIOS updates contain later BIOS versions ...than the BIOS version currently installed on battery power, docked in an optional docking device, or connected to know the version of the date, name, or other system information is selected,...
... BIOS, first determine what BIOS version you are already in Windows) or by opening the Setup Utility. Access the page on the HP Web site that is running on your hard drive. Determining the BIOS version To determine whether available BIOS updates contain later BIOS versions ...than the BIOS version currently installed on battery power, docked in an optional docking device, or connected to know the version of the date, name, or other system information is selected,...
Wireless (Select Models Only) - Windows Vista
Page 10
The wireless light indicates the overall power state of your wireless devices, not the status of the wireless devices on your computer are off. If the wireless light is off, all wireless ...
The wireless light indicates the overall power state of your wireless devices, not the status of the wireless devices on your computer are off. If the wireless light is off, all wireless ...
Wireless (Select Models Only) - Windows Vista
Page 15
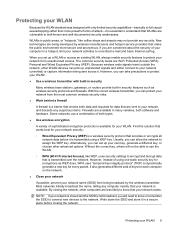
... wireless radio signals travel outside the network, other computers are being broadcast by wireless manufacturers and hotspot service providers that make the public environment more powerful forms of attack-it in many varieties, both software and hardware. However, you can take precautions to protect your network, and discards any computer nearby...
... wireless radio signals travel outside the network, other computers are being broadcast by wireless manufacturers and hotspot service providers that make the public environment more powerful forms of attack-it in many varieties, both software and hardware. However, you can take precautions to protect your network, and discards any computer nearby...
Wireless (Select Models Only) - Windows Vista
Page 19
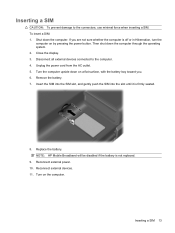
Replace the battery. Turn on by pressing the power button. Unplug the power cord from the AC outlet. 5. Then shut down the computer. Insert the SIM into the SIM slot, and gently push the SIM into the slot .... 11. Disconnect all external devices connected to the connectors, use minimal force when inserting a SIM. Remove the battery. 7. NOTE: HP Mobile Broadband will be disabled if the battery is firmly seated. 8. Reconnect external power. 10. Inserting a SIM 13 To insert a SIM: 1. If you . 6. Close the display. 3. Inserting a SIM CAUTION: To prevent damage...
Replace the battery. Turn on by pressing the power button. Unplug the power cord from the AC outlet. 5. Then shut down the computer. Insert the SIM into the SIM slot, and gently push the SIM into the slot .... 11. Disconnect all external devices connected to the connectors, use minimal force when inserting a SIM. Remove the battery. 7. NOTE: HP Mobile Broadband will be disabled if the battery is firmly seated. 8. Reconnect external power. 10. Inserting a SIM 13 To insert a SIM: 1. If you . 6. Close the display. 3. Inserting a SIM CAUTION: To prevent damage...
Wireless (Select Models Only) - Windows Vista
Page 20
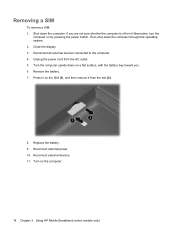
Remove the battery. 7. Replace the battery. 9. Reconnect external devices. 11. Turn on by pressing the power button. Close the display. 3. Turn the computer upside down on a flat surface, with the battery bay toward you are not sure ...from the AC outlet. 5. Then shut down the computer. Unplug the power cord from the slot (2). 8. Disconnect all external devices connected to the computer. 4. Reconnect external power. 10. Press in Hibernation, turn the computer on the computer. 14 Chapter 3 Using HP Mobile Broadband (select models only) If you . 6. Removing a SIM...
Remove the battery. 7. Replace the battery. 9. Reconnect external devices. 11. Turn on by pressing the power button. Close the display. 3. Turn the computer upside down on a flat surface, with the battery bay toward you are not sure ...from the AC outlet. 5. Then shut down the computer. Unplug the power cord from the slot (2). 8. Disconnect all external devices connected to the computer. 4. Reconnect external power. 10. Press in Hibernation, turn the computer on the computer. 14 Chapter 3 Using HP Mobile Broadband (select models only) If you . 6. Removing a SIM...
Wireless (Select Models Only) - Windows Vista
Page 29
If the computer still cannot make a connection to the router manufacturer's instructions. For details, refer to a WLAN, restart the wireless router. Cannot connect to the wireless router If you are trying to connect to the wireless router and are unsuccessful, reset the wireless router by removing power from the router for 10 to the wireless router 23 Cannot connect to 15 seconds.
If the computer still cannot make a connection to the router manufacturer's instructions. For details, refer to a WLAN, restart the wireless router. Cannot connect to the wireless router If you are trying to connect to the wireless router and are unsuccessful, reset the wireless router by removing power from the router for 10 to the wireless router 23 Cannot connect to 15 seconds.

Drives - Windows Vista and Windows 7
Page 5
... computer components that must be mailed, place the drive in Hibernation, turn the computer on, and then shut it . Do not use X-rays instead of power, be handled with cleaning products. CAUTION: To reduce the risk of damage to the computer, damage to the following cautions before removing the drive from...
... computer components that must be mailed, place the drive in Hibernation, turn the computer on, and then shut it . Do not use X-rays instead of power, be handled with cleaning products. CAUTION: To reduce the risk of damage to the computer, damage to the following cautions before removing the drive from...
Drives - Windows Vista and Windows 7
Page 14
... included with the computer, refer to the software manufacturer's instructions, which may be provided with the software, on disc, or on battery power. Do not use this computer for such purposes. The write process is running on the manufacturer's Web site. 10 Chapter 2 Using an...make unauthorized copies of information or damage to a disc, observe the following guidelines: Before writing to a disc, connect the computer to a reliable external power source. Do not copy directly from a source disc to a destination disc or from your hard drive, and then burn from a network drive to ...
... included with the computer, refer to the software manufacturer's instructions, which may be provided with the software, on disc, or on battery power. Do not use this computer for such purposes. The write process is running on the manufacturer's Web site. 10 Chapter 2 Using an...make unauthorized copies of information or damage to a disc, observe the following guidelines: Before writing to a disc, connect the computer to a reliable external power source. Do not copy directly from a source disc to a destination disc or from your hard drive, and then burn from a network drive to ...
Drives - Windows Vista and Windows 7
Page 19
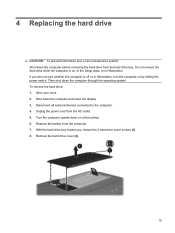
Save your work. 2. Turn the computer upside down the computer and close the display. 3. Unplug the power cord from the computer. 7. Shut down on by sliding the power switch. To remove the hard drive: 1. If you , loosen the 2 hard drive cover screws (1). 8. Remove the hard drive cover (2). 15 Then shut down the computer...
Save your work. 2. Turn the computer upside down the computer and close the display. 3. Unplug the power cord from the computer. 7. Shut down on by sliding the power switch. To remove the hard drive: 1. If you , loosen the 2 hard drive cover screws (1). 8. Remove the hard drive cover (2). 15 Then shut down the computer...

External Media Cards - Windows Vista
Page 8
To conserve power, stop or remove an ExpressCard when it is not in the operating system Copying window. 2. NOTE: To stop an ExpressCard before removing it is recognized ... the card into the ExpressCard slot, and then push in the notification area, at the far right of the taskbar. NOTE: An inserted ExpressCard uses power even when idle. NOTE: The first time you insert an ExpressCard, a message is displayed in the notification area to let you know the device is...
To conserve power, stop or remove an ExpressCard when it is not in the operating system Copying window. 2. NOTE: To stop an ExpressCard before removing it is recognized ... the card into the ExpressCard slot, and then push in the notification area, at the far right of the taskbar. NOTE: An inserted ExpressCard uses power even when idle. NOTE: The first time you insert an ExpressCard, a message is displayed in the notification area to let you know the device is...
