
HP t5740/t5745 Thin Clients Hardware Reference Guide
Page 5
...contents 1 Product Features ...1 Standard Features ...1 Thin Client Management Solutions ...2 Front Panel Components ...2 Top Components ...3 Rear Panel Components ...4 Installing the Antenna (Wireless Models 5 Installing the Rubber Feet ...5 Installing the Stand ...5 Removing the Stand ...6 Using the Power Cord Retention Slot 7 Using the Keyboard ...7 Windows...Access Panel and Metal Side Cover 14 Replacing the Metal Side Cover and Side Access Panel 15 Installing Thin Client Options ...16 Installing the USB Device 17 Removing and Replacing the Battery 17 Installing a Secondary Flash Memory...
...contents 1 Product Features ...1 Standard Features ...1 Thin Client Management Solutions ...2 Front Panel Components ...2 Top Components ...3 Rear Panel Components ...4 Installing the Antenna (Wireless Models 5 Installing the Rubber Feet ...5 Installing the Stand ...5 Removing the Stand ...6 Using the Power Cord Retention Slot 7 Using the Keyboard ...7 Windows...Access Panel and Metal Side Cover 14 Replacing the Metal Side Cover and Side Access Panel 15 Installing Thin Client Options ...16 Installing the USB Device 17 Removing and Replacing the Battery 17 Installing a Secondary Flash Memory...
HP t5740/t5745 Thin Clients Hardware Reference Guide
Page 10
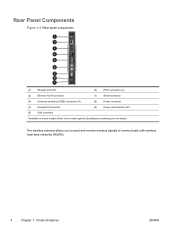
The wireless antenna allows you to send and receive wireless signals to the model-specific QuickSpecs at www.hp.com for details. Rear Panel Components Figure 1-4 Rear panel components (1) Wireless antenna* (6) PS/2 connectors (2) (2) Ethernet RJ-45 connector (7) Serial connector (3) Universal serial bus (USB) connectors (4) (8) Power connector (4) DisplayPort connector (9) Power cord retention slot (5) VGA connector *Available on some models. Refer to communicate with wireless local area networks (WLAN). 4 Chapter 1 Product Features ENWW
The wireless antenna allows you to send and receive wireless signals to the model-specific QuickSpecs at www.hp.com for details. Rear Panel Components Figure 1-4 Rear panel components (1) Wireless antenna* (6) PS/2 connectors (2) (2) Ethernet RJ-45 connector (7) Serial connector (3) Universal serial bus (USB) connectors (4) (8) Power connector (4) DisplayPort connector (9) Power cord retention slot (5) VGA connector *Available on some models. Refer to communicate with wireless local area networks (WLAN). 4 Chapter 1 Product Features ENWW

HP t5740/t5745 Thin Clients Hardware Reference Guide
Page 13
Using the Power Cord Retention Slot 7 Using the Power Cord Retention Slot To prevent accidental disconnection, press a loop of the power cord into the power cord retention slot. Use in combination with another key; Use in Microsoft Windows. Activates/deactivates the Scroll Lock ... page 9. For more information, see Windows Logo Key on the application software you are using. Activates/deactivates the Num Lock feature. Figure 1-9 Power cord retention slot Using the Keyboard Figure 1-10 Keyboard features (1) Caps Lock key (2) Scroll Lock key (3) Num Lock key (4) Ctrl key (5)...
Using the Power Cord Retention Slot 7 Using the Power Cord Retention Slot To prevent accidental disconnection, press a loop of the power cord into the power cord retention slot. Use in combination with another key; Use in Microsoft Windows. Activates/deactivates the Scroll Lock ... page 9. For more information, see Windows Logo Key on the application software you are using. Activates/deactivates the Num Lock feature. Figure 1-9 Power cord retention slot Using the Keyboard Figure 1-10 Keyboard features (1) Caps Lock key (2) Scroll Lock key (3) Num Lock key (4) Ctrl key (5)...
HP t5740/t5745 Thin Clients Hardware Reference Guide
Page 17
...DIMM on : a. See Removing and Replacing the Side Access Panel and Metal Side Cover on page 32 for more information. If the thin client is installed. Disconnect any hardware that you will replace. 7. WARNING! Remove the side access panel and metal side cover. 2 Hardware ... and any data, if necessary. 2. To reduce the risk of the thin client or optional equipment. Disconnect the power cord from the wall outlet and allow the internal system components to disconnect the power cord from the wall outlet. CAUTION: Static electricity can damage the electronic components...
...DIMM on : a. See Removing and Replacing the Side Access Panel and Metal Side Cover on page 32 for more information. If the thin client is installed. Disconnect any hardware that you will replace. 7. WARNING! Remove the side access panel and metal side cover. 2 Hardware ... and any data, if necessary. 2. To reduce the risk of the thin client or optional equipment. Disconnect the power cord from the wall outlet and allow the internal system components to disconnect the power cord from the wall outlet. CAUTION: Static electricity can damage the electronic components...

HP t5740/t5745 Thin Clients Hardware Reference Guide
Page 18
.... Before beginning the installation process, review General Hardware Installation Sequence on the monitor, the thin client, and any device you should follow the detailed instructions that the thin client is turned off and the power cord is disconnected from HP at http://www.hp.com/country/us/ eng/support.html. 14. See Removing and Replacing the Secure USB...
.... Before beginning the installation process, review General Hardware Installation Sequence on the monitor, the thin client, and any device you should follow the detailed instructions that the thin client is turned off and the power cord is disconnected from HP at http://www.hp.com/country/us/ eng/support.html. 14. See Removing and Replacing the Secure USB...
HP t5740/t5745 Thin Clients Hardware Reference Guide
Page 20
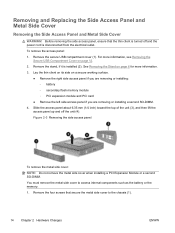
... the access panel about 6.35 mm (1/4 inch) toward the top of the unit (3), and then lift the access panel up and off and the power cord is installed (2). Remove the secure USB compartment cover (1). Figure 2-3 Removing the side access panel To remove the metal side cover: NOTE: Do not remove...Module or a second SO-DIMM. Remove the stand, if it is disconnected from the electrical outlet. Lay the thin client on its side on page 12. 2. Remove the four screws that the thin client is turned off the unit (4). You must remove the metal side cover to the chassis (1). 14 Chapter 2 ...
... the access panel about 6.35 mm (1/4 inch) toward the top of the unit (3), and then lift the access panel up and off and the power cord is installed (2). Remove the secure USB compartment cover (1). Figure 2-3 Removing the side access panel To remove the metal side cover: NOTE: Do not remove...Module or a second SO-DIMM. Remove the stand, if it is disconnected from the electrical outlet. Lay the thin client on its side on page 12. 2. Remove the four screws that the thin client is turned off the unit (4). You must remove the metal side cover to the chassis (1). 14 Chapter 2 ...

HP t5740/t5745 Thin Clients Hardware Reference Guide
Page 23
... and replace the battery: 1. You must remove the right side panel to access the battery. ENWW Installing Thin Client Options 17 Before removing the side access panel, ensure that the thin client is turned off and the power cord is disconnected from the electrical outlet. Installing the USB Device Before beginning the replacement process, review General...
... and replace the battery: 1. You must remove the right side panel to access the battery. ENWW Installing Thin Client Options 17 Before removing the side access panel, ensure that the thin client is turned off and the power cord is disconnected from the electrical outlet. Installing the USB Device Before beginning the replacement process, review General...

HP t5740/t5745 Thin Clients Hardware Reference Guide
Page 24
... it out (1). In order to forward them to recycling or proper disposal, please use the public collection system or return them to www.hp.com/recycle. When the battery pops up . Push the other edge down until the clamp snaps over the other edge of together with...general household waste. For more information about recycling programs, go to HP, an authorized HP partner, or their agents. To release the battery from its holder, squeeze the metal clamp that the thin client is turned off and the power cord is disconnected from the electrical outlet. 18 Chapter 2 Hardware Changes ...
... it out (1). In order to forward them to recycling or proper disposal, please use the public collection system or return them to www.hp.com/recycle. When the battery pops up . Push the other edge down until the clamp snaps over the other edge of together with...general household waste. For more information about recycling programs, go to HP, an authorized HP partner, or their agents. To release the battery from its holder, squeeze the metal clamp that the thin client is turned off and the power cord is disconnected from the electrical outlet. 18 Chapter 2 Hardware Changes ...

HP t5740/t5745 Thin Clients Hardware Reference Guide
Page 25
... process, review General Hardware Installation Sequence on page 11 for information about mounting orientations and options). ENWW Installing Thin Client Options 19 Before beginning these procedures, ensure that you should follow before and after installing or replacing hardware. Before...HP Quick Release (see Mounting the Thin Client on the system board comes up the hole in a horizontal orientation. Insert the flash memory module into the flash memory module socket, making sure that the thin client is turned off and the power cord is installed, do not operate the thin client...
... process, review General Hardware Installation Sequence on page 11 for information about mounting orientations and options). ENWW Installing Thin Client Options 19 Before beginning these procedures, ensure that you should follow before and after installing or replacing hardware. Before...HP Quick Release (see Mounting the Thin Client on the system board comes up the hole in a horizontal orientation. Insert the flash memory module into the flash memory module socket, making sure that the thin client is turned off and the power cord is installed, do not operate the thin client...

HP t5740/t5745 Thin Clients Hardware Reference Guide
Page 27
... accompany the option. For more information about available options, visit the HP Web site at http://h10010.www1.hp.com/ wwpc/us /en/sm/WF12a/12454-12454-321959.html, or refer to the instructions that the thin client is turned off and the power cord is disconnected from the electrical outlet. b. External Drives Various external USB...
... accompany the option. For more information about available options, visit the HP Web site at http://h10010.www1.hp.com/ wwpc/us /en/sm/WF12a/12454-12454-321959.html, or refer to the instructions that the thin client is turned off and the power cord is disconnected from the electrical outlet. b. External Drives Various external USB...

HP t5740/t5745 Thin Clients Hardware Reference Guide
Page 39
... every effort to return the repaired unit with sufficient packing material to HP for repair. ENWW Shipping Preparation 33 In countries that were sent. Disconnect the power cord from the electrical outlet, then from the thin client. 4. Important Service Repair Information In all cases, remove and safeguard all internal options should be removed and safeguarded...
... every effort to return the repaired unit with sufficient packing material to HP for repair. ENWW Shipping Preparation 33 In countries that were sent. Disconnect the power cord from the electrical outlet, then from the thin client. 4. Important Service Repair Information In all cases, remove and safeguard all internal options should be removed and safeguarded...
HP t5740/t5745 Thin Clients Hardware Reference Guide
Page 40
...hardware specifications 22 hardware, upgrades 11 headphone connector location 2 HP Client Automation 2 HP Device Manager 2 HP Quick Release 24 HP ThinState Tools 2 humidity specifications 22 I installation sequence 11 ...thin client 24 mouse functions 9 N non-supported orientations in a drawer 31 under a monitor 31 O options installing 11 PCIe expansion module 21 supported 11 USB device 17 P PCIe expansion card, installing 21 PCIe expansion module, installing 21 power button location 2 power connector location 4 power cord retention slot 7 power LED location 2 power output specifications 22 power...
...hardware specifications 22 hardware, upgrades 11 headphone connector location 2 HP Client Automation 2 HP Device Manager 2 HP Quick Release 24 HP ThinState Tools 2 humidity specifications 22 I installation sequence 11 ...thin client 24 mouse functions 9 N non-supported orientations in a drawer 31 under a monitor 31 O options installing 11 PCIe expansion module 21 supported 11 USB device 17 P PCIe expansion card, installing 21 PCIe expansion module, installing 21 power button location 2 power connector location 4 power cord retention slot 7 power LED location 2 power output specifications 22 power...

HP t5740/t5745 Thin Clients Hardware Reference Guide
Page 41
... 19 metal side cover 15 secure USB compartment cover 13 side access panel 15 retention slot, power cord 7 RJ-45 connector location 4 routine care 29 rubber feet, installing 5 S SATA flash ... 22 dimensions 22 hardware 22 humidity 22 power output 22 power supply 22 rated output current 22 relative humidity 22 temperature 22 thin client 22 weight 22 stand installing 5 removing ... 21 fire 11 Web sites downloads 12 external USB drives 21 HP hardware drivers 12 options 1, 23, 24 QuickSpecs 2 thin client hardware and software 1 thin client options 1 USB drive options 21 Websites Altiris 2 weight 22 ...
... 19 metal side cover 15 secure USB compartment cover 13 side access panel 15 retention slot, power cord 7 RJ-45 connector location 4 routine care 29 rubber feet, installing 5 S SATA flash ... 22 dimensions 22 hardware 22 humidity 22 power output 22 power supply 22 rated output current 22 relative humidity 22 temperature 22 thin client 22 weight 22 stand installing 5 removing ... 21 fire 11 Web sites downloads 12 external USB drives 21 HP hardware drivers 12 options 1, 23, 24 QuickSpecs 2 thin client hardware and software 1 thin client options 1 USB drive options 21 Websites Altiris 2 weight 22 ...


