
HP t5550/t5565/t5570 Thin Clients Hardware Reference Guide
Page 5
... of contents 1 Product Features ...1 Standard Features ...1 Front Panel Components ...1 Top Components ...2 Rear Panel Components ...3 Installing the Antenna (Wireless Models 4 Installing the Rubber Feet ...4 Installing the Stand ...5 Removing the Stand ...6 Using the Power Cord Retention Slot 6 Using the...Cover 12 Removing the Side Access Panel and Metal Side Cover 12 Replacing the Metal Side Cover and Side Access Panel 14 Installing Thin Client Options ...15 Installing the USB Device 15 Removing and Replacing the Battery 16 Installing a Secondary Flash Memory Module 18 External Drives...
... of contents 1 Product Features ...1 Standard Features ...1 Front Panel Components ...1 Top Components ...2 Rear Panel Components ...3 Installing the Antenna (Wireless Models 4 Installing the Rubber Feet ...4 Installing the Stand ...5 Removing the Stand ...6 Using the Power Cord Retention Slot 6 Using the...Cover 12 Removing the Side Access Panel and Metal Side Cover 12 Replacing the Metal Side Cover and Side Access Panel 14 Installing Thin Client Options ...15 Installing the USB Device 15 Removing and Replacing the Battery 16 Installing a Secondary Flash Memory Module 18 External Drives...

HP t5550/t5565/t5570 Thin Clients Hardware Reference Guide
Page 9
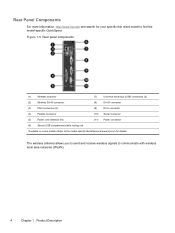
... to find the model-specific QuickSpecs. Refer to the model-specific QuickSpecs at www.hp.com for your specific thin client model to communicate with wireless local area networks (WLAN). ENWW Rear Panel Components 3 Figure 1-4 Rear panel components (1) Wireless antenna* (7) Universal serial bus (USB) connectors (2) (2) Ethernet RJ-45 connector (8) DVI-D connector (3) PS/2 connectors (2) (9) DVI-I connector...
... to find the model-specific QuickSpecs. Refer to the model-specific QuickSpecs at www.hp.com for your specific thin client model to communicate with wireless local area networks (WLAN). ENWW Rear Panel Components 3 Figure 1-4 Rear panel components (1) Wireless antenna* (7) Universal serial bus (USB) connectors (2) (2) Ethernet RJ-45 connector (8) DVI-D connector (3) PS/2 connectors (2) (9) DVI-I connector...

HP t5550/t5565/t5570 Thin Clients Hardware Reference Guide
Page 10
CAUTION: If you use your thin client in place. Installing the Antenna (Wireless Models) ▲ Screw the antenna in equipment damage. The rubber feet help keep the unit safely in a horizontal orientation. Remove the feet from their backing. 4 ...Chapter 1 Product Features ENWW To install the rubber feet: 1. You can install self-adhesive rubber feet at the corners of the left side of the thin client...
CAUTION: If you use your thin client in place. Installing the Antenna (Wireless Models) ▲ Screw the antenna in equipment damage. The rubber feet help keep the unit safely in a horizontal orientation. Remove the feet from their backing. 4 ...Chapter 1 Product Features ENWW To install the rubber feet: 1. You can install self-adhesive rubber feet at the corners of the left side of the thin client...

HP t5550/t5565/t5570 Thin Clients Hardware Reference Guide
Page 40
... altitude 20 dimensions 20 hardware 20 humidity 20 34 Index power output 20 power supply 20 rated output current 21 relative humidity 20 temperature 20 thin client 20 weight 20 stand installing 5 removing 6 supported mounting options 25 supported orientations horizontal 29 under monitor stand 29 vertical 29 T temperature specifications 20 ... 19 USB ports location 1, 3 secure 2 V vertical orientation 5, 29 VGA connector location 3 W warnings electric shock 10, 11, 12, 16, 18 fire 10 Web sites HP 1 options 1 weight 20 Windows Logo Key 7 Windows logo key 8 wireless antenna installing 4 ENWW
... altitude 20 dimensions 20 hardware 20 humidity 20 34 Index power output 20 power supply 20 rated output current 21 relative humidity 20 temperature 20 thin client 20 weight 20 stand installing 5 removing 6 supported mounting options 25 supported orientations horizontal 29 under monitor stand 29 vertical 29 T temperature specifications 20 ... 19 USB ports location 1, 3 secure 2 V vertical orientation 5, 29 VGA connector location 3 W warnings electric shock 10, 11, 12, 16, 18 fire 10 Web sites HP 1 options 1 weight 20 Windows Logo Key 7 Windows logo key 8 wireless antenna installing 4 ENWW

Troubleshooting Guide: HP t5550/t5565/t5570 Thin Clients
Page 5
... ...3 Rear Panel Components ...4 Using the Power Cord Retention Slot 5 2 Hardware Changes ...6 General Hardware Installation Sequence 6 Installing the Antenna (Wireless Models 8 Installing the Rubber Feet ...8 Installing the Stand ...9 Removing the Stand ...10 Removing and Replacing the Secure USB Compartment Cover 10 ...Removing the Side Access Panel and Metal Side Cover 12 Replacing the Metal Side Cover and Side Access Panel 13 Installing Thin Client Options ...14 Installing the USB Device 14 Removing and Replacing the Battery 15 Installing a Secondary Flash Memory Module 17 External...
... ...3 Rear Panel Components ...4 Using the Power Cord Retention Slot 5 2 Hardware Changes ...6 General Hardware Installation Sequence 6 Installing the Antenna (Wireless Models 8 Installing the Rubber Feet ...8 Installing the Stand ...9 Removing the Stand ...10 Removing and Replacing the Secure USB Compartment Cover 10 ...Removing the Side Access Panel and Metal Side Cover 12 Replacing the Metal Side Cover and Side Access Panel 13 Installing Thin Client Options ...14 Installing the USB Device 14 Removing and Replacing the Battery 15 Installing a Secondary Flash Memory Module 17 External...

Troubleshooting Guide: HP t5550/t5565/t5570 Thin Clients
Page 9
... the HP t5550/t5565/t5570 Thin Clients: ● VIA Nano u3500 1-GHz processor ● VIA VX900 chipset ● Single Channel DDR3 at 800 MHz; 1 GB minimum RAM expandable to 4 GB ● IDE Flash module, minimum 512 MB (CE, ThinPro), 2 GB (WES). 4 GB maximum standard ● Broadcom 57780 LAN (Embedded) ● Mini PCI-E Internal Wireless LAN...
... the HP t5550/t5565/t5570 Thin Clients: ● VIA Nano u3500 1-GHz processor ● VIA VX900 chipset ● Single Channel DDR3 at 800 MHz; 1 GB minimum RAM expandable to 4 GB ● IDE Flash module, minimum 512 MB (CE, ThinPro), 2 GB (WES). 4 GB maximum standard ● Broadcom 57780 LAN (Embedded) ● Mini PCI-E Internal Wireless LAN...
Troubleshooting Guide: HP t5550/t5565/t5570 Thin Clients
Page 12
Refer to find the model-specific QuickSpecs. Rear Panel Components For more information, http://www.hp.com and search for your specific thin client model to the model-specific QuickSpecs at www.hp.com for details. Figure 1-5 Rear panel components (1) Wireless antenna* (7) Universal serial bus (USB) connectors (2) (2) Ethernet RJ-45 connector (8) DVI-D connector (3) PS/2 connectors (2) (9) DVI...
Refer to find the model-specific QuickSpecs. Rear Panel Components For more information, http://www.hp.com and search for your specific thin client model to the model-specific QuickSpecs at www.hp.com for details. Figure 1-5 Rear panel components (1) Wireless antenna* (7) Universal serial bus (USB) connectors (2) (2) Ethernet RJ-45 connector (8) DVI-D connector (3) PS/2 connectors (2) (9) DVI...

Troubleshooting Guide: HP t5550/t5565/t5570 Thin Clients
Page 16
... in place on the rear of the unit. To install the rubber feet: 1. Installing the Antenna (Wireless Models) Screw the antenna in place. CAUTION: If you use the thin client in a horizontal orientation without the rubber feet, it may want to the antenna mounting, do not overtighten... the antenna. Figure 2-1 Installing the antenna CAUTION: To prevent damage to use your thin client in equipment damage. Remove the feet from their backing. 8 Chapter 2 Hardware Changes You can install self-adhesive rubber feet at the corners...
... in place on the rear of the unit. To install the rubber feet: 1. Installing the Antenna (Wireless Models) Screw the antenna in place. CAUTION: If you use the thin client in a horizontal orientation without the rubber feet, it may want to the antenna mounting, do not overtighten... the antenna. Figure 2-1 Installing the antenna CAUTION: To prevent damage to use your thin client in equipment damage. Remove the feet from their backing. 8 Chapter 2 Hardware Changes You can install self-adhesive rubber feet at the corners...

Troubleshooting Guide: HP t5550/t5565/t5570 Thin Clients
Page 64
...option DHCP option 137 should contain the following available free space on the FTP server. 56 Appendix D FTP Update D FTP Update HP FTP Image Update Client is only provided on the t5570 WES image. FTP Image Update is a utility that allows image update from an FTP share to... images and WinPE image are stored in the same folder on the client: ● Approximately 200MB of flash ● Approximately 250MB of RAM FTP Image Update over wireless is not supported For greater usage flexibility and to an HP thin client system running the Windows Embedded Standard (WES) operating system.
...option DHCP option 137 should contain the following available free space on the FTP server. 56 Appendix D FTP Update D FTP Update HP FTP Image Update Client is only provided on the t5570 WES image. FTP Image Update is a utility that allows image update from an FTP share to... images and WinPE image are stored in the same folder on the client: ● Approximately 200MB of flash ● Approximately 250MB of RAM FTP Image Update over wireless is not supported For greater usage flexibility and to an HP thin client system running the Windows Embedded Standard (WES) operating system.

Troubleshooting Guide: HP t5550/t5565/t5570 Thin Clients
Page 72
... 13 specifications altitude 51 dimensions 50 hardware 50 humidity 50 power output 51 power supply 51 rated output current 51 relative humidity 50 temperature 50 thin client 50 weight 50 stand installing 9 removing 10 T temperature specifications 50 top components 3 troubleshooting 27 U updating a BIOS 60 USB devices, installing USB drive options 18 10..., 14 USB ports location 2, 4 secure 3 V vertical orientation 9 VGA connector location 4 W warnings electric shock 6, 10, 12, 15, 17 fire 6 Web sites QuickSpecs 2 weight 50 wireless antenna installing 8 64 Index
... 13 specifications altitude 51 dimensions 50 hardware 50 humidity 50 power output 51 power supply 51 rated output current 51 relative humidity 50 temperature 50 thin client 50 weight 50 stand installing 9 removing 10 T temperature specifications 50 top components 3 troubleshooting 27 U updating a BIOS 60 USB devices, installing USB drive options 18 10..., 14 USB ports location 2, 4 secure 3 V vertical orientation 9 VGA connector location 4 W warnings electric shock 6, 10, 12, 15, 17 fire 6 Web sites QuickSpecs 2 weight 50 wireless antenna installing 8 64 Index

HP ThinPro, version 3.2, Administrator's Guide
Page 6
Peripherals ...29 Client Aggregation 29 Client Aggregation Overview 29 Configuring Client Aggregation 31 Disabling Client Aggregation 35 Display Preferences 35 Adding a Profile 35 Editing a Profile 36 Deleting a Profile 36 Keyboard Layout 36 Keyboard Preferences 36... Setup ...38 Date and Time 39 Global Network Settings 39 Language ...40 Network Connections 40 Wired Connection 40 Wireless Connection 41 VPN Connection 42 Security ...43 HP ThinPro Configuration 43 Setting Connections and Control Panel User Permissions 44 Setting User Desktop and System Options 44 Personalization ...
Peripherals ...29 Client Aggregation 29 Client Aggregation Overview 29 Configuring Client Aggregation 31 Disabling Client Aggregation 35 Display Preferences 35 Adding a Profile 35 Editing a Profile 36 Deleting a Profile 36 Keyboard Layout 36 Keyboard Preferences 36... Setup ...38 Date and Time 39 Global Network Settings 39 Language ...40 Network Connections 40 Wired Connection 40 Wireless Connection 41 VPN Connection 42 Security ...43 HP ThinPro Configuration 43 Setting Connections and Control Panel User Permissions 44 Setting User Desktop and System Options 44 Personalization ...

HP ThinPro, version 3.2, Administrator's Guide
Page 48
... to close the dialog box. You can be set Network attributes: 1. Table 3-45 Global Network Settings - This tab can configure wired, wireless, and VPN connections in this utility. Click Close to the connection. 4. Click the Wired tab, and then click Add. 2. Click Apply... to Connect automatically. 3. Network Connections To set by completing the information on the Wired, Wireless and VPN tabs. 3. Configure the new setting by configuring Dynamic Host Configuration Protocol (DHCP) tag 192 as a string whose value is required...
... to close the dialog box. You can be set Network attributes: 1. Table 3-45 Global Network Settings - This tab can configure wired, wireless, and VPN connections in this utility. Click Close to the connection. 4. Click the Wired tab, and then click Add. 2. Click Apply... to Connect automatically. 3. Network Connections To set by completing the information on the Wired, Wireless and VPN tabs. 3. Configure the new setting by configuring Dynamic Host Configuration Protocol (DHCP) tag 192 as a string whose value is required...

HP ThinPro, version 3.2, Administrator's Guide
Page 49
...box. Click Close to change and click Edit. 3. Configure the new setting by revising the information on the three tabs: ● Wireless ● Wireless Security ● IPv4 Settings 4. Select the connection you want to close the dialog box. Select the connection you want to apply your... settings and close the dialog box. Click the Wireless tab. 2. Click Apply to change and click Edit. Editing a Wired Network Connection To edit a wired connection: 1. Click Delete to ...
...box. Click Close to change and click Edit. 3. Configure the new setting by revising the information on the three tabs: ● Wireless ● Wireless Security ● IPv4 Settings 4. Select the connection you want to close the dialog box. Select the connection you want to apply your... settings and close the dialog box. Click the Wireless tab. 2. Click Apply to change and click Edit. Editing a Wired Network Connection To edit a wired connection: 1. Click Delete to ...

HP ThinPro, version 3.2, Administrator's Guide
Page 50
...settings and close the dialog box. Change setting by completing the information on the two tabs: ● VPN ● IPv4 Settings 5. Click the Wireless tab. 2. Click the VPN tab, and then click Add. 2. Click Apply to remove and click Delete. 3. Click Apply to close the dialog... box. Configure the new setting by revising the information on the three tabs: ● Wireless ● Wireless Security ● IPv4 Settings 4. 3. Click Close to apply your settings and close the dialog box. Click the VPN tab. 2. An additional...
...settings and close the dialog box. Change setting by completing the information on the two tabs: ● VPN ● IPv4 Settings 5. Click the Wireless tab. 2. Click the VPN tab, and then click Add. 2. Click Apply to remove and click Delete. 3. Click Apply to close the dialog... box. Configure the new setting by revising the information on the three tabs: ● Wireless ● Wireless Security ● IPv4 Settings 4. 3. Click Close to apply your settings and close the dialog box. Click the VPN tab. 2. An additional...

HP ThinPro, version 3.2, Administrator's Guide
Page 67
... in as 2 advanced utilities 54 Agent Configure Manager 48 aggregation client configuration 32 client, disabling 35 client, overview 29 server configuration 32 aggregation, client 29 Altiris configuration 47 B boot logo 44 C CDA mode 54... delete 27 edit 27 list of 9 network 40 user view 28 VPN 42 wired 40 wireless 41 control panel Active Directory manager 47 AD/DDNS Manager 47 advanced utilities 54 Agent Configure ...System manager 47 Easy Config 48 Easy Update 48 factory reset 48 global network 39 HP Automatic Update 48 keyboard layout 36 keyboard preferences 36 language 40 management utilities 46 ...
... in as 2 advanced utilities 54 Agent Configure Manager 48 aggregation client configuration 32 client, disabling 35 client, overview 29 server configuration 32 aggregation, client 29 Altiris configuration 47 B boot logo 44 C CDA mode 54... delete 27 edit 27 list of 9 network 40 user view 28 VPN 42 wired 40 wireless 41 control panel Active Directory manager 47 AD/DDNS Manager 47 advanced utilities 54 Agent Configure ...System manager 47 Easy Config 48 Easy Update 48 factory reset 48 global network 39 HP Automatic Update 48 keyboard layout 36 keyboard preferences 36 language 40 management utilities 46 ...

HP ThinPro, version 3.2, Administrator's Guide
Page 68
... VPN connection 42 wired connection 41 wireless connection 41 exporting VPN connection 43 F factory reset 48 G general settings 7 general system information 56 global network 39 H HP Automatic Update 48 HP ThinPro installation 4 I ICA adding connection 11 configuring connection 7 options 11 image, thin client 1 importing VPN connection 43 installation HP ThinPro 4 installation, HP ThinPro 4 K keyboard layout 36 keyboard...
... VPN connection 42 wired connection 41 wireless connection 41 exporting VPN connection 43 F factory reset 48 G general settings 7 general system information 56 global network 39 H HP Automatic Update 48 HP ThinPro installation 4 I ICA adding connection 11 configuring connection 7 options 11 image, thin client 1 importing VPN connection 43 installation HP ThinPro 4 installation, HP ThinPro 4 K keyboard layout 36 keyboard...
HP ThinPro, version 3.2, Administrator's Guide
Page 69
... 4 ThinState capture thin client configuration to USB drive 53 capture ThinPro image to FTP server 50 capture ThinPro image to USB flash drive 51 deploy ThinPro image from a Remote Site 50 deploy ThinPro image from USB flash drive 52 manage HP ThinPro configuration 52 manage...connection 18 configuring connection 9 options 18 window manager 46 wired connection adding 40 configuring 40 deleting 41 editing 41 wireless connection adding 41 deleting 42 editing 41 wireless connection, configuring 41 X X Terminal 55 Xdmcp adding connection 24 options 24 XenApp adding connection 19 options 19...
... 4 ThinState capture thin client configuration to USB drive 53 capture ThinPro image to FTP server 50 capture ThinPro image to USB flash drive 51 deploy ThinPro image from a Remote Site 50 deploy ThinPro image from USB flash drive 52 manage HP ThinPro configuration 52 manage...connection 18 configuring connection 9 options 18 window manager 46 wired connection adding 40 configuring 40 deleting 41 editing 41 wireless connection adding 41 deleting 42 editing 41 wireless connection, configuring 41 X X Terminal 55 Xdmcp adding connection 24 options 24 XenApp adding connection 19 options 19...


