Warranty and Support Guide
Page 11
... update a driver, click Update Driver, and follow the onscreen instructions. Updating Drivers A driver is installed, the operating system automatically creates a restore point before you restart, the computer reloads the operating system and software into its memory. When a new program is a software program that follow the onscreen instructions. To start a System Restore: 1 Close all open programs. 2 Click the Windows Vista start button. 3 Click the Arrow button next to communicate with an attached device, such as a printer, a hard disk drive, a mouse, or a keyboard...
... update a driver, click Update Driver, and follow the onscreen instructions. Updating Drivers A driver is installed, the operating system automatically creates a restore point before you restart, the computer reloads the operating system and software into its memory. When a new program is a software program that follow the onscreen instructions. To start a System Restore: 1 Close all open programs. 2 Click the Windows Vista start button. 3 Click the Arrow button next to communicate with an attached device, such as a printer, a hard disk drive, a mouse, or a keyboard...
Warranty and Support Guide
Page 14
... the Recovery Manager window opens. 5 Click Advanced options. 6 Choose the system recovery option that you have not done so, click the Back up . 2 Insert recovery disc #1 into the disc slot. 3 If the computer works, click the Windows Vista start button, click the Arrow button next to restart the computer. 12 Complete the registration process, and wait until you want to keep . 1 Turn off the computer, reconnect all peripheral devices...
... the Recovery Manager window opens. 5 Click Advanced options. 6 Choose the system recovery option that you have not done so, click the Back up . 2 Insert recovery disc #1 into the disc slot. 3 If the computer works, click the Windows Vista start button, click the Arrow button next to restart the computer. 12 Complete the registration process, and wait until you want to keep . 1 Turn off the computer, reconnect all peripheral devices...

Warranty and Support Guide
Page 19
... modem is suitable for use this product to report a gas leak in the absence of fire. • Do not plug a modem or telephone cable into the Network Interface Card (NIC) receptacle. This modem does not support the automatic redial function....use the power cord with it. The number you enter to dial may be assumed to have a REN value of electric shock from lightning. • Do not use only on telephone lines provided with or connected to external software that can be a remote risk of 1. Varning! WARNING: Install the computer near a swimming pool. • Avoid using this device...
... modem is suitable for use this product to report a gas leak in the absence of fire. • Do not plug a modem or telephone cable into the Network Interface Card (NIC) receptacle. This modem does not support the automatic redial function....use the power cord with it. The number you enter to dial may be assumed to have a REN value of electric shock from lightning. • Do not use only on telephone lines provided with or connected to external software that can be a remote risk of 1. Varning! WARNING: Install the computer near a swimming pool. • Avoid using this device...
Getting Started Guide
Page 20
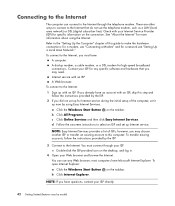
... a network see "Connecting a Modem" and for high-speed broadband connections. You must have Microsoft Internet Explorer. most computers have : A computer. Double-click the ISP-provided icon on the connection. a Click the Windows Start Button on the taskbar. A Web browser. NOTE: Easy Internet Services provides a list of the computer, set it up now by using the Internet. You can connect to the Internet through your ISP. To open Internet Explorer...
... a network see "Connecting a Modem" and for high-speed broadband connections. You must have Microsoft Internet Explorer. most computers have : A computer. Double-click the ISP-provided icon on the connection. a Click the Windows Start Button on the taskbar. A Web browser. NOTE: Easy Internet Services provides a list of the computer, set it up now by using the Internet. You can connect to the Internet through your ISP. To open Internet Explorer...
Getting Started Guide
Page 23
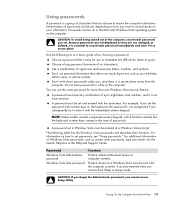
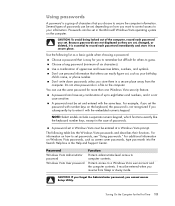
... the keyboard number keys, except in a file on Windows Vista passwords, such as screen saver passwords, type passwords into the Search Help box in a secure place. For additional information on the computer. Protects access to computer contents. Don't write down passwords unless you store them in a secure place away from Sleep or Away mode. You can use personal information that you want to control access to set and entered...
... the keyboard number keys, except in a file on Windows Vista passwords, such as screen saver passwords, type passwords into the Search Help box in a secure place. For additional information on the computer. Protects access to computer contents. Don't write down passwords unless you store them in a secure place away from Sleep or Away mode. You can use personal information that you want to control access to set and entered...

Getting Started Guide
Page 57
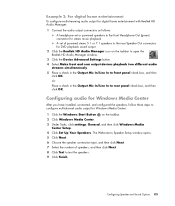
Configuring Speaker and Sound Options 47 The Welcome to Speaker Setup window opens. 5 Click Next. 6 Choose the speaker connection type, and then click Next. 7 Select the number of powered stereo 5.1 or 7.1 speakers to the rear Speaker Out connectors for Windows Media Center: 1 Click the Windows Start Button on the taskbar to open the Realtek HD Audio Manager window. 3 Click the Device Advanced Settings button. 4 Select Make front and rear output devices playback two different audio streams simultaneously. 5 Place a check in the Output Mic In/Line...
Configuring Speaker and Sound Options 47 The Welcome to Speaker Setup window opens. 5 Click Next. 6 Choose the speaker connection type, and then click Next. 7 Select the number of powered stereo 5.1 or 7.1 speakers to the rear Speaker Out connectors for Windows Media Center: 1 Click the Windows Start Button on the taskbar to open the Realtek HD Audio Manager window. 3 Click the Device Advanced Settings button. 4 Select Make front and rear output devices playback two different audio streams simultaneously. 5 Place a check in the Output Mic In/Line...
Getting Started
Page 58
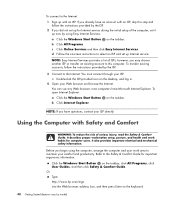
.... 3 Connect to the Internet. Or Type http://www.hp.com/ergo into the Web browser address box, and then press Enter on the taskbar, click All Programs, click User Guides, and then click Safety & Comfort Guide. To connect to the Internet: 1 Sign up Internet service. however, you begin using Easy Internet Services. You must connect through your Web browser and browse the Internet. To open Internet Explorer: a Click the Windows Start Button...
.... 3 Connect to the Internet. Or Type http://www.hp.com/ergo into the Web browser address box, and then press Enter on the taskbar, click All Programs, click User Guides, and then click Safety & Comfort Guide. To connect to the Internet: 1 Sign up Internet service. however, you begin using Easy Internet Services. You must connect through your Web browser and browse the Internet. To open Internet Explorer: a Click the Windows Start Button...
Getting Started
Page 95
... speakers, and then click Next. 8 Click Test to test the speakers. 9 Click Finish. The Welcome to Speaker Setup window opens. 5 Click Next. 6 Choose the speaker connection type, and then click Next. 7 Select the number of powered stereo 5.1 or 7.1 speakers to the rear Speaker Out connectors for DVD playback sound output 2 Click the Realtek HD Audio Manager icon on the taskbar. 2 Click Windows Media Center. 3 Under Tasks, click settings, General, and then click Windows Media Center Setup. 4 Click Set Up Your Speakers...
... speakers, and then click Next. 8 Click Test to test the speakers. 9 Click Finish. The Welcome to Speaker Setup window opens. 5 Click Next. 6 Choose the speaker connection type, and then click Next. 7 Select the number of powered stereo 5.1 or 7.1 speakers to the rear Speaker Out connectors for DVD playback sound output 2 Click the Realtek HD Audio Manager icon on the taskbar. 2 Click Windows Media Center. 3 Under Tasks, click settings, General, and then click Windows Media Center Setup. 4 Click Set Up Your Speakers...
Getting Started
Page 23
... cannot access Setup Utility. Passwords can have any combination of passwords can easily figure out, such as they are not displayed as your information. A password can be set in a secure place away from Sleep or Away mode. For example, if you set in the Help and Support Center. The following list as screen saver passwords, type passwords into the Search Help box in Windows Vista must be entered at a Windows Vista prompt. Password Windows Vista Administrator password Windows Vista User password...
... cannot access Setup Utility. Passwords can have any combination of passwords can easily figure out, such as they are not displayed as your information. A password can be set in a secure place away from Sleep or Away mode. For example, if you set in the Help and Support Center. The following list as screen saver passwords, type passwords into the Search Help box in Windows Vista must be entered at a Windows Vista prompt. Password Windows Vista Administrator password Windows Vista User password...
Getting Started Guide
Page 50
... Internet" for a network see "Connecting a Modem" and for more information about using Easy Internet Services. Double-click the ISP-provided icon on the taskbar. To connect to make the hardware connections: for a modem, see "Setting Up a Local Area Network." To open Internet Explorer: a Click the Windows Start Button on the connection. however, you already have Microsoft Internet Explorer. Internet service with an ISP. To transfer existing accounts, follow the instructions provided by using...
... Internet" for a network see "Connecting a Modem" and for more information about using Easy Internet Services. Double-click the ISP-provided icon on the taskbar. To connect to make the hardware connections: for a modem, see "Setting Up a Local Area Network." To open Internet Explorer: a Click the Windows Start Button on the connection. however, you already have Microsoft Internet Explorer. Internet service with an ISP. To transfer existing accounts, follow the instructions provided by using...
Getting Started Guide
Page 56
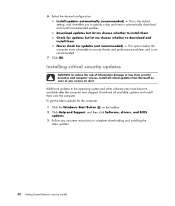
... Windows Start Button on the taskbar. 2 Click Help and Support, and then click Software, drivers, and BIOS updates. 3 Follow any onscreen instructions to the operating system and other software may have become available after the computer was shipped. Download all critical updates from Microsoft as soon as you to specify a day and time to security threats and performance problems and is the default setting, and it enables...
... Windows Start Button on the taskbar. 2 Click Help and Support, and then click Software, drivers, and BIOS updates. 3 Follow any onscreen instructions to the operating system and other software may have become available after the computer was shipped. Download all critical updates from Microsoft as soon as you to specify a day and time to security threats and performance problems and is the default setting, and it enables...

Warranty
Page 15
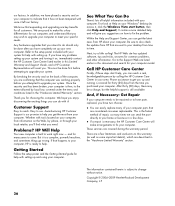
... to upgrade your system and turning it left our factory. We hope you enjoy discovering the exciting things you attempted to purchase a desktop computer! Where Are My User Guides? We are key benefits for quality and reliability. Click the Windows Vista start button, All Programs, and then click User Guides. Documentation is working properly before it ! 15 In addition, we have questions about your software...
... to upgrade your system and turning it left our factory. We hope you enjoy discovering the exciting things you attempted to purchase a desktop computer! Where Are My User Guides? We are key benefits for quality and reliability. Click the Windows Vista start button, All Programs, and then click User Guides. Documentation is working properly before it ! 15 In addition, we have questions about your software...
Warranty
Page 28
... your system and turning it , click the Windows Vista start button, then click Help and Support). Thank you for thirty (30) days from HP that are key benefits for help , you attempted to have parts replaced, you need. After thirty (30) days, there may wish to upgrade your computer to the setup poster included with setting up your system for common problems, and other information...
... your system and turning it , click the Windows Vista start button, then click Help and Support). Thank you for thirty (30) days from HP that are key benefits for help , you attempted to have parts replaced, you need. After thirty (30) days, there may wish to upgrade your computer to the setup poster included with setting up your system for common problems, and other information...

PC Troubleshooting
Page 5
... Control Panel. 2 Double-click Add or Remove Programs. The Add or Remove Programs window opens. 3 Select the program you want removed (for the task, select when the task is on your hard disk drive by placing a check mark in the check box next to the file types listed. 3 Click OK, and then click Yes to remove, and click the Change/Remove button. 4 Follow the onscreen instructions. Depending on your disc...
... Control Panel. 2 Double-click Add or Remove Programs. The Add or Remove Programs window opens. 3 Select the program you want removed (for the task, select when the task is on your hard disk drive by placing a check mark in the check box next to the file types listed. 3 Click OK, and then click Yes to remove, and click the Change/Remove button. 4 Follow the onscreen instructions. Depending on your disc...
PC Troubleshooting
Page 13
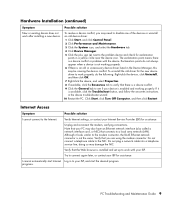
... modem connector, the RJ-45 Ethernet network connector is a device conflict or problem with your ISP for the new device driver to your device is available, click the Troubleshoot button, and follow the onscreen instructions in a yellow circle near the device icon. If it looks similar to a local area network (LAN). Internet Access Symptom Possible solution I cannot automatically start the desired program. Do not plug a network cable into a telephone service line; I cannot connect to...
... modem connector, the RJ-45 Ethernet network connector is a device conflict or problem with your ISP for the new device driver to your device is available, click the Troubleshoot button, and follow the onscreen instructions in a yellow circle near the device icon. If it looks similar to a local area network (LAN). Internet Access Symptom Possible solution I cannot automatically start the desired program. Do not plug a network cable into a telephone service line; I cannot connect to...
PC Troubleshooting
Page 15
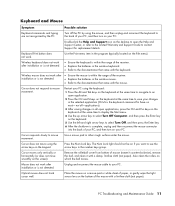
... Maintenance Guide 11 Use a mouse pad or other rough surface under the mouse. Unplug and reconnect the mouse cable to your PC. Wireless keyboard does not work after installation or is not detected. • Ensure the keyboard is within the range of the receiver. • Replace the batteries in the number keys group. Cursor responds slowly to mouse movement. Double-click the Help and Support icon on the screen). Wireless mouse...
... Maintenance Guide 11 Use a mouse pad or other rough surface under the mouse. Unplug and reconnect the mouse cable to your PC. Wireless keyboard does not work after installation or is not detected. • Ensure the keyboard is within the range of the receiver. • Replace the batteries in the number keys group. Cursor responds slowly to mouse movement. Double-click the Help and Support icon on the screen). Wireless mouse...
PC Troubleshooting
Page 18
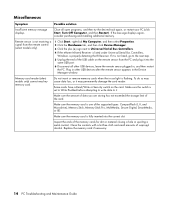
... message displays again, consider purchasing and installing additional memory. Make sure the memory card is flashing. Replace the memory card if necessary. 14 PC Troubleshooting and Maintenance Guide Miscellaneous Symptom Possible solution Insufficient memory message displays. Do not insert or remove memory cards when the in-use light is fully inserted into the same USB port. 6 Disconnect all open programs, and then try the desired task again, or restart your PC (click Start, Turn Off...
... message displays again, consider purchasing and installing additional memory. Make sure the memory card is flashing. Replace the memory card if necessary. 14 PC Troubleshooting and Maintenance Guide Miscellaneous Symptom Possible solution Insufficient memory message displays. Do not insert or remove memory cards when the in-use light is fully inserted into the same USB port. 6 Disconnect all open programs, and then try the desired task again, or restart your PC (click Start, Turn Off...
Troubleshooting
Page 9
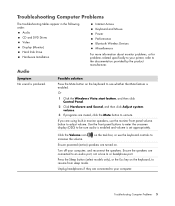
... DVD Drives Video Display (Monitor) Hard Disk Drive Hardware Installation Internet Access Keyboard and Mouse Power Performance Bluetooth Wireless Devices Miscellaneous For more information about monitor problems, or for problems related specifically to your printer, refer to the documentation provided by the product manufacturer. Press the Sleep button (select models only), or the Esc key on the keyboard, to see whether the Mute feature is enabled. Audio Symptom No sound is set appropriately. Or 1 Click the Windows Vista start button, and then click Control Panel. 2 Click Hardware...
... DVD Drives Video Display (Monitor) Hard Disk Drive Hardware Installation Internet Access Keyboard and Mouse Power Performance Bluetooth Wireless Devices Miscellaneous For more information about monitor problems, or for problems related specifically to your printer, refer to the documentation provided by the product manufacturer. Press the Sleep button (select models only), or the Esc key on the keyboard, to see whether the Mute feature is enabled. Audio Symptom No sound is set appropriately. Or 1 Click the Windows Vista start button, and then click Control Panel. 2 Click Hardware...
Troubleshooting
Page 17
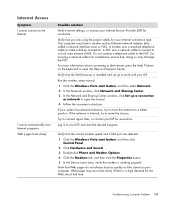
... the Web browser is working properly. I cannot connect to your ISP, and start the desired program. Run the wireless setup wizard: 1 Click the Windows Vista start button, and then select Network. 2 In the Network window, click Network and Sharing Center. 3 In the Network and Sharing Center window, click Set up to open the Help and Support Center. Verify that you are selected: 1 Click the Windows Vista start button, and then click Control Panel. 2 Click Hardware and Sound. 3 Double-click Phone...
... the Web browser is working properly. I cannot connect to your ISP, and start the desired program. Run the wireless setup wizard: 1 Click the Windows Vista start button, and then select Network. 2 In the Network window, click Network and Sharing Center. 3 In the Network and Sharing Center window, click Set up to open the Help and Support Center. Verify that you are selected: 1 Click the Windows Vista start button, and then click Control Panel. 2 Click Hardware and Sound. 3 Double-click Phone...
Troubleshooting
Page 19
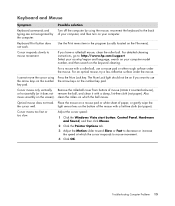
... vertically Remove the rollerball cover from bottom of the mouse with a damp, lint-free cloth (not paper). Troubleshooting Computer Problems 15 Keyboard Print button does not work. Cursor responds slowly to : http://www.hp.com/support Select your country/region and language, search on your computer model number, and then search on your computer, and then turn on the keyword cleaning. For detailed cleaning instructions...
... vertically Remove the rollerball cover from bottom of the mouse with a damp, lint-free cloth (not paper). Troubleshooting Computer Problems 15 Keyboard Print button does not work. Cursor responds slowly to : http://www.hp.com/support Select your country/region and language, search on your computer model number, and then search on your computer, and then turn on the keyword cleaning. For detailed cleaning instructions...


