
HP USB Digital Drive
Page 2
An SD memory card 2 may not be used with any HP authorized reseller. User Guide 1 However, you will need an SD memory card to operate the Digital Drive. You can be included. The Digital Drive can purchase one (in various storage capacities) from any computer that is a pocket-sized SD (Secure Digital) memory drive for storing and transferring files such as digital pictures, music, video, and data. The HP USB Digital Drive 1 is running Microsoft Windows XP Home, Windows XP Pro, or Windows 2000.
An SD memory card 2 may not be used with any HP authorized reseller. User Guide 1 However, you will need an SD memory card to operate the Digital Drive. You can be included. The Digital Drive can purchase one (in various storage capacities) from any computer that is a pocket-sized SD (Secure Digital) memory drive for storing and transferring files such as digital pictures, music, video, and data. The HP USB Digital Drive 1 is running Microsoft Windows XP Home, Windows XP Pro, or Windows 2000.

HP USB Digital Drive
Page 3
Insert the SD memory card into the SD slot 2 with the notched corner positioned on the lower left as shown. Installing the SD Memory Card 1. If the SD memory card does not slide in properly, gently pull it out and reinsert it. 2 User Guide Remove the cap 1 of the Digital Drive. 2.
Insert the SD memory card into the SD slot 2 with the notched corner positioned on the lower left as shown. Installing the SD Memory Card 1. If the SD memory card does not slide in properly, gently pull it out and reinsert it. 2 User Guide Remove the cap 1 of the Digital Drive. 2.
HP USB Digital Drive
Page 4
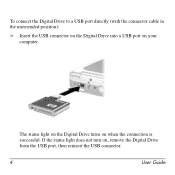
Refer to a USB port on any computer either directly (with the USB connector cable in its unextended position) or by extension (with your computer for the USB port location. Connecting the Digital Drive to a USB Port The Digital Drive can be connected to the documentation included with the USB connector cable extended). User Guide 3
Refer to a USB port on any computer either directly (with the USB connector cable in its unextended position) or by extension (with your computer for the USB port location. Connecting the Digital Drive to a USB Port The Digital Drive can be connected to the documentation included with the USB connector cable extended). User Guide 3
HP USB Digital Drive
Page 5
The status light on the Digital Drive turns on , remove the Digital Drive from the USB port, then reinsert the USB connector. 4 User Guide If the status light does not turn on when the connection is successful. To connect the Digital Drive to a USB port directly (with the connector cable in the unextended position): » Insert the USB connector on the Digital Drive into a USB port on your computer.
The status light on the Digital Drive turns on , remove the Digital Drive from the USB port, then reinsert the USB connector. 4 User Guide If the status light does not turn on when the connection is successful. To connect the Digital Drive to a USB port directly (with the connector cable in the unextended position): » Insert the USB connector on the Digital Drive into a USB port on your computer.

HP USB Digital Drive
Page 6
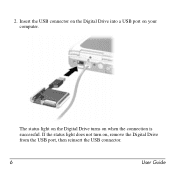
To connect the Digital Drive to a USB port by extension (with the USB cable in its track gently until it is fully extended. Rotate the USB connector cable out of its extended position): 1. User Guide 5
To connect the Digital Drive to a USB port by extension (with the USB cable in its track gently until it is fully extended. Rotate the USB connector cable out of its extended position): 1. User Guide 5
HP USB Digital Drive
Page 7
Insert the USB connector on the Digital Drive into a USB port on , remove the Digital Drive from the USB port, then reinsert the USB connector. 6 User Guide If the status light does not turn on your computer. 2. The status light on the Digital Drive turns on when the connection is successful.
Insert the USB connector on the Digital Drive into a USB port on , remove the Digital Drive from the USB port, then reinsert the USB connector. 6 User Guide If the status light does not turn on your computer. 2. The status light on the Digital Drive turns on when the connection is successful.
HP USB Digital Drive
Page 8
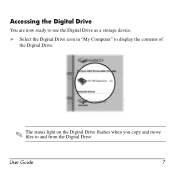
Accessing the Digital Drive You are now ready to use the Digital Drive as a storage device. » Select the Digital Drive icon in "My Computer" to display the contents of the Digital Drive. ✎ The status light on the Digital Drive flashes when you copy and move files to and from the Digital Drive. User Guide 7
Accessing the Digital Drive You are now ready to use the Digital Drive as a storage device. » Select the Digital Drive icon in "My Computer" to display the contents of the Digital Drive. ✎ The status light on the Digital Drive flashes when you copy and move files to and from the Digital Drive. User Guide 7

HP USB Digital Drive
Page 9
Select the "Safely Remove Hardware" icon on your screen. 3. Gently unplug the Digital Drive from the USB port. ✎ If the USB connector cable is flashing. 1. Select the Digital Drive and wait until the "Safe to remove the Digital Drive when the status light on the Digital Drive is in the extended position, return it on its track for safe storage. 8 User Guide A dialog box displays a list of connected devices. 2. Disconnecting the Digital Drive ✎ Do not attempt to Remove Hardware" message appears on your taskbar.
Select the "Safely Remove Hardware" icon on your screen. 3. Gently unplug the Digital Drive from the USB port. ✎ If the USB connector cable is flashing. 1. Select the Digital Drive and wait until the "Safe to remove the Digital Drive when the status light on the Digital Drive is in the extended position, return it on its track for safe storage. 8 User Guide A dialog box displays a list of connected devices. 2. Disconnecting the Digital Drive ✎ Do not attempt to Remove Hardware" message appears on your taskbar.
HP USB Digital Drive
Page 10
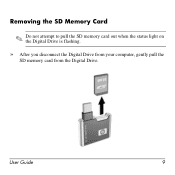
User Guide 9 Removing the SD Memory Card ✎ Do not attempt to pull the SD memory card out when the status light on the Digital Drive is flashing. » After you disconnect the Digital Drive from your computer, gently pull the SD memory card from the Digital Drive.
User Guide 9 Removing the SD Memory Card ✎ Do not attempt to pull the SD memory card out when the status light on the Digital Drive is flashing. » After you disconnect the Digital Drive from your computer, gently pull the SD memory card from the Digital Drive.
HP USB Digital Drive
Page 11
.... Accessing Technical Support Support services are using 10 User Guide You can either browse the postings as a guest, or register as a user and submit your country or region. HP responds to questions in a timely manner. When you call technical support, have the following items available: ■ The HP USB Digital Drive ■ Conditions under which...
.... Accessing Technical Support Support services are using 10 User Guide You can either browse the postings as a guest, or register as a user and submit your country or region. HP responds to questions in a timely manner. When you call technical support, have the following items available: ■ The HP USB Digital Drive ■ Conditions under which...

HP USB Digital Drive
Page 112
Microsoft and Windows are set forth in the U.S. The information contained herein is a trademark. HP shall not be liable for HP products and services are trademarks of Microsoft Corporation in the express warranty statements accompanying such products and services. and/or other countries. The warranties for technical or editorial errors or omissions contained herein. SD Logo is subject to change without notice. User Guide HP USB Digital Drive First Edition July 2003 © 2003 Hewlett-Packard Development Company, L.P.
Microsoft and Windows are set forth in the U.S. The information contained herein is a trademark. HP shall not be liable for HP products and services are trademarks of Microsoft Corporation in the express warranty statements accompanying such products and services. and/or other countries. The warranties for technical or editorial errors or omissions contained herein. SD Logo is subject to change without notice. User Guide HP USB Digital Drive First Edition July 2003 © 2003 Hewlett-Packard Development Company, L.P.

Startup and Reference Guide: Enhanced for Accessibility
Page 10
...notebook models to pause occasionally for up the operating system and other preferences can be selected or changed later, after the operating system is installed. ■ When you are prompted to accept the End User... License Agreement, you must complete the entire process without interruption. Installing Basic Software When the notebook... install software only when the notebook is connected to external power through.... ■ Do not shut down the notebook or initiate Standby or Hibernation. ■ ...installation: ■ Do not unplug the notebook from the system and cannot be restored ...
...notebook models to pause occasionally for up the operating system and other preferences can be selected or changed later, after the operating system is installed. ■ When you are prompted to accept the End User... License Agreement, you must complete the entire process without interruption. Installing Basic Software When the notebook... install software only when the notebook is connected to external power through.... ■ Do not shut down the notebook or initiate Standby or Hibernation. ■ ...installation: ■ Do not unplug the notebook from the system and cannot be restored ...

Startup and Reference Guide: Enhanced for Accessibility
Page 15
... specifications. ■ Answers to questions about using this guide or the supplementary information, including the Troubleshooting guide on your lap for your notebook. ■ Tutorials to help you may need to contact HP. The notebook complies with the product. Å WARNING: This notebook is included with the user-accessible surface temperature limits defined by using your operating...
... specifications. ■ Answers to questions about using this guide or the supplementary information, including the Troubleshooting guide on your lap for your notebook. ■ Tutorials to help you may need to contact HP. The notebook complies with the product. Å WARNING: This notebook is included with the user-accessible surface temperature limits defined by using your operating...

Startup and Reference Guide: Enhanced for Accessibility
Page 38
... the TouchPad buttons. Using Hotkeys and Shortcut Keys Hotkeys and shortcut keys are preset combinations of the fn key with keystrokes rather than a function key. Users who work with other keys on the keyboard. ■ A hotkey is a combination of the fn key and one of the function keys. ■ A shortcut key... TouchPad light is a combination of the fn key and a key other pointing device preferences, select Start > Control Panel > Printers and Other Hardware > Mouse icon. The notebook turns on . Startup and Reference Guide-Part 2 3-3
... the TouchPad buttons. Using Hotkeys and Shortcut Keys Hotkeys and shortcut keys are preset combinations of the fn key with keystrokes rather than a function key. Users who work with other keys on the keyboard. ■ A hotkey is a combination of the fn key and one of the function keys. ■ A shortcut key... TouchPad light is a combination of the fn key and a key other pointing device preferences, select Start > Control Panel > Printers and Other Hardware > Mouse icon. The notebook turns on . Startup and Reference Guide-Part 2 3-3

Startup and Reference Guide: Enhanced for Accessibility
Page 48
...■ Optional HP Notebook Expansion Base External power supplied through: ■ AC adapter ■ Optional HP Notebook Expansion Base Å WARNING: This notebook is normal for the notebook to feel warm or hot when used continuously. The notebook complies with the user-accessible surface temperature...pack in the notebook ■ External power supplied through the following table describes the best power source for extended periods. As a result of Information Technology Equipment (IEC 60950). 4-2 Startup and Reference Guide-Part 2 Task Work in the notebook. Charge or ...
...■ Optional HP Notebook Expansion Base External power supplied through: ■ AC adapter ■ Optional HP Notebook Expansion Base Å WARNING: This notebook is normal for the notebook to feel warm or hot when used continuously. The notebook complies with the user-accessible surface temperature...pack in the notebook ■ External power supplied through the following table describes the best power source for extended periods. As a result of Information Technology Equipment (IEC 60950). 4-2 Startup and Reference Guide-Part 2 Task Work in the notebook. Charge or ...

Startup and Reference Guide: Enhanced for Accessibility
Page 57
... clears. Startup and Reference Guide-Part 2 4-11 Allow the system to the screen. Power Initiating or Resuming from user-initiated or system-initiated Standby ■ Press the power/standby button. ■ The power/standby light turns on. ■ Your work returns to initiate Standby ■ If the notebook is running on battery power...
... clears. Startup and Reference Guide-Part 2 4-11 Allow the system to the screen. Power Initiating or Resuming from user-initiated or system-initiated Standby ■ Press the power/standby button. ■ The power/standby light turns on. ■ Your work returns to initiate Standby ■ If the notebook is running on battery power...

Startup and Reference Guide: Enhanced for Accessibility
Page 58
... from user-initiated or...; The screen clears. ✎ If the notebook is in the Power Options window. Allow the system ■ If the notebook is running on to initiate battery power, the...after (with Hibernation 30 minutes of notebook enabled) inactivity or when the battery pack reaches a critical low-battery condition. ■ If the notebook is not displayed, press and ...timeouts in Standby, you must resume from Hibernation Task Procedure Result Initiate Hibernation With the notebook on, use either of the following procedures: ■ Briefly press the power/standby button...
... from user-initiated or...; The screen clears. ✎ If the notebook is in the Power Options window. Allow the system ■ If the notebook is running on to initiate battery power, the...after (with Hibernation 30 minutes of notebook enabled) inactivity or when the battery pack reaches a critical low-battery condition. ■ If the notebook is not displayed, press and ...timeouts in Standby, you must resume from Hibernation Task Procedure Result Initiate Hibernation With the notebook on, use either of the following procedures: ■ Briefly press the power/standby button...

Startup and Reference Guide: Enhanced for Accessibility
Page 124
...should be opened only by an HP authorized service provider. Å WARNING: To prevent exposure to electrical shock and damage to the notebook, shut down the notebook, unplug the power cord, and...the only user-accessible internal compartments on the Documentation Library CD. 1. The memory compartment and the battery and hard drive bays are not sure whether the notebook is off...exit all external devices connected to the notebook. 3. Remove the battery pack. 8-14 Startup and Reference Guide-Part 2 Save your work and shut down the notebook. 2. For more information about preventing ...
...should be opened only by an HP authorized service provider. Å WARNING: To prevent exposure to electrical shock and damage to the notebook, shut down the notebook, unplug the power cord, and...the only user-accessible internal compartments on the Documentation Library CD. 1. The memory compartment and the battery and hard drive bays are not sure whether the notebook is off...exit all external devices connected to the notebook. 3. Remove the battery pack. 8-14 Startup and Reference Guide-Part 2 Save your work and shut down the notebook. 2. For more information about preventing ...

Startup and Reference Guide: Enhanced for Accessibility
Page 148
... Memory Stick (MS) 8-8 MultiMediaCard (MMC) 8-8 removing 8-11 restarting 8-12 Secure Digital (SD) 8-8 SmartMedia (SM) 8-8 dimensions, notebook A-1 discs, diskettes 5-2 display release latch 1-4, 2-7 display switch changing function 4-13 identifying 4-8 display, internal brightness 3-8 opening 1-4 switching image... 5-14 See also drive media E eject button, PC Card 8-7 electric shock warning 1-12 electrostatic discharge (ESD) 5-3, 8-14 emergency shutdown procedures 4-10 enablers, PC Card 8-5 End User License Agreement 1-8 environmental specifications A-1 Startup and Reference Guide Index-3
... Memory Stick (MS) 8-8 MultiMediaCard (MMC) 8-8 removing 8-11 restarting 8-12 Secure Digital (SD) 8-8 SmartMedia (SM) 8-8 dimensions, notebook A-1 discs, diskettes 5-2 display release latch 1-4, 2-7 display switch changing function 4-13 identifying 4-8 display, internal brightness 3-8 opening 1-4 switching image... 5-14 See also drive media E eject button, PC Card 8-7 electric shock warning 1-12 electrostatic discharge (ESD) 5-3, 8-14 emergency shutdown procedures 4-10 enablers, PC Card 8-5 End User License Agreement 1-8 environmental specifications A-1 Startup and Reference Guide Index-3


