User Guide
Page 5
... Monitor ...4 Installing the Monitor Pedestal Base ...4 Rear Components ...5 HP ZR30w Model ...5 Routing and Connecting the Cables ...6 Connecting USB Devices ...8 Adjusting the Monitor ...8 Turning on the Monitor ...10 Removing the Monitor Pedestal Base 11 Mounting the Monitor ...12 Locating the Rating Labels ...14 Installing an HP/Kensington MicroSaver Security Cable Lock 14 4 Operating the Monitor ...15 Software and Utilities ...15 The Information File ...15 The Image Color Matching File 15 Installing the .INF and .ICM Files ...16 Installing from the CD ...16 Downloading...
... Monitor ...4 Installing the Monitor Pedestal Base ...4 Rear Components ...5 HP ZR30w Model ...5 Routing and Connecting the Cables ...6 Connecting USB Devices ...8 Adjusting the Monitor ...8 Turning on the Monitor ...10 Removing the Monitor Pedestal Base 11 Mounting the Monitor ...12 Locating the Rating Labels ...14 Installing an HP/Kensington MicroSaver Security Cable Lock 14 4 Operating the Monitor ...15 Software and Utilities ...15 The Information File ...15 The Image Color Matching File 15 Installing the .INF and .ICM Files ...16 Installing from the CD ...16 Downloading...
User Guide
Page 7
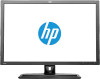
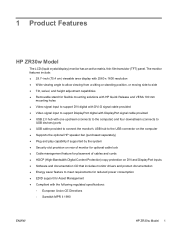
...; 29.7-inch (75.4 cm) viewable area display with 2560 x 1600 resolution ● Wide viewing angle to allow viewing from a sitting or standing position, or moving side-to-side ● Tilt, swivel, and height adjustment capabilities ● Removable stand for flexible mounting solutions with HP Quick Release and VESA 100 mm mounting holes ● Video signal input to support DVI digital with DVI-D signal cable provided ● Video signal input to support DisplayPort digital with DisplayPort signal cable provided ● USB 2.0 hub with one upstream (connects to...
...; 29.7-inch (75.4 cm) viewable area display with 2560 x 1600 resolution ● Wide viewing angle to allow viewing from a sitting or standing position, or moving side-to-side ● Tilt, swivel, and height adjustment capabilities ● Removable stand for flexible mounting solutions with HP Quick Release and VESA 100 mm mounting holes ● Video signal input to support DVI digital with DVI-D signal cable provided ● Video signal input to support DisplayPort digital with DisplayPort signal cable provided ● USB 2.0 hub with one upstream (connects to...

User Guide
Page 8
... important safety feature. • Plug the power cord in Appendix C. Arrange them . Do not pull on power cords or cables. It describes proper workstation, setup, posture, and health and work habits for this ability. This guide is easily accessible at all cords and cables connected to the LCD monitor so that are inappropriately situated on dressers, bookcases, shelves, desks, speakers, chests, or carts may accidentally...
... important safety feature. • Plug the power cord in Appendix C. Arrange them . Do not pull on power cords or cables. It describes proper workstation, setup, posture, and health and work habits for this ability. This guide is easily accessible at all cords and cables connected to the LCD monitor so that are inappropriately situated on dressers, bookcases, shelves, desks, speakers, chests, or carts may accidentally...

User Guide
Page 9
... the rating of the cord. Dust the monitor by using a screen saver program and turning off the monitor when not in the operating instructions. These chemicals may need it from excessive light, heat or moisture. ● When removing the monitor stand, you can substantially increase the life expectancy of the monitor by wiping the screen and the cabinet with a "burned-in image" are not covered under the HP...
... the rating of the cord. Dust the monitor by using a screen saver program and turning off the monitor when not in the operating instructions. These chemicals may need it from excessive light, heat or moisture. ● When removing the monitor stand, you can substantially increase the life expectancy of the monitor by wiping the screen and the cabinet with a "burned-in image" are not covered under the HP...

User Guide
Page 10
... the master power switch, located on the rear panel of the monitor, is in place. Using both hands, position the monitor over the pedestal base. The master power switch turns off position. Installing the Monitor Pedestal Base NOTE: Do not install the pedestal base if the monitor will be used on page 12 in this occurs the screen will make a clicking sound. When the base locks, it will not recover to the monitor. CAUTION: Do not touch the...
... the master power switch, located on the rear panel of the monitor, is in place. Using both hands, position the monitor over the pedestal base. The master power switch turns off position. Installing the Monitor Pedestal Base NOTE: Do not install the pedestal base if the monitor will be used on page 12 in this occurs the screen will make a clicking sound. When the base locks, it will not recover to the monitor. CAUTION: Do not touch the...

User Guide
Page 17
... pedestal base to disassemble the monitor, be sure the monitor is turned off and the power and signal cables are connected to remove it from the Pedestal Base ENWW Removing the Monitor Pedestal Base 11 Figure 3-10 Removing the Monitor from the base. CAUTION: Before beginning to the side (either right or left). 3. Also disconnect any USB cables that allows you to easily remove and replace the monitor panel to mount the panel on the monitor display...
... pedestal base to disassemble the monitor, be sure the monitor is turned off and the power and signal cables are connected to remove it from the Pedestal Base ENWW Removing the Monitor Pedestal Base 11 Figure 3-10 Removing the Monitor from the base. CAUTION: Before beginning to the side (either right or left). 3. Also disconnect any USB cables that allows you to easily remove and replace the monitor panel to mount the panel on the monitor display...
User Guide
Page 22
The CD menu is displayed. 2. Download the software by following the instructions. 16 Chapter 4 Operating the Monitor ENWW Installing the .INF and .ICM Files After you determine that the proper resolution and refresh rates appear in the Windows Display control panel. Select Install Monitor Driver Software. 4. Follow the on the computer from the CD or download them. Refer to update, you need to http://www.hp.com/support and select the country region. 2. Insert...
The CD menu is displayed. 2. Download the software by following the instructions. 16 Chapter 4 Operating the Monitor ENWW Installing the .INF and .ICM Files After you determine that the proper resolution and refresh rates appear in the Windows Display control panel. Select Install Monitor Driver Software. 4. Follow the on the computer from the CD or download them. Refer to update, you need to http://www.hp.com/support and select the country region. 2. Insert...

User Guide
Page 23
.... 4 Power Turns the monitor on or off after 30 seconds) NOTE: The monitor does not support an On-Screen Display (OSD) menu. DCR is enabled One flash of blue - amber Continuous flashing blue - upper or lower limit of brightness control Four flashes of blue - non-supported video mode Three flashes of blue - DCR is disabled Steady blue - When disabling the DCR function, the power LED will flash four times. ENWW Front Panel Controls 17 Front Panel Controls Table 4-1 Monitor Front Panel Controls Control Function 1 Source Selects the video input...
.... 4 Power Turns the monitor on or off after 30 seconds) NOTE: The monitor does not support an On-Screen Display (OSD) menu. DCR is enabled One flash of blue - amber Continuous flashing blue - upper or lower limit of brightness control Four flashes of blue - non-supported video mode Three flashes of blue - DCR is disabled Steady blue - When disabling the DCR function, the power LED will flash four times. ENWW Front Panel Controls 17 Front Panel Controls Table 4-1 Monitor Front Panel Controls Control Function 1 Source Selects the video input...

User Guide
Page 25
.... Power button on front panel of IT experts, broad mutlivendor knowledge base, monitoring and diagnostic tools, go to http://www.hp.com/support. Refer to Setting Up the Monitor on the keyboard or move the mouse to inactivate the screen blanking utility. Brightness adjustment is turned Set the master power switch on the rear panel of each problem, and the recommended solutions. Connect the power cord. Brightness is disconnected. Connect the video cable properly. Online Technical Support...
.... Power button on front panel of IT experts, broad mutlivendor knowledge base, monitoring and diagnostic tools, go to http://www.hp.com/support. Refer to Setting Up the Monitor on the keyboard or move the mouse to inactivate the screen blanking utility. Brightness adjustment is turned Set the master power switch on the rear panel of each problem, and the recommended solutions. Connect the power cord. Brightness is disconnected. Connect the video cable properly. Online Technical Support...
User Guide
Page 27
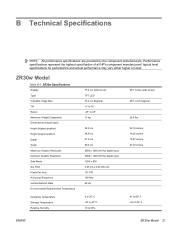
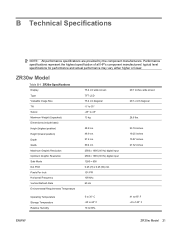
... all HP's component manufacturers' typical level specifications for performance and actual performance may vary either higher or lower. ZR30w Model Table B-1 ZR30w Specifications Display Type Viewable Image Size Tilt Swivel Maximum Weight (Unpacked) Dimensions (include base) Height (highest position) Height (lowest position) Depth Width Maximum Graphic Resolution Optimum Graphic Resolution Safe Mode Dot Pitch Pixels Per Inch Horizontal Frequency Vertical Refresh Rate Environmental Requirements Temperature Operating Temperature Storage Temperature Relative Humidity 75.4 cm wide screen TFT LCD...
... all HP's component manufacturers' typical level specifications for performance and actual performance may vary either higher or lower. ZR30w Model Table B-1 ZR30w Specifications Display Type Viewable Image Size Tilt Swivel Maximum Weight (Unpacked) Dimensions (include base) Height (highest position) Height (lowest position) Depth Width Maximum Graphic Resolution Optimum Graphic Resolution Safe Mode Dot Pitch Pixels Per Inch Horizontal Frequency Vertical Refresh Rate Environmental Requirements Temperature Operating Temperature Storage Temperature Relative Humidity 75.4 cm wide screen TFT LCD...

User Guide
Page 28
Table B-1 ZR30w Specifications (continued) Power Source 100 - 240 VAC, 50/60 Hz Altitude: Operating 0 to 5000 m 0 to 16,400 feet Storage 0 to 12192 m 0 to 40,000 feet Measured Power Consumption: Full Power
Table B-1 ZR30w Specifications (continued) Power Source 100 - 240 VAC, 50/60 Hz Altitude: Operating 0 to 5000 m 0 to 16,400 feet Storage 0 to 12192 m 0 to 40,000 feet Measured Power Consumption: Full Power
ZR30w LCD Monitor User Guide
Page 5
... the Monitor Installing the Monitor Pedestal Base ...4 Rear Components ...5 HP ZR30w Model ...5 Routing and Connecting the Cables ...6 Connecting USB Devices ...8 Adjusting the Monitor ...8 Turning on the Monitor ...10 Removing the Monitor Pedestal Base 11 Mounting the Monitor ...12 Locating the Rating Labels ...14 Installing an HP/Kensington MicroSaver Security Cable Lock 14 4 Operating the Monitor Software and Utilities ...15 The Information File ...15 The Image Color Matching File 15 Installing the .INF and .ICM Files ...16 Installing from the CD ...16 Downloading...
... the Monitor Installing the Monitor Pedestal Base ...4 Rear Components ...5 HP ZR30w Model ...5 Routing and Connecting the Cables ...6 Connecting USB Devices ...8 Adjusting the Monitor ...8 Turning on the Monitor ...10 Removing the Monitor Pedestal Base 11 Mounting the Monitor ...12 Locating the Rating Labels ...14 Installing an HP/Kensington MicroSaver Security Cable Lock 14 4 Operating the Monitor Software and Utilities ...15 The Information File ...15 The Image Color Matching File 15 Installing the .INF and .ICM Files ...16 Installing from the CD ...16 Downloading...
ZR30w LCD Monitor User Guide
Page 7
...; 29.7-inch (75.4 cm) viewable area display with 2560 x 1600 resolution ● Wide viewing angle to allow viewing from a sitting or standing position, or moving side-to-side ● Tilt, swivel, and height adjustment capabilities ● Removable stand for flexible mounting solutions with HP Quick Release and VESA 100 mm mounting holes ● Video signal input to support DVI digital with DVI-D signal cable provided ● Video signal input to support DisplayPort digital with DisplayPort signal cable provided ● USB 2.0 hub with one upstream (connects to...
...; 29.7-inch (75.4 cm) viewable area display with 2560 x 1600 resolution ● Wide viewing angle to allow viewing from a sitting or standing position, or moving side-to-side ● Tilt, swivel, and height adjustment capabilities ● Removable stand for flexible mounting solutions with HP Quick Release and VESA 100 mm mounting holes ● Video signal input to support DVI digital with DVI-D signal cable provided ● Video signal input to support DisplayPort digital with DisplayPort signal cable provided ● USB 2.0 hub with one upstream (connects to...

ZR30w LCD Monitor User Guide
Page 8
... its peripheral devices (such as the computer, connect all power strips provide surge protection; To reduce the risk of the monitor, as well as a monitor, printer, scanner) to properly support your safety, do not place anything on a cord or cable. For your HP LCD monitor. the power strips must be specifically labeled as a power strip or Uninterruptible Power Supply (UPS). To reduce the risk of...
... its peripheral devices (such as the computer, connect all power strips provide surge protection; To reduce the risk of the monitor, as well as a monitor, printer, scanner) to properly support your safety, do not place anything on a cord or cable. For your HP LCD monitor. the power strips must be specifically labeled as a power strip or Uninterruptible Power Supply (UPS). To reduce the risk of...

ZR30w LCD Monitor User Guide
Page 9
... the cord. ● Turn the monitor off the monitor and unplug the power cord from the outlet. You may damage the monitor. If the monitor is not operating properly or has been dropped or damaged, contact an authorized HP dealer, reseller, or service provider. ● Use only a power source and connection appropriate for ventilation. Never push objects of any volatile substance to clean the monitor screen or...
... the cord. ● Turn the monitor off the monitor and unplug the power cord from the outlet. You may damage the monitor. If the monitor is not operating properly or has been dropped or damaged, contact an authorized HP dealer, reseller, or service provider. ● Use only a power source and connection appropriate for ventilation. Never push objects of any volatile substance to clean the monitor screen or...

ZR30w LCD Monitor User Guide
Page 17
... disassemble the monitor, be sure the monitor is turned off and the power and signal cables are connected to mount the panel on a wall, a swing arm, or other mounting fixture (purchased separately). Slide the Quick Release latch (1) on the monitor display head (2) to remove it from the pedestal base to the monitor. 1. Figure 3-10 Removing the Monitor from the back of the monitor. 2. Pull up on the pedestal base to the pedestal base...
... disassemble the monitor, be sure the monitor is turned off and the power and signal cables are connected to mount the panel on a wall, a swing arm, or other mounting fixture (purchased separately). Slide the Quick Release latch (1) on the monitor display head (2) to remove it from the pedestal base to the monitor. 1. Figure 3-10 Removing the Monitor from the back of the monitor. 2. Pull up on the pedestal base to the pedestal base...

ZR30w LCD Monitor User Guide
Page 23
...) NOTE: The monitor does not support an On-Screen Display (OSD) menu. amber Continuous flashing blue - upper or lower limit of brightness control Four flashes of blue - DCR is enabled One flash of blue - DCR is displaying a supported mode (LED automatically turns off . 5 Power LED Sleep mode - full power and monitor is disabled Steady blue - When disabling the DCR function, the power LED will flash four times. Front Panel Controls Table 4-1 Monitor Front Panel Controls Control Function 1 Source Selects the video input (DisplayPort or DVI-D) 2 - (Minus) Reduces...
...) NOTE: The monitor does not support an On-Screen Display (OSD) menu. amber Continuous flashing blue - upper or lower limit of brightness control Four flashes of blue - DCR is enabled One flash of blue - DCR is displaying a supported mode (LED automatically turns off . 5 Power LED Sleep mode - full power and monitor is disabled Steady blue - When disabling the DCR function, the power LED will flash four times. Front Panel Controls Table 4-1 Monitor Front Panel Controls Control Function 1 Source Selects the video input (DisplayPort or DVI-D) 2 - (Minus) Reduces...

ZR30w LCD Monitor User Guide
Page 25
... the Monitor on front panel of Press the front panel power button. Screen blanking is blank and no LED. Press any key on the rear panel of each problem, and the recommended solutions. Problem Screen is active. Master power switch is improperly connected. Video cable is turned Set the master power switch on the keyboard or move the mouse to the On position and press the front panel power button. Possible Cause Solution Power cord is not Adjust the brightness setting using...
... the Monitor on front panel of Press the front panel power button. Screen blanking is blank and no LED. Press any key on the rear panel of each problem, and the recommended solutions. Problem Screen is active. Master power switch is improperly connected. Video cable is turned Set the master power switch on the keyboard or move the mouse to the On position and press the front panel power button. Possible Cause Solution Power cord is not Adjust the brightness setting using...
ZR30w LCD Monitor User Guide
Page 27
ZR30w Model Table B-1 ZR30w Specifications Display Type Viewable Image Size Tilt Swivel Maximum Weight (Unpacked) Dimensions (include base) Height (highest position) Height (lowest position) Depth Width Maximum Graphic Resolution Optimum Graphic Resolution Safe Mode Dot Pitch Pixels Per Inch Horizontal Frequency Vertical Refresh Rate Environmental Requirements Temperature Operating Temperature Storage Temperature Relative Humidity 75.4 cm wide screen TFT LCD 75.4 cm diagonal -5° to 35° -45° to 45° 13 kg 58.9 cm 48.9 cm 27...
ZR30w Model Table B-1 ZR30w Specifications Display Type Viewable Image Size Tilt Swivel Maximum Weight (Unpacked) Dimensions (include base) Height (highest position) Height (lowest position) Depth Width Maximum Graphic Resolution Optimum Graphic Resolution Safe Mode Dot Pitch Pixels Per Inch Horizontal Frequency Vertical Refresh Rate Environmental Requirements Temperature Operating Temperature Storage Temperature Relative Humidity 75.4 cm wide screen TFT LCD 75.4 cm diagonal -5° to 35° -45° to 45° 13 kg 58.9 cm 48.9 cm 27...

ZR30w LCD Monitor User Guide
Page 28
Table B-1 ZR30w Specifications (continued) Power Source 100 - 240 VAC, 50/60 Hz Altitude: Operating 0 to 5000 m 0 to 16,400 feet Storage 0 to 12192 m 0 to 40,000 feet Measured Power Consumption: Full Power
Table B-1 ZR30w Specifications (continued) Power Source 100 - 240 VAC, 50/60 Hz Altitude: Operating 0 to 5000 m 0 to 16,400 feet Storage 0 to 12192 m 0 to 40,000 feet Measured Power Consumption: Full Power


