
HP ZR22w and ZR24w LCD Monitors User Guide
Page 2
This document contains proprietary information that is protected by copyright. Microsoft, Windows, and Windows Vista are set forth in the United States and/or other countries. No part of this document may be construed as constituting an additional warranty. Nothing herein ... 2009) Document Part Number: 589365-001 © 2009 Hewlett-Packard Development Company, L.P. The only warranties for technical or editorial errors or omissions contained herein. HP shall not be liable for HP products and services are either trademarks or registered trademarks of Hewlett-Packard Company.
This document contains proprietary information that is protected by copyright. Microsoft, Windows, and Windows Vista are set forth in the United States and/or other countries. No part of this document may be construed as constituting an additional warranty. Nothing herein ... 2009) Document Part Number: 589365-001 © 2009 Hewlett-Packard Development Company, L.P. The only warranties for technical or editorial errors or omissions contained herein. HP shall not be liable for HP products and services are either trademarks or registered trademarks of Hewlett-Packard Company.

HP ZR22w and ZR24w LCD Monitors User Guide
Page 3
NOTE: Text set off in this manner indicates that failure to equipment or loss of life. ENWW iii About This Guide This guide provides information on setting up the monitor, installing drivers, using the on-screen display menu, troubleshooting and technical specifications. CAUTION: Text set off in bodily harm or loss of information. WARNING! Text set off in this manner indicates that failure to follow directions could result in damage to follow directions could result in this manner provides important supplemental information.
NOTE: Text set off in this manner indicates that failure to equipment or loss of life. ENWW iii About This Guide This guide provides information on setting up the monitor, installing drivers, using the on-screen display menu, troubleshooting and technical specifications. CAUTION: Text set off in bodily harm or loss of information. WARNING! Text set off in this manner indicates that failure to follow directions could result in damage to follow directions could result in this manner provides important supplemental information.

HP ZR22w and ZR24w LCD Monitors User Guide
Page 5
... Guidelines Important Safety Information ...3 Maintenance Guidelines ...4 Cleaning the Monitor ...4 Shipping the Monitor ...4 3 Setting Up the Monitor Installing the Monitor Pedestal Base ...5 Rear Components ...6 HP ZR22w and ZR24w Models 6 Routing and Connecting the Cables ...7 Connecting USB Devices ...9 Adjusting the Monitor ...9 Turning on the Monitor ...11 Removing the Monitor Pedestal Base 12 Mounting the Monitor ...13 Locating the Rating Labels ...15 Installing a Cable...
... Guidelines Important Safety Information ...3 Maintenance Guidelines ...4 Cleaning the Monitor ...4 Shipping the Monitor ...4 3 Setting Up the Monitor Installing the Monitor Pedestal Base ...5 Rear Components ...6 HP ZR22w and ZR24w Models 6 Routing and Connecting the Cables ...7 Connecting USB Devices ...9 Adjusting the Monitor ...9 Turning on the Monitor ...11 Removing the Monitor Pedestal Base 12 Mounting the Monitor ...13 Locating the Rating Labels ...15 Installing a Cable...

HP ZR22w and ZR24w LCD Monitors User Guide
Page 6
... Conversion 25 Using the HP Display Assistant Utility 25 Identifying Monitor Conditions ...26 Sleep Timer Mode ...27 HP Display LiteSaver ...28 Installing the HP Display LiteSaver Software 28 ... Preparing to Call Technical Support 32 Appendix B Technical Specifications ZR22w Model ...34 ZR24w Model ...35 Recognizing Preset Display Resolutions 36 ZR22w Model ...36 ZR24w Model ...37 Entering User Modes ...37...Ergonomics Notice ...41 Japanese Notice ...41 Korean Notice ...41 Power Cord Set Requirements ...41 Japanese Power Cord Requirements 42 Product Environmental Notices ...42 ENERGY STAR®...
... Conversion 25 Using the HP Display Assistant Utility 25 Identifying Monitor Conditions ...26 Sleep Timer Mode ...27 HP Display LiteSaver ...28 Installing the HP Display LiteSaver Software 28 ... Preparing to Call Technical Support 32 Appendix B Technical Specifications ZR22w Model ...34 ZR24w Model ...35 Recognizing Preset Display Resolutions 36 ZR22w Model ...36 ZR24w Model ...37 Entering User Modes ...37...Ergonomics Notice ...41 Japanese Notice ...41 Korean Notice ...41 Power Cord Set Requirements ...41 Japanese Power Cord Requirements 42 Product Environmental Notices ...42 ENERGY STAR®...

HP ZR22w and ZR24w LCD Monitors User Guide
Page 9
1 Product Features HP ZR22w and ZR24w Models The LCD (liquid crystal display) monitor has an active matrix, thin-film transistor (TFT). The monitor features include: ● ZR22w model, 54.61 cm (21.5-inch) diagonal viewable area display with 1920 × ...monitor for optional cable lock ● Cable management feature for placement of cables and cords ● On-Screen Display (OSD) adjustments in several languages for ease of setup and screen optimization ● HP Display Assistant utility software for adjusting monitor settings and enabling the theft deterrence feature ENWW HP ZR22w...
1 Product Features HP ZR22w and ZR24w Models The LCD (liquid crystal display) monitor has an active matrix, thin-film transistor (TFT). The monitor features include: ● ZR22w model, 54.61 cm (21.5-inch) diagonal viewable area display with 1920 × ...monitor for optional cable lock ● Cable management feature for placement of cables and cords ● On-Screen Display (OSD) adjustments in several languages for ease of setup and screen optimization ● HP Display Assistant utility software for adjusting monitor settings and enabling the theft deterrence feature ENWW HP ZR22w...

HP ZR22w and ZR24w LCD Monitors User Guide
Page 11
...unplugging from the electrical outlet. LCD monitors that no one is used, use with the monitor. Arrange them so that are inappropriately situated on dressers, bookcases, shelves, desks, speakers, chests, or carts may accidentally step on the correct power cord set to some form of serious ...and Maintenance Guidelines Important Safety Information A power cord is easily accessible at http://www.hp.com/ergo and/or on page 41 in a grounded (earthed) outlet that is included with the monitor. Not all power cords for the computer and its peripheral devices (such as ...
...unplugging from the electrical outlet. LCD monitors that no one is used, use with the monitor. Arrange them so that are inappropriately situated on dressers, bookcases, shelves, desks, speakers, chests, or carts may accidentally step on the correct power cord set to some form of serious ...and Maintenance Guidelines Important Safety Information A power cord is easily accessible at http://www.hp.com/ergo and/or on page 41 in a grounded (earthed) outlet that is included with the monitor. Not all power cords for the computer and its peripheral devices (such as ...

HP ZR22w and ZR24w LCD Monitors User Guide
Page 13
... on the panel may cause nonuniformity of color or disorientation of the liquid crystals. If this chapter. 1. instead see Mounting the Monitor on the rear panel of the LCD panel. When the base locks, it will not recover to its normal condition. 2. ENWW Installing the... pedestal base if the monitor will be used on a wall, swing arm, or other attached devices, then follow the instructions below. Using both hands, position the monitor over the pedestal base. 3 Setting Up the Monitor To set up the monitor, ensure that the power is turned off to the monitor, computer system, and...
... on the panel may cause nonuniformity of color or disorientation of the liquid crystals. If this chapter. 1. instead see Mounting the Monitor on the rear panel of the LCD panel. When the base locks, it will not recover to its normal condition. 2. ENWW Installing the... pedestal base if the monitor will be used on a wall, swing arm, or other attached devices, then follow the instructions below. Using both hands, position the monitor over the pedestal base. 3 Setting Up the Monitor To set up the monitor, ensure that the power is turned off to the monitor, computer system, and...

HP ZR22w and ZR24w LCD Monitors User Guide
Page 14
Connects the DisplayPort cable to the monitor. 6 Chapter 3 Setting Up the Monitor ENWW Connects optional USB devices to the monitor. Rear Components HP ZR22w and ZR24w Models Figure 3-2 Rear Components Table 3-1 Rear Components Component 1 Cable Lock Provision 2 Master Power Switch 3 AC Power Connector 4 DisplayPort Connector 5 DVI-D Connector 6 VGA Connector 7 ...
Connects the DisplayPort cable to the monitor. 6 Chapter 3 Setting Up the Monitor ENWW Connects optional USB devices to the monitor. Rear Components HP ZR22w and ZR24w Models Figure 3-2 Rear Components Table 3-1 Rear Components Component 1 Cable Lock Provision 2 Master Power Switch 3 AC Power Connector 4 DisplayPort Connector 5 DVI-D Connector 6 VGA Connector 7 ...

HP ZR22w and ZR24w LCD Monitors User Guide
Page 16
... Connect the DVI-D signal cable to the DisplayPort connector on the computer. 5. The grounding plug is determined by the plug. 8 Chapter 3 Setting Up the Monitor ENWW For your safety, do not place anything on a cord or cable. When unplugging from the electrical outlet. Connect the DisplayPort signal cable to... grounded (earthed) electrical outlet that no one end of the provided USB cable to the USB hub connector on the rear panel of the monitor and the other end to an electrical wall outlet. Arrange them . The video mode is an important safety feature. Connect the VGA signal ...
... Connect the DVI-D signal cable to the DisplayPort connector on the computer. 5. The grounding plug is determined by the plug. 8 Chapter 3 Setting Up the Monitor ENWW For your safety, do not place anything on a cord or cable. When unplugging from the electrical outlet. Connect the DisplayPort signal cable to... grounded (earthed) electrical outlet that no one end of the provided USB cable to the USB hub connector on the rear panel of the monitor and the other end to an electrical wall outlet. Arrange them . The video mode is an important safety feature. Connect the VGA signal ...

HP ZR22w and ZR24w LCD Monitors User Guide
Page 17
Tilt the monitor's panel forward or backward to set it to enable the USB 2.0 ports on the monitor. Figure 3-6 Connecting USB Devices Adjusting the Monitor 1. Refer to Step 5 in Routing and Connecting the Cables on the rear panel that can be used to connect devices such as a digital camera, USB keyboard, or USB mouse. Connecting USB Devices The monitor provides USB connectors on the side panel and on page 7. Figure 3-7 Tilting the Monitor ENWW Connecting USB Devices 9 NOTE: You must connect the USB hub cable from the monitor to the computer to a comfortable eye level.
Tilt the monitor's panel forward or backward to set it to enable the USB 2.0 ports on the monitor. Figure 3-6 Connecting USB Devices Adjusting the Monitor 1. Refer to Step 5 in Routing and Connecting the Cables on the rear panel that can be used to connect devices such as a digital camera, USB keyboard, or USB mouse. Connecting USB Devices The monitor provides USB connectors on the side panel and on page 7. Figure 3-7 Tilting the Monitor ENWW Connecting USB Devices 9 NOTE: You must connect the USB hub cable from the monitor to the computer to a comfortable eye level.

HP ZR22w and ZR24w LCD Monitors User Guide
Page 18
... sure that it is safely positioned on the back of the column (2). Figure 3-9 Adjusting the Height 10 Chapter 3 Setting Up the Monitor ENWW A lock-down/release button on a stable surface. While pushing down the display head, press the lock-down on the back of the column prevents ...the display head from sliding up to the left or right for a comfortable viewing position. Adjust the monitor's height so that the monitor is parallel to your eye height for the best viewing angle. c. Guide the display head up when the...
... sure that it is safely positioned on the back of the column (2). Figure 3-9 Adjusting the Height 10 Chapter 3 Setting Up the Monitor ENWW A lock-down/release button on a stable surface. While pushing down the display head, press the lock-down on the back of the column prevents ...the display head from sliding up to the left or right for a comfortable viewing position. Adjust the monitor's height so that the monitor is parallel to your eye height for the best viewing angle. c. Guide the display head up when the...

HP ZR22w and ZR24w LCD Monitors User Guide
Page 19
...can also be enabled. Press the power button on screen for a prolonged period of the auto-switch source setting (On or Off; The position of time. Turning on the monitor's front panel, then select OSD Control > Rotate OSD. Image retention is displayed for five seconds. To disable...10 Pivoting the Monitor NOTE: To view information on the monitor screen, you will need to portrait mode. ENWW Turning on all LCD screens. The message shows which input (DisplayPort, DVI, or VGA) is in image" are not covered under the HP warranty. * A prolonged period of the monitor, then select ...
...can also be enabled. Press the power button on screen for a prolonged period of the auto-switch source setting (On or Off; The position of time. Turning on the monitor's front panel, then select OSD Control > Rotate OSD. Image retention is displayed for five seconds. To disable...10 Pivoting the Monitor NOTE: To view information on the monitor screen, you will need to portrait mode. ENWW Turning on all LCD screens. The message shows which input (DisplayPort, DVI, or VGA) is in image" are not covered under the HP warranty. * A prolonged period of the monitor, then select ...

HP ZR22w and ZR24w LCD Monitors User Guide
Page 20
... Base You can change the default source in the following order: DisplayPort, DVI, then VGA. Pull up on the monitor display head (2) to mount the panel on the pedestal base to the pedestal base. If the default source is turned off and the power and ...signal cables are both disconnected. Disconnect and remove the signal and power cables from the Pedestal Base 12 Chapter 3 Setting Up the Monitor ENWW Also disconnect any USB cables that are active, the monitor will display the highest ranking priority input in the OSD by pressing the front panel menu button and selecting...
... Base You can change the default source in the following order: DisplayPort, DVI, then VGA. Pull up on the monitor display head (2) to mount the panel on the pedestal base to the pedestal base. If the default source is turned off and the power and ...signal cables are both disconnected. Disconnect and remove the signal and power cables from the Pedestal Base 12 Chapter 3 Setting Up the Monitor ENWW Also disconnect any USB cables that are active, the monitor will display the highest ranking priority input in the OSD by pressing the front panel menu button and selecting...

HP ZR22w and ZR24w LCD Monitors User Guide
Page 22
When the Quick Release locks, it in the previous step. If you are mounting to a wall, HP recommends that you consult with a qualified engineering, architectural, or construction professional to determine the appropriate type and quantity of mounting fasteners ...on the monitor to mount the monitor panel. It is properly installed to a swing arm or other mounting fixture using the four screws removed from the Quick Release in place. Mount the Quick Release to support applied loads. 4. Insert the monitor panel into the Quick Release 14 Chapter 3 Setting Up the Monitor ENWW ...
When the Quick Release locks, it in the previous step. If you are mounting to a wall, HP recommends that you consult with a qualified engineering, architectural, or construction professional to determine the appropriate type and quantity of mounting fasteners ...on the monitor to mount the monitor panel. It is properly installed to a swing arm or other mounting fixture using the four screws removed from the Quick Release in place. Mount the Quick Release to support applied loads. 4. Insert the monitor panel into the Quick Release 14 Chapter 3 Setting Up the Monitor ENWW ...

HP ZR22w and ZR24w LCD Monitors User Guide
Page 26
...page 20 in the disc drive. Do not use the auto-adjustment feature: 1. Allow the monitor to warm up for the VGA (analog) input by using a DVI or DisplayPort input. Refer to Adjusting the Monitor Settings on the keyboard to produce a stable, centered image. 6. The setup test pattern is ...using the OK/auto button on the monitor and the auto-adjustment pattern software utility on the CD provided. Insert the CD...
...page 20 in the disc drive. Do not use the auto-adjustment feature: 1. Allow the monitor to warm up for the VGA (analog) input by using a DVI or DisplayPort input. Refer to Adjusting the Monitor Settings on the keyboard to produce a stable, centered image. 6. The setup test pattern is ...using the OK/auto button on the monitor and the auto-adjustment pattern software utility on the CD provided. Insert the CD...
HP ZR22w and ZR24w LCD Monitors User Guide
Page 28
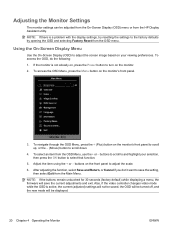
... Use the On-Screen Display (OSD) to adjust the screen image based on the front panel to save the current adjustments and exit. If the monitor is active, the current (adjusted) settings will not be saved, the OSD will be adjusted from the On-Screen Display (OSD) menu or from the... HP Display Assistant utility. To access the OSD Menu, press the Menu button on the monitor's front panel to scroll up, or the - (Minus) button to turn on the monitor. 2. To navigate...
... Use the On-Screen Display (OSD) to adjust the screen image based on the front panel to save the current adjustments and exit. If the monitor is active, the current (adjusted) settings will not be saved, the OSD will be adjusted from the On-Screen Display (OSD) menu or from the... HP Display Assistant utility. To access the OSD Menu, press the Menu button on the monitor's front panel to scroll up, or the - (Minus) button to turn on the monitor. 2. To navigate...

HP ZR22w and ZR24w LCD Monitors User Guide
Page 29
...image left and right. Color Selects the screen color. Custom (RGB) Selects and adjusts your own color scales: ● R-sets your own red color levels ● G-sets your own green color levels ● B-sets your own blue color levels Image Control Adjusts the screen image. (VGA input only) Auto Adjustment Clock Clock Phase...menu item, and if the menu screen has these options, you change the horizontal screen image. The factory default range is 80. ENWW Adjusting the Monitor Settings 21 Adjusts the position of characters. Cool Produces a slightly bluish white color.
...image left and right. Color Selects the screen color. Custom (RGB) Selects and adjusts your own color scales: ● R-sets your own red color levels ● G-sets your own green color levels ● B-sets your own blue color levels Image Control Adjusts the screen image. (VGA input only) Auto Adjustment Clock Clock Phase...menu item, and if the menu screen has these options, you change the horizontal screen image. The factory default range is 80. ENWW Adjusting the Monitor Settings 21 Adjusts the position of characters. Cool Produces a slightly bluish white color.

HP ZR22w and ZR24w LCD Monitors User Guide
Page 30
...The range is On. 22 Chapter 4 Operating the Monitor ENWW Select: ● On ● Off The factory default is 5 - 60 seconds. The factory default is 50. The factory default range is Off. OSD Timeout Rotate OSD Power Saver Sets the time duration in seconds that the OSD is visible...view the background information through the OSD. This option can be formatted. Changes the viewing position of the image for adjusting the on the monitor will be set to: ◦ Off ◦ On Adjusts the screen image to fit the screen and maintains proportional image ● Overscan - Adjust ...
...The range is On. 22 Chapter 4 Operating the Monitor ENWW Select: ● On ● Off The factory default is 5 - 60 seconds. The factory default is 50. The factory default range is Off. OSD Timeout Rotate OSD Power Saver Sets the time duration in seconds that the OSD is visible...view the background information through the OSD. This option can be formatted. Changes the viewing position of the image for adjusting the on the monitor will be set to: ◦ Off ◦ On Adjusts the screen image to fit the screen and maintains proportional image ● Overscan - Adjust ...

HP ZR22w and ZR24w LCD Monitors User Guide
Page 31
...Bezel Power LED Sleep Timer Language Description Restores power to the monitor following an unexpected removal of the monitor. Provides the timer adjustment menu options: ● Set Current Time-sets the current time in hours and minutes ● Set Sleep Time-sets the time you want to : ● Top ●... Turns off the power LED on Time-sets the time you want the monitor to : ● On ● Off The factory default is displayed. ENWW Adjusting the Monitor Settings 23 The default setting is Off. ● Sleep Now-immediately sets the monitor to control some OSD menu features such as...
...Bezel Power LED Sleep Timer Language Description Restores power to the monitor following an unexpected removal of the monitor. Provides the timer adjustment menu options: ● Set Current Time-sets the current time in hours and minutes ● Set Sleep Time-sets the time you want to : ● Top ●... Turns off the power LED on Time-sets the time you want the monitor to : ● On ● Off The factory default is displayed. ENWW Adjusting the Monitor Settings 23 The default setting is Off. ● Sleep Now-immediately sets the monitor to control some OSD menu features such as...

HP ZR22w and ZR24w LCD Monitors User Guide
Page 32
... Selects DVI as the video input signal. Reports the total hours of the monitor. This option is displayed in the OSD when a DisplayPort input is the factory default. http://www.hp.com/support Returns all OSD menu settings and DDC/CI controls to On or Off. Selects VGA as the video ...input signal. Selects the video input signal. The monitor will automatically determine the video format. Reports the serial number of...
... Selects DVI as the video input signal. Reports the total hours of the monitor. This option is displayed in the OSD when a DisplayPort input is the factory default. http://www.hp.com/support Returns all OSD menu settings and DDC/CI controls to On or Off. Selects VGA as the video ...input signal. Selects the video input signal. The monitor will automatically determine the video format. Reports the serial number of...


