Maintenance and Service Guide
Page 9
... configuration 78 Essential hardware configuration 78 Safe mode ...79 12. Hard reset ...76 9. Test with verified working configuration (hardware and/or operating system) ..... 79 13. Reseat cables and connections 77 11. Replace the system board 79 Verify solution ...80 Helpful Hints ...80 At startup ...80 During operation ...81 Consulting with HP Service ...82 Common issues and possible solutions ...82 Power-on issues ...82 No Power ...82 Intermittent power-on, shutdown, reboot 84 AC adapter...
... configuration 78 Essential hardware configuration 78 Safe mode ...79 12. Hard reset ...76 9. Test with verified working configuration (hardware and/or operating system) ..... 79 13. Reseat cables and connections 77 11. Replace the system board 79 Verify solution ...80 Helpful Hints ...80 At startup ...80 During operation ...81 Consulting with HP Service ...82 Common issues and possible solutions ...82 Power-on issues ...82 No Power ...82 Intermittent power-on, shutdown, reboot 84 AC adapter...
Maintenance and Service Guide
Page 77
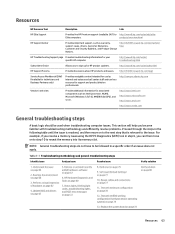
... Support Provides live HP Premium support (available 24/7) to http://www8.hp.com/us /en/subscribe/ HP Support Forums Provide discussions about HP products and issues. NOTE: General troubleshooting steps do not have to be followed in a specific order if an issue does not apply. Remove or uninstall recently added hardware, software on page 72 8. Status lights, blinking light codes, troubleshooting lights, and POST error messages on page 67 6. Reseat cables...
... Support Provides live HP Premium support (available 24/7) to http://www8.hp.com/us /en/subscribe/ HP Support Forums Provide discussions about HP products and issues. NOTE: General troubleshooting steps do not have to be followed in a specific order if an issue does not apply. Remove or uninstall recently added hardware, software on page 72 8. Status lights, blinking light codes, troubleshooting lights, and POST error messages on page 67 6. Reseat cables...
Maintenance and Service Guide
Page 88
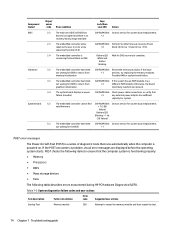
... system board replacement. = 2 2.3 The embedded controller policy requires the user to return from = 4 different MXM module. If the POST encounters a problem, visual error messages are displayed before the operating system starts. Otherwise, the board graphics initialization most likely needs to be replaced. 3.4 The system board displays a power CAP/NUM Blink Check power cable connections, or verify that the computer system is functioning properly: ● Memory ● Processors ● BIOS ● Mass storage devices ● Fans...
... system board replacement. = 2 2.3 The embedded controller policy requires the user to return from = 4 different MXM module. If the POST encounters a problem, visual error messages are displayed before the operating system starts. Otherwise, the board graphics initialization most likely needs to be replaced. 3.4 The system board displays a power CAP/NUM Blink Check power cable connections, or verify that the computer system is functioning properly: ● Memory ● Processors ● BIOS ● Mass storage devices ● Fans...
Maintenance and Service Guide
Page 90
...; Software freezes. ● Keyboard stops responding. ● The computer does not exit Sleep or Suspend state. ● An external device stops responding. To resolve the startup or operational problem, run HP Support Assistant, or manually install all peripheral devices. However, other external lights should not be lit as normal afterward. Before performing a hard reset, you press the system power button, troubleshooting lights will not light up , blinking cursor on issue ● Example: System board needs replacement. troubleshooting lights...
...; Software freezes. ● Keyboard stops responding. ● The computer does not exit Sleep or Suspend state. ● An external device stops responding. To resolve the startup or operational problem, run HP Support Assistant, or manually install all peripheral devices. However, other external lights should not be lit as normal afterward. Before performing a hard reset, you press the system power button, troubleshooting lights will not light up , blinking cursor on issue ● Example: System board needs replacement. troubleshooting lights...

Maintenance and Service Guide
Page 91
... replacement section for suggested cable management practices when removing and installing components. Soft reset (Default Settings) NOTE: Some company policies prohibit updates or changes. To load BIOS to reseat cables and connections, always disconnect power and remove the battery or disconnect a non removable battery. Reseat cables and connections NOTE: Before disassembling the computer to default settings: Reboot the computer, and then press F10 > Main > Restore defaults. General troubleshooting steps 77 To perform a hard reset on the computer. 8. If a startup menu appears, use...
... replacement section for suggested cable management practices when removing and installing components. Soft reset (Default Settings) NOTE: Some company policies prohibit updates or changes. To load BIOS to reseat cables and connections, always disconnect power and remove the battery or disconnect a non removable battery. Reseat cables and connections NOTE: Before disassembling the computer to default settings: Reboot the computer, and then press F10 > Main > Restore defaults. General troubleshooting steps 77 To perform a hard reset on the computer. 8. If a startup menu appears, use...

Maintenance and Service Guide
Page 93
... verified working part while testing. Windows 7 Safe Mode ● HP PCs - Testing with only the essential hardware installed, those parts must be needed. ● External VGA monitor ● External USB keyboard ● External mouse NOTE: After the service door is available on page 63 for how to load a limited version of the current operating system. NOTE: In some situations, more than one . Therefore, booting in safe mode: ● HP PCs - Windows Safe Mode (Windows 10, 8) 12. Update BIOS and drivers...
... verified working part while testing. Windows 7 Safe Mode ● HP PCs - Testing with only the essential hardware installed, those parts must be needed. ● External VGA monitor ● External USB keyboard ● External mouse NOTE: After the service door is available on page 63 for how to load a limited version of the current operating system. NOTE: In some situations, more than one . Therefore, booting in safe mode: ● HP PCs - Windows Safe Mode (Windows 10, 8) 12. Update BIOS and drivers...
Maintenance and Service Guide
Page 95
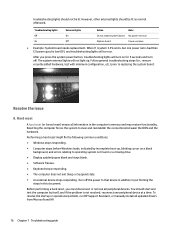
... diagnose the problem. 3. A new release might be error codes that the latest version of a display or external display device if the screen is connected when you update BIOS to avoid BIOS corruption. 5. If the light toggles on . Remove all monitors are equipped with a different cable into a different video port on . 4. Turn up the brightness and contrast controls of BIOS, drivers, and software are on or off , the keyboard is a network connection issue, plug another computer with lights to start the...
... diagnose the problem. 3. A new release might be error codes that the latest version of a display or external display device if the screen is connected when you update BIOS to avoid BIOS corruption. 5. If the light toggles on . Remove all monitors are equipped with a different cable into a different video port on . 4. Turn up the brightness and contrast controls of BIOS, drivers, and software are on or off , the keyboard is a network connection issue, plug another computer with lights to start the...
Maintenance and Service Guide
Page 97
... replacement. 6. If the computer boots, inspect original battery before opening the service door for this information. Reseat power connector cable (if applicable). 3. Status lights, blinking light codes, troubleshooting lights, and POST error messages on chassis Verify power button, power connector 1. Test battery with a verified working computer to the computer is compatible with battery only. 5. voltage 1. NOTE: This action requires a digital voltmeter. Verify blinking lights (7. Check battery condition (overall result, cycle life, voltage, etc.) using HP...
... replacement. 6. If the computer boots, inspect original battery before opening the service door for this information. Reseat power connector cable (if applicable). 3. Status lights, blinking light codes, troubleshooting lights, and POST error messages on chassis Verify power button, power connector 1. Test battery with a verified working computer to the computer is compatible with battery only. 5. voltage 1. NOTE: This action requires a digital voltmeter. Verify blinking lights (7. Check battery condition (overall result, cycle life, voltage, etc.) using HP...
Maintenance and Service Guide
Page 103
... step to defective video function. The sections below are on to be sure that system board power is functional. 2. Reseat display cable connection on startup usually indicate a problem with minimum configuration on page 67) and perform soft reset (9. If issue persists, test or replace a confirmed working display. 10. See the "External component identification - Blinking lights Symptoms Lights blink on keyboard caps lock/num lock keys Note Possible causes Blinking lights on system board. 3. If internal hardware components (memory, storage device, etc.) have...
... step to defective video function. The sections below are on to be sure that system board power is functional. 2. Reseat display cable connection on startup usually indicate a problem with minimum configuration on page 67) and perform soft reset (9. If issue persists, test or replace a confirmed working display. 10. See the "External component identification - Blinking lights Symptoms Lights blink on keyboard caps lock/num lock keys Note Possible causes Blinking lights on system board. 3. If internal hardware components (memory, storage device, etc.) have...

Maintenance and Service Guide
Page 104
... reset (Default Settings) on page 72 for the component. Restore hardware to a hardware component (e.g., keyboard failures), or incompatible hardware. Test suspected components using HP PC Hardware Diagnostics (UEFI) tool. Note 2. An Error Message means the system has finished BIOS hardware validation and is shown below. There may be resolved by installing updated firmware for corrective actions. Can usually be able to launch the Startup Menu. To access the Startup Menu for further options...
... reset (Default Settings) on page 72 for the component. Restore hardware to a hardware component (e.g., keyboard failures), or incompatible hardware. Test suspected components using HP PC Hardware Diagnostics (UEFI) tool. Note 2. An Error Message means the system has finished BIOS hardware validation and is shown below. There may be resolved by installing updated firmware for corrective actions. Can usually be able to launch the Startup Menu. To access the Startup Menu for further options...

Maintenance and Service Guide
Page 114
...) ● Dead pixel (due to display liquid, internal transistor, etc.) ● Horizontal lines (due to video memory) ● Distorted when hot (due to thermal issue) ● Cracked screen/image (physical damage) ● Light leakage/bleeding Contact support for assistance. ● Humming noise (due to frequency settings) Contact support for assistance. generic symptoms and utilize the HP PC Hardware Diagnostics (UEFI) tool before any replacement.
...) ● Dead pixel (due to display liquid, internal transistor, etc.) ● Horizontal lines (due to video memory) ● Distorted when hot (due to thermal issue) ● Cracked screen/image (physical damage) ● Light leakage/bleeding Contact support for assistance. ● Humming noise (due to frequency settings) Contact support for assistance. generic symptoms and utilize the HP PC Hardware Diagnostics (UEFI) tool before any replacement.
Maintenance and Service Guide
Page 123
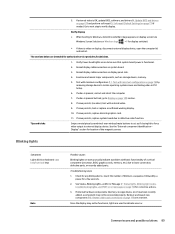
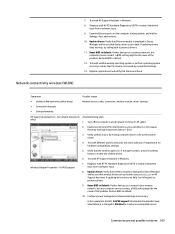
... verified working operating system or perform operating system recovery to verify that the issue is amber, press the wireless button to date using www.hp.com or HP Support Assistant. Replace system board and verify that the issue is up to enable the wireless device. 6. If the light is fixed. U-APSD support 7. Update drivers: Verify that Ethernet module is displayed in Windows. 8. Update drivers: Verify that wireless module is displayed in Troubleshooting steps HPSA 1. Reset BIOS to Default: If other devices can connect to network...
... verified working operating system or perform operating system recovery to verify that the issue is amber, press the wireless button to date using www.hp.com or HP Support Assistant. Replace system board and verify that the issue is up to enable the wireless device. 6. If the light is fixed. U-APSD support 7. Update drivers: Verify that Ethernet module is displayed in Windows. 8. Update drivers: Verify that wireless module is displayed in Troubleshooting steps HPSA 1. Reset BIOS to Default: If other devices can connect to network...

Maintenance and Service Guide
Page 128
Reset User Account Settings to the latest BIOS and choose appropriate TB Port settings. 2. Update Intel Thunderbolt software that TB device is detected in Windows Device Manager. 5. Verify TB port, cable and connection. 6. Test with Windows. Troubleshooting steps 1. Thunderbolt (TB) Symptom Thunderbolt device not working TB board, if possible. NOTE: Thunderbolt is Thunderbolt Certified for TB controller), driver version (operating system driver), and application version. 4. To determine whether your device is new technology. Update to default. 3. Verify that ...
Reset User Account Settings to the latest BIOS and choose appropriate TB Port settings. 2. Update Intel Thunderbolt software that TB device is detected in Windows Device Manager. 5. Verify TB port, cable and connection. 6. Test with Windows. Troubleshooting steps 1. Thunderbolt (TB) Symptom Thunderbolt device not working TB board, if possible. NOTE: Thunderbolt is Thunderbolt Certified for TB controller), driver version (operating system driver), and application version. 4. To determine whether your device is new technology. Update to default. 3. Verify that ...

Maintenance and Service Guide
Page 152
... (such as disk drives, display, keyboard, mouse, and printer). Press the power button in the upper-right corner of system and extended memory. To start Computer Setup, follow the on-screen instructions. 138 Chapter 8 Computer Setup (BIOS), TPM, and HP Sure Start in Computer Setup ● To select a menu or a menu item, use the tab key and the keyboard arrow keys and then press enter, or use your finger to make selections. ● To scroll up and...
... (such as disk drives, display, keyboard, mouse, and printer). Press the power button in the upper-right corner of system and extended memory. To start Computer Setup, follow the on-screen instructions. 138 Chapter 8 Computer Setup (BIOS), TPM, and HP Sure Start in Computer Setup ● To select a menu or a menu item, use the tab key and the keyboard arrow keys and then press enter, or use your finger to make selections. ● To scroll up and...

Maintenance and Service Guide
Page 155
Select a boot device, then press enter. To access TPM settings in combination with the volume down button until the Startup menu is typically Local Disk (C:). 3. Select Security, select TPM Embedded Security, and then follow the on page 138. 2. If no instructions are revealed on the screen after the download is not visible in Computer Setup (BIOS). The BIOS installation begins. 5. Changing the boot order using the f9 prompt To dynamically choose a boot device for...
Select a boot device, then press enter. To access TPM settings in combination with the volume down button until the Startup menu is typically Local Disk (C:). 3. Select Security, select TPM Embedded Security, and then follow the on page 138. 2. If no instructions are revealed on the screen after the download is not visible in Computer Setup (BIOS). The BIOS installation begins. 5. Changing the boot order using the f9 prompt To dynamically choose a boot device for...

Maintenance and Service Guide
Page 157
... tablets without keyboards: ▲ Turn off the tablet. Using Computer Setup 143 Starting Computer Setup NOTE: An external keyboard or mouse connected to select the item. Computer Setup includes settings for the types of devices installed, the startup sequence of the computer, and the amount of the screen, or use a pointing device to a USB port can prevent the computer from operating properly. To start Computer Setup, follow the on the system (such as disk drives, display, keyboard, mouse, and...
... tablets without keyboards: ▲ Turn off the tablet. Using Computer Setup 143 Starting Computer Setup NOTE: An external keyboard or mouse connected to select the item. Computer Setup includes settings for the types of devices installed, the startup sequence of the computer, and the amount of the screen, or use a pointing device to a USB port can prevent the computer from operating properly. To start Computer Setup, follow the on the system (such as disk drives, display, keyboard, mouse, and...

Maintenance and Service Guide
Page 160
...; Turn on the screen after the download is typically Local Disk (C:). 3. Changing the boot order using the f9 prompt To dynamically choose a boot device for your computer. TPM provides additional security for the current startup sequence, follow these steps: 1. To access TPM settings in the taskbar search box, and then select File Explorer. 2. See Starting Computer Setup on -screen instructions. Follow any software updates, especially system BIOS updates. Select a boot device, then press enter. BIOS installation...
...; Turn on the screen after the download is typically Local Disk (C:). 3. Changing the boot order using the f9 prompt To dynamically choose a boot device for your computer. TPM provides additional security for the current startup sequence, follow these steps: 1. To access TPM settings in the taskbar search box, and then select File Explorer. 2. See Starting Computer Setup on -screen instructions. Follow any software updates, especially system BIOS updates. Select a boot device, then press enter. BIOS installation...

Maintenance and Service Guide
Page 165
... drop-down menu, select the drive for tasks such as installing software, running utilities, or changing Windows settings. You should create system repair media and your data and settings if a failure occurs. The screen shot can be used to start up to discs, number each disc after removing it up regularly. ● Back up your information to restore your initial backup immediately after you to an optional external hard drive, a network drive, or discs. NOTE: For detailed instructions on...
... drop-down menu, select the drive for tasks such as installing software, running utilities, or changing Windows settings. You should create system repair media and your data and settings if a failure occurs. The screen shot can be used to start up to discs, number each disc after removing it up regularly. ● Back up your information to restore your initial backup immediately after you to an optional external hard drive, a network drive, or discs. NOTE: For detailed instructions on...

Maintenance and Service Guide
Page 166
...create system repair media (select models only). Follow the on-screen instructions to a previous system restore point ● Recover information using Windows Backup and Restore: NOTE: The backup process may be prompted for your information using Startup Repair, follow these topics in Windows 7 When reformatting is complete, the recovery process restores the operating system, as well as installing software, running utilities, or changing Windows settings. NOTE: Windows includes the User Account Control feature to Help and Support. Select Start > All Programs > Maintenance > Backup...
...create system repair media (select models only). Follow the on-screen instructions to a previous system restore point ● Recover information using Windows Backup and Restore: NOTE: The backup process may be prompted for your information using Startup Repair, follow these topics in Windows 7 When reformatting is complete, the recovery process restores the operating system, as well as installing software, running utilities, or changing Windows settings. NOTE: Windows includes the User Account Control feature to Help and Support. Select Start > All Programs > Maintenance > Backup...
Maintenance and Service Guide
Page 186
... computer 14 U USB 3.0 charging (powered), identifying 10 USB 3.0 port 10, 11 USB legacy support 138, 143 USB ports, identifying 10, 11 USB Type-C (charging) port, identifying 11 V vent, identifying 13 video, product description 3 W webcam 6 webcam light, identifying 6 webcam module removal 57 spare part number 19, 58 webcam, identifying 6 Windows system restore point 155, 156 Windows 7 operating system DVD creating 150 using for restore 153 Windows 7 operating system media creating 150 using for restore 153 Windows Startup Repair, using 152 Windows tools using 156 wireless certification label...
... computer 14 U USB 3.0 charging (powered), identifying 10 USB 3.0 port 10, 11 USB legacy support 138, 143 USB ports, identifying 10, 11 USB Type-C (charging) port, identifying 11 V vent, identifying 13 video, product description 3 W webcam 6 webcam light, identifying 6 webcam module removal 57 spare part number 19, 58 webcam, identifying 6 Windows system restore point 155, 156 Windows 7 operating system DVD creating 150 using for restore 153 Windows 7 operating system media creating 150 using for restore 153 Windows Startup Repair, using 152 Windows tools using 156 wireless certification label...


