User Guide
Page 5
......5 Connecting USB devices ...8 Adjusting the monitor ...9 Turning on the monitor ...10 Mounting the monitor ...11 Removing the monitor stand 11 Attaching the monitor to a mounting device 12 2 Using the monitor ...13 Software and utilities ...13 The Information file ...13 The Image Color Matching file ...13 Using the on-screen display (OSD) menu ...13 Assigning the Function buttons ...14 Using Picture-in-Picture (PIP) and Picture-beside-Picture (PBP 15 Adjusting to Low Blue Light Mode ...15 Using Auto-Sleep Mode ...16 3 Support and troubleshooting ...17 Solving common problems ...17 Button...
......5 Connecting USB devices ...8 Adjusting the monitor ...9 Turning on the monitor ...10 Mounting the monitor ...11 Removing the monitor stand 11 Attaching the monitor to a mounting device 12 2 Using the monitor ...13 Software and utilities ...13 The Information file ...13 The Image Color Matching file ...13 Using the on-screen display (OSD) menu ...13 Assigning the Function buttons ...14 Using Picture-in-Picture (PIP) and Picture-beside-Picture (PBP 15 Adjusting to Low Blue Light Mode ...15 Using Auto-Sleep Mode ...16 3 Support and troubleshooting ...17 Solving common problems ...17 Button...

User Guide
Page 6
Shipping the monitor ...19 Appendix A Technical specifications ...20 Preset display resolutions ...21 Energy saver feature ...22 Appendix B Accessibility ...23 Supported assistive technologies ...23 Contacting support ...23 vi
Shipping the monitor ...19 Appendix A Technical specifications ...20 Preset display resolutions ...21 Energy saver feature ...22 Appendix B Accessibility ...23 Supported assistive technologies ...23 Contacting support ...23 vi
User Guide
Page 7
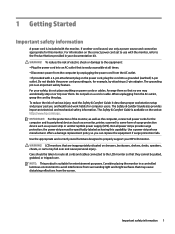
For your HP LCD monitor. the power strips must be specifically labeled as the computer, connect all times. • Disconnect power from the screen. Use the appropriate and correctly sized furniture designed to use only a power source and connection appropriate for this capability. Important safety information 1 Arrange them so that may cause disturbing reflections from the computer by the plug. Use a power strip whose manufacturer offers a damage replacement policy...
For your HP LCD monitor. the power strips must be specifically labeled as the computer, connect all times. • Disconnect power from the screen. Use the appropriate and correctly sized furniture designed to use only a power source and connection appropriate for this capability. Important safety information 1 Arrange them so that may cause disturbing reflections from the computer by the plug. Use a power strip whose manufacturer offers a damage replacement policy...
User Guide
Page 8
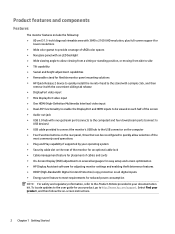
... LED backlight ● Wide viewing angle to allow viewing from a sitting or standing position, or moving from side to side ● Tilt capability ● Swivel and height adjustment capabilities ● Removable stand for flexible monitor panel mounting solutions ● HP Quick Release 2 device to quickly install the monitor head to the stand with a simple click, and then remove it with the convenient sliding tab release ● DisplayPort video input ● Mini DisplayPort video input ● One HDMI...
... LED backlight ● Wide viewing angle to allow viewing from a sitting or standing position, or moving from side to side ● Tilt capability ● Swivel and height adjustment capabilities ● Removable stand for flexible monitor panel mounting solutions ● HP Quick Release 2 device to quickly install the monitor head to the stand with a simple click, and then remove it with the convenient sliding tab release ● DisplayPort video input ● Mini DisplayPort video input ● One HDMI...

User Guide
Page 9
.... Connects a USB Type-C cable to the monitor. Connects the DisplayPort cable from being mishandled or stolen. Connects a security cable to the monitor. Rear components Component 1 Function buttons 2 Power button 3 Master power switch 4 Power connector 5 VESA release button 6 HDMI port 7 Mini DisplayPort port 8 DisplayPort port 9 Audio-out jack 10 USB Type-C port (upstream) 11 USB Type-A ports (2) (downstream) 12 Security cable slot 13 USB Type-A port (downstream) Function Use these buttons to navigate through the OSD menu based on or off . Turns...
.... Connects a USB Type-C cable to the monitor. Connects the DisplayPort cable from being mishandled or stolen. Connects a security cable to the monitor. Rear components Component 1 Function buttons 2 Power button 3 Master power switch 4 Power connector 5 VESA release button 6 HDMI port 7 Mini DisplayPort port 8 DisplayPort port 9 Audio-out jack 10 USB Type-C port (upstream) 11 USB Type-A ports (2) (downstream) 12 Security cable slot 13 USB Type-A port (downstream) Function Use these buttons to navigate through the OSD menu based on or off . Turns...

User Guide
Page 10
... port can function as a DisplayPort audio/video input, as a USB 3.0 upstream connection, or it can cause damage. Avoid touching or applying pressure to a source device. Slide the top of the stand's mounting plate (1) under the upper lip of the recess in the back of the stand's mounting plate (2) into place. 4 Chapter 1 Getting Started Setting up the monitor Use caution when setting up to 65 watts of the LCD panel...
... port can function as a DisplayPort audio/video input, as a USB 3.0 upstream connection, or it can cause damage. Avoid touching or applying pressure to a source device. Slide the top of the stand's mounting plate (1) under the upper lip of the recess in the back of the stand's mounting plate (2) into place. 4 Chapter 1 Getting Started Setting up the monitor Use caution when setting up to 65 watts of the LCD panel...

User Guide
Page 11
... monitor will automatically determine which inputs have valid video signals. Setting up the monitor 5 Place the monitor in this section are included with select cables. Connect a video cable. The inputs can be selected through the OSD by pressing the Menu button and selecting Input Control. ● Connect one end of a DisplayPort cable to the DisplayPort port on the rear of the monitor and the other end to the DisplayPort port on the source...
... monitor will automatically determine which inputs have valid video signals. Setting up the monitor 5 Place the monitor in this section are included with select cables. Connect a video cable. The inputs can be selected through the OSD by pressing the Menu button and selecting Input Control. ● Connect one end of a DisplayPort cable to the DisplayPort port on the rear of the monitor and the other end to the DisplayPort port on the source...
User Guide
Page 12
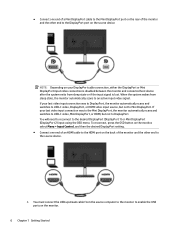
... 2) input using the OSD menu. ● Connect one end of an HDMI cable to the HDMI port on the back of the monitor and the other end to the source device. 3. You must connect the USB upstream cable from sleep state or if the input signal is lost. NOTE: Depending on the monitor. 6 Chapter 1 Getting Started To reconnect, press the OSD button on the monitor, select Menu > Input Control, and then the desired DisplayPort setting. ● Connect...
... 2) input using the OSD menu. ● Connect one end of an HDMI cable to the HDMI port on the back of the monitor and the other end to the source device. 3. You must connect the USB upstream cable from sleep state or if the input signal is lost. NOTE: Depending on the monitor. 6 Chapter 1 Getting Started To reconnect, press the OSD button on the monitor, select Menu > Input Control, and then the desired DisplayPort setting. ● Connect...

User Guide
Page 14
... times. Arrange them . NOTE: You must connect the USB upstream cable from the computer to the monitor to the equipment: Do not disable the power cord grounding plug. See step 4 in Connecting the cables on power cords or cables. For your safety, do not place anything on page 5. 8 Chapter 1 Getting Started Connecting USB devices USB ports are four downstream USB ports on the monitor: two USB-A downstream on the rear and one...
... times. Arrange them . NOTE: You must connect the USB upstream cable from the computer to the monitor to the equipment: Do not disable the power cord grounding plug. See step 4 in Connecting the cables on power cords or cables. For your safety, do not place anything on page 5. 8 Chapter 1 Getting Started Connecting USB devices USB ports are four downstream USB ports on the monitor: two USB-A downstream on the rear and one...

User Guide
Page 16
... activate a screen saver application or turn it is the current active signal, the current preset display resolution, and the recommended preset display resolution. To disable this feature, press and hold the monitor power button for a prolonged period of the monitor to the On position. 2. When the monitor is displayed for two or more hours. NOTE: You can disable the power LED in use for 10 seconds. Set the master power switch (1) on , a Monitor Status...
... activate a screen saver application or turn it is the current active signal, the current preset display resolution, and the recommended preset display resolution. To disable this feature, press and hold the monitor power button for a prolonged period of the monitor to the On position. 2. When the monitor is displayed for two or more hours. NOTE: You can disable the power LED in use for 10 seconds. Set the master power switch (1) on , a Monitor Status...
User Guide
Page 17
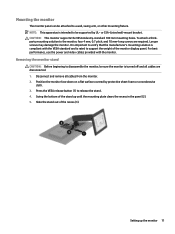
... best performance, use the power and video cables provided with the VESA standard and is rated to support the weight of the monitor display panel. Position the monitor face down on a flat surface covered by UL- To attach a thirdparty mounting solution to disassemble the monitor, be supported by protective sheet foam or a nonabrasive cloth. 3. Removing the monitor stand CAUTION: Before beginning to the monitor, four 4 mm, 0.7 pitch, and 10 mm-long screws are disconnected. 1. Setting...
... best performance, use the power and video cables provided with the VESA standard and is rated to support the weight of the monitor display panel. Position the monitor face down on a flat surface covered by UL- To attach a thirdparty mounting solution to disassemble the monitor, be supported by protective sheet foam or a nonabrasive cloth. 3. Removing the monitor stand CAUTION: Before beginning to the monitor, four 4 mm, 0.7 pitch, and 10 mm-long screws are disconnected. 1. Setting...
User Guide
Page 19
... file. Using the on-screen display (OSD) menu Use the OSD menu to turn on the monitor's rear panel. Main Menu Brightness or Luminance Contrast Description Adjusts the brightness or luminance level of the screen. Software and utilities 13 Monitor Plug and Play-compatibility requires that the monitor connects directly to open the OSD. 3. If the monitor is not already on, press the power button on the monitor's rear panel to adjust the monitor screen image based on the monitor's rear panel to monitor screen. You can download and install the...
... file. Using the on-screen display (OSD) menu Use the OSD menu to turn on the monitor's rear panel. Main Menu Brightness or Luminance Contrast Description Adjusts the brightness or luminance level of the screen. Software and utilities 13 Monitor Plug and Play-compatibility requires that the monitor connects directly to open the OSD. 3. If the monitor is not already on, press the power button on the monitor's rear panel to adjust the monitor screen image based on the monitor's rear panel to monitor screen. You can download and install the...

User Guide
Page 20
... Control Image Control PIP Control Power Control Menu Control Management Information Exit Description Selects and adjusts the screen color. Selects and displays important information about the monitor. Opens the Information menu. Navigates through the OSD menu and selects a video input source. 14 Chapter 2 Using the monitor Exits the OSD menu screen. Adjusts the power settings. Adjusts the DDC/CI settings and returns all OSD menu settings to the factory default settings. Assigning the Function buttons Pressing one of the four Function buttons on monitor's rear panel...
... Control Image Control PIP Control Power Control Menu Control Management Information Exit Description Selects and adjusts the screen color. Selects and displays important information about the monitor. Opens the Information menu. Navigates through the OSD menu and selects a video input source. 14 Chapter 2 Using the monitor Exits the OSD menu screen. Adjusts the power settings. Adjusts the DDC/CI settings and returns all OSD menu settings to the factory default settings. Assigning the Function buttons Pressing one of the four Function buttons on monitor's rear panel...
User Guide
Page 21
... This monitor allows you want to change the size of the four rear panel Function buttons to activate the buttons, and then press the Menu button to reduce blue light output and create a more relaxing and less stimulating image while reading content on sleep 3. If you to select a setting to open the OSD. Select Color Control and Viewing Mode. 2. You can change the Assignable Function buttons from their default values so that input...
... This monitor allows you want to change the size of the four rear panel Function buttons to activate the buttons, and then press the Menu button to reduce blue light output and create a more relaxing and less stimulating image while reading content on sleep 3. If you to select a setting to open the OSD. Select Color Control and Viewing Mode. 2. You can change the Assignable Function buttons from their default values so that input...
User Guide
Page 22
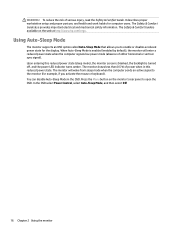
... can disable Auto-Sleep Mode in this reduced power state (sleep mode), the monitor screen is blanked, the backlight is enabled (enabled by default), the monitor will wake from sleep mode when the computer sends an active signal to the monitor (for example, if you to open the OSD. WARNING! In the OSD select Power Control, select Auto-Sleep Mode, and then select Off. 16 Chapter 2 Using the monitor To reduce the risk of either horizontal or vertical sync signal...
... can disable Auto-Sleep Mode in this reduced power state (sleep mode), the monitor screen is blanked, the backlight is enabled (enabled by default), the monitor will wake from sleep mode when the computer sends an active signal to the monitor (for example, if you to open the OSD. WARNING! In the OSD select Power Control, select Auto-Sleep Mode, and then select Off. 16 Chapter 2 Using the monitor To reduce the risk of either horizontal or vertical sync signal...
User Guide
Page 23
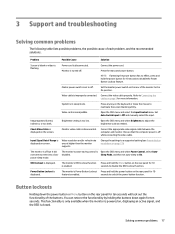
... manually select the input. The monitor's power saving control is too low. Connect the appropriate video signal cable between the computer and monitor. Press the rear panel power button. NOTE: If pressing the power button has no effect, press and hold the power button on the rear panel for 10 feature is set to off but it did not seem to a supported setting (see Preset display resolutions on the screen. Video resolution and/or refresh rate are set auto-sleep to unlock the power button...
... manually select the input. The monitor's power saving control is too low. Connect the appropriate video signal cable between the computer and monitor. Press the rear panel power button. NOTE: If pressing the power button has no effect, press and hold the power button on the rear panel for 10 feature is set to off but it did not seem to a supported setting (see Preset display resolutions on the screen. Video resolution and/or refresh rate are set auto-sleep to unlock the power button...
User Guide
Page 24
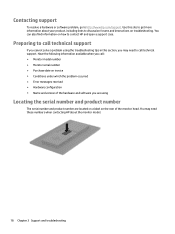
... serial number and product number The serial number and product number are using the troubleshooting tips in this site to call technical support If you may need to get more information about the monitor model. 18 Chapter 3 Support and troubleshooting You may need these numbers when contacting HP about your product, including links to http://www.hp.com/support. Contacting support To resolve a hardware or software problem, go to discussion forums and instructions...
... serial number and product number The serial number and product number are using the troubleshooting tips in this site to call technical support If you may need to get more information about the monitor model. 18 Chapter 3 Support and troubleshooting You may need these numbers when contacting HP about your product, including links to http://www.hp.com/support. Contacting support To resolve a hardware or software problem, go to discussion forums and instructions...

User Guide
Page 25
... service provider. ● Use only a power source and connection appropriate for this product yourself. Never disconnect the monitor by wiping the screen and the cabinet with a "burned-in image" are provided for each device. ● Install the monitor near an outlet that are covered in the cabinet are not covered under the HP warranty. ● Slots and openings in the operating instructions. For more difficult cleaning...
... service provider. ● Use only a power source and connection appropriate for this product yourself. Never disconnect the monitor by wiping the screen and the cabinet with a "burned-in image" are provided for each device. ● Install the monitor near an outlet that are covered in the cabinet are not covered under the HP warranty. ● Slots and openings in the operating instructions. For more difficult cleaning...

User Guide
Page 27
Typical settings Sleep Off Input terminal 70 W
Typical settings Sleep Off Input terminal 70 W
User Guide
Page 28
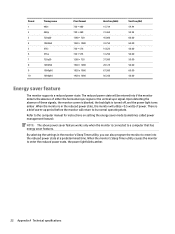
... 1 2 3 4 5 6 7 8 9 10 Timing name 480i 480p 720p60 1080i60 576i 576p 720p50 1080i50 1080p60 1080p50 Pixel format 720 × 480 720 × 480 1280 × 720 1920 × 1080 720 × 576 720 ...monitor supports a reduced power state. When the monitor is in the reduced power state, the monitor will be entered into if the monitor detects the absence of these signals, the monitor screen is blanked, the backlight is turned off, and the power light turns amber. The reduced power state will utilize Upon detecting the absence of either the horizontal sync signal or the vertical sync signal...
... 1 2 3 4 5 6 7 8 9 10 Timing name 480i 480p 720p60 1080i60 576i 576p 720p50 1080i50 1080p60 1080p50 Pixel format 720 × 480 720 × 480 1280 × 720 1920 × 1080 720 × 576 720 ...monitor supports a reduced power state. When the monitor is in the reduced power state, the monitor will be entered into if the monitor detects the absence of these signals, the monitor screen is blanked, the backlight is turned off, and the power light turns amber. The reduced power state will utilize Upon detecting the absence of either the horizontal sync signal or the vertical sync signal...


