
User Guide
Page 9
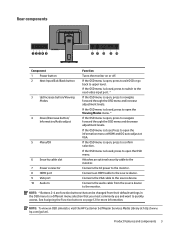
...Input/Exit/Back button 3 Up/Increase button/Viewing Modes 4 Down/Decrease button/ Information/Audio adjust 5 Menu/OK 6 Security cable slot 7 Power connector 8 HDMI port 9 VGA port 10 Audio In Function Turns the monitor on page 12 for more information. If the OSD menu is closed, press to switch to the next... source device. If the OSD menu is open, press to open , press to the monitor. NOTE: To view an OSD simulator, visit the HP Customer Self Repair Services Media Library at VGA. Product features and components 3 If the OSD menu is closed , press to confirm selection. If the...
...Input/Exit/Back button 3 Up/Increase button/Viewing Modes 4 Down/Decrease button/ Information/Audio adjust 5 Menu/OK 6 Security cable slot 7 Power connector 8 HDMI port 9 VGA port 10 Audio In Function Turns the monitor on page 12 for more information. If the OSD menu is closed, press to switch to the next... source device. If the OSD menu is open, press to open , press to the monitor. NOTE: To view an OSD simulator, visit the HP Customer Self Repair Services Media Library at VGA. Product features and components 3 If the OSD menu is closed , press to confirm selection. If the...

User Guide
Page 10
Attach the pedestal stand to the video input port. 4 Chapter 1 Getting started Place the monitor in this occurs, the screen will not recover to its normal condition. 1. Setting up the monitor Installing the monitor ...
Attach the pedestal stand to the video input port. 4 Chapter 1 Getting started Place the monitor in this occurs, the screen will not recover to its normal condition. 1. Setting up the monitor Installing the monitor ...

User Guide
Page 11
VGA Connect one end of the VGA cable to the VGA port on the rear of the monitor and the other end to the source device. HDMI Setting up the monitor 5 NOTE: The monitor automatically determines which inputs have valid video signals. cable not included. Connect one end of an HDMI cable to the HDMI port on the rear of the monitor and the other end to access the on-screen display (OSD) menu and selecting Input Control. The inputs can be selected by pressing the Menu button to the source device.
VGA Connect one end of the VGA cable to the VGA port on the rear of the monitor and the other end to the source device. HDMI Setting up the monitor 5 NOTE: The monitor automatically determines which inputs have valid video signals. cable not included. Connect one end of an HDMI cable to the HDMI port on the rear of the monitor and the other end to access the on-screen display (OSD) menu and selecting Input Control. The inputs can be selected by pressing the Menu button to the source device.
User Guide
Page 19
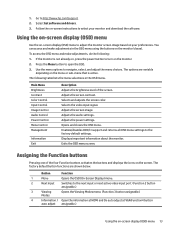
... level of the four Function buttons activates the buttons and displays the icons on -screen instructions to the next input or next active video input port. (Function 2 button assignable.) 3 Viewing Modes Opens the Viewing Modes menu. (Function 3 button assignable.) 4 Information / Open the information at ...display (OSD) menu 13 Select Get software and drivers. 3. Enables/disables DDC/CI support and returns all OSD menu settings to http://www.hp.com/support. 2. 1. Exits the OSD menu screen. Opens and closes the OSD menu. Assigning the Function buttons Pressing one of the screen...
... level of the four Function buttons activates the buttons and displays the icons on -screen instructions to the next input or next active video input port. (Function 2 button assignable.) 3 Viewing Modes Opens the Viewing Modes menu. (Function 3 button assignable.) 4 Information / Open the information at ...display (OSD) menu 13 Select Get software and drivers. 3. Enables/disables DDC/CI support and returns all OSD menu settings to http://www.hp.com/support. 2. 1. Exits the OSD menu screen. Opens and closes the OSD menu. Assigning the Function buttons Pressing one of the screen...

User Guide
Page 27
For the latest specifications or additional specifications on this product, go to http://www.hp.com/go/ quickspecs/ and search for your product. one HDMI port -4 to 140° F/5% to 95% RH 60.5 cm/23.8-inch 21 A Technical specifications NOTE: The product specifications provided in the user guide might have changed ... 35° C 41 to 95° F Storage temperature/Humidity Power source Input terminal -20 to 60° C 100-240 V ac 50/60 Hz One VGA port with cable included;
For the latest specifications or additional specifications on this product, go to http://www.hp.com/go/ quickspecs/ and search for your product. one HDMI port -4 to 140° F/5% to 95% RH 60.5 cm/23.8-inch 21 A Technical specifications NOTE: The product specifications provided in the user guide might have changed ... 35° C 41 to 95° F Storage temperature/Humidity Power source Input terminal -20 to 60° C 100-240 V ac 50/60 Hz One VGA port with cable included;


