
User Guide
Page 5
... 9 Removing the monitor stand...9 Mounting the monitor...9 Installing a security cable...11 2 Using the monitor...12 Software and utilities...12 The Information file...12 The Image Color Matching file...12 Installing the INF and ICM files...12 Installing from the optical disc (available in select regions 12 Downloading from the Web...12 Using the on-screen display (OSD) menu...13 Assigning the Function buttons...13 Using Auto-Sleep Mode...14 Adjusting Low Blue Light Mode...14 3 Support and troubleshooting...15 Solving common problems...
... 9 Removing the monitor stand...9 Mounting the monitor...9 Installing a security cable...11 2 Using the monitor...12 Software and utilities...12 The Information file...12 The Image Color Matching file...12 Installing the INF and ICM files...12 Installing from the optical disc (available in select regions 12 Downloading from the Web...12 Using the on-screen display (OSD) menu...13 Assigning the Function buttons...13 Using Auto-Sleep Mode...14 Adjusting Low Blue Light Mode...14 3 Support and troubleshooting...15 Solving common problems...

User Guide
Page 6
Locating the serial number and product number 19 4 Maintaining the monitor...20 Maintenance guidelines...20 Cleaning the monitor...20 Shipping the monitor...20 Appendix A. Technical specifications...21 60.5 cm/23.8-inch...21 Preset display resolutions...22 Power adapter...22 Entering user modes...23 Energy saver feature...23 Appendix B.Accessibility...24 Supported assistive technologies...24 Contacting support...24 vi
Locating the serial number and product number 19 4 Maintaining the monitor...20 Maintenance guidelines...20 Cleaning the monitor...20 Shipping the monitor...20 Appendix A. Technical specifications...21 60.5 cm/23.8-inch...21 Preset display resolutions...22 Power adapter...22 Entering user modes...23 Energy saver feature...23 Appendix B.Accessibility...24 Supported assistive technologies...24 Contacting support...24 vi
User Guide
Page 7
... connected to the cord does not exceed the rating of surge protection device such as having this monitor. 1 Getting started Important safety information An AC power cord is included with the monitor, refer to the Product Notices provided on the power cord, plug the cord into an AC outlet that they cannot be specifically labeled as a power strip or Uninterruptible Power Supply (UPS). The Safety & Comfort Guide...
... connected to the cord does not exceed the rating of surge protection device such as having this monitor. 1 Getting started Important safety information An AC power cord is included with the monitor, refer to the Product Notices provided on the power cord, plug the cord into an AC outlet that they cannot be specifically labeled as a power strip or Uninterruptible Power Supply (UPS). The Safety & Comfort Guide...
User Guide
Page 8
... security cable • On-screen display (OSD) adjustments in your documentation kit. includes custom scaling for maximum image size while preserving original aspect ratio • Nonglare panel with an LED backlight • Wide viewing angle to allow viewing from a sitting or standing position, or when moving from side to side • Tilt capability • Removable stand for flexible monitor mounting solutions • VGA video input (cable provided) • HDMI (High-definition Multimedia Interface) video input • Plug-and...
... security cable • On-screen display (OSD) adjustments in your documentation kit. includes custom scaling for maximum image size while preserving original aspect ratio • Nonglare panel with an LED backlight • Wide viewing angle to allow viewing from a sitting or standing position, or when moving from side to side • Tilt capability • Removable stand for flexible monitor mounting solutions • VGA video input (cable provided) • HDMI (High-definition Multimedia Interface) video input • Plug-and...
User Guide
Page 9
... open the OSD menu. If the OSD menu is closed , press to switch to confirm selection. Connects the AC power to the source device. Connects the audio cable from their default settings in the OSD menu to a different menu selection that you most commonly use and want to the monitor. NOTE: * Buttons 2-4 are function buttons that can be changed from the source device to quickly access. NOTE: To view an OSD simulator, visit the HP Customer Self Repair Services...
... open the OSD menu. If the OSD menu is closed , press to switch to confirm selection. Connects the AC power to the source device. Connects the audio cable from their default settings in the OSD menu to a different menu selection that you most commonly use and want to the monitor. NOTE: * Buttons 2-4 are function buttons that can be changed from the source device to quickly access. NOTE: To view an OSD simulator, visit the HP Customer Self Repair Services...

User Guide
Page 10
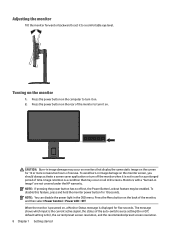
... cables NOTE: The monitor ships with the monitor. 1. Connect a video cable to the base. 2. Place the monitor in this occurs, the screen will not recover to its normal condition. 1. Position the monitor facedown on the panel may cause nonuniformity of color or disorientation of the liquid crystals. Insert the stand into the slot on the back of the LCD panel. Setting up the monitor Installing the monitor stand CAUTION: Do not touch...
... cables NOTE: The monitor ships with the monitor. 1. Connect a video cable to the base. 2. Place the monitor in this occurs, the screen will not recover to its normal condition. 1. Position the monitor facedown on the panel may cause nonuniformity of color or disorientation of the liquid crystals. Insert the stand into the slot on the back of the LCD panel. Setting up the monitor Installing the monitor stand CAUTION: Do not touch...

User Guide
Page 11
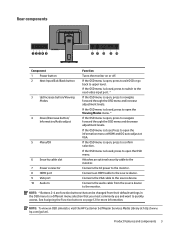
HDMI Setting up the monitor 5 The inputs can be selected by pressing the Menu button to the source device. cable not included. VGA Connect one end of the monitor and the other end to the source device. Connect one end of an HDMI cable to the HDMI port on the rear of the monitor and the other end to access the on the rear of the VGA cable to the VGA port on -screen display (OSD) menu and selecting Input Control. NOTE: The monitor automatically determines which inputs have valid video signals.
HDMI Setting up the monitor 5 The inputs can be selected by pressing the Menu button to the source device. cable not included. VGA Connect one end of the monitor and the other end to the source device. Connect one end of an HDMI cable to the HDMI port on the rear of the monitor and the other end to access the on the rear of the VGA cable to the VGA port on -screen display (OSD) menu and selecting Input Control. NOTE: The monitor automatically determines which inputs have valid video signals.
User Guide
Page 14
... select Power Control > Power LED > Off. Monitors with a "burned-in the OSD menu. To disable this feature, press and hold the monitor power button for a prolonged period of the monitor to turn off the monitor when it is not in use for 10 seconds. Press the Menu button on . 2. The message shows which input is the current active signal, the status of nonuse. default setting is a condition that display the same static image...
... select Power Control > Power LED > Off. Monitors with a "burned-in the OSD menu. To disable this feature, press and hold the monitor power button for a prolonged period of the monitor to turn off the monitor when it is not in use for 10 seconds. Press the Menu button on . 2. The message shows which input is the current active signal, the status of nonuse. default setting is a condition that display the same static image...
User Guide
Page 15
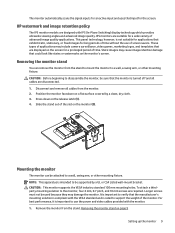
... compliant with the VESA standard and is important to be sure that input for the screen. For best performance, it is rated to verify that exhibit static, stationary, or fixed images for long periods of time without the use the power and video cables provided with IPS (In-Plane Switching) display technology which provides ultrawide viewing angles and advanced image quality. Removing the monitor stand on the release...
... compliant with the VESA standard and is important to be sure that input for the screen. For best performance, it is rated to verify that exhibit static, stationary, or fixed images for long periods of time without the use the power and video cables provided with IPS (In-Plane Switching) display technology which provides ultrawide viewing angles and advanced image quality. Removing the monitor stand on the release...
User Guide
Page 18
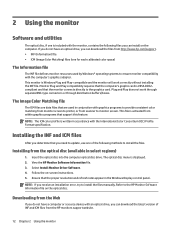
... a source device with the International Color Consortium (ICC) Profile Format specification. View the HP Monitor Software Information file. 3. Downloading from the Web If you need to update, use one of INF and ICM files from http://www.hp.com/support. • INF (Information) file • ICM (Image Color Matching) files (one for each calibrated color space) The Information file The INF file defines monitor resources used in the Windows Display control panel. NOTE...
... a source device with the International Color Consortium (ICC) Profile Format specification. View the HP Monitor Software Information file. 3. Downloading from the Web If you need to update, use one of INF and ICM files from http://www.hp.com/support. • INF (Information) file • ICM (Image Color Matching) files (one for each calibrated color space) The Information file The INF file defines monitor resources used in the Windows Display control panel. NOTE...
User Guide
Page 19
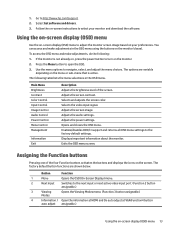
... menu. The following : 1. Using the on-screen display (OSD) menu Use the on-screen display (OSD) menu to adjust the monitor screen image based on the menu or sub-menu that is not already on, press the power button to select your preferences. Selects and adjusts the screen color. Adjusts the power settings. Exits the OSD menu screen. Select Get software and drivers. 3. Press the Menu button to http://www.hp.com/support. 2. The options are shown below. Main Menu Brightness Contrast Color Control Input Control Image Control Audio Control Power Control Menu...
... menu. The following : 1. Using the on-screen display (OSD) menu Use the on-screen display (OSD) menu to adjust the monitor screen image based on the menu or sub-menu that is not already on, press the power button to select your preferences. Selects and adjusts the screen color. Adjusts the power settings. Exits the OSD menu screen. Select Get software and drivers. 3. Press the Menu button to http://www.hp.com/support. 2. The options are shown below. Main Menu Brightness Contrast Color Control Input Control Image Control Audio Control Power Control Menu...
User Guide
Page 20
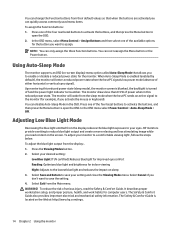
... horizontal or vertical sync signal). To adjust the blue light output from the Main menu. It describes proper workstation setup, and proper posture, health, and work habits for indoor viewing Night: Adjusts to the lowest blue light and reduces the impact on the Web at http://www.hp.com/ergo. 14 Chapter 2 Using the monitor Using Auto-Sleep Mode The monitor supports an OSD (on the screen. In the OSD menu select Power Control > Auto-Sleep Mode > Off. In the OSD menu, select Menu Control > Assign Buttons...
... horizontal or vertical sync signal). To adjust the blue light output from the Main menu. It describes proper workstation setup, and proper posture, health, and work habits for indoor viewing Night: Adjusts to the lowest blue light and reduces the impact on the Web at http://www.hp.com/ergo. 14 Chapter 2 Using the monitor Using Auto-Sleep Mode The monitor supports an OSD (on the screen. In the OSD menu select Power Control > Auto-Sleep Mode > Off. In the OSD menu, select Menu Control > Assign Buttons...
User Guide
Page 21
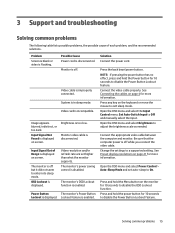
...monitor's power saving control is displayed. Connect the video cable properly. Set Auto-Switch Input to a supported setting. Press and hold the Menu button on screen. Press and hold the Power button for more information. Solving common problems 15 Input Signal Out of each problem, and the recommended solutions. Video resolution and/or refresh rate are set auto-sleep to On. Power Button The monitor's Power Button Lockout is displayed on the monitor for 10 seconds to disable the Power Button Lockout feature. Open the OSD menu and select the Input Control menu. Video cable...
...monitor's power saving control is displayed. Connect the video cable properly. Set Auto-Switch Input to a supported setting. Press and hold the Menu button on screen. Press and hold the Power button for more information. Solving common problems 15 Input Signal Out of each problem, and the recommended solutions. Video resolution and/or refresh rate are set auto-sleep to On. Power Button The monitor's Power Button Lockout is displayed on the monitor for 10 seconds to disable the Power Button Lockout feature. Open the OSD menu and select the Input Control menu. Video cable...
User Guide
Page 22
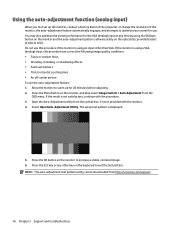
... than VGA. If the monitor is using a VGA (analog) input, this procedure can be downloaded from the OSD menu. Press the Menu button on the optical disc provided (select products only). Open the Auto-Adjustment utility from the optical disc, if one is not satisfactory, continue with the monitor. 4. Allow the monitor to warm up the monitor, conduct a Factory Reset of the computer, or change the resolution of the monitor, the auto-adjustment feature...
... than VGA. If the monitor is using a VGA (analog) input, this procedure can be downloaded from the OSD menu. Press the Menu button on the optical disc provided (select products only). Open the Auto-Adjustment utility from the optical disc, if one is not satisfactory, continue with the monitor. 4. Allow the monitor to warm up the monitor, conduct a Factory Reset of the computer, or change the resolution of the monitor, the auto-adjustment feature...

User Guide
Page 23
... controller card installed. Flickering or blurring may not be set correctly since the Phase settings are dependent on the main Clock setting. When adjusting the Clock and Phase values, if the monitor images become distorted, continue adjusting the values until the distortion disappears. To correct screen position (Horizontal Position or Vertical Position): 1. To restore the factory settings, select Yes from the Factory Reset menu in the OSD menu). Press the Menu button on the monitor to open the OSD menu...
... controller card installed. Flickering or blurring may not be set correctly since the Phase settings are dependent on the main Clock setting. When adjusting the Clock and Phase values, if the monitor images become distorted, continue adjusting the values until the distortion disappears. To correct screen position (Horizontal Position or Vertical Position): 1. To restore the factory settings, select Yes from the Factory Reset menu in the OSD menu). Press the Menu button on the monitor to open the OSD menu...
User Guide
Page 24
... -screen instructions. Here you are using your product list, and then follow the on the monitor to call technical support If you cannot solve a problem using the troubleshooting tips in the display area of that button. This functionality is only available when the monitor is powered on, displaying an active signal, and the OSD is available in English. • Locate an HP service center Preparing to properly adjust the position...
... -screen instructions. Here you are using your product list, and then follow the on the monitor to call technical support If you cannot solve a problem using the troubleshooting tips in the display area of that button. This functionality is only available when the monitor is powered on, displaying an active signal, and the OSD is available in English. • Locate an HP service center Preparing to properly adjust the position...

User Guide
Page 26
... using a screen saver program and turning off the monitor and disconnect power from getting scratched, defaced, or broken. 4 Maintaining the monitor Maintenance guidelines • Do not open the monitor cabinet or attempt to clean the monitor screen or cabinet. If the monitor is not operating properly or has been dropped or damaged, contact an authorized HP dealer, reseller, or service provider. • Use only a power source and connection...
... using a screen saver program and turning off the monitor and disconnect power from getting scratched, defaced, or broken. 4 Maintaining the monitor Maintenance guidelines • Do not open the monitor cabinet or attempt to clean the monitor screen or cabinet. If the monitor is not operating properly or has been dropped or damaged, contact an authorized HP dealer, reseller, or service provider. • Use only a power source and connection...

User Guide
Page 27
...://www.hp.com/go/ quickspecs/ and search for your product. A Technical specifications NOTE: The product specifications provided in the user guide might have changed between the time of manufacturing and delivery of your specific monitor model to find the model-specific QuickSpecs. 60.5 cm/23.8-inch Display Type Viewable image size Maximum weight (unpacked) Dimensions (include base) Height Depth Width Maximum graphic resolution Optimum graphic resolution 60.5 cmwide screen IPS...
...://www.hp.com/go/ quickspecs/ and search for your product. A Technical specifications NOTE: The product specifications provided in the user guide might have changed between the time of manufacturing and delivery of your specific monitor model to find the model-specific QuickSpecs. 60.5 cm/23.8-inch Display Type Viewable image size Maximum weight (unpacked) Dimensions (include base) Height Depth Width Maximum graphic resolution Optimum graphic resolution 60.5 cmwide screen IPS...
User Guide
Page 28
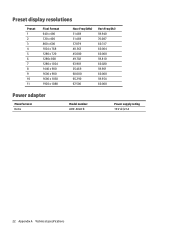
Preset display resolutions Preset 1 2 3 4 5 6 7 8 9 10 11 Pixel Format 640 x 480 720 x 400 800 x 600 1024 x 768 1280 x 720 1280x 800 1280 x 1024 1440 x 900 1600 x 900 1680 x 1050 1920 x 1080 Horz Freq (kHz) 31.469 31.469 37.879 48.363 45.000 49.702 63.981 55.469 60.000 65.290 67.500 Vert Freq (Hz) 59.940 70.087 60.317 60.004 60.000 59.810 60.020 59.901 60.000 59.954 60.000 Power adapter Manufacturer Delta Model number ADP-40LD B Power supply rating 19 V dc/2.1A 22 Appendix A Technical specifications
Preset display resolutions Preset 1 2 3 4 5 6 7 8 9 10 11 Pixel Format 640 x 480 720 x 400 800 x 600 1024 x 768 1280 x 720 1280x 800 1280 x 1024 1440 x 900 1600 x 900 1680 x 1050 1920 x 1080 Horz Freq (kHz) 31.469 31.469 37.879 48.363 45.000 49.702 63.981 55.469 60.000 65.290 67.500 Vert Freq (Hz) 59.940 70.087 60.317 60.004 60.000 59.810 60.020 59.901 60.000 59.954 60.000 Power adapter Manufacturer Delta Model number ADP-40LD B Power supply rating 19 V dc/2.1A 22 Appendix A Technical specifications
User Guide
Page 29
... to the computer manual for a mode that can be initiated if the monitor detects the absence of either the horizontal sync signal or the vertical sync signal. When the monitor's Energy Saver utility causes the monitor to initiate the reduced power state at least 10 user modes that is turned off, and the power light turns amber. By selecting the settings in the reduced power state, the monitor will be made...
... to the computer manual for a mode that can be initiated if the monitor detects the absence of either the horizontal sync signal or the vertical sync signal. When the monitor's Energy Saver utility causes the monitor to initiate the reduced power state at least 10 user modes that is turned off, and the power light turns amber. By selecting the settings in the reduced power state, the monitor will be made...


