

Security - Window Vista and Windows 7
Page 8
... to your computer information. CAUTION: To prevent being locked out of passwords can be entered at a Windows prompt. For additional information about Windows passwords, such as they are not displayed as screen-saver passwords, select Start > Help and Support. 2 Chapter 2 Using passwords Passwords can be set in a secure place. The following tips for creating and saving passwords: ● When creating passwords, follow requirements set in the Setup Utility must be entered at a Setup Utility prompt.
... to your computer information. CAUTION: To prevent being locked out of passwords can be entered at a Windows prompt. For additional information about Windows passwords, such as they are not displayed as screen-saver passwords, select Start > Help and Support. 2 Chapter 2 Using passwords Passwords can be set in a secure place. The following tips for creating and saving passwords: ● When creating passwords, follow requirements set in the Setup Utility must be entered at a Setup Utility prompt.

Setup Utility - Windows Vista and Windows 7
Page 10
... order for: ◦ USB Floppy ◦ Internal CD/DVD ROM drive ◦ USB CD/DVD ROM drive ◦ Hard drive ◦ USB Diskette on Key ◦ USB Hard drive ◦ Network adapter Diagnostics menu Select Hard Disk Self Test Secondary Hard Disk Self Test (select models only) Memory Test To do this Change the Setup Utility language. Enable/disable LAN Power Saving. System Configuration menu Select Language Support Button Sound (select models only) Virtualization Technology (select models only) Processor C6 State (select models only) LAN Power Saving (select models only) Card Reader...
... order for: ◦ USB Floppy ◦ Internal CD/DVD ROM drive ◦ USB CD/DVD ROM drive ◦ Hard drive ◦ USB Diskette on Key ◦ USB Hard drive ◦ Network adapter Diagnostics menu Select Hard Disk Self Test Secondary Hard Disk Self Test (select models only) Memory Test To do this Change the Setup Utility language. Enable/disable LAN Power Saving. System Configuration menu Select Language Support Button Sound (select models only) Virtualization Technology (select models only) Processor C6 State (select models only) LAN Power Saving (select models only) Card Reader...
Software Update - Windows Vista and Windows 7
Page 5
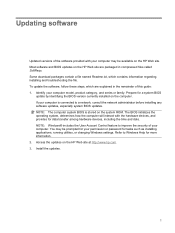
... among hardware devices, including the time and date. NOTE: The computer system BIOS is connected to Windows Help for tasks such as installing applications, running utilities, or changing Windows settings. Identify your permission or password for more information. 2. The BIOS initializes the operating system, determines how the computer will interact with your computer. Refer to a network, consult the network administrator before installing any software updates, especially system BIOS updates. If...
... among hardware devices, including the time and date. NOTE: The computer system BIOS is connected to Windows Help for tasks such as installing applications, running utilities, or changing Windows settings. Identify your permission or password for more information. 2. The BIOS initializes the operating system, determines how the computer will interact with your computer. Refer to a network, consult the network administrator before installing any software updates, especially system BIOS updates. If...

Software Update - Windows Vista and Windows 7
Page 6
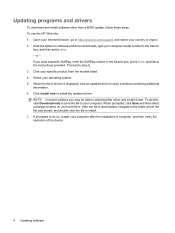
... information displayed, use the arrow keys to select Exit > Exit Discarding Changes, and then press enter. To exit the Setup Utility, use the arrow keys to select the Main menu. Access the page on the HP Web site that is connected to reliable external power using the AC adapter. Do not insert, remove, connect, or disconnect any device, cable, or cord. At the download area, follow these steps: a. b. Updating the BIOS To update the BIOS, first...
... information displayed, use the arrow keys to select Exit > Exit Discarding Changes, and then press enter. To exit the Setup Utility, use the arrow keys to select the Main menu. Access the page on the HP Web site that is connected to reliable external power using the AC adapter. Do not insert, remove, connect, or disconnect any device, cable, or cord. At the download area, follow these steps: a. b. Updating the BIOS To update the BIOS, first...
Software Update - Windows Vista and Windows 7
Page 8
... model number in the Search box, press enter, and follow these steps: To use the HP Web site: 1. Click the option for software and driver downloads, type your Internet browser, go to install the updated driver. When the list of drivers is complete, and then verify the operation of the device. 4 Updating software Select your hard drive. Click Install now to http://www.hp.com/support, and select your computer after the installation is displayed, click an updated driver...
... model number in the Search box, press enter, and follow these steps: To use the HP Web site: 1. Click the option for software and driver downloads, type your Internet browser, go to install the updated driver. When the list of drivers is complete, and then verify the operation of the device. 4 Updating software Select your hard drive. Click Install now to http://www.hp.com/support, and select your computer after the installation is displayed, click an updated driver...
Wireless (Select Models Only) - Windows 7
Page 22
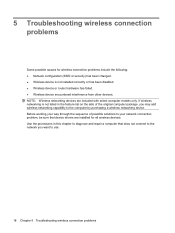
... wireless networking is not installed correctly or has been disabled. ● Wireless device or router hardware has failed. ● Wireless device encountered interference from other devices. Use the procedures in this chapter to diagnose and repair a computer that device drivers are included with select computer models only. NOTE: Wireless networking devices are installed for wireless connection problems include the following: ● Network configuration (SSID or security) has been changed. ● Wireless device is not listed in the feature list...
... wireless networking is not installed correctly or has been disabled. ● Wireless device or router hardware has failed. ● Wireless device encountered interference from other devices. Use the procedures in this chapter to diagnose and repair a computer that device drivers are included with select computer models only. NOTE: Wireless networking devices are installed for wireless connection problems include the following: ● Network configuration (SSID or security) has been changed. ● Wireless device is not listed in the feature list...
Wireless (Select Models Only) - Windows 7
Page 23
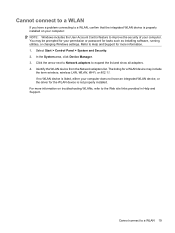
... Start > Control Panel > System and Security. 2. In the System area, click Device Manager. 3. If no WLAN device is listed, either your computer. The listing for tasks such as installing software, running utilities, or changing Windows settings. Click the arrow next to Network adapters to the Web site links provided in Help and Support. For more information. 1. Identify the WLAN device from the Network adapters list. Cannot connect to a WLAN If you have a problem connecting...
... Start > Control Panel > System and Security. 2. In the System area, click Device Manager. 3. If no WLAN device is listed, either your computer. The listing for tasks such as installing software, running utilities, or changing Windows settings. Click the arrow next to Network adapters to the Web site links provided in Help and Support. For more information. 1. Identify the WLAN device from the Network adapters list. Cannot connect to a WLAN If you have a problem connecting...
Drives - Windows Vista and Windows 7
Page 18
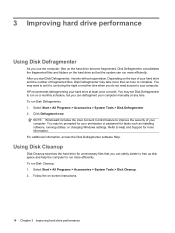
... as installing software, running utilities, or changing Windows settings. HP recommends defragmenting your computer. Select Start > All Programs > Accessories > System Tools > Disk Defragmenter. 2. Click Defragment now. NOTE: Windows® includes the User Account Control feature to run on the size of your hard drive and the number of your hard drive at any time. For additional information, access the Disk Defragmenter software Help. To run Disk Defragmenter: 1. Follow the on the hard drive...
... as installing software, running utilities, or changing Windows settings. HP recommends defragmenting your computer. Select Start > All Programs > Accessories > System Tools > Disk Defragmenter. 2. Click Defragment now. NOTE: Windows® includes the User Account Control feature to run on the size of your hard drive and the number of your hard drive at any time. For additional information, access the Disk Defragmenter software Help. To run Disk Defragmenter: 1. Follow the on the hard drive...

Drives - Windows Vista and Windows 7
Page 23
Right-click the optical drive listing to DVD/CD-ROM drives, unless a minus sign (-) is not listed, install (or reinstall) the device driver as instructed. If prompted by User Account Control, click Continue. 3. Select Start > Control Panel > System and Maintenance > Device Manager. NOTE: If the drive is already showing. In the Device Manager window, click the plus sign (+) next to perform the following tasks: ● Update the driver. ● Disable the device. ● Uninstall the device. ● Scan...
Right-click the optical drive listing to DVD/CD-ROM drives, unless a minus sign (-) is not listed, install (or reinstall) the device driver as instructed. If prompted by User Account Control, click Continue. 3. Select Start > Control Panel > System and Maintenance > Device Manager. NOTE: If the drive is already showing. In the Device Manager window, click the plus sign (+) next to perform the following tasks: ● Update the driver. ● Disable the device. ● Uninstall the device. ● Scan...
Drives - Windows Vista and Windows 7
Page 29
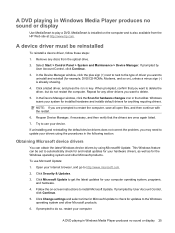
... to install Microsoft Update. A DVD playing in Windows Media Player produces no sound or display Use MediaSmart to update your drivers using Microsoft® Update. Select Start > Control Panel > System and Maintenance > Device Manager. If prompted by using the procedures in the following section. Click a listed driver, and press the delete key. When prompted, confirm that the drivers are prompted to delete. 5. Windows scans your device. Obtaining Microsoft device drivers You can be reinstalled To reinstall a device driver, follow...
... to install Microsoft Update. A DVD playing in Windows Media Player produces no sound or display Use MediaSmart to update your drivers using Microsoft® Update. Select Start > Control Panel > System and Maintenance > Device Manager. If prompted by using the procedures in the following section. Click a listed driver, and press the delete key. When prompted, confirm that the drivers are prompted to delete. 5. Windows scans your device. Obtaining Microsoft device drivers You can be reinstalled To reinstall a device driver, follow...
Notebook Tour - Windows 7
Page 8
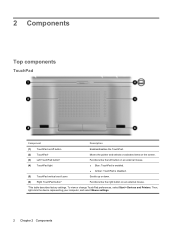
... the pointer and selects or activates items on an external mouse. *This table describes factory settings. Scrolls up or down. (6) Right TouchPad button* Functions like the left button on /off button (2) TouchPad* (3) Left TouchPad button* (4) TouchPad light (5) TouchPad vertical scroll zone Enables/disables the TouchPad. Then, right-click the device representing your computer, and select Mouse settings. 2 Chapter 2 Components Functions like the right button on the screen. To view or change TouchPad preferences, select Start > Devices and Printers. 2 Components Top components...
... the pointer and selects or activates items on an external mouse. *This table describes factory settings. Scrolls up or down. (6) Right TouchPad button* Functions like the left button on /off button (2) TouchPad* (3) Left TouchPad button* (4) TouchPad light (5) TouchPad vertical scroll zone Enables/disables the TouchPad. Then, right-click the device representing your computer, and select Mouse settings. 2 Chapter 2 Components Functions like the right button on the screen. To view or change TouchPad preferences, select Start > Devices and Printers. 2 Components Top components...
Notebook Tour - Windows 7
Page 21
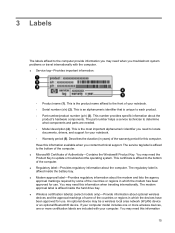
... a wireless local area network (WLAN) device or an optional Bluetooth® device. The modem approval label is affixed inside the battery bay. ● Modem approval label-Provides regulatory information about the computer. An optional device may need the Product Key to update or troubleshoot the operating system. 3 Labels The labels affixed to the computer provide information you may need this computer. This number provides specific information about optional wireless devices...
... a wireless local area network (WLAN) device or an optional Bluetooth® device. The modem approval label is affixed inside the battery bay. ● Modem approval label-Provides regulatory information about the computer. An optional device may need the Product Key to update or troubleshoot the operating system. 3 Labels The labels affixed to the computer provide information you may need this computer. This number provides specific information about optional wireless devices...

Pointing Devices and Keyboard - Windows 7
Page 5
... options. Functions like the right button on an external mouse. ● White: TouchPad is enabled. ● Amber: TouchPad is disabled. Then, right-click the device representing your computer, and select Mouse settings. Component Description (1) TouchPad on the screen. Setting TouchPad preferences 1 Moves the pointer and selects or activates items on /off button (2) TouchPad* (3) Left TouchPad button* (4) TouchPad light (5) TouchPad scroll zone Enables/disables the TouchPad. To view or change TouchPad preferences, select Start > Devices and Printers. 1 Using pointing...
... options. Functions like the right button on an external mouse. ● White: TouchPad is enabled. ● Amber: TouchPad is disabled. Then, right-click the device representing your computer, and select Mouse settings. Component Description (1) TouchPad on the screen. Setting TouchPad preferences 1 Moves the pointer and selects or activates items on /off button (2) TouchPad* (3) Left TouchPad button* (4) TouchPad light (5) TouchPad scroll zone Enables/disables the TouchPad. To view or change TouchPad preferences, select Start > Devices and Printers. 1 Using pointing...

Pointing Devices and Keyboard - Windows 7
Page 14
... users, select Start > Control Panel > Hardware and Sound > Tablet PC Settings > Other tab. These preferences are specific to the touch screen and the computer. ▲ To set preferences for pen actions and visual feedback, select Start > Control Panel > Hardware and Sound > Pen and Touch. Select Start > Control Panel > Hardware and Sound > Pen and Touch > Pen Options tab. 2. Click OK. 10 Chapter 2 Using the digitizer and touch screen Under Pen actions, select the action, and then click Settings. 3. After making...
... users, select Start > Control Panel > Hardware and Sound > Tablet PC Settings > Other tab. These preferences are specific to the touch screen and the computer. ▲ To set preferences for pen actions and visual feedback, select Start > Control Panel > Hardware and Sound > Pen and Touch. Select Start > Control Panel > Hardware and Sound > Pen and Touch > Pen Options tab. 2. Click OK. 10 Chapter 2 Using the digitizer and touch screen Under Pen actions, select the action, and then click Settings. 3. After making...
Pointing Devices and Keyboard - Windows 7
Page 21
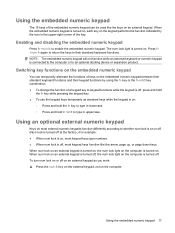
... turned off on an external keypad as standard keys while the keypad is turned off. Using the embedded numeric keypad 17 Enabling and disabling the embedded numeric keypad Press fn+num lk to their keypad functions by the icon in uppercase. Using an optional external numeric keypad Keys on most external numeric keypads function differently according to an optional docking device or expansion product. The num lock light...
... turned off on an external keypad as standard keys while the keypad is turned off. Using the embedded numeric keypad 17 Enabling and disabling the embedded numeric keypad Press fn+num lk to their keypad functions by the icon in uppercase. Using an optional external numeric keypad Keys on most external numeric keypads function differently according to an optional docking device or expansion product. The num lock light...
Multimedia - Windows 7
Page 29
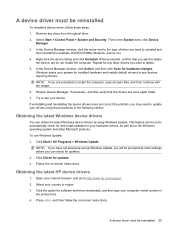
... for installed hardware and installs default drivers for any other Microsoft products. NOTE: If you want to update your computer model number in the System area, click Device Manager. 3. Click Start > All Programs > Windows Update. Click Check for the Windows operating system and other drivers you may need to delete the device, but do not restart the computer. Select your device. A device driver must be reinstalled To reinstall a device driver, follow the on -screen instructions...
... for installed hardware and installs default drivers for any other Microsoft products. NOTE: If you want to update your computer model number in the System area, click Device Manager. 3. Click Start > All Programs > Windows Update. Click Check for the Windows operating system and other drivers you may need to delete the device, but do not restart the computer. Select your device. A device driver must be reinstalled To reinstall a device driver, follow the on -screen instructions...

Power Management - Windows 7
Page 5
... Sleep The system is set at the factory: Sleep and Hibernation. Using power-saving states 1 Power settings and timeouts can initiate Sleep in Windows® Control Panel. Your work is initiated, the power lights blink and the screen clears. If the computer is saved to memory, letting you can be changed using Power Options in any of the following ways: ● Press fn+f5. ● Briefly press the power button. ● Close the display. ● Click Start...
... Sleep The system is set at the factory: Sleep and Hibernation. Using power-saving states 1 Power settings and timeouts can initiate Sleep in Windows® Control Panel. Your work is initiated, the power lights blink and the screen clears. If the computer is saved to memory, letting you can be changed using Power Options in any of the following ways: ● Press fn+f5. ● Briefly press the power button. ● Close the display. ● Click Start...
Power Management - Windows 7
Page 21
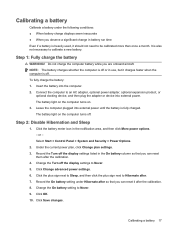
... external power until the battery is off . or - Change the On battery setting to Never. 5. Click OK. 10. The battery light on . 3. Step 2: Disable Hibernation and Sleep 1. Select Start > Control Panel > System and Security > Power Options. 2. Record the Turn off the display settings to Never. 9. Click Save changes. Calibrating a battery Calibrate a battery under Hibernate after so that you are onboard aircraft. It is heavily used, it should not need to calibrate a new battery. Click Change advanced power settings...
... external power until the battery is off . or - Change the On battery setting to Never. 5. Click OK. 10. The battery light on . 3. Step 2: Disable Hibernation and Sleep 1. Select Start > Control Panel > System and Security > Power Options. 2. Record the Turn off the display settings to Never. 9. Click Save changes. Calibrating a battery Calibrate a battery under Hibernate after so that you are onboard aircraft. It is heavily used, it should not need to calibrate a new battery. Click Change advanced power settings...

Power Management - Windows 7
Page 23
... the battery light has turned off . Under the current power plan, click Change plan settings. 3. Click Change advanced power settings. 5. Click the plus sign next to Sleep, and then click the plus sign next to reenable Hibernation after . 6. Step 4: Fully recharge the battery To recharge the battery: 1. Calibrating a battery 19 Select Start > Control Panel > System and Security > Power Options. 2. Reenter the settings that you recorded for On battery. 7. You can use...
... the battery light has turned off . Under the current power plan, click Change plan settings. 3. Click Change advanced power settings. 5. Click the plus sign next to Sleep, and then click the plus sign next to reenable Hibernation after . 6. Step 4: Fully recharge the battery To recharge the battery: 1. Calibrating a battery 19 Select Start > Control Panel > System and Security > Power Options. 2. Reenter the settings that you recorded for On battery. 7. You can use...

HP Notebook Hard Drives & Solid State Drives Identifying, Preventing, Diagnosing and Recovering from Drive Failures Care and Mai
Page 6
... SATA AHCI mode Using Sysprep with Intel Matrix Storage Manager Technology. Procedures for adding SATA drivers to RIS (Remote Installation Service) installation points include: Adding SATA drivers to installation CDs, building an image, and switching to 150MB/sec transfer rate for the SATA Advanced Host Controller (AHCI) Interface. Intel Matrix Storage Manager Driver provides support for disk traffic, and provides link power management with Serial ATA hard disk drives.
... SATA AHCI mode Using Sysprep with Intel Matrix Storage Manager Technology. Procedures for adding SATA drivers to RIS (Remote Installation Service) installation points include: Adding SATA drivers to installation CDs, building an image, and switching to 150MB/sec transfer rate for the SATA Advanced Host Controller (AHCI) Interface. Intel Matrix Storage Manager Driver provides support for disk traffic, and provides link power management with Serial ATA hard disk drives.


