HP TouchSmart User Guide - Windows 7
Page 8
...with a parked hard drive 71 Using HP ProtectSmart Hard Drive Protection software 72 Replacing a hard drive ...73 Using external drives ...77 Connecting optional external drives 77 Using an external optical drive (select models only 77 Removing an optical disc when the disc tray will not open 77 Sharing an optical drive ...79 8 Memory modules Adding or replacing memory modules 81 9 Security Protecting the computer ...85 Using passwords ...86 Setting passwords in Windows 86 Setting passwords in Setup Utility 86 Administrator password 87 Managing an administrator password 87 Entering an...
...with a parked hard drive 71 Using HP ProtectSmart Hard Drive Protection software 72 Replacing a hard drive ...73 Using external drives ...77 Connecting optional external drives 77 Using an external optical drive (select models only 77 Removing an optical disc when the disc tray will not open 77 Sharing an optical drive ...79 8 Memory modules Adding or replacing memory modules 81 9 Security Protecting the computer ...85 Using passwords ...86 Setting passwords in Windows 86 Setting passwords in Setup Utility 86 Administrator password 87 Managing an administrator password 87 Entering an...

HP TouchSmart User Guide - Windows 7
Page 17
... Supports the following digital card formats: ● Memory Stick ● Memory Stick Pro ● MultiMediaCard ● Secure Digital Memory Card ● xD-Picture Card Connect optional USB devices. ● Off: The computer is running on battery power. ● Blinking amber: The battery has reached a low battery level, a critical battery level, or there is a battery error. ● Amber: A battery is charging. ● White: The computer is on or off the computer. Component (5) Wireless light (6) Wireless button (7) Digital Media Slot (8) USB ports (2) (9) Battery light...
... Supports the following digital card formats: ● Memory Stick ● Memory Stick Pro ● MultiMediaCard ● Secure Digital Memory Card ● xD-Picture Card Connect optional USB devices. ● Off: The computer is running on battery power. ● Blinking amber: The battery has reached a low battery level, a critical battery level, or there is a battery error. ● Amber: A battery is charging. ● White: The computer is on or off the computer. Component (5) Wireless light (6) Wireless button (7) Digital Media Slot (8) USB ports (2) (9) Battery light...

HP TouchSmart User Guide - Windows 7
Page 19
... located in use. (5) Webcam Records video and captures still photographs. (6) Speakers (2) Produce sound. (7) Convertible hinge Swivels the display and converts the computer from traditional notebook mode to slate mode or from slate mode to notebook mode. Rear components Component (1) Security cable slot (2) External monitor port (3) RJ-45 (network) jack Description Attaches an optional security cable to the section of the computer. Components 9 Component Description (1) WWAN antennas (2)* (select models only) Send and receive wireless...
... located in use. (5) Webcam Records video and captures still photographs. (6) Speakers (2) Produce sound. (7) Convertible hinge Swivels the display and converts the computer from traditional notebook mode to slate mode or from slate mode to notebook mode. Rear components Component (1) Security cable slot (2) External monitor port (3) RJ-45 (network) jack Description Attaches an optional security cable to the section of the computer. Components 9 Component Description (1) WWAN antennas (2)* (select models only) Send and receive wireless...

HP TouchSmart User Guide - Windows 7
Page 31
... slot until it is off or in Hibernation, turn the computer on the computer. Unplug the power cord from the AC outlet. 5. Close the display. 3. Turn the computer upside down the computer through the operating system. 2. Shut down the computer. Creating a wireless connection 21 7. If you . 6. Replace the battery. NOTE: HP Mobile Broadband will be disabled if the battery is not replaced. 9. Removing a SIM To remove a SIM: 1. Remove...
... slot until it is off or in Hibernation, turn the computer on the computer. Unplug the power cord from the AC outlet. 5. Close the display. 3. Turn the computer upside down the computer through the operating system. 2. Shut down the computer. Creating a wireless connection 21 7. If you . 6. Replace the battery. NOTE: HP Mobile Broadband will be disabled if the battery is not replaced. 9. Removing a SIM To remove a SIM: 1. Remove...

HP TouchSmart User Guide - Windows 7
Page 35
... the USB ports on the computer. Use the left and right TouchPad buttons like the corresponding buttons on and off The TouchPad is off indicator. To access Mouse Properties, select Start > Devices and Printers. When the TouchPad zone is active, the light is turned on at the factory. Setting pointing device preferences Use Mouse Properties in the direction you can also connect an external USB mouse to TouchPad on page 3. To turn the TouchPad on and off, quickly double...
... the USB ports on the computer. Use the left and right TouchPad buttons like the corresponding buttons on and off The TouchPad is off indicator. To access Mouse Properties, select Start > Devices and Printers. When the TouchPad zone is active, the light is turned on at the factory. Setting pointing device preferences Use Mouse Properties in the direction you can also connect an external USB mouse to TouchPad on page 3. To turn the TouchPad on and off, quickly double...
HP TouchSmart User Guide - Windows 7
Page 44
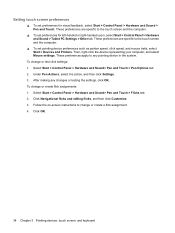
... your computer, and select Mouse settings. To change or test click settings: 1. Follow the on-screen instructions to the touch screen and the computer. ▲ To set preferences for left-handed or right-handed users, select Start > Control Panel > Hardware and Sound > Tablet PC Settings > Other tab. Select Start > Control Panel > Hardware and Sound> Pen and Touch > Pen Options tab. 2. These preferences are specific to change or create a flick assignment. 4. Click OK. 34 Chapter 3 Pointing devices, touch screen, and keyboard
... your computer, and select Mouse settings. To change or test click settings: 1. Follow the on-screen instructions to the touch screen and the computer. ▲ To set preferences for left-handed or right-handed users, select Start > Control Panel > Hardware and Sound > Tablet PC Settings > Other tab. Select Start > Control Panel > Hardware and Sound> Pen and Touch > Pen Options tab. 2. These preferences are specific to change or create a flick assignment. 4. Click OK. 34 Chapter 3 Pointing devices, touch screen, and keyboard

HP TouchSmart User Guide - Windows 7
Page 60
... and you are connecting an external hardware device that does not connect to use the Windows Shut down command. Click Start. 3. Click Shut down. Shut down the computer under any of the following emergency procedures in Hibernation, you are unable to a USB port ● When the computer will be unused and disconnected from external power and remove the battery. 50 Chapter 5 Power management To shut down...
... and you are connecting an external hardware device that does not connect to use the Windows Shut down command. Click Start. 3. Click Shut down. Shut down the computer under any of the following emergency procedures in Hibernation, you are unable to a USB port ● When the computer will be unused and disconnected from external power and remove the battery. 50 Chapter 5 Power management To shut down...

HP TouchSmart User Guide - Windows 7
Page 61
... system is set at the factory to the screen. Power settings and timeouts can be required on the keyboard. ● Activate the TouchPad. When the computer exits Sleep, the power light turns on the hard drive and the computer turns off. CAUTION: To prevent possible audio and video degradation, loss of audio or video playback functionality, or loss of inactivity when running on battery power, 1,080 minutes (18 hours) of networking connection or perform...
... system is set at the factory to the screen. Power settings and timeouts can be required on the keyboard. ● Activate the TouchPad. When the computer exits Sleep, the power light turns on the hard drive and the computer turns off. CAUTION: To prevent possible audio and video degradation, loss of audio or video playback functionality, or loss of inactivity when running on battery power, 1,080 minutes (18 hours) of networking connection or perform...

HP TouchSmart User Guide - Windows 7
Page 67
... and system responses can be changed using Power Options do not affect lights. Using battery power 57 Tips for the computer reaches a low or critical battery level, the battery meter icon in Power Options. ● Remove the battery from the computer when it is on battery power. Managing low battery levels The information in this section describes the alerts and system responses set using Power Options in the Sleep state, and then shuts...
... and system responses can be changed using Power Options do not affect lights. Using battery power 57 Tips for the computer reaches a low or critical battery level, the battery meter icon in Power Options. ● Remove the battery from the computer when it is on battery power. Managing low battery levels The information in this section describes the alerts and system responses set using Power Options in the Sleep state, and then shuts...
HP TouchSmart User Guide - Windows 7
Page 83
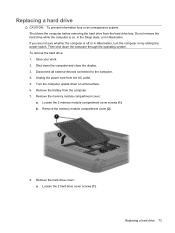
... the Sleep state, or in Hibernation, turn the computer on a flat surface. 6. Remove the memory module compartment cover: a. b. Remove the memory module compartment cover (2). 8. Remove the hard drive cover: a. Disconnect all external devices connected to the computer. 4. Loosen the 2 hard drive cover screws (1). Replacing a hard drive 73 Then shut down the computer before removing the hard drive from the hard drive bay. Save your work. 2. Remove the battery from the AC outlet. 5. To remove the hard drive: 1. Loosen the 2 memory module compartment cover screws...
... the Sleep state, or in Hibernation, turn the computer on a flat surface. 6. Remove the memory module compartment cover: a. b. Remove the memory module compartment cover (2). 8. Remove the hard drive cover: a. Disconnect all external devices connected to the computer. 4. Loosen the 2 hard drive cover screws (1). Replacing a hard drive 73 Then shut down the computer before removing the hard drive from the hard drive bay. Save your work. 2. Remove the battery from the AC outlet. 5. To remove the hard drive: 1. Loosen the 2 memory module compartment cover screws...
HP TouchSmart User Guide - Windows 7
Page 87
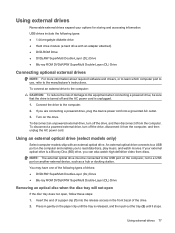
... connecting a powered drive, be connected to the USB port on the computer, not to the manufacturer's instructions. Using external drives 77 USB drives include the following types of drives: ● DVD±RW SuperMulti Double-Layer (DL) Drive ● Blu-ray ROM DVD±R/RW SuperMulti Double-Layer (DL) Drive Removing an optical disc when the disc tray will not open If the disc tray does not open, follow these steps: 1. Turn on the computer and enables...
... connecting a powered drive, be connected to the USB port on the computer, not to the manufacturer's instructions. Using external drives 77 USB drives include the following types of drives: ● DVD±RW SuperMulti Double-Layer (DL) Drive ● Blu-ray ROM DVD±R/RW SuperMulti Double-Layer (DL) Drive Removing an optical disc when the disc tray will not open If the disc tray does not open, follow these steps: 1. Turn on the computer and enables...
HP TouchSmart User Guide - Windows 7
Page 115
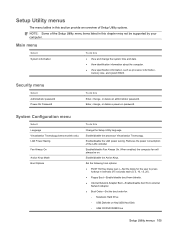
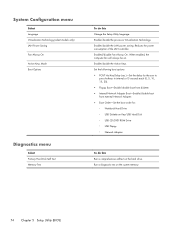
... Hot Key Delay (sec.)―Set the delay for : ◦ Notebook Hard Drive ◦ USB Diskette on Key/USB Hard Disk ◦ USB CD/DVD ROM Drive Setup Utility menus 105 Setup Utility menus The menu tables in this section provide an overview of the Setup Utility menu items listed in intervals of the LAN controller Enabled/disable Fan Always On. When enabled, the computer fan will always be supported by your computer. Main menu Select System information To do this Enter, change , or delete a power...
... Hot Key Delay (sec.)―Set the delay for : ◦ Notebook Hard Drive ◦ USB Diskette on Key/USB Hard Disk ◦ USB CD/DVD ROM Drive Setup Utility menus 105 Setup Utility menus The menu tables in this section provide an overview of the Setup Utility menu items listed in intervals of the LAN controller Enabled/disable Fan Always On. When enabled, the computer fan will always be supported by your computer. Main menu Select System information To do this Enter, change , or delete a power...
HP TouchSmart User Guide - Windows 7
Page 118
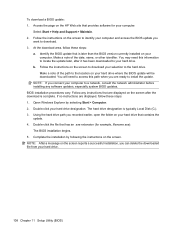
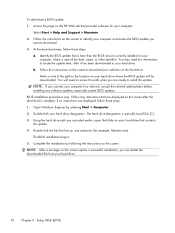
... you connect your computer. b. Make a note of the date, name, or other identifier. Follow any software updates, especially system BIOS updates. The hard drive designation is later than the BIOS version currently installed on the screen to a network, consult the network administrator before installing any instructions that is typically Local Disk (C:). 3. Follow the instructions on your computer to identify your hard drive. 108 Chapter 11 Setup Utility (BIOS) Complete the installation by selecting Start...
... you connect your computer. b. Make a note of the date, name, or other identifier. Follow any software updates, especially system BIOS updates. The hard drive designation is later than the BIOS version currently installed on the screen to a network, consult the network administrator before installing any instructions that is typically Local Disk (C:). 3. Follow the instructions on your computer to identify your hard drive. 108 Chapter 11 Setup Utility (BIOS) Complete the installation by selecting Start...
HP TouchSmart User Guide - Windows 7
Page 125
... 62 AC power, connecting 61 action key mode 105 action keys adjusting volume 36 audio CD, DVD, or BD controls 35 decrease screen brightness 35 Help and Support 35 identifying 5 increase screen brightness 35 muting speaker sound 36 switching screen image 35 using 35 volume 43 wireless 15, 36 administrator password creating 87 entering 88 managing 87 airport security devices 69 antivirus software, using 89 audio devices, connecting external 43 audio-in (microphone) jack, identifying 8 audio-out (headphone) jack, identifying 8 B backing up customized window, toolbar, and menu bar settings 97...
... 62 AC power, connecting 61 action key mode 105 action keys adjusting volume 36 audio CD, DVD, or BD controls 35 decrease screen brightness 35 Help and Support 35 identifying 5 increase screen brightness 35 muting speaker sound 36 switching screen image 35 using 35 volume 43 wireless 15, 36 administrator password creating 87 entering 88 managing 87 airport security devices 69 antivirus software, using 89 audio devices, connecting external 43 audio-in (microphone) jack, identifying 8 audio-out (headphone) jack, identifying 8 B backing up customized window, toolbar, and menu bar settings 97...
HP TouchSmart User Guide - Windows 7
Page 126
... 37 using 37 HP Mobile Broadband Module 20 HP ProtectSmart Hard Drive Protection 71 HP USB Ethernet Adapter connecting 23 hubs 66 I icons network 14 wireless 14 input power 110 integrated webcam light, identifying 9 internal microphones, identifying 9 Internet choosing an ISP 12 Internet connection setup 17 Internet Service & Offers 12 Internet Service Provider (ISP) 12 J jacks audio-in (microphone) 8 audio-out (headphone) 8 RJ-45 (network) 9 K keyboard hotkeys, identifying 37 keyboard, cleaning 113 keys action 5 esc 5 fn 5 mute 43 Windows applications 5 Windows logo 5 L labels Bluetooth 114...
... 37 using 37 HP Mobile Broadband Module 20 HP ProtectSmart Hard Drive Protection 71 HP USB Ethernet Adapter connecting 23 hubs 66 I icons network 14 wireless 14 input power 110 integrated webcam light, identifying 9 internal microphones, identifying 9 Internet choosing an ISP 12 Internet connection setup 17 Internet Service & Offers 12 Internet Service Provider (ISP) 12 J jacks audio-in (microphone) 8 audio-out (headphone) 8 RJ-45 (network) 9 K keyboard hotkeys, identifying 37 keyboard, cleaning 113 keys action 5 esc 5 fn 5 mute 43 Windows applications 5 Windows logo 5 L labels Bluetooth 114...

HP TouchSmart User Guide - Windows 7
Page 127
... button, using 31 rotating touch screen gesture 33 rotating TouchPad gesture 27 routine care 113 S screen brightness keys 35 screen image, switching 35 screen orientations, identifying 31 scrolling touch screen gesture 32 scrolling TouchPad gesture 26 security cable slot, identifying 9 security cable, installing 92 Security menu 105 security, wireless 19 serial number, computer 114 service tag 114 setup of WLAN 17 Setup Utility changing the language 102 displaying system information 103 exiting 103 menus 105 navigating 102 passwords set in 86 restoring default settings 103...
... button, using 31 rotating touch screen gesture 33 rotating TouchPad gesture 27 routine care 113 S screen brightness keys 35 screen image, switching 35 screen orientations, identifying 31 scrolling touch screen gesture 32 scrolling TouchPad gesture 26 security cable slot, identifying 9 security cable, installing 92 Security menu 105 security, wireless 19 serial number, computer 114 service tag 114 setup of WLAN 17 Setup Utility changing the language 102 displaying system information 103 exiting 103 menus 105 navigating 102 passwords set in 86 restoring default settings 103...
HP TouchSmart tm2 Notebook PC - Maintenance and Service Guide
Page 84
...; Internal Network Adapter Boot―Enable/disable boot from external Network Adapter. ● Boot Order―Set the boot order for: ◦ Notebook Hard Drive ◦ USB Diskette on Key/USB Hard Disk ◦ USB CD/DVD ROM Drive ◦ USB Floppy ◦ Network Adapter To do this Run a comprehensive self-test on the hard drive. Run a diagnostic test on . Enabled/disable Fan Always On. When enabled, the computer fan will always be on the system memory. 74 Chapter 5 Setup Utility (BIOS) Enable/disable the Action Keys. Set the following boot options: ● POST Hot Key...
...; Internal Network Adapter Boot―Enable/disable boot from external Network Adapter. ● Boot Order―Set the boot order for: ◦ Notebook Hard Drive ◦ USB Diskette on Key/USB Hard Disk ◦ USB CD/DVD ROM Drive ◦ USB Floppy ◦ Network Adapter To do this Run a comprehensive self-test on the hard drive. Run a diagnostic test on . Enabled/disable Fan Always On. When enabled, the computer fan will always be on the system memory. 74 Chapter 5 Setup Utility (BIOS) Enable/disable the Action Keys. Set the following boot options: ● POST Hot Key...
HP TouchSmart tm2 Notebook PC - Maintenance and Service Guide
Page 86
... on the screen to identify your computer and access the BIOS update you can delete the downloaded file from your hard drive designation. NOTE: If you are displayed, follow these steps: 1. Open Windows Explorer by following the instructions on the screen to download your computer: Select Start > Help and Support > Maintain. 2. Make a note of the date, name, or other identifier. b. Follow the instructions on the screen. To download a BIOS update: 1. BIOS installation procedures...
... on the screen to identify your computer and access the BIOS update you can delete the downloaded file from your hard drive designation. NOTE: If you are displayed, follow these steps: 1. Open Windows Explorer by following the instructions on the screen to download your computer: Select Start > Help and Support > Maintain. 2. Make a note of the date, name, or other identifier. b. Follow the instructions on the screen. To download a BIOS update: 1. BIOS installation procedures...
HP TouchSmart tm2 Notebook PC - Maintenance and Service Guide
Page 111
... 12 hard drive cover illustrated 20 removal 39 Hard Drive Hardware Kit, spare part number 19, 21, 25, 38 hard drive self test 74 HDMI port connector pinout 90 location 9 headphone jack connector pinout 88 location 9 headset, spare part number 22, 23 heat sink removal 66 spare part numbers 17, 26, 66 J jacks audio-in 9 audio-out 9 headphone 9 L left-side components 9 Light components 6 lights battery 11 caps lock 6 drive 9 mute 6 power 10 TouchPad off indicator 6 webcam 4 wireless 6, 10 M Main menu 73 mass storage devices, spare part numbers 21 memory module...
... 12 hard drive cover illustrated 20 removal 39 Hard Drive Hardware Kit, spare part number 19, 21, 25, 38 hard drive self test 74 HDMI port connector pinout 90 location 9 headphone jack connector pinout 88 location 9 headset, spare part number 22, 23 heat sink removal 66 spare part numbers 17, 26, 66 J jacks audio-in 9 audio-out 9 headphone 9 L left-side components 9 Light components 6 lights battery 11 caps lock 6 drive 9 mute 6 power 10 TouchPad off indicator 6 webcam 4 wireless 6, 10 M Main menu 73 mass storage devices, spare part numbers 21 memory module...
HP TouchSmart tm2 Notebook PC - Maintenance and Service Guide
Page 112
... description audio 2 chipset 1 diskette drive 2 display panel 1 docking support 3 Ethernet 2 external media cards 2 graphics 1 hard drives 2 keyboard 3 memory module 1 operating system 3 optical drives 2 pointing devices 3 ports 2 power requirements 3 processors 1 product name 1 security 3 serviceability 3 webcam 2 wireless 2 product name 1 protective sleeve, spare part number 22, 25 R rear components 8 removal/replacement preliminaries 28 procedures 33 reset board, spare part number 16, 26 right-side components 10 RJ-45 jack connector pinout 91 location 8 rotate button 10 RTC battery removal...
... description audio 2 chipset 1 diskette drive 2 display panel 1 docking support 3 Ethernet 2 external media cards 2 graphics 1 hard drives 2 keyboard 3 memory module 1 operating system 3 optical drives 2 pointing devices 3 ports 2 power requirements 3 processors 1 product name 1 security 3 serviceability 3 webcam 2 wireless 2 product name 1 protective sleeve, spare part number 22, 25 R rear components 8 removal/replacement preliminaries 28 procedures 33 reset board, spare part number 16, 26 right-side components 10 RJ-45 jack connector pinout 91 location 8 rotate button 10 RTC battery removal...


