Watching and Recording TV
Page 4
...the guide 24 Recording quality and hard disk drive storage space 25 Watching TV programs stored on the HP Media Drive 26 About recording TV to the HP Media Drive 27 Recording TV programs to the HP Media Drive 27 Changing the TV recording path to the HP Media Drive 28 Changing the TV recording ...path to the local hard disk drive 28 Add TV recording folder for Windows Media Center to find 29 Changing disk space for recording TV programs 29 Updating recorded TV list after removing the HP Media Drive 29 System requirements ...
...the guide 24 Recording quality and hard disk drive storage space 25 Watching TV programs stored on the HP Media Drive 26 About recording TV to the HP Media Drive 27 Recording TV programs to the HP Media Drive 27 Changing the TV recording path to the HP Media Drive 28 Changing the TV recording ...path to the local hard disk drive 28 Add TV recording folder for Windows Media Center to find 29 Changing disk space for recording TV programs 29 Updating recorded TV list after removing the HP Media Drive 29 System requirements ...
Watching and Recording TV
Page 30
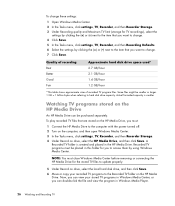
... Windows Media Center before removing or connecting the HP Media Drive for the stored TV files to update properly. 5 Under Record on the HP Media Drive. Watching TV programs stored on drive, select the HP Media Drive, and then click Save. A Recorded TV folder is smaller. Quality of recording Best Better Good Fair Approximate hard disk drive space used* 2.7 GB...
... Windows Media Center before removing or connecting the HP Media Drive for the stored TV files to update properly. 5 Under Record on the HP Media Drive. Watching TV programs stored on drive, select the HP Media Drive, and then click Save. A Recorded TV folder is smaller. Quality of recording Best Better Good Fair Approximate hard disk drive space used* 2.7 GB...
Watching and Recording TV
Page 31
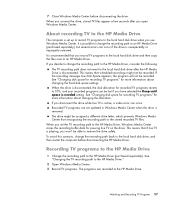
... might be able to the local hard disk drive when you have selected the Keep until space is playing, you set up to record TV programs to remove the drive safely. About recording TV to the HP Media Drive The computer is unexpectedly or improperly removed. When you won't be assigned a different drive letter, which prevents Windows Media...
... might be able to the local hard disk drive when you have selected the Keep until space is playing, you set up to record TV programs to remove the drive safely. About recording TV to the HP Media Drive The computer is unexpectedly or improperly removed. When you won't be assigned a different drive letter, which prevents Windows Media...
Warranty and Support Guide
Page 5
...SERVICE MAY HAVE THE DATA ERASED FROM THE HARD DRIVE AND THE PROGRAMS RESTORED TO THEIR ORIGINAL STATE. THIS LIMITATION OF LIABILITY, HOWEVER, WILL NOT APPLY TO CLAIMS FOR PERSONAL INJURY. BEFORE RETURNING ANY UNIT FOR SERVICE, BE SURE TO BACK UP DATA AND REMOVE ANY CONFIDENTIAL, PROPRIETARY, OR PERSONAL INFORMATION....CONDITIONS OF NORMAL USE. No change to any product from loss or damage in writing. 5 EXCEPT AS INDICATED ABOVE, IN NO EVENT WILL HP BE LIABLE FOR ANY DAMAGES CAUSED BY THE PRODUCT OR THE FAILURE OF THE PRODUCT TO PERFORM, INCLUDING ANY LOST PROFITS OR SAVINGS OR SPECIAL...
...SERVICE MAY HAVE THE DATA ERASED FROM THE HARD DRIVE AND THE PROGRAMS RESTORED TO THEIR ORIGINAL STATE. THIS LIMITATION OF LIABILITY, HOWEVER, WILL NOT APPLY TO CLAIMS FOR PERSONAL INJURY. BEFORE RETURNING ANY UNIT FOR SERVICE, BE SURE TO BACK UP DATA AND REMOVE ANY CONFIDENTIAL, PROPRIETARY, OR PERSONAL INFORMATION....CONDITIONS OF NORMAL USE. No change to any product from loss or damage in writing. 5 EXCEPT AS INDICATED ABOVE, IN NO EVENT WILL HP BE LIABLE FOR ANY DAMAGES CAUSED BY THE PRODUCT OR THE FAILURE OF THE PRODUCT TO PERFORM, INCLUDING ANY LOST PROFITS OR SAVINGS OR SPECIAL...

Warranty and Support Guide
Page 14
...remove, and then click Uninstall. 6 Click Yes if you want to create a restore point. 6 Click Create. 7 Follow the onscreen instructions. You must reinstall any software that contains a copy of the original factory-shipped software. System Recovery - System recovery completely erases and reformats the hard disk drive...Recovery Image - Or check that came with your program is a file that was not installed on page 15. A list of the hard disk drive that came with your computer, you installed after purchase. Check whether your computer, and then click Next. 3 Click Next at the ...
...remove, and then click Uninstall. 6 Click Yes if you want to create a restore point. 6 Click Create. 7 Follow the onscreen instructions. You must reinstall any software that contains a copy of the original factory-shipped software. System Recovery - System recovery completely erases and reformats the hard disk drive...Recovery Image - Or check that came with your program is a file that was not installed on page 15. A list of the hard disk drive that came with your computer, you installed after purchase. Check whether your computer, and then click Next. 3 Click Next at the ...

Warranty and Support Guide
Page 15
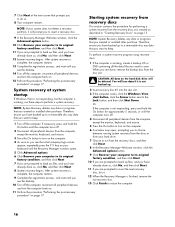
... you created or installed after purchase. It is correct. NOTE: Do not delete the recovery image until you have backed up to a removable disc any data that you can quit the process at the factory. DVD recovery discs take less time to make it left off the ...DVD+R DVD+R DualLayer CD-R Number of Required Blank Discs 1-3 discs 1-2 discs 7-16 discs Contact HP Support The process takes some time to reinstall the software from the recovery image on your hard disk drive: • Starting system recovery from the Windows Vista Start menu • System recovery from system startup...
... you created or installed after purchase. It is correct. NOTE: Do not delete the recovery image until you have backed up to a removable disc any data that you can quit the process at the factory. DVD recovery discs take less time to make it left off the ...DVD+R DVD+R DualLayer CD-R Number of Required Blank Discs 1-3 discs 1-2 discs 7-16 discs Contact HP Support The process takes some time to reinstall the software from the recovery image on your hard disk drive: • Starting system recovery from the Windows Vista Start menu • System recovery from system startup...
Warranty and Support Guide
Page 16
... devices, and turn on the computer. 6 A window may open, prompting you to choose between running system recovery from the discs or from your hard drive. 7 Choose to run from the recovery discs you created as you see the initial company logo screen appear, repeatedly press the F11 key on your...system recovery is not backed up files, and you have backed up to a removable disc any data that you want to turn the computer back on. 15 Perform the procedure "Performing the post-recovery procedure" on the hard disk drive will prompt you to insert a recovery disc. 9 In the Recovery Manager ...
... devices, and turn on the computer. 6 A window may open, prompting you to choose between running system recovery from the discs or from your hard drive. 7 Choose to run from the recovery discs you created as you see the initial company logo screen appear, repeatedly press the F11 key on your...system recovery is not backed up files, and you have backed up to a removable disc any data that you want to turn the computer back on. 15 Perform the procedure "Performing the post-recovery procedure" on the hard disk drive will prompt you to insert a recovery disc. 9 In the Recovery Manager ...

Upgrade and Service Guide
Page 3
Table of Contents Safety Information ...1 Before You Begin ...1 Locating Components of the HP TouchSmart PC 2 Opening the HP TouchSmart PC...3 Adding Memory...7 Before you begin...7 Removing a memory module...8 Installing a memory module ...10 Removing and Installing the Hard Disk Drive 12 Removing the hard disk drive 12 Installing a hard disk drive ...18 Closing the HP TouchSmart PC...23 Table of Contents iii
Table of Contents Safety Information ...1 Before You Begin ...1 Locating Components of the HP TouchSmart PC 2 Opening the HP TouchSmart PC...3 Adding Memory...7 Before you begin...7 Removing a memory module...8 Installing a memory module ...10 Removing and Installing the Hard Disk Drive 12 Removing the hard disk drive 12 Installing a hard disk drive ...18 Closing the HP TouchSmart PC...23 Table of Contents iii

Upgrade and Service Guide
Page 7
... injury and equipment damage, always complete the following steps in order, when opening the HP TouchSmart PC: 1 Remove any media (CD, DVD, memory cards, USB devices, and external hard disk drives) from the HP TouchSmart PC. 2 Disconnect any external devices that you are connected to cool before touching them... components to the computer. A A Upgrading and Servicing Guide 3 CAUTION: Static electricity can damage the electronic components of the HP TouchSmart PC. WARNING: To reduce the risk of personal injury from electrical shock or hot surfaces, disconnect the power cord from the back...
... injury and equipment damage, always complete the following steps in order, when opening the HP TouchSmart PC: 1 Remove any media (CD, DVD, memory cards, USB devices, and external hard disk drives) from the HP TouchSmart PC. 2 Disconnect any external devices that you are connected to cool before touching them... components to the computer. A A Upgrading and Servicing Guide 3 CAUTION: Static electricity can damage the electronic components of the HP TouchSmart PC. WARNING: To reduce the risk of personal injury from electrical shock or hot surfaces, disconnect the power cord from the back...
Upgrade and Service Guide
Page 10
A 11 Pull up the memory cover slightly on page 12. 6 Upgrading and Servicing Guide To upgrade your hard disk drive, see "Removing and Installing the Hard Disk Drive" on the bottom edge to the back of the computer. B C WARNING: Beware of sharp edges inside the chassis. 10 Remove the screw (A) that secures the memory cover to release it (B), then, gently slide the cover down toward the bottom of the computer (C), and then remove it.
A 11 Pull up the memory cover slightly on page 12. 6 Upgrading and Servicing Guide To upgrade your hard disk drive, see "Removing and Installing the Hard Disk Drive" on the bottom edge to the back of the computer. B C WARNING: Beware of sharp edges inside the chassis. 10 Remove the screw (A) that secures the memory cover to release it (B), then, gently slide the cover down toward the bottom of the computer (C), and then remove it.
Upgrade and Service Guide
Page 16
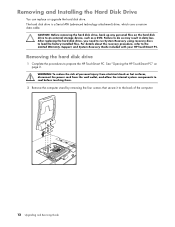
...screws that secure it to the Limited Warranty, Support, and System Recovery Guide included with your HP TouchSmart PC. Removing and Installing the Hard Disk Drive You can replace or upgrade the hard disk drive. For details about the recovery procedure, refer to the back of the computer. 12 Upgrading... and Servicing Guide See "Opening the HP TouchSmart PC" on the hard disk drive to do so may result in data loss. CAUTION: Before removing the hard disk drive, back up any personal files on page 3. Failure to an external storage device, ...
...screws that secure it to the Limited Warranty, Support, and System Recovery Guide included with your HP TouchSmart PC. Removing and Installing the Hard Disk Drive You can replace or upgrade the hard disk drive. For details about the recovery procedure, refer to the back of the computer. 12 Upgrading... and Servicing Guide See "Opening the HP TouchSmart PC" on the hard disk drive to do so may result in data loss. CAUTION: Before removing the hard disk drive, back up any personal files on page 3. Failure to an external storage device, ...
Upgrade and Service Guide
Page 19
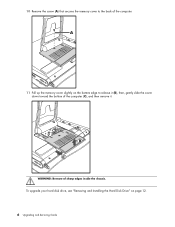
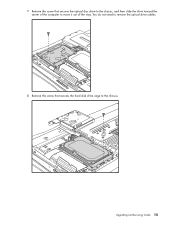
You do not need to remove the optical drive cables. 8 Remove the screw that secures the optical disc drive to the chassis, and then slide the drive toward the center of the computer to the chassis. Upgrading and Servicing Guide 15 7 Remove the screw that secures the hard disk drive cage to move it out of the way.
You do not need to remove the optical drive cables. 8 Remove the screw that secures the optical disc drive to the chassis, and then slide the drive toward the center of the computer to the chassis. Upgrading and Servicing Guide 15 7 Remove the screw that secures the hard disk drive cage to move it out of the way.
Upgrade and Service Guide
Page 20
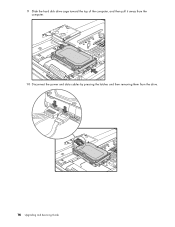
9 Slide the hard disk drive cage toward the top of the computer, and then pull it away from the computer. 10 Disconnect the power and data cables by pressing the latches and then removing them from the drive. 16 Upgrading and Servicing Guide
9 Slide the hard disk drive cage toward the top of the computer, and then pull it away from the computer. 10 Disconnect the power and data cables by pressing the latches and then removing them from the drive. 16 Upgrading and Servicing Guide
Upgrade and Service Guide
Page 21
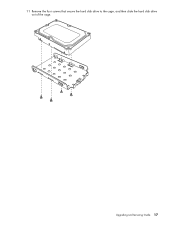
Upgrading and Servicing Guide 17 11 Remove the four screws that secure the hard disk drive to the cage, and then slide the hard disk drive out of the cage.
Upgrading and Servicing Guide 17 11 Remove the four screws that secure the hard disk drive to the cage, and then slide the hard disk drive out of the cage.
Upgrade and Service Guide
Page 22
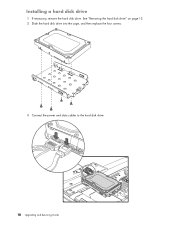
See "Removing the hard disk drive" on page 12. 2 Slide the hard disk drive into the cage, and then replace the four screws. 3 Connect the power and data cables to the hard disk drive. 18 Upgrading and Servicing Guide Installing a hard disk drive 1 If necessary, remove the hard disk drive.
See "Removing the hard disk drive" on page 12. 2 Slide the hard disk drive into the cage, and then replace the four screws. 3 Connect the power and data cables to the hard disk drive. 18 Upgrading and Servicing Guide Installing a hard disk drive 1 If necessary, remove the hard disk drive.
Getting Started Guide
Page 11
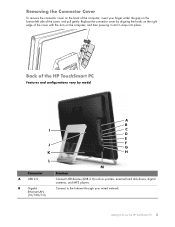
... Cover To remove the connector cover on the back of the computer, insert your wired network. Replace the connector cover by model A B I C D E J F G K H L M Connector Function A USB 2.0 Connect USB devices (USB 2.0) such as printers, external hard disk drives, digital cameras, and MP3... players. Getting to the Internet through your finger under the gap on the bottom-left side of the cover with the slots on the right edge of the cover, and pull gently. B Gigabit Ethernet LAN (10/100/1G) Connect to Know the HP TouchSmart...
... Cover To remove the connector cover on the back of the computer, insert your wired network. Replace the connector cover by model A B I C D E J F G K H L M Connector Function A USB 2.0 Connect USB devices (USB 2.0) such as printers, external hard disk drives, digital cameras, and MP3... players. Getting to the Internet through your finger under the gap on the bottom-left side of the cover with the slots on the right edge of the cover, and pull gently. B Gigabit Ethernet LAN (10/100/1G) Connect to Know the HP TouchSmart...

Getting Started Guide
Page 13
...navigate windows, record TV shows, and perform other activities in Windows Media Center. blue indicates power on your HP TouchSmart PC: LED What it does A Event Indicates an event reminder notification has been set from a software application... software applications only. D Hard disk drive Indicates hard disk drive activity. H Optical Disc Drive Activity Indicates Optical Disc Drive is working with your memory card. F Remote control IR receiver Indicates that a card is flashing, do not remove your remote control to Know the HP TouchSmart PC 7 Activity LED indicator...
...navigate windows, record TV shows, and perform other activities in Windows Media Center. blue indicates power on your HP TouchSmart PC: LED What it does A Event Indicates an event reminder notification has been set from a software application... software applications only. D Hard disk drive Indicates hard disk drive activity. H Optical Disc Drive Activity Indicates Optical Disc Drive is working with your memory card. F Remote control IR receiver Indicates that a card is flashing, do not remove your remote control to Know the HP TouchSmart PC 7 Activity LED indicator...
Getting Started Guide
Page 23
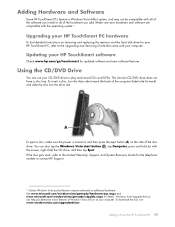
Make sure your hardware and software are compatible with the operating system.* Upgrading your HP TouchSmart PC hardware To find detailed instructions on removing and replacing the memory and the hard disk drive for the telephone number to the Upgrading and Servicing Guide that came with your computer. You can help you add. Using the CD...
Make sure your hardware and software are compatible with the operating system.* Upgrading your HP TouchSmart PC hardware To find detailed instructions on removing and replacing the memory and the hard disk drive for the telephone number to the Upgrading and Servicing Guide that came with your computer. You can help you add. Using the CD...
Getting Started Guide
Page 42
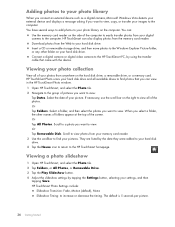
...and then tapping Save. HP TouchSmart can view in the HP TouchSmart Photo window. 1 Open HP TouchSmart, and select the Photo tile. 2 Navigate to the group of your photo library on the hard disk drive, a removable drive, or a memory card. Viewing a photo slideshow 1 Open HP TouchSmart, and select the Photo... tile. 2 Tap Folders, or All Photos, or Removable Drive. 3 Tap the Play Slideshow button. 4 Adjust the ...
...and then tapping Save. HP TouchSmart can view in the HP TouchSmart Photo window. 1 Open HP TouchSmart, and select the Photo tile. 2 Navigate to the group of your photo library on the hard disk drive, a removable drive, or a memory card. Viewing a photo slideshow 1 Open HP TouchSmart, and select the Photo... tile. 2 Tap Folders, or All Photos, or Removable Drive. 3 Tap the Play Slideshow button. 4 Adjust the ...


