Wall-Mounting your HP TouchSmart User Guide
Page 5
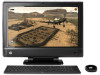
...protect the computer when you need 1 WARNING! This adapter assembly attaches to the electrical power system. WARNING! WARNING! Wall-Mounting your HP TouchSmart What you place it face down. ● Another person (it might require two people to lift and move the computer) &#.... Take proper precautions when lifting or moving your HP TouchSmart PC for wall-mounting This document provides instructions for reinstalling the stand on the HP TouchSmart PC. 1 Preparing your computer. The VESA adapter plate is attached to desktop unit, instructions are also included for computer wall...
...protect the computer when you need 1 WARNING! This adapter assembly attaches to the electrical power system. WARNING! WARNING! Wall-Mounting your HP TouchSmart What you place it face down. ● Another person (it might require two people to lift and move the computer) &#.... Take proper precautions when lifting or moving your HP TouchSmart PC for wall-mounting This document provides instructions for reinstalling the stand on the HP TouchSmart PC. 1 Preparing your computer. The VESA adapter plate is attached to desktop unit, instructions are also included for computer wall...
Wall-Mounting your HP TouchSmart User Guide
Page 10
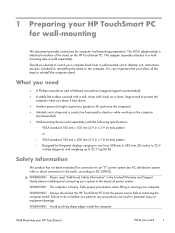
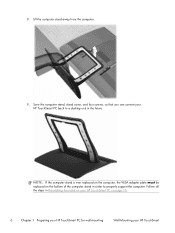
Lift the computer stand away from the computer. 9. NOTE: If the computer stand is ever replaced on the computer, the VESA adapter plate must be replaced on page 10. 6 Chapter 1 Preparing your HP TouchSmart PC for wall-mounting Wall-Mounting your HP TouchSmart PC back to a desktop unit in order to properly support the computer. Save the computer stand, stand cover, and four screws, so that you can convert your HP TouchSmart Follow all the steps in Reinstalling the stand on your HP TouchSmart PC on the bottom of the computer stand in the future. 8.
Lift the computer stand away from the computer. 9. NOTE: If the computer stand is ever replaced on the computer, the VESA adapter plate must be replaced on page 10. 6 Chapter 1 Preparing your HP TouchSmart PC for wall-mounting Wall-Mounting your HP TouchSmart PC back to a desktop unit in order to properly support the computer. Save the computer stand, stand cover, and four screws, so that you can convert your HP TouchSmart Follow all the steps in Reinstalling the stand on your HP TouchSmart PC on the bottom of the computer stand in the future. 8.

Wall-Mounting your HP TouchSmart User Guide
Page 14
... the power source before removing the computer stand. WARNING! The computer is heavy. Always disconnect the HP TouchSmart PC from a wall-mounted unit back to a desktop unit. Failure to do so before installing and connecting your HP TouchSmart The VESA adapter plate must be replaced on the bottom of the computer stand, in personal injury...
... the power source before removing the computer stand. WARNING! The computer is heavy. Always disconnect the HP TouchSmart PC from a wall-mounted unit back to a desktop unit. Failure to do so before installing and connecting your HP TouchSmart The VESA adapter plate must be replaced on the bottom of the computer stand, in personal injury...

Troubleshooting & Maintenance Guide
Page 15
... off the computer. Otherwise, select Recover without backing up your files first (recommended), and then click Next. Disconnect all data and programs you see the desktop. 10. If prompted, click Yes to allow the program to restart the computer. Turn off . 2. ENWW System Recovery options 11 If using discs, insert the...
... off the computer. Otherwise, select Recover without backing up your files first (recommended), and then click Next. Disconnect all data and programs you see the desktop. 10. If prompted, click Yes to allow the program to restart the computer. Turn off . 2. ENWW System Recovery options 11 If using discs, insert the...

Troubleshooting & Maintenance Guide
Page 16
... the other, but not both). Store the recovery media in a safe place. Back up your computer at the factory. To create recovery media, see the desktop. 9. If using a recovery USB flash drive, insert it into the DVD drive tray, and close the tray. If you are running System Recovery from media...
... the other, but not both). Store the recovery media in a safe place. Back up your computer at the factory. To create recovery media, see the desktop. 9. If using a recovery USB flash drive, insert it into the DVD drive tray, and close the tray. If you are running System Recovery from media...

Getting Started Guide
Page 8
... your Magic Canvas with other software applications, and creating website shortcut tiles. To launch the software, tap the HP TouchSmart icon on the desktop, or tap the Start button and then tap HP TouchSmart. ● The Magic Canvas ◦ Access a submenu, by tapping on the Magic Canvas, to maximize ...ports, a media card reader, Wireless 802.11n networking, full support for wall mounting (not the actual wall mount) is included in select HP TouchSmart PC models and can be scrolled on the Magic Canvas and leave it in the carousel. ◦ Applications can be mounted on a wall...
... your Magic Canvas with other software applications, and creating website shortcut tiles. To launch the software, tap the HP TouchSmart icon on the desktop, or tap the Start button and then tap HP TouchSmart. ● The Magic Canvas ◦ Access a submenu, by tapping on the Magic Canvas, to maximize ...ports, a media card reader, Wireless 802.11n networking, full support for wall mounting (not the actual wall mount) is included in select HP TouchSmart PC models and can be scrolled on the Magic Canvas and leave it in the carousel. ◦ Applications can be mounted on a wall...
Getting Started Guide
Page 16
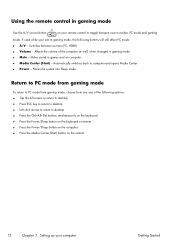
... used while your are in gaming mode, the following options: ● Tap the full screen to return to desktop ● Press ESC key to return to desktop ● Left click mouse to return to desktop ● Press the Ctrl+Alt+Del buttons simultaneously on the keyboard ● Press the Power/Sleep button on...
... used while your are in gaming mode, the following options: ● Tap the full screen to return to desktop ● Press ESC key to return to desktop ● Left click mouse to return to desktop ● Press the Ctrl+Alt+Del buttons simultaneously on the keyboard ● Press the Power/Sleep button on...
Getting Started Guide
Page 17
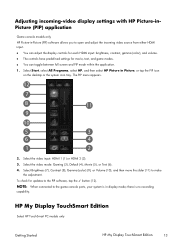
...connected to the game console ports, your system is no recording capability. Adjusting incoming-video display settings with HP Picture-inPicture (PIP) application Game console models only HP Picture-in-Picture (PIP) software allows you to open and adjust the incoming video source from either HDMI ...the ✓ button (12). HP My Display TouchSmart Edition Select HP TouchSmart PC models only Getting Started HP My Display TouchSmart Edition 13 Select Start, select All Programs, select HP, and then select HP Picture in Picture, or tap the PIP icon on the desktop or the system icon tray. ...
...connected to the game console ports, your system is no recording capability. Adjusting incoming-video display settings with HP Picture-inPicture (PIP) application Game console models only HP Picture-in-Picture (PIP) software allows you to open and adjust the incoming video source from either HDMI ...the ✓ button (12). HP My Display TouchSmart Edition Select HP TouchSmart PC models only Getting Started HP My Display TouchSmart Edition 13 Select Start, select All Programs, select HP, and then select HP Picture in Picture, or tap the PIP icon on the desktop or the system icon tray. ...
Getting Started Guide
Page 18
...14 Chapter 3 Setting up your work habits for HP My Display TouchSmart Edition is plug the Beats Audio headphones into the Audio Out connector on the desktop, or from the Start Menu, tap All Programs, tap HP, and then tap HP My Display TouchSmart Edition. Refer to do is available by right-...clicking on the back panel. HP My Display TouchSmart Edition can be accessed from the task tray,...
...14 Chapter 3 Setting up your work habits for HP My Display TouchSmart Edition is plug the Beats Audio headphones into the Audio Out connector on the desktop, or from the Start Menu, tap All Programs, tap HP, and then tap HP My Display TouchSmart Edition. Refer to do is available by right-...clicking on the back panel. HP My Display TouchSmart Edition can be accessed from the task tray,...

Getting Started Guide
Page 35
... the computer and run Recovery Manager from the computer except the keyboard and mouse. 3. Complete the registration process, and wait until you will see the desktop. 10. Back up your files, and you are prompted to continue. 5. Under I need help immediately, tap System Recovery. When the computer restarts, you see the...
... the computer and run Recovery Manager from the computer except the keyboard and mouse. 3. Complete the registration process, and wait until you will see the desktop. 10. Back up your files, and you are prompted to continue. 5. Under I need help immediately, tap System Recovery. When the computer restarts, you see the...
Getting Started Guide
Page 36
... Recovery is working, follow these steps to back up your files, and you see Recovery media on the computer. 4. To create recovery media, see the desktop. 9. message appears on your keyboard until you have not done so, tap Back up your files first (recommended), and then tap Next.
... Recovery is working, follow these steps to back up your files, and you see Recovery media on the computer. 4. To create recovery media, see the desktop. 9. message appears on your keyboard until you have not done so, tap Back up your files first (recommended), and then tap Next.
Getting Started (For 3D Models Only)
Page 8
... shortcut tiles. Some of your favorite websites into the carousel. 4 Chapter 2 Features Getting Started To launch the software, tap the HP TouchSmart icon on the desktop, or tap the Start button and then tap HP TouchSmart. ● The Magic Canvas ◦ Access a submenu, by tapping the Quick Launch button. ◦ Size application views to full...
... shortcut tiles. Some of your favorite websites into the carousel. 4 Chapter 2 Features Getting Started To launch the software, tap the HP TouchSmart icon on the desktop, or tap the Start button and then tap HP TouchSmart. ● The Magic Canvas ◦ Access a submenu, by tapping the Quick Launch button. ◦ Size application views to full...

Getting Started (For 3D Models Only)
Page 16
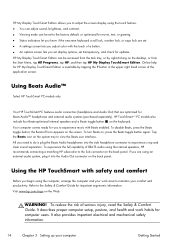
... Using Beats Audio™ Select HP TouchSmart PC models only Your HP TouchSmart PC features audio connectors (headphone and Audio Out ) that are using an external audio system, plug it into the side headphone connector. If you are optimized for HP My Display TouchSmart Edition is available by right-clicking on the desktop, or from the Start...
... Using Beats Audio™ Select HP TouchSmart PC models only Your HP TouchSmart PC features audio connectors (headphone and Audio Out ) that are using an external audio system, plug it into the side headphone connector. If you are optimized for HP My Display TouchSmart Edition is available by right-clicking on the desktop, or from the Start...

Getting Started (For 3D Models Only)
Page 25
... 3D Cinema Technology operate may cause flickering or interfere with the operation of the keyboard. 2. ● Double-click the 3D demo icon on the computer desktop and select a 3D clip from the menu. ● Insert a Blu-ray 3D movie (purchased separately) into place. To eject the disc, press the optical drive...
... 3D Cinema Technology operate may cause flickering or interfere with the operation of the keyboard. 2. ● Double-click the 3D demo icon on the computer desktop and select a 3D clip from the menu. ● Insert a Blu-ray 3D movie (purchased separately) into place. To eject the disc, press the optical drive...

Getting Started (For 3D Models Only)
Page 47
... the recovery disc, or the recovery USB flash drive. System Recovery begins. Turn off the computer, reconnect all data and programs you will see the desktop. 10. When the computer restarts, you created or installed. Under I need help immediately, tap System Recovery. After System Recovery is responding, use these steps to...
... the recovery disc, or the recovery USB flash drive. System Recovery begins. Turn off the computer, reconnect all data and programs you will see the desktop. 10. When the computer restarts, you created or installed. Under I need help immediately, tap System Recovery. After System Recovery is responding, use these steps to...

Getting Started (For 3D Models Only)
Page 48
... the computer back on. If you are prompted to back up your files first (recommended), and then tap Next. To create recovery media, see the desktop. 9. Disconnect all peripheral devices from recovery media CAUTION: System Recovery deletes all peripheral devices, and turn on your files, and then tap Next. 7. Turn off...
... the computer back on. If you are prompted to back up your files first (recommended), and then tap Next. To create recovery media, see the desktop. 9. Disconnect all peripheral devices from recovery media CAUTION: System Recovery deletes all peripheral devices, and turn on your files, and then tap Next. 7. Turn off...

