Wall-Mounting your HP TouchSmart User Guide
Page 5
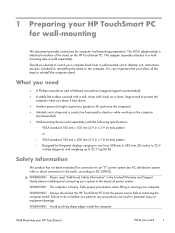
... the earth, according to bottom of the stand on the computer. Failure to desktop unit, instructions are also included for flat-panel displays ranging in size from the power source before removing the computer stand. Wall-Mounting your HP TouchSmart What you need ● A Phillips screwdriver and a flathead screwdriver (magnetic-tipped recommended) ●...
... the earth, according to bottom of the stand on the computer. Failure to desktop unit, instructions are also included for flat-panel displays ranging in size from the power source before removing the computer stand. Wall-Mounting your HP TouchSmart What you need ● A Phillips screwdriver and a flathead screwdriver (magnetic-tipped recommended) ●...
Wall-Mounting your HP TouchSmart User Guide
Page 10
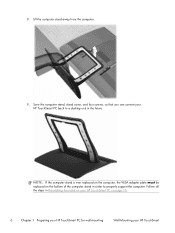
Lift the computer stand away from the computer. 9. NOTE: If the computer stand is ever replaced on the computer, the VESA adapter plate must be replaced on the bottom of the computer stand in Reinstalling the stand on your HP TouchSmart PC on page 10. 6 Chapter 1 Preparing your HP TouchSmart PC for wall-mounting Wall-Mounting your HP TouchSmart PC back to properly support the computer. Follow all the steps in order to a desktop unit in the future. 8. Save the computer stand, stand cover, and four screws, so that you can convert your HP TouchSmart
Lift the computer stand away from the computer. 9. NOTE: If the computer stand is ever replaced on the computer, the VESA adapter plate must be replaced on the bottom of the computer stand in Reinstalling the stand on your HP TouchSmart PC on page 10. 6 Chapter 1 Preparing your HP TouchSmart PC for wall-mounting Wall-Mounting your HP TouchSmart PC back to properly support the computer. Follow all the steps in order to a desktop unit in the future. 8. Save the computer stand, stand cover, and four screws, so that you can convert your HP TouchSmart

Wall-Mounting your HP TouchSmart User Guide
Page 14
... you need to install the computer stand back on your HP TouchSmart PC Wall-Mounting your HP TouchSmart PC. WARNING! Always disconnect the HP TouchSmart PC from a wall-mounted unit back to a desktop unit. 2 Reinstalling the stand on your HP TouchSmart PC You may decide to convert your system to the ...; Antistatic wrist strap and conductive foam pad to stand on while working on the bottom of the computer stand, in order to your HP TouchSmart The computer is heavy. WARNING! You will need ● A Phillips screwdriver and flathead screwdriver (magnetic-tipped recommended) ● A ...
... you need to install the computer stand back on your HP TouchSmart PC Wall-Mounting your HP TouchSmart PC. WARNING! Always disconnect the HP TouchSmart PC from a wall-mounted unit back to a desktop unit. 2 Reinstalling the stand on your HP TouchSmart PC You may decide to convert your system to the ...; Antistatic wrist strap and conductive foam pad to stand on while working on the bottom of the computer stand, in order to your HP TouchSmart The computer is heavy. WARNING! You will need ● A Phillips screwdriver and flathead screwdriver (magnetic-tipped recommended) ● A ...

Troubleshooting & Maintenance Guide
Page 15
... backing up your files, and then click Next. 8. As soon as you have not done so, select Back up your files, and you see the desktop. 10. Under I need help immediately, select System Recovery. ENWW System Recovery options 11 When the computer restarts, you created or installed. If you are prompted...
... backing up your files, and then click Next. 8. As soon as you have not done so, select Back up your files, and you see the desktop. 10. Under I need help immediately, select System Recovery. ENWW System Recovery options 11 When the computer restarts, you created or installed. If you are prompted...

Troubleshooting & Maintenance Guide
Page 16
... all data and programs you have not done so, select Back up your computer at the factory. Turn off . 4. To create recovery media, see the desktop. 9. If the computer is not responding, press and hold the Power button for your files, and you created or installed. If the computer works, click...
... all data and programs you have not done so, select Back up your computer at the factory. Turn off . 4. To create recovery media, see the desktop. 9. If the computer is not responding, press and hold the Power button for your files, and you created or installed. If the computer works, click...

Getting Started Guide
Page 8
...software applications, and creating website shortcut tiles. Some of the screen. To launch the software, tap the HP TouchSmart icon on the desktop, or tap the Start button and then tap HP TouchSmart. ● The Magic Canvas ◦ Access a submenu, by tapping on the Magic Canvas, to your...ports, a media card reader, Wireless 802.11n networking, full support for wall mounting (not the actual wall mount) is included in the HP TouchSmart 4.0 application are highlighted in the carousel. ◦ View all applications and website shortcuts by tapping the Quick Launch button. ◦ Size...
...software applications, and creating website shortcut tiles. Some of the screen. To launch the software, tap the HP TouchSmart icon on the desktop, or tap the Start button and then tap HP TouchSmart. ● The Magic Canvas ◦ Access a submenu, by tapping on the Magic Canvas, to your...ports, a media card reader, Wireless 802.11n networking, full support for wall mounting (not the actual wall mount) is included in the HP TouchSmart 4.0 application are highlighted in the carousel. ◦ View all applications and website shortcuts by tapping the Quick Launch button. ◦ Size...
Getting Started Guide
Page 16
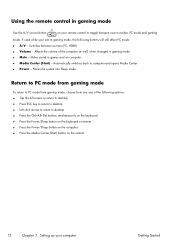
... between source modes: PC mode and gaming mode. Using the remote control in gaming mode Use the A/V source button on your remote control to desktop ● Press the Ctrl+Alt+Del buttons simultaneously on the keyboard ● Press the Power/Sleep button on the keyboard or remote ● ... of the computer as well, when changed in gaming mode, the following options: ● Tap the full screen to return to desktop ● Press ESC key to return to desktop ● Left click mouse to return to toggle between sources (PC, HDMI) ● Volume - Places the system into Sleep mode...
... between source modes: PC mode and gaming mode. Using the remote control in gaming mode Use the A/V source button on your remote control to desktop ● Press the Ctrl+Alt+Del buttons simultaneously on the keyboard ● Press the Power/Sleep button on the keyboard or remote ● ... of the computer as well, when changed in gaming mode, the following options: ● Tap the full screen to return to desktop ● Press ESC key to return to desktop ● Left click mouse to return to toggle between sources (PC, HDMI) ● Volume - Places the system into Sleep mode...
Getting Started Guide
Page 17
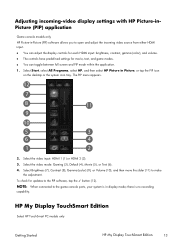
... tap the PIP icon on the desktop or the system icon tray. Select Brightness (7), Contrast (8), Gamma (color) (9), or Volume (10), and then move the slider (11) to the PIP software, tap the ✓ button (12). HP My Display TouchSmart Edition Select HP TouchSmart PC models only Getting Started HP My Display TouchSmart Edition 13 Select the video...
... tap the PIP icon on the desktop or the system icon tray. Select Brightness (7), Contrast (8), Gamma (color) (9), or Volume (10), and then move the slider (11) to the PIP software, tap the ✓ button (12). HP My Display TouchSmart Edition Select HP TouchSmart PC models only Getting Started HP My Display TouchSmart Edition 13 Select the video...
Getting Started Guide
Page 18
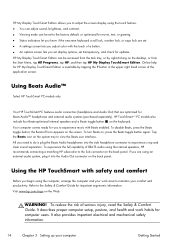
...computer setup, posture, and health and work area to maintain your computer Getting Started WARNING! Using the HP TouchSmart with Beats enabled. Using Beats Audio™ Select HP TouchSmart PC models only Your HP TouchSmart PC features audio connectors (headphone and Audio Out) that are set. ● A settings screen lets... know if the onscreen keyboard scroll lock, number lock, or caps lock are optimized for important ergonomic information: Visit www.hp.com/ergo on the desktop, or from the Start Menu, tap All Programs, tap HP, and then tap HP My Display TouchSmart Edition.
...computer setup, posture, and health and work area to maintain your computer Getting Started WARNING! Using the HP TouchSmart with Beats enabled. Using Beats Audio™ Select HP TouchSmart PC models only Your HP TouchSmart PC features audio connectors (headphone and Audio Out) that are set. ● A settings screen lets... know if the onscreen keyboard scroll lock, number lock, or caps lock are optimized for important ergonomic information: Visit www.hp.com/ergo on the desktop, or from the Start Menu, tap All Programs, tap HP, and then tap HP My Display TouchSmart Edition.

Getting Started Guide
Page 35
... tap Recovery Manager. Your computer restarts. If using discs, insert the next system-recovery disc when prompted. 7. When the computer restarts, you will see the desktop. 10. Under I need help immediately, tap System Recovery. 6. Complete the registration process, and wait until you have not done so, tap Back up your files...
... tap Recovery Manager. Your computer restarts. If using discs, insert the next system-recovery disc when prompted. 7. When the computer restarts, you will see the desktop. 10. Under I need help immediately, tap System Recovery. 6. Complete the registration process, and wait until you have not done so, tap Back up your files...
Getting Started Guide
Page 36
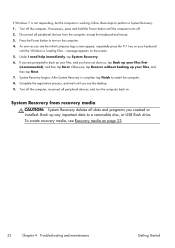
.... 1. If Windows 7 is not responding, but the computer is working, follow these steps to turn the computer back on. To create recovery media, see the desktop. 9. As soon as you see Recovery media on page 33. 32 Chapter 4 Troubleshooting and maintenance Getting Started After System Recovery is complete, tap Finish to...
.... 1. If Windows 7 is not responding, but the computer is working, follow these steps to turn the computer back on. To create recovery media, see the desktop. 9. As soon as you see Recovery media on page 33. 32 Chapter 4 Troubleshooting and maintenance Getting Started After System Recovery is complete, tap Finish to...
Getting Started (For 3D Models Only)
Page 8
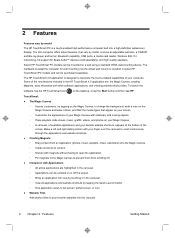
.... ◦ Place playlists, slide shows, music, graffiti, videos, and photos on a wall using a standard VESA wall-mounting device. The HP TouchSmart 4.0 application is included in the carousel. ◦ Applications can be scrolled on or off . ● Interaction with other software applications, and...your favorite websites into the carousel. 4 Chapter 2 Features Getting Started To launch the software, tap the HP TouchSmart icon on the desktop, or tap the Start button and then tap HP TouchSmart. ● The Magic Canvas ◦ Access a submenu, by tapping on the Magic Canvas, to...
.... ◦ Place playlists, slide shows, music, graffiti, videos, and photos on a wall using a standard VESA wall-mounting device. The HP TouchSmart 4.0 application is included in the carousel. ◦ Applications can be scrolled on or off . ● Interaction with other software applications, and...your favorite websites into the carousel. 4 Chapter 2 Features Getting Started To launch the software, tap the HP TouchSmart icon on the desktop, or tap the Start button and then tap HP TouchSmart. ● The Magic Canvas ◦ Access a submenu, by tapping on the Magic Canvas, to...

Getting Started (For 3D Models Only)
Page 16
...-screen keyboard scroll lock, number lock, or caps lock are set transparency, and check for HP My Display TouchSmart Edition is available by right-clicking on the desktop, or from the task tray, or by tapping the ? Using the HP TouchSmart with safety and comfort Before you set display options, set . ● A settings screen lets...
...-screen keyboard scroll lock, number lock, or caps lock are set transparency, and check for HP My Display TouchSmart Edition is available by right-clicking on the desktop, or from the task tray, or by tapping the ? Using the HP TouchSmart with safety and comfort Before you set display options, set . ● A settings screen lets...

Getting Started (For 3D Models Only)
Page 25
... keyboard. 2. NOTE: Differences in your 3D glasses. If you suspect a physical problem seeing stereoscopic 3D. ● Double-click the 3D demo icon on the computer desktop and select a 3D clip from the menu. ● Insert a Blu-ray 3D movie (purchased separately) into place. NOTE: Insert the disc into the optical drive...
... keyboard. 2. NOTE: Differences in your 3D glasses. If you suspect a physical problem seeing stereoscopic 3D. ● Double-click the 3D demo icon on the computer desktop and select a 3D clip from the menu. ● Insert a Blu-ray 3D movie (purchased separately) into place. NOTE: Insert the disc into the optical drive...

Getting Started (For 3D Models Only)
Page 47
..., tap Back up any important data to continue. 5. System Recovery at system startup CAUTION: System Recovery deletes all data and programs you will see the desktop. 10. When the computer restarts, you created or installed. System Recovery begins. Back up your files, and then tap Next. 8. Turn off the computer, reconnect...
..., tap Back up any important data to continue. 5. System Recovery at system startup CAUTION: System Recovery deletes all data and programs you will see the desktop. 10. When the computer restarts, you created or installed. System Recovery begins. Back up your files, and then tap Next. 8. Turn off the computer, reconnect...

Getting Started (For 3D Models Only)
Page 48
... then tap Next. 7. Otherwise, tap Recover without backing up any important data to a removable disc, or USB flash drive. To create recovery media, see the desktop. 9. System Recovery from the computer, except the keyboard and mouse. 3. If Windows 7 is not responding, but the computer is complete, tap Finish to restart the...
... then tap Next. 7. Otherwise, tap Recover without backing up any important data to a removable disc, or USB flash drive. To create recovery media, see the desktop. 9. System Recovery from the computer, except the keyboard and mouse. 3. If Windows 7 is not responding, but the computer is complete, tap Finish to restart the...


