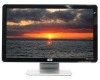
1859m,2009m,2009v, 2009f, 2159m,2159v,2309m,2309v, 2509m, 2709m LCD Monitor User Guide
Page 5
...Features HP LCD Monitors ...1-1 Features ...1-1 2 Safety and Maintenance Guidelines Important Safety Information ...2-1 Safety Precautions ...2-1 Maintenance Guidelines...2-2 Cleaning the Monitor ...2-2 3 Setting Up the Monitor Unpacking the Monitor...3-1 Installing the Monitor ...3-1 Preparing the monitor for desktop use 3-1 Preparing the monitor for... Keyboard Parking...3-10 4 Operating the Monitor CD Software and Utilities ...4-1 Installing Drivers...4-1 Downloading updated drivers from the Internet 4-1 Using the Auto-Adjustment Function 4-2 Front-Panel Controls ...4-3 Using the On-screen ...
1859m,2009m,2009v, 2009f, 2159m,2159v,2309m,2309v, 2509m, 2709m LCD Monitor User Guide
Page 14
These holes are exposed. User's Guide The four threaded holes that are on the back of the monitor. Attach a swing arm or other mounting fixture to the back of the panel are compliant with the mounting fixture to attach the swing arm or other mounting fixture. 3-4 Features may vary by model. Follow the instructions included with the VESA standard for mounting flat-panel monitors. 7. Setting Up the Monitor Four threaded holes are for screws to ensure that the monitor is safely attached. Threaded holes for attaching wall mount 6.
1859m,2009m,2009v, 2009f, 2159m,2159v,2309m,2309v, 2509m, 2709m LCD Monitor User Guide
Page 21
.... 3. Downloading updated drivers from the Internet To download the latest version of an installation error. Ensure that you need to : http://www.hp.com/support 2. The CD menu appears. 2. NOTE: You might need to update the drivers, you can install on the CD for your... in the Display Control Panel settings. Select Download Drivers and Software. 4. Ensure that your monitor are displayed. 5. 4 Operating the Monitor CD Software and Utilities The CD that is included with this monitor contains the drivers and software that you can install the monitor-driver INF and ICM ...
1859m,2009m,2009v, 2009f, 2159m,2159v,2309m,2309v, 2509m, 2709m LCD Monitor User Guide
Page 22
... non-use the auto-adjustment feature: 1. Image retention is using the Auto/Select button on the monitor and the auto-adjustment pattern software on all LCD screens. To use ). Press the Auto/Select button on the monitor front panel. ❏ You can correct the following image-quality conditions: ■ Fuzzy or unclear focus ■...
1859m,2009m,2009v, 2009f, 2159m,2159v,2309m,2309v, 2509m, 2709m LCD Monitor User Guide
Page 23
...Display (OSD) An On-screen display is not already on, press the Power button to scroll in reverse. If the monitor is an image superimposed on the monitor's front panel to scroll up at the bottom of the selections. Press the Menu button to standby or sleep mode. User's Guide ... Power Menu Source - + Auto OK Description Turns the monitor on and to exit the OSD. Navigates forward through the OSD menu and decreases adjustment levels. Opens, selects, or exits the OSD menu. Operating the Monitor Front-Panel Controls Control buttons are saved and the menu closes. NOTE: When a menu...
1859m,2009m,2009v, 2009f, 2159m,2159v,2309m,2309v, 2509m, 2709m LCD Monitor User Guide
Page 27
... - Indicates the screen display is active. The OSD can be enabled or disabled by pressing and holding the Menu button on the front panel for 10 seconds to see if the computer or input signal source is not properly connected to an HDMI input source may take effect. ... "Adjusting Screen Quality" in place of input can be switched using the Switch Video Input option in sleep mode. ■ Check Video Cable - Indicates the monitor does not support the video card's input signal because its resolution or refresh rate are : ■ VGA connector (analog) ■ DVI-D connector (digital) ...
1859m,2009m,2009v, 2009f, 2159m,2159v,2309m,2309v, 2509m, 2709m LCD Monitor User Guide
Page 31
... output connector on the back of Range" appears on . Restart your system from: www.hp.com/support. Make sure the Power button is on the monitor front panel. Click Sound, and in Appendix B). Connect the power cord. Make sure that you can... download the latest graphics driver for more information. Make sure the latest supported driver is black or displaying at a lower resolution while displaying high-definition (HD)...
1859m,2009m,2009v, 2009f, 2159m,2159v,2309m,2309v, 2509m, 2709m LCD Monitor User Guide
Page 32
... you need a computer and graphic card that none of the monitor to work, you are installed. Monitor is good by using . Check that the HP monitor drivers are using headphones at the resolution that may vary by model. User's Guide Check with the front panel volume button. ■ Ensure speaker volume is properly connected to...
1859m,2009m,2009v, 2009f, 2159m,2159v,2309m,2309v, 2509m, 2709m LCD Monitor User Guide
Page 45
... Substances and Elements Part Name Lead Mercury (Pb) (Hg) Cadmium (Cd) Hexavalent Chromium (Cr(VI)) Polybrominated biphenyls (PBB) Polybrominated diphenyl ethers (PBDE) Liquid Crystal Display X X O O O O Panel Chassis/Other X O O O O O O: Indicates that this toxic or hazardous substance contained in at least one of the homogeneous materials for this part is below the limit...
1859m,2009m,2009v, 2009f, 2159m,2159v,2309m,2309v, 2509m, 2709m LCD Monitor User Guide
Page 47
... and video cables and adaptors 3-6 B base assembling 3-2 C cable management 3-9 cleaning 2-2 connecting audio cable 3-7 HDMI 3-6 power cable 3-8 USB hub cable 3-7 VGA DVI-D 3-5 F features 1-1 front panel 4-3 H High-Bandwidth Digital Content Protection (HDCP) 3-7 I installing 3-1 - 3-10 K keyboard parking 3-10 M maintenance cleaning 2-2 guidelines 2-2 monitor conditions Auto Adjustment in Progress 4-7 Check Video Cable 4-7 Input Signal Out of Range...
HP 2210i/2310i/2510i LCD Monitors - User Guide
Page 5
...of contents 1 Product Features ...1 HP LCD Monitors ...1 2 Safety and Maintenance Guidelines ...3 Important Safety Information ...3 Safety Precautions ...4 Maintenance Guidelines ...5 Cleaning the Monitor ...5 Shipping the Monitor ...5 3 Setting Up the Monitor ...7 Unpacking the Monitor ...7 Installing the Monitor ...7 Connecting Monitor Cables ...11 High-Bandwidth Digital ... Swivel ...15 Keyboard Parking ...16 4 Operating the Monitor ...17 CD Software and Utilities ...17 Installing Drivers ...17 Using the Auto Adjustment Function 18 Front-Panel Controls ...19 Using the On-Screen Display (OSD ...
HP 2210i/2310i/2510i LCD Monitors - User Guide
Page 17
... must have a DVI-compliant graphic card. Connecting Monitor Cables 11 7. Figure 3-7 Threaded holes for mounting flat-panel monitors. 9. Four threaded holes are for screws to attach the swing arm or other mounting fixture to the back of the monitor and the other mounting fixture. Follow the instructions ... connect your computer. Be sure the computer and monitor are compliant with the VESA standard for attaching wall mount 8. The four threaded holes that the monitor is safely attached. Connectors are located on the back of the panel are turned off and unplugged. 1. Attach a ...
HP 2210i/2310i/2510i LCD Monitors - User Guide
Page 23
... The CD menu appears. 2. Follow the on the download pages. 6. Refer to : http://www.hp.com/support. 2. NOTE: You might need to update the drivers, you can install the monitor driver INF and ICM files from the CD, or download them from the Internet. The software download pages... for instructions (in the Display Control Panel settings. Refer to install the digitally signed monitor drivers (INF or ICM files) manually from the CD, in your country/region. 3. Select Download Drivers and Software. 4....
HP 2210i/2310i/2510i LCD Monitors - User Guide
Page 24
...setup test pattern 7. To avoid burn-in image damage on your monitor screen, you should always activate a screen saver application or turn off the monitor when it is not in image damage may occur on the monitor front panel. ● You can easily optimize the screen performance for 20 ... the Menu button, and then select Image Control, followed by using a DVI or HDMI input. Allow the monitor to produce a stable, centered image. 18 Chapter 4 Operating the Monitor Press the Auto/OK button on all LCD screens. Select Open Auto Adjustment Software. 6. The setup test pattern displays.
HP 2210i/2310i/2510i LCD Monitors - User Guide
Page 25
Enters the selected option Front-Panel Controls 19 Navigates forward through the OSD menu and decreases adjustment levels. Icon 1 Power Description Turns the monitor on or puts it in standby or sleep mode. Auto-adjusts the display to the ideal setting when the OSD is located on ...the top or front of the monitor: No. The Power button is not active / Enters the selected option. Front-Panel Controls Control buttons are located on the right front of the monitor depending on the model. 2 Menu 3 Opens, selects, or exits the OSD menu...
HP 2210i/2310i/2510i LCD Monitors - User Guide
Page 26
...screen picture, commonly used in reverse. to return to slightly blueish white. Sets your screen colors to adapt to the color standards used by monitors, televisions, VCRs, and DVD players to scroll up at the bottom of the selections. This Save and Return option is 6500 K or Custom... Color, depending on the monitor's side panel to display information such as volume, channel, and time. 1. Color 9300 K 6500 K sRGB Selects the screen color. Changes to the previous ...
HP 2210i/2310i/2510i LCD Monitors - User Guide
Page 31
... resolution or refresh rate are : ● VGA connector (analog) ● DVI-D connector (digital) (select models) ● HDMI connector (select models) The monitor automatically determines which inputs have valid video signals, and displays the image. Restart your video card settings to take several seconds. Indicates the screen display... to On or Off. You can be switched using the Source Control option in sleep mode. ● Power Button Lockout- Identifying Monitor Conditions Special messages appear on the front panel for the new settings to a lower resolution or refresh rate.
HP 2210i/2310i/2510i LCD Monitors - User Guide
Page 34
...utility. Refer to access the OSD menu. Turn on the monitor front panel. Picture is blank. We recommend plugging the monitor directly into the graphic card output connector on , and the ...cable properly. Image is black or displaying at a lower resolution while displaying high-definition (HD) content. Input Signal Out of Range appears on . Make sure the graphics card supports... switch box. Adjust the contrast and brightness controls. Check if your system from: www.hp.com/ support. computer. For other systems, refer to the optimal resolution. A Troubleshooting ...
HP 2210i/2310i/2510i LCD Monitors - User Guide
Page 35
...muted or too low: Click the Windows start button™, Control Panel, and Hardware and Sound. Under Main Volume, move the slider up the volume with your monitor. Check the monitor's video cable, and make sure that none of at : http://www.hp.com/support Move electrical devices that the speakers work , you ...country/region, and then follow the links to the computer. To do so, click the Windows Start Button, and then click Control Panel. Check that the monitor video cable is operational: Press the Caps Lock key and observe the Caps Lock LED found on or off after hitting the Caps Lock...