User Guide
Page 2
...copying, downloading, or otherwise using any further information or to be available on this tablet, you do not accept these license terms, your local point of purchase. Google is a trademark of the HP End User License Agreement (EULA). Windows is subject to change without notice. The ...services. For any software product preinstalled on your place of sale (the seller). HP shall not be construed as constituting an additional warranty. If you agree to request a full refund of the tablet, please contact your sole remedy is a trademark owned by its proprietor and ...
...copying, downloading, or otherwise using any further information or to be available on this tablet, you do not accept these license terms, your local point of purchase. Google is a trademark of the HP End User License Agreement (EULA). Windows is subject to change without notice. The ...services. For any software product preinstalled on your place of sale (the seller). HP shall not be construed as constituting an additional warranty. If you agree to request a full refund of the tablet, please contact your sole remedy is a trademark owned by its proprietor and ...

User Guide
Page 4
SYSTEM ...11 7 Securing your tablet ...12 8 Backing up and recovering your data ...13 Updating apps, widgets, and the operating system 13 Back up and reset ...13 Factory data reset ...13 9 More HP resources ...14 Index ...15 iv
SYSTEM ...11 7 Securing your tablet ...12 8 Backing up and recovering your data ...13 Updating apps, widgets, and the operating system 13 Back up and reset ...13 Factory data reset ...13 9 More HP resources ...14 Index ...15 iv
User Guide
Page 5
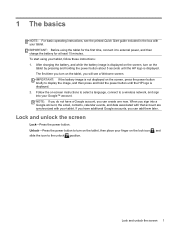
...Google account, you will see the printed Quick Start guide included in the box with your finger on the tablet by pressing and holding the power button about 5 seconds until the HP logo is displayed on the screen, turn on the lock icon and slide the icon to a wireless network,... and sign into a Google account, the email, contacts, calendar events, and data associated with that account are synchronized with your tablet, follow these instructions: 1. ...
...Google account, you will see the printed Quick Start guide included in the box with your finger on the tablet by pressing and holding the power button about 5 seconds until the HP logo is displayed on the screen, turn on the lock icon and slide the icon to a wireless network,... and sign into a Google account, the email, contacts, calendar events, and data associated with that account are synchronized with your tablet, follow these instructions: 1. ...

User Guide
Page 7
.... ● To open a widget, touch the icon. Under ACCOUNTS, touch Add account. 3. You can view the updated content without opening the widget. To access your tablet. Touch Google, and then follow the on -screen keyboard 3 Widgets are shortcuts placed on the Home screen and used to open applications installed on your...
.... ● To open a widget, touch the icon. Under ACCOUNTS, touch Add account. 3. You can view the updated content without opening the widget. To access your tablet. Touch Google, and then follow the on -screen keyboard 3 Widgets are shortcuts placed on the Home screen and used to open applications installed on your...

User Guide
Page 11
... Forget. Turn on . 3. To find available Bluetooth devices, touch SEARCH FOR DEVICES. 6. Connect to a wireless network Browse the Web, read your tablet. Type the security key if required, and then touch Connect. To connect to the Internet. Connect to which you can connect the... tablet to a wireless network: 1. Under WIRELESS & NETWORKS, turn off Bluetooth when not in use. Connect to Bluetooth (select models only) Pair a Bluetooth device, ...
... Forget. Turn on . 3. To find available Bluetooth devices, touch SEARCH FOR DEVICES. 6. Connect to a wireless network Browse the Web, read your tablet. Type the security key if required, and then touch Connect. To connect to the Internet. Connect to which you can connect the... tablet to a wireless network: 1. Under WIRELESS & NETWORKS, turn off Bluetooth when not in use. Connect to Bluetooth (select models only) Pair a Bluetooth device, ...
User Guide
Page 13
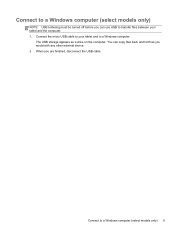
The USB storage appears as you would with any other external device. 2. When you are finished, disconnect the USB cable. You can use USB to transfer files between your tablet and to a Windows computer. Connect the micro USB cable to your tablet and the computer. 1. Connect to a Windows computer (select models only) 9 Connect to a Windows computer (select models only) NOTE: USB tethering must be turned off before you can copy files back and forth as a drive on the computer.
The USB storage appears as you would with any other external device. 2. When you are finished, disconnect the USB cable. You can use USB to transfer files between your tablet and to a Windows computer. Connect the micro USB cable to your tablet and the computer. 1. Connect to a Windows computer (select models only) 9 Connect to a Windows computer (select models only) NOTE: USB tethering must be turned off before you can copy files back and forth as a drive on the computer.
User Guide
Page 14
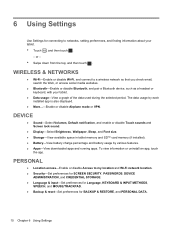
... an app, touch the app. PERSONAL ● Location access-Enable or disable Access to networks, setting preferences, and finding information about your tablet. ● Data usage-View a graph of the data used during the selected period. DEVICE ● Sound-Select Volumes, Default notification, ...Touch sounds and Screen lock sound. ● Display-Select Brightness, Wallpaper, Sleep, and Font size. ● Storage-View available space in tablet memory and SD™ card memory (if installed). ● Battery-View battery charge percentage and battery usage by each installed app is also ...
... an app, touch the app. PERSONAL ● Location access-Enable or disable Access to networks, setting preferences, and finding information about your tablet. ● Data usage-View a graph of the data used during the selected period. DEVICE ● Sound-Select Volumes, Default notification, ...Touch sounds and Screen lock sound. ● Display-Select Brightness, Wallpaper, Sleep, and Font size. ● Storage-View available space in tablet memory and SD™ card memory (if installed). ● Battery-View battery charge percentage and battery usage by each installed app is also ...

User Guide
Page 15
... ● Add an email account or another type of account-Under ACCOUNTS, touch + Add account, and then follow the on your tablet. ● About tablet-Display the software version and legal information for time zone, time format, and date format. ● Accessibility-Enable or disable TalkBack, Large..., touch the name of the account. SYSTEM ● Date & time-Enable or disable Automatic date & time, and select preferences for your tablet. ACCOUNTS 11 CAUTION: Enabling this setting may cause errors on -screen instructions. ● Sync an account-Under ACCOUNTS, touch the name of the...
... ● Add an email account or another type of account-Under ACCOUNTS, touch + Add account, and then follow the on your tablet. ● About tablet-Display the software version and legal information for time zone, time format, and date format. ● Accessibility-Enable or disable TalkBack, Large..., touch the name of the account. SYSTEM ● Date & time-Enable or disable Automatic date & time, and select preferences for your tablet. ACCOUNTS 11 CAUTION: Enabling this setting may cause errors on -screen instructions. ● Sync an account-Under ACCOUNTS, touch the name of the...
User Guide
Page 16
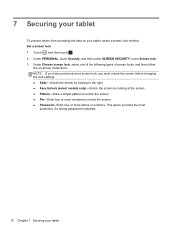
...lock. 3. Touch , and then touch . 2. Under Choose screen lock, select one of the following types of screen locks, and then follow the on your tablet, select a screen lock method. This option provides the most protection, if a strong password is selected. 12 Chapter 7 Securing your... tablet 7 Securing your tablet To prevent others from accessing the data on -screen instructions. Set a screen lock 1. NOTE: If you have previously set a screen lock, you must unlock ...
...lock. 3. Touch , and then touch . 2. Under Choose screen lock, select one of the following types of screen locks, and then follow the on your tablet, select a screen lock method. This option provides the most protection, if a strong password is selected. 12 Chapter 7 Securing your... tablet 7 Securing your tablet To prevent others from accessing the data on -screen instructions. Set a screen lock 1. NOTE: If you have previously set a screen lock, you must unlock ...
User Guide
Page 17
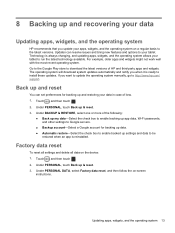
... up app data, Wi-Fi passwords, and other settings to Google servers. ● Backup account-Select a Google account for backing up and restoring your tablet. Under PERSONAL DATA, select Factory data reset, and then follow the on the device: 1. Factory data reset To reset all settings and delete all data... run the latest technology available. Back up and reset You can resolve issues and bring new features and options to your data in case of HP and third-party apps and widgets. Go to the Google Play store to download the latest versions of loss. 1. 8 Backing up and recovering your...
... up app data, Wi-Fi passwords, and other settings to Google servers. ● Backup account-Select a Google account for backing up and restoring your tablet. Under PERSONAL DATA, select Factory data reset, and then follow the on the device: 1. Factory data reset To reset all settings and delete all data... run the latest technology available. Back up and reset You can resolve issues and bring new features and options to your data in case of HP and third-party apps and widgets. Go to the Google Play store to download the latest versions of loss. 1. 8 Backing up and recovering your...
User Guide
Page 18
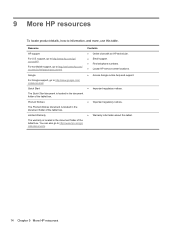
... Product Notices The Product Notices document is located in the document folder of the tablet box. Contents ● Online chat with an HP technician. ● Email support. ● Find telephone numbers. ● Locate HP service center locations. ● Access Google online help and support. ● ... Limited Warranty The warranty is located in the document folder of the tablet box. 9 More HP resources To locate product details, how-to information, and more, use this tablet. 14 Chapter 9 More HP resources Quick Start The Quick Start document is located in the document folder...
... Product Notices The Product Notices document is located in the document folder of the tablet box. Contents ● Online chat with an HP technician. ● Email support. ● Find telephone numbers. ● Locate HP service center locations. ● Access Google online help and support. ● ... Limited Warranty The warranty is located in the document folder of the tablet box. 9 More HP resources To locate product details, how-to information, and more, use this tablet. 14 Chapter 9 More HP resources Quick Start The Quick Start document is located in the document folder...
HP Slate8 Pro Maintenance and Service Guide
Page 2
... your local point of its proprietor and used by the terms of purchase. Nothing herein should be available on this tablet, you do not accept these license terms, your place of the HP End User License Agreement (EULA). Software terms By installing, copying, downloading, or otherwise using any further information or to...
... your local point of its proprietor and used by the terms of purchase. Nothing herein should be available on this tablet, you do not accept these license terms, your place of the HP End User License Agreement (EULA). Software terms By installing, copying, downloading, or otherwise using any further information or to...
HP Slate8 Pro Maintenance and Service Guide
Page 5
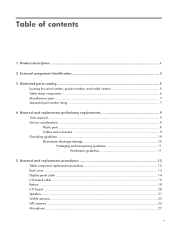
... 2 External component identification 3 3 Illustrated parts catalog ...5 Locating the serial number, product number, and model number 5 Tablet major components ...6 Miscellaneous parts ...7 Sequential part number listing ...7 4 Removal and replacement preliminary requirements 9 Tools required ...9 Service...guidelines ...10 Electrostatic discharge damage 10 Packaging and transporting guidelines 11 Workstation guidelines 11 5 Removal and replacement procedures 13 Tablet component replacement procedures 13 Back cover ...13 Display panel cable ...14 I/O board cable ...16 Battery ...18 I/O ...
... 2 External component identification 3 3 Illustrated parts catalog ...5 Locating the serial number, product number, and model number 5 Tablet major components ...6 Miscellaneous parts ...7 Sequential part number listing ...7 4 Removal and replacement preliminary requirements 9 Tools required ...9 Service...guidelines ...10 Electrostatic discharge damage 10 Packaging and transporting guidelines 11 Workstation guidelines 11 5 Removal and replacement procedures 13 Tablet component replacement procedures 13 Back cover ...13 Display panel cable ...14 I/O board cable ...16 Battery ...18 I/O ...

HP Slate8 Pro Maintenance and Service Guide
Page 11
You may need this information when you travel internationally or when you contact support. 3 Illustrated parts catalog Locating the serial number, product number, and model number The serial number and product number of your tablet are located on the bottom edge of the tablet. Locating the serial number, product number, and model number 5
You may need this information when you travel internationally or when you contact support. 3 Illustrated parts catalog Locating the serial number, product number, and model number The serial number and product number of your tablet are located on the bottom edge of the tablet. Locating the serial number, product number, and model number 5
HP Slate8 Pro Maintenance and Service Guide
Page 12
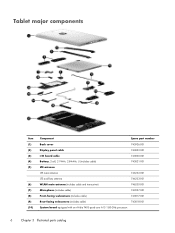
Tablet major components Item (1) (2) (3) (4) (5) (6) (7) (8) (9) (10) Component Spare part number Back cover 743926-001 Display panel cable 743832-001 I/O board cable 743830-001 Battery, 2-cell, 21-WHr, 2....
Tablet major components Item (1) (2) (3) (4) (5) (6) (7) (8) (9) (10) Component Spare part number Back cover 743926-001 Display panel cable 743832-001 I/O board cable 743830-001 Battery, 2-cell, 21-WHr, 2....

HP Slate8 Pro Maintenance and Service Guide
Page 15
...driver ● Plastic case utility tool Service considerations The following sections include some of the considerations that you remove each subassembly from the tablet, place the subassembly (and all cases, avoid bending, twisting, or tearing cables. Use care when handling the plastic parts. Cables... only at the points designated in their proper locations during disassembly and assembly procedures. Cables and connectors CAUTION: When servicing the tablet, be caught or snagged by the connector whenever possible. Be sure that cables are routed in mind during the reassembly process....
...driver ● Plastic case utility tool Service considerations The following sections include some of the considerations that you remove each subassembly from the tablet, place the subassembly (and all cases, avoid bending, twisting, or tearing cables. Use care when handling the plastic parts. Cables... only at the points designated in their proper locations during disassembly and assembly procedures. Cables and connectors CAUTION: When servicing the tablet, be caught or snagged by the connector whenever possible. Be sure that cables are routed in mind during the reassembly process....
HP Slate8 Pro Maintenance and Service Guide
Page 16
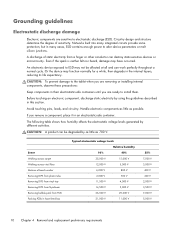
... occurred. Networks built into many integrated circuits provide some protection, but in the internal layers, reducing its life expectancy. CAUTION: To prevent damage to the tablet when you are removing or installing internal components, observe these precautions: Keep components in their electrostatic-safe containers until you remove a component, place it in...
... occurred. Networks built into many integrated circuits provide some protection, but in the internal layers, reducing its life expectancy. CAUTION: To prevent damage to the tablet when you are removing or installing internal components, observe these precautions: Keep components in their electrostatic-safe containers until you remove a component, place it in...

HP Slate8 Pro Maintenance and Service Guide
Page 19
... If you are as many as 14 screws that must be accessed by unplugging the power cord from the tablet. Turn off or in Hibernation, turn the tablet on, and then shut it down through the operating system. 2. Make special note of each screw size ...745814-001 Before disassembling the tablet, follow these parts can damage the tablet and void the warranty. Disconnect all external devices from the tablet. 3. There are unsure whether the tablet is off the tablet. 5 Removal and replacement procedures Tablet component replacement procedures CAUTION: Tablet components described in this ...
... If you are as many as 14 screws that must be accessed by unplugging the power cord from the tablet. Turn off or in Hibernation, turn the tablet on, and then shut it down through the operating system. 2. Make special note of each screw size ...745814-001 Before disassembling the tablet, follow these parts can damage the tablet and void the warranty. Disconnect all external devices from the tablet. 3. There are unsure whether the tablet is off the tablet. 5 Removal and replacement procedures Tablet component replacement procedures CAUTION: Tablet components described in this ...

HP Slate8 Pro Maintenance and Service Guide
Page 20
... a flat surface, display panel side up, with the SIM slot and SD Card slot toward you are unsure whether the tablet is off the tablet. Turn off or in damage to follow these steps: 1. The first insertion point should be in Step 2, make sure not to install the back... cover. Failure to the tablet. 3. Remove the back cover (5). Display panel cable Description Display panel cable Spare part number 743832-001 Before removing the display panel cable, follow this...
... a flat surface, display panel side up, with the SIM slot and SD Card slot toward you are unsure whether the tablet is off the tablet. Turn off or in damage to follow these steps: 1. The first insertion point should be in Step 2, make sure not to install the back... cover. Failure to the tablet. 3. Remove the back cover (5). Display panel cable Description Display panel cable Spare part number 743832-001 Before removing the display panel cable, follow this...

HP Slate8 Pro Maintenance and Service Guide
Page 21
Release the zero insertion force (ZIF) connector (1) to which the display panel cable is attached, and then disconnect the display panel cable from the system board. 3. Release the ZIF connector (2) to which the display panel cable is attached, and then disconnect the display panel cable from the display panel assembly. Disconnect all external devices from the system board. 2. Disconnect the battery cable from the tablet. 4. Remove the display panel cable: 1. Display panel cable 15 3. Remove the back cover (see Back cover on page 13).
Release the zero insertion force (ZIF) connector (1) to which the display panel cable is attached, and then disconnect the display panel cable from the system board. 3. Release the ZIF connector (2) to which the display panel cable is attached, and then disconnect the display panel cable from the display panel assembly. Disconnect all external devices from the system board. 2. Disconnect the battery cable from the tablet. 4. Remove the display panel cable: 1. Display panel cable 15 3. Remove the back cover (see Back cover on page 13).

