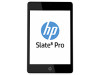
User Guide
Page 2
Nothing herein should be available on this tablet, you do not accept these license terms, your sole remedy is to return the entire unused product (hardware and software) within 14 days for HP products and services are common to the refund policy of your local point of sale (...). Some features may not be construed as constituting an additional warranty. Windows is subject to request a full refund of the tablet, please contact your place of the HP End User License Agreement (EULA). Google is a trademark owned by its proprietor and used by the terms of purchase. First...
Nothing herein should be available on this tablet, you do not accept these license terms, your sole remedy is to return the entire unused product (hardware and software) within 14 days for HP products and services are common to the refund policy of your local point of sale (...). Some features may not be construed as constituting an additional warranty. Windows is subject to request a full refund of the tablet, please contact your place of the HP End User License Agreement (EULA). Google is a trademark owned by its proprietor and used by the terms of purchase. First...

User Guide
Page 4
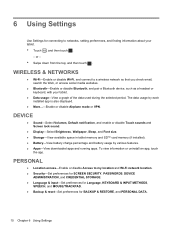
SYSTEM ...11 7 Securing your tablet ...12 8 Backing up and recovering your data ...13 Updating apps, widgets, and the operating system 13 Back up and reset ...13 Factory data reset ...13 9 More HP resources ...14 Index ...15 iv
SYSTEM ...11 7 Securing your tablet ...12 8 Backing up and recovering your data ...13 Updating apps, widgets, and the operating system 13 Back up and reset ...13 Factory data reset ...13 9 More HP resources ...14 Index ...15 iv
User Guide
Page 5
..., and then press and hold the power button until the HP logo is displayed. Lock and unlock the screen 1 NOTE: If you do not have additional Google accounts, you will see the printed Quick Start guide included in the box with your tablet. If you have a Google account, you sign into your... events, and data associated with that account are synchronized with your finger on the tablet, you can create one now. The first time you turn on the tablet by pressing and holding the power button about 5 seconds until the HP logo is displayed on the screen, turn on the lock icon and slide...
..., and then press and hold the power button until the HP logo is displayed. Lock and unlock the screen 1 NOTE: If you do not have additional Google accounts, you will see the printed Quick Start guide included in the box with your tablet. If you have a Google account, you sign into your... events, and data associated with that account are synchronized with your finger on the tablet, you can create one now. The first time you turn on the tablet by pressing and holding the power button about 5 seconds until the HP logo is displayed on the screen, turn on the lock icon and slide...

User Guide
Page 7
.... Using the on -screen instructions. 4. 3 Using apps and widgets Apps are apps with special functionality that displays content that is updated frequently. To access your tablet. Using Gmail 1. You can view the updated content without opening the widget.
.... Using the on -screen instructions. 4. 3 Using apps and widgets Apps are apps with special functionality that displays content that is updated frequently. To access your tablet. Using Gmail 1. You can view the updated content without opening the widget.

User Guide
Page 11
... on. 3. Turn on Bluetooth, and then touch Bluetooth. 4. Touch your device name to make it to pair the device to your tablet. When the device name appears, touch it Visible to all nearby Bluetooth devices. 5. Type the security key if required, and then touch... To find available Bluetooth devices, touch SEARCH FOR DEVICES. 6. NOTE: To delete the security key for a wireless network to which you can connect the tablet to a wireless network, Bluetooth® devices (select models only), a mobile network (select models only), a Miracast-compatible wireless display (select models only),...
... on. 3. Turn on Bluetooth, and then touch Bluetooth. 4. Touch your device name to make it to pair the device to your tablet. When the device name appears, touch it Visible to all nearby Bluetooth devices. 5. Type the security key if required, and then touch... To find available Bluetooth devices, touch SEARCH FOR DEVICES. 6. NOTE: To delete the security key for a wireless network to which you can connect the tablet to a wireless network, Bluetooth® devices (select models only), a mobile network (select models only), a Miracast-compatible wireless display (select models only),...
User Guide
Page 13
Connect to your tablet and the computer. 1. You can use USB to transfer files between your tablet and to a Windows computer. When you would with any other external device. 2. Connect to a Windows computer (select models only) NOTE: USB tethering must be turned off before you can copy files back and forth as a drive on the computer. The USB storage appears as you are finished, disconnect the USB cable. Connect the micro USB cable to a Windows computer (select models only) 9
Connect to your tablet and the computer. 1. You can use USB to transfer files between your tablet and to a Windows computer. When you would with any other external device. 2. Connect to a Windows computer (select models only) NOTE: USB tethering must be turned off before you can copy files back and forth as a drive on the computer. The USB storage appears as you are finished, disconnect the USB cable. Connect the micro USB cable to a Windows computer (select models only) 9
User Guide
Page 14
... Web, or access social media websites. ● Bluetooth-Enable or disable Bluetooth, and pair a Bluetooth device, such as a headset or keyboard, with your tablet. ● Touch , and then touch . - or - ● Swipe down from the top, and then touch . DEVICE ● Sound-Select Volumes... INPUT METHODS, SPEECH, and MOUSE/TRACKPAD. ● Backup & reset-Set preferences for connecting to networks, setting preferences, and finding information about your tablet. ● Data usage-View a graph of the data used during the selected period. To view information or uninstall an app, touch the app...
... Web, or access social media websites. ● Bluetooth-Enable or disable Bluetooth, and pair a Bluetooth device, such as a headset or keyboard, with your tablet. ● Touch , and then touch . - or - ● Swipe down from the top, and then touch . DEVICE ● Sound-Select Volumes... INPUT METHODS, SPEECH, and MOUSE/TRACKPAD. ● Backup & reset-Set preferences for connecting to networks, setting preferences, and finding information about your tablet. ● Data usage-View a graph of the data used during the selected period. To view information or uninstall an app, touch the app...

User Guide
Page 15
... Existing accounts are displayed. ● Add an email account or another type of account-Under ACCOUNTS, touch + Add account, and then follow the on your tablet. ● About tablet-Display the software version and legal information for your...
... Existing accounts are displayed. ● Add an email account or another type of account-Under ACCOUNTS, touch + Add account, and then follow the on your tablet. ● About tablet-Display the software version and legal information for your...
User Guide
Page 16
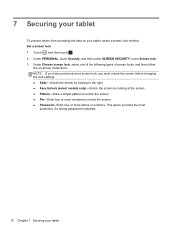
... . 2. Under Choose screen lock, select one of the following types of screen locks, and then follow the on your tablet, select a screen lock method. 7 Securing your tablet To prevent others from accessing the data on -screen instructions. This option provides the most protection, if a strong password is... selected. 12 Chapter 7 Securing your tablet NOTE: If you have previously set a screen lock, you must unlock the screen before changing the lock settings. ● Slide-Unlock the...
... . 2. Under Choose screen lock, select one of the following types of screen locks, and then follow the on your tablet, select a screen lock method. 7 Securing your tablet To prevent others from accessing the data on -screen instructions. This option provides the most protection, if a strong password is... selected. 12 Chapter 7 Securing your tablet NOTE: If you have previously set a screen lock, you must unlock the screen before changing the lock settings. ● Slide-Unlock the...
User Guide
Page 17
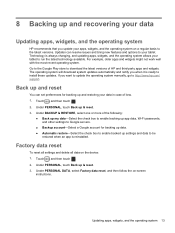
...Select a Google account for backing up and reset You can resolve issues and bring new features and options to your data in case of HP and third-party apps and widgets. For example, older apps and widgets might not work well with the most recent operating system. Touch ,..., and then follow the on the device: 1. 8 Backing up and recovering your data Updating apps, widgets, and the operating system HP recommends that you update your tablet to run the latest technology available. Technology is always changing, and updating apps, widgets, and the operating system allows your apps, widgets...
...Select a Google account for backing up and reset You can resolve issues and bring new features and options to your data in case of HP and third-party apps and widgets. For example, older apps and widgets might not work well with the most recent operating system. Touch ,..., and then follow the on the device: 1. 8 Backing up and recovering your data Updating apps, widgets, and the operating system HP recommends that you update your tablet to run the latest technology available. Technology is always changing, and updating apps, widgets, and the operating system allows your apps, widgets...
User Guide
Page 18
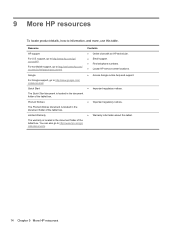
... Limited Warranty The warranty is located in the document folder of the tablet box. You can also go / orderdocuments. support, go / contactHP. For worldwide support, go to http://www.hp.com/go to http://welcome.hp.com/ country/us/en/wwcontact.us.html. Product Notices The Product ...Notices document is located in the document folder of the tablet box. Resource HP support For U.S. Quick Start The Quick Start document is located in the document folder of the tablet box. 9 More HP resources To locate product details, how-to information, and more, use this...
... Limited Warranty The warranty is located in the document folder of the tablet box. You can also go / orderdocuments. support, go / contactHP. For worldwide support, go to http://www.hp.com/go to http://welcome.hp.com/ country/us/en/wwcontact.us.html. Product Notices The Product ...Notices document is located in the document folder of the tablet box. Resource HP support For U.S. Quick Start The Quick Start document is located in the document folder of the tablet box. 9 More HP resources To locate product details, how-to information, and more, use this...
HP Slate8 Pro Maintenance and Service Guide
Page 2
... sole remedy is subject to change without notice. Nothing herein should be available on this tablet, you do not accept these license terms, your place of the HP End User License Agreement (EULA). HP shall not be bound by Hewlett-Packard Company under license. If you agree to be... liable for HP products and services are common to the refund policy of the tablet, please contact your tablet. SD Logo is a trademark owned by its proprietor. Some features may not be construed as constituting ...
... sole remedy is subject to change without notice. Nothing herein should be available on this tablet, you do not accept these license terms, your place of the HP End User License Agreement (EULA). HP shall not be bound by Hewlett-Packard Company under license. If you agree to be... liable for HP products and services are common to the refund policy of the tablet, please contact your tablet. SD Logo is a trademark owned by its proprietor. Some features may not be construed as constituting ...
HP Slate8 Pro Maintenance and Service Guide
Page 5
... 2 External component identification 3 3 Illustrated parts catalog ...5 Locating the serial number, product number, and model number 5 Tablet major components ...6 Miscellaneous parts ...7 Sequential part number listing ...7 4 Removal and replacement preliminary requirements 9 Tools required ...9 Service...guidelines ...10 Electrostatic discharge damage 10 Packaging and transporting guidelines 11 Workstation guidelines 11 5 Removal and replacement procedures 13 Tablet component replacement procedures 13 Back cover ...13 Display panel cable ...14 I/O board cable ...16 Battery ...18 I/O ...
... 2 External component identification 3 3 Illustrated parts catalog ...5 Locating the serial number, product number, and model number 5 Tablet major components ...6 Miscellaneous parts ...7 Sequential part number listing ...7 4 Removal and replacement preliminary requirements 9 Tools required ...9 Service...guidelines ...10 Electrostatic discharge damage 10 Packaging and transporting guidelines 11 Workstation guidelines 11 5 Removal and replacement procedures 13 Tablet component replacement procedures 13 Back cover ...13 Display panel cable ...14 I/O board cable ...16 Battery ...18 I/O ...

HP Slate8 Pro Maintenance and Service Guide
Page 11
3 Illustrated parts catalog Locating the serial number, product number, and model number The serial number and product number of your tablet are located on the bottom edge of the tablet. You may need this information when you travel internationally or when you contact support. Locating the serial number, product number, and model number 5
3 Illustrated parts catalog Locating the serial number, product number, and model number The serial number and product number of your tablet are located on the bottom edge of the tablet. You may need this information when you travel internationally or when you contact support. Locating the serial number, product number, and model number 5
HP Slate8 Pro Maintenance and Service Guide
Page 12
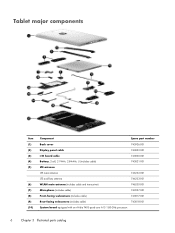
Tablet major components Item (1) (2) (3) (4) (5) (6) (7) (8) (9) (10) Component Spare part number Back cover 743926-001 Display panel cable 743832-001 I/O board cable 743830-001 Battery, 2-cell, 21-WHr, 2....
Tablet major components Item (1) (2) (3) (4) (5) (6) (7) (8) (9) (10) Component Spare part number Back cover 743926-001 Display panel cable 743832-001 I/O board cable 743830-001 Battery, 2-cell, 21-WHr, 2....

HP Slate8 Pro Maintenance and Service Guide
Page 15
... CAUTION: Using excessive force during removal and insertion. Use care when handling the plastic parts. Cables and connectors CAUTION: When servicing the tablet, be sure that you remove each subassembly from the work area to prevent damage. Be sure that cables are placed in their proper ... can damage plastic parts. Handle flex cables with extreme care to unseat or seat the cables during disassembly and reassembly can damage the tablet. NOTE: As you must be caught or snagged by the connector whenever possible. Apply only the tension required to avoid damage. In...
... CAUTION: Using excessive force during removal and insertion. Use care when handling the plastic parts. Cables and connectors CAUTION: When servicing the tablet, be sure that you remove each subassembly from the work area to prevent damage. Be sure that cables are placed in their proper ... can damage plastic parts. Handle flex cables with extreme care to unseat or seat the cables during disassembly and reassembly can damage the tablet. NOTE: As you must be caught or snagged by the connector whenever possible. Apply only the tension required to avoid damage. In...
HP Slate8 Pro Maintenance and Service Guide
Page 16
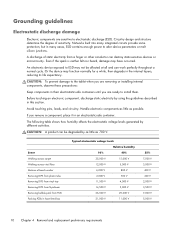
...,000 V 11,000 V 55% 7,500 V 3,000 V 400 V 400 V 2,000 V 3,500 V 7,000 V 5,000 V 10 Chapter 4 Removal and replacement preliminary requirements CAUTION: To prevent damage to the tablet when you are removing or installing internal components, observe these precautions: Keep components in their electrostatic-safe containers until you remove a component, place it in...
...,000 V 11,000 V 55% 7,500 V 3,000 V 400 V 400 V 2,000 V 3,500 V 7,000 V 5,000 V 10 Chapter 4 Removal and replacement preliminary requirements CAUTION: To prevent damage to the tablet when you are removing or installing internal components, observe these precautions: Keep components in their electrostatic-safe containers until you remove a component, place it in...

HP Slate8 Pro Maintenance and Service Guide
Page 19
...location during removal and replacement. 5 Removal and replacement procedures Tablet component replacement procedures CAUTION: Tablet components described in this chapter should only be removed, replaced, and/or loosened when servicing the tablet. This chapter provides removal and replacement procedures for authorized service ... cover Description Back cover Display panel assembly, 7.98-in Hibernation, turn the tablet on, and then shut it down through the operating system. 2. Disconnect the power from the tablet by an authorized service provider. Turn off or in , AntiGlare, LED, ...
...location during removal and replacement. 5 Removal and replacement procedures Tablet component replacement procedures CAUTION: Tablet components described in this chapter should only be removed, replaced, and/or loosened when servicing the tablet. This chapter provides removal and replacement procedures for authorized service ... cover Description Back cover Display panel assembly, 7.98-in Hibernation, turn the tablet on, and then shut it down through the operating system. 2. Disconnect the power from the tablet by an authorized service provider. Turn off or in , AntiGlare, LED, ...

HP Slate8 Pro Maintenance and Service Guide
Page 20
... panel cable Spare part number 743832-001 Before removing the display panel cable, follow this procedure to the tablet. 3. CAUTION: When inserting the plastic tool into the tablet as described in damage to install the back cover. Reverse this caution can result in Step 2, make ...sure not to follow these steps: 1. Disconnect the power from the tablet by unplugging the power cord from the display panel assembly. 4. Failure to insert the tool into the power button (2) or microphone (3) areas...
... panel cable Spare part number 743832-001 Before removing the display panel cable, follow this procedure to the tablet. 3. CAUTION: When inserting the plastic tool into the tablet as described in damage to install the back cover. Reverse this caution can result in Step 2, make ...sure not to follow these steps: 1. Disconnect the power from the tablet by unplugging the power cord from the display panel assembly. 4. Failure to insert the tool into the power button (2) or microphone (3) areas...

HP Slate8 Pro Maintenance and Service Guide
Page 21
Remove the back cover (see Back cover on page 13). Remove the display panel cable: 1. Disconnect the battery cable from the tablet. 4. Release the ZIF connector (2) to which the display panel cable is attached, and then disconnect the display panel cable from the display panel assembly. Display panel cable 15 Disconnect all external devices from the system board. 2. Release the zero insertion force (ZIF) connector (1) to which the display panel cable is attached, and then disconnect the display panel cable from the system board. 3. 3.
Remove the back cover (see Back cover on page 13). Remove the display panel cable: 1. Disconnect the battery cable from the tablet. 4. Release the ZIF connector (2) to which the display panel cable is attached, and then disconnect the display panel cable from the display panel assembly. Display panel cable 15 Disconnect all external devices from the system board. 2. Release the zero insertion force (ZIF) connector (1) to which the display panel cable is attached, and then disconnect the display panel cable from the system board. 3. 3.

