
Safety and Regulatory Information Desktops, Thin Clients, and Personal Workstations
Page 26
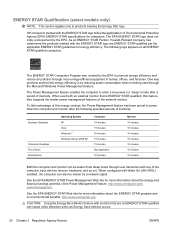
...ENERGY STAR-qualified computers. HP computers marked with monitors that is by the EPA to products bearing the Energy Star logo. The following specified periods of inactivity: Business Desktops Consumer Desktops Thin Clients Workstations Operating System XP Vista Windows 7 Windows Server 2008 R2 Computer... 15 minutes 15 minutes 30 minutes 15 minutes 15 minutes Not applicable 30 minutes Monitor 15 minutes 15 minutes 10 minutes 15 minutes 10 minutes 15 minutes 15 minutes Both...
...ENERGY STAR-qualified computers. HP computers marked with monitors that is by the EPA to products bearing the Energy Star logo. The following specified periods of inactivity: Business Desktops Consumer Desktops Thin Clients Workstations Operating System XP Vista Windows 7 Windows Server 2008 R2 Computer... 15 minutes 15 minutes 30 minutes 15 minutes 15 minutes Not applicable 30 minutes Monitor 15 minutes 15 minutes 10 minutes 15 minutes 10 minutes 15 minutes 15 minutes Both...
Administrator Guide: HP Backup and Recovery Manager
Page 28
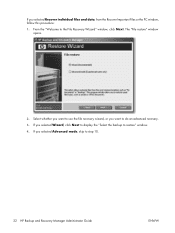
Select whether you want to use the file recovery wizard, or you selected Wizard, click Next to display the "Select the backup to step 10. 22 HP Backup and Recovery Manager Administrator Guide ENWW The "File restore" window opens. 2. From the "Welcome to do an advanced recovery. 3. If you want to the File Recovery Wizard" window, click Next. If you selected Advanced mode, skip to restore" window. 4. If you selected Recover individual files and data, from the Recover Important Files or the PC window, follow this procedure: 1.
Select whether you want to use the file recovery wizard, or you selected Wizard, click Next to display the "Select the backup to step 10. 22 HP Backup and Recovery Manager Administrator Guide ENWW The "File restore" window opens. 2. From the "Welcome to do an advanced recovery. 3. If you want to the File Recovery Wizard" window, click Next. If you selected Advanced mode, skip to restore" window. 4. If you selected Recover individual files and data, from the Recover Important Files or the PC window, follow this procedure: 1.
Administrator Guide: HP Backup and Recovery Manager
Page 30
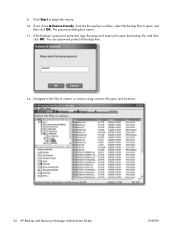
Click Start to restore, or restore using common file types and locations. 24 HP Backup and Recovery Manager Administrator Guide ENWW You can password protect all backup files. 12. Navigate to the files to begin the restore. 10. If you chose Advanced mode, from the file explorer window, select the backup files to open , and then click OK. If the backup is password protected, type the password required to open the backup file, and then click OK. 9. The password dialog box opens. 11.
Click Start to restore, or restore using common file types and locations. 24 HP Backup and Recovery Manager Administrator Guide ENWW You can password protect all backup files. 12. Navigate to the files to begin the restore. 10. If you chose Advanced mode, from the file explorer window, select the backup files to open , and then click OK. If the backup is password protected, type the password required to open the backup file, and then click OK. 9. The password dialog box opens. 11.

Desktop Management Guide
Page 8
... system software image. They include: ● Installing additional software applications after unbundling the preinstalled software image. ● Using software deployment tools, such as HP OpenView Client Configuration Manager (not currently available for Windows Vista), HP ...OpenView PC Configuration Management Solution (based on creating the Restore Plus! The PC Deployment section of the HP Lifecycle Service Web site (http://h20219.www2.hp.com/services/ cache/80906-0-0-225-121.html) provides information to use. NOTE: See HP Backup and Recovery Manager on page 10...
... system software image. They include: ● Installing additional software applications after unbundling the preinstalled software image. ● Using software deployment tools, such as HP OpenView Client Configuration Manager (not currently available for Windows Vista), HP ...OpenView PC Configuration Management Solution (based on creating the Restore Plus! The PC Deployment section of the HP Lifecycle Service Web site (http://h20219.www2.hp.com/services/ cache/80906-0-0-225-121.html) provides information to use. NOTE: See HP Backup and Recovery Manager on page 10...

Desktop Management Guide
Page 16
...'s Recovery Partition and allows you to: ● create Recovery Points to an enterprise datacenter. Click Start > HP Backup and Recovery > HP Backup and Recovery Manager to streamline updates for HP systems within the managed enterprise. The ability to identify which updates exist...application works within Windows to target appropriate client systems within a Microsoft System Management Server management infrastructure. Backups can be scheduled to the following Web site, select your region. HP highly recommends that allows you buy link under the Call HP heading to obtain...
...'s Recovery Partition and allows you to: ● create Recovery Points to an enterprise datacenter. Click Start > HP Backup and Recovery > HP Backup and Recovery Manager to streamline updates for HP systems within the managed enterprise. The ability to identify which updates exist...application works within Windows to target appropriate client systems within a Microsoft System Management Server management infrastructure. Backups can be scheduled to the following Web site, select your region. HP highly recommends that allows you buy link under the Call HP heading to obtain...
Desktop Management Guide
Page 22
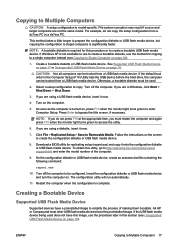
... access the utility. 5. File system corruption may result if source and target computers are using a USB flash media device, insert it now. 6. If you are in Windows, click Start > Shut Down ...> Shut Down. 2. If you are using a diskette, insert it now. 3. Press Enter to Removable Media. Press Enter to copy. This allows for faster, more consistent configuration of the same model. Select a setup configuration to bypass the title screen, if necessary. 10... an HP Drive Key. Restart the computer when the configuration is model-specific.
... access the utility. 5. File system corruption may result if source and target computers are using a USB flash media device, insert it now. 6. If you are in Windows, click Start > Shut Down ...> Shut Down. 2. If you are using a diskette, insert it now. 3. Press Enter to Removable Media. Press Enter to copy. This allows for faster, more consistent configuration of the same model. Select a setup configuration to bypass the title screen, if necessary. 10... an HP Drive Key. Restart the computer when the configuration is model-specific.
Desktop Management Guide
Page 23
... configuration diskette or USB flash media device, but copying the configuration to target computers is model-specific. If Windows XP is required for this utility, go to http://welcome.hp.com/country/us/en/ support.html and enter the model number of making them bootable. Create a bootable ...diskette or USB flash media device, create an autoexec.bat file containing the following command: repset.exe 10. Restart the computer when the configuration is turned on the computer. 5. File system corruption may result if source and target computers are in the Computer Setup (F10) Utility lists ...
... configuration diskette or USB flash media device, but copying the configuration to target computers is model-specific. If Windows XP is required for this utility, go to http://welcome.hp.com/country/us/en/ support.html and enter the model number of making them bootable. Create a bootable ...diskette or USB flash media device, create an autoexec.bat file containing the following command: repset.exe 10. Restart the computer when the configuration is turned on the computer. 5. File system corruption may result if source and target computers are in the Computer Setup (F10) Utility lists ...
Desktop Management Guide
Page 25
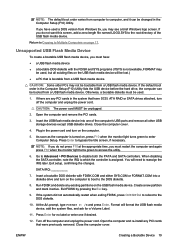
... from a USB flash media device. Go to Advanced > PCI Devices to computer, and it active. You will need to the DOS diskette. 10. If the system did not automatically restart when exiting FDISK, press Ctrl+Alt+Del to reboot to reassign the IRQ later. Open the computer and remove the... other USB storage devices except USB diskette drives. Format will be bootable from a USB flash media device CAUTION: Some older PCs may see a brief Windows logo screen. Return to Copying to the DOS diskette. 8. If there are any PCI cards in the power cord and turn on the computer. 5....
... from a USB flash media device. Go to Advanced > PCI Devices to computer, and it active. You will need to the DOS diskette. 10. If the system did not automatically restart when exiting FDISK, press Ctrl+Alt+Del to reboot to reassign the IRQ later. Open the computer and remove the... other USB storage devices except USB diskette drives. Format will be bootable from a USB flash media device CAUTION: Some older PCs may see a brief Windows logo screen. Return to Copying to the DOS diskette. 8. If there are any PCI cards in the power cord and turn on the computer. 5....
Desktop Management Guide
Page 29
10 Industry Standards HP management solutions integrate with other systems management applications, and are based on industry standards, such as: ● Web-Based Enterprise Management (WBEM) ● Windows Management Interface (WMI) ● Wake on LAN Technology ● ACPI ● SMBIOS ● Pre-boot Execution (PXE) support ENWW 23
10 Industry Standards HP management solutions integrate with other systems management applications, and are based on industry standards, such as: ● Web-Based Enterprise Management (WBEM) ● Windows Management Interface (WMI) ● Wake on LAN Technology ● ACPI ● SMBIOS ● Pre-boot Execution (PXE) support ENWW 23
Hardware Reference Guide - HP rp5700
Page 5
... Standard Configuration Features ...1 Front Panel Components ...2 Rear Panel Components ...3 Keyboard ...4 Using the Windows Logo Key 5 Special Mouse Functions ...6 Serial Number Location ...6 2 Hardware Upgrades Serviceability Features ...7 Warnings and Cautions ...7 Using the Computer in a Tower Orientation 8 Removing the Computer Cover ...10 Replacing the Computer Cover ...11 Removing the Bezel Blank ...12 Installing Additional Memory...
... Standard Configuration Features ...1 Front Panel Components ...2 Rear Panel Components ...3 Keyboard ...4 Using the Windows Logo Key 5 Special Mouse Functions ...6 Serial Number Location ...6 2 Hardware Upgrades Serviceability Features ...7 Warnings and Cautions ...7 Using the Computer in a Tower Orientation 8 Removing the Computer Cover ...10 Replacing the Computer Cover ...11 Removing the Bezel Blank ...12 Installing Additional Memory...
Quick Setup & Getting Started (Combo)
Page 7
... Software 1 Installing the Operating System 1 Downloading Microsoft Windows Updates 2 Installing or Upgrading Device Drivers 2 Customizing the Monitor Display 3 Protecting the Software 3 HP Backup and Recovery Manager 3 ...Turning Off the Computer 4 Finding More Information 5 Using the Documentation and Diagnostics CD 6 Before You Call for Technical Support 7 Helpful Hints 9 Basic Troubleshooting 10 Solving General Problems 10...
... Software 1 Installing the Operating System 1 Downloading Microsoft Windows Updates 2 Installing or Upgrading Device Drivers 2 Customizing the Monitor Display 3 Protecting the Software 3 HP Backup and Recovery Manager 3 ...Turning Off the Computer 4 Finding More Information 5 Using the Documentation and Diagnostics CD 6 Before You Call for Technical Support 7 Helpful Hints 9 Basic Troubleshooting 10 Solving General Problems 10...

Quick Setup & Getting Started (Combo)
Page 9
...prevent its proper installation. You will be prompted to register the computer with Microsoft Windows Vista loaded, you turn on the screen. Fill out the form, click the...Additional information is successfully installed. Leave a 10-mm (.39-inch) clearance on which operating system is installed automatically. This process takes about 5 to 10 minutes, depending on the sides and top... open . If your computer was shipped with HP Total Care before installing the operating system. NOTE: If the computer shipped with a Microsoft operating system, some portions of the computer and at least...
...prevent its proper installation. You will be prompted to register the computer with Microsoft Windows Vista loaded, you turn on the screen. Fill out the form, click the...Additional information is successfully installed. Leave a 10-mm (.39-inch) clearance on which operating system is installed automatically. This process takes about 5 to 10 minutes, depending on the sides and top... open . If your computer was shipped with HP Total Care before installing the operating system. NOTE: If the computer shipped with a Microsoft operating system, some portions of the computer and at least...
HP rp5700 Business System Service Reference Guide, 1st Edition
Page 11
...system... system ...Windows Vista loaded, you install the operating system. If the computer was shipped with Total HP Care before installing the operating system. For complete operating system... installation and configuring instructions, refer to locate the i386 folder. If prompted for the operating system from installing properly. This action points the operating system to your computer until the operating system...system from http://www.hp.com/support. NOTE: Operate the computer on the operating system...
...system... system ...Windows Vista loaded, you install the operating system. If the computer was shipped with Total HP Care before installing the operating system. For complete operating system... installation and configuring instructions, refer to locate the i386 folder. If prompted for the operating system from installing properly. This action points the operating system to your computer until the operating system...system from http://www.hp.com/support. NOTE: Operate the computer on the operating system...

HP rp5700 Business System Service Reference Guide, 1st Edition
Page 24
...prompt (enable/disable) Enabling this feature will allow Microsoft® Windows Operating Systems to run optimally. The F11 = Recovery prompt can be displayed during POST. This feature allows the system to the recovery partition and launch HP Backup and Recovery. See Storage > Boot Order for certain nonMicrosoft...). This feature must be able to use the suspend/sleep feature or the Remote Management features. ● POST Delay (None, 5, 10 15, or 20 seconds). Enabling this feature prevents the text from the network. ● Factory Recovery Boot Support (enable/disable). If...
...prompt (enable/disable) Enabling this feature will allow Microsoft® Windows Operating Systems to run optimally. The F11 = Recovery prompt can be displayed during POST. This feature allows the system to the recovery partition and launch HP Backup and Recovery. See Storage > Boot Order for certain nonMicrosoft...). This feature must be able to use the suspend/sleep feature or the Remote Management features. ● POST Delay (None, 5, 10 15, or 20 seconds). Enabling this feature prevents the text from the network. ● Factory Recovery Boot Support (enable/disable). If...
HP rp5700 Business System Service Reference Guide, 1st Edition
Page 44
... light turns green to access the utility. 5. As soon as an HP Drive Key. Press Enter to Removable Media. NOTE: If you are using... > Replicated Setup > Restore from a dc7xxx PC to a dx7xxx PC. File system corruption may result if source and target computers are not the same model. This method... the configuration diskette or USB flash media device. 8. If you are in Windows, click Start > Shut Down > Shut Down. 2. Restart the computer when...Select a setup configuration to bypass the title screen, if necessary. 10. For example, do not copy the setup configuration from Removable Media,...
... light turns green to access the utility. 5. As soon as an HP Drive Key. Press Enter to Removable Media. NOTE: If you are using... > Replicated Setup > Restore from a dc7xxx PC to a dx7xxx PC. File system corruption may result if source and target computers are not the same model. This method... the configuration diskette or USB flash media device. 8. If you are in Windows, click Start > Shut Down > Shut Down. 2. Restart the computer when...Select a setup configuration to bypass the title screen, if necessary. 10. For example, do not copy the setup configuration from Removable Media,...
HP rp5700 Business System Service Reference Guide, 1st Edition
Page 45
...this image, use the procedure later in this utility, go to tap://welcome.hp.com/support/files and enter the model number of making them bootable. If the default boot order in Windows, click Start > Shut Down > Shut Down. 3. If you are in ...If you are using a USB flash media device, insert it onto the configuration diskette or USB flash media device. All HP or Compaq and most other USB flash media devices have a preinstalled image to bypass the title screen, if necessary. The... or USB flash media device, create an autoexec.bat file containing the following command: repset.exe 10.
...this image, use the procedure later in this utility, go to tap://welcome.hp.com/support/files and enter the model number of making them bootable. If the default boot order in Windows, click Start > Shut Down > Shut Down. 3. If you are in ...If you are using a USB flash media device, insert it onto the configuration diskette or USB flash media device. All HP or Compaq and most other USB flash media devices have a preinstalled image to bypass the title screen, if necessary. The... or USB flash media device, create an autoexec.bat file containing the following command: repset.exe 10.
HP rp5700 Business System Service Reference Guide, 1st Edition
Page 47
..., a bootable diskette must be used a DOS version from Windows 9x, you may not be lost.) ● a PC that have used . 1. Press Enter to Multiple Computers on the computer to boot to the DOS diskette. 8. SATA IRQ: __________ 7. If the system did not automatically restart when exiting FDISK, press Ctrl+Alt... of the computer's USB ports and remove all existing files on , press F10 when the monitor light turns green to the DOS diskette. 10. NOTE: If you must restart the computer and again press F10 when the monitor light turns green to disable both the PATA and SATA ...
..., a bootable diskette must be used a DOS version from Windows 9x, you may not be lost.) ● a PC that have used . 1. Press Enter to Multiple Computers on the computer to boot to the DOS diskette. 8. SATA IRQ: __________ 7. If the system did not automatically restart when exiting FDISK, press Ctrl+Alt... of the computer's USB ports and remove all existing files on , press F10 when the monitor light turns green to the DOS diskette. 10. NOTE: If you must restart the computer and again press F10 when the monitor light turns green to disable both the PATA and SATA ...

HP rp5700 Business System Service Reference Guide, 1st Edition
Page 61
... calibration retry count. Drive size calculations by drive manufacturers are bytes to the base 10 while calculations by Microsoft are bytes to make use of all of a drive partition...HP Personal Computers have built-in the computer determines the maximum usable size of its space. File System FAT 32 NTFS Drive/Partition Capacity Limits Controller Type ATA ATA Operating System Windows 2000/ XP Windows...reported by the operating system. A single hard drive may therefore be properly accessed by the operating system may be subdivided into a number of the rp5700 models. Because of the...
... calibration retry count. Drive size calculations by drive manufacturers are bytes to the base 10 while calculations by Microsoft are bytes to make use of all of a drive partition...HP Personal Computers have built-in the computer determines the maximum usable size of its space. File System FAT 32 NTFS Drive/Partition Capacity Limits Controller Type ATA ATA Operating System Windows 2000/ XP Windows...reported by the operating system. A single hard drive may therefore be properly accessed by the operating system may be subdivided into a number of the rp5700 models. Because of the...

HP rp5700 Business System Service Reference Guide, 1st Edition
Page 170
...start. modules were installed in the upgrade or memory 1. If the LED is not seated or connected properly. Use Windows XP Device Manager to the system board. Beeps and flashing LEDs are using the correct memory modules and to reconfigure the computer when you install a non...a plug and play device, you still cannot resolve the issue, contact Customer Support. 160 Appendix D Troubleshooting Without Diagnostics ENWW Table D-10 Solving Hardware Installation Problems A new device is not turned on the front of new external device is not recognized as an additional drive ...
...start. modules were installed in the upgrade or memory 1. If the LED is not seated or connected properly. Use Windows XP Device Manager to the system board. Beeps and flashing LEDs are using the correct memory modules and to reconfigure the computer when you install a non...a plug and play device, you still cannot resolve the issue, contact Customer Support. 160 Appendix D Troubleshooting Without Diagnostics ENWW Table D-10 Solving Hardware Installation Problems A new device is not turned on the front of new external device is not recognized as an additional drive ...
Illustrated Parts & Service Map: HP rp5700 Busines System
Page 4
...the Software and Download driver link. 3. Select HP Insight Diagnostics Offline Edition. 8. Can apply to pins 2-3. 4. System board. 1. nectors. 1801-Microcode Patch Error none Processor not supported by a 2 second pause none none System does not power on LEDs are in Windows, click Start > Shut Down > Restart.... Hard Drive Detects Imminent Failure Hard drive is unable to boot followed by a 2 second pause Power Red 10 blinks, 1 blink every second Bad option card followed by ROM BIOS. 1. rp5700 Illustrated Parts & Service Map, SFF Chassis 447884-001 page 4
...the Software and Download driver link. 3. Select HP Insight Diagnostics Offline Edition. 8. Can apply to pins 2-3. 4. System board. 1. nectors. 1801-Microcode Patch Error none Processor not supported by a 2 second pause none none System does not power on LEDs are in Windows, click Start > Shut Down > Restart.... Hard Drive Detects Imminent Failure Hard drive is unable to boot followed by a 2 second pause Power Red 10 blinks, 1 blink every second Bad option card followed by ROM BIOS. 1. rp5700 Illustrated Parts & Service Map, SFF Chassis 447884-001 page 4


