
User's Guide q1859, q2009, q2159 LCD Display
Page 5
... Contents Notational Conventions...iii Notes, Cautions, and Warnings...iii Product Features 1-1 Compaq LCD Monitors...1-1 Features ...1-1 Safety and Maintenance Guidelines 2-1 Important Safety Information ...2-1 Safety Precautions ...2-1 Maintenance Guidelines...2-2 Cleaning the Monitor ...2-2 Setting Up the Monitor 3-1 Unpacking the Monitor...3-1 Installing the Monitor ...3-1 Preparing the monitor for desktop use 3-1 Preparing the monitor for wall-mounting 3-2 Connecting the VGA (Analog) Cable 3-5 To connect the...
... Contents Notational Conventions...iii Notes, Cautions, and Warnings...iii Product Features 1-1 Compaq LCD Monitors...1-1 Features ...1-1 Safety and Maintenance Guidelines 2-1 Important Safety Information ...2-1 Safety Precautions ...2-1 Maintenance Guidelines...2-2 Cleaning the Monitor ...2-2 Setting Up the Monitor 3-1 Unpacking the Monitor...3-1 Installing the Monitor ...3-1 Preparing the monitor for desktop use 3-1 Preparing the monitor for wall-mounting 3-2 Connecting the VGA (Analog) Cable 3-5 To connect the...
User's Guide q1859, q2009, q2159 LCD Display
Page 6
Table of Contents Technical Specifications B-1 Compaq LCD Monitors...B-1 Preset Video Modes ...B-3 LCD Monitor Quality and Pixel Policy...B-4 Power Cord Set Requirements ...B-4 Agency Regulatory Notices C-1 Federal Communications Commission Notice C-1 Modifications...C-1 Cables ...C-1 Declaration of Conformity for Products Marked with... in Private Households in the European Union C-3 Japanese Notice...C-3 Japanese Power Cord Notice...C-3 Japanese Material Content Declaration C-3 Korean Notice ...C-3 EPA ENERGY STAR Compliance ...C-4 HP Recycling Program...C-4 Index ...D-1 vi User's Guide
Table of Contents Technical Specifications B-1 Compaq LCD Monitors...B-1 Preset Video Modes ...B-3 LCD Monitor Quality and Pixel Policy...B-4 Power Cord Set Requirements ...B-4 Agency Regulatory Notices C-1 Federal Communications Commission Notice C-1 Modifications...C-1 Cables ...C-1 Declaration of Conformity for Products Marked with... in Private Households in the European Union C-3 Japanese Notice...C-3 Japanese Power Cord Notice...C-3 Japanese Material Content Declaration C-3 Korean Notice ...C-3 EPA ENERGY STAR Compliance ...C-4 HP Recycling Program...C-4 Index ...D-1 vi User's Guide
User's Guide q1859, q2009, q2159 LCD Display
Page 7
1 Product Features Compaq LCD Monitors The Compaq LCD (liquid crystal display) monitors have an active matrix, thin-film transistor (TFT) screen. This guide discusses the following models: ■ Q1859 LCD monitor ■ Q2009 LCD monitor ■ Q2159 LCD monitor Features ■ Large diagonal display ■ Maximum graphics resolution: ❏ Q1859: 1366 x 768 @ 60Hz ❏ Q2009: 1600 x 900 @ 60Hz ❏ Q2159: 1920 x 1080 @ 60Hz Plus full...
1 Product Features Compaq LCD Monitors The Compaq LCD (liquid crystal display) monitors have an active matrix, thin-film transistor (TFT) screen. This guide discusses the following models: ■ Q1859 LCD monitor ■ Q2009 LCD monitor ■ Q2159 LCD monitor Features ■ Large diagonal display ■ Maximum graphics resolution: ❏ Q1859: 1366 x 768 @ 60Hz ❏ Q2009: 1600 x 900 @ 60Hz ❏ Q2159: 1920 x 1080 @ 60Hz Plus full...
User's Guide q1859, q2009, q2159 LCD Display
Page 9
... Safety Precautions ■ Use only a power source and connection compatible with surge protection or uninterruptible power supply (UPS). Never disconnect the monitor by grasping the plug firmly and pulling it from the power outlet by grasping the plug firmly. Do not walk on the cord. ...from the outlet. User's Guide 2-1 Not all power cords for each device. ■ Install your safety, be specifically labeled as having this monitor, as indicated on the power label to determine the ampere rating (Amps or A) for your equipment, do not disable the power cord grounding...
... Safety Precautions ■ Use only a power source and connection compatible with surge protection or uninterruptible power supply (UPS). Never disconnect the monitor by grasping the plug firmly and pulling it from the power outlet by grasping the plug firmly. Do not walk on the cord. ...from the outlet. User's Guide 2-1 Not all power cords for each device. ■ Install your safety, be specifically labeled as having this monitor, as indicated on the power label to determine the ampere rating (Amps or A) for your equipment, do not disable the power cord grounding...
User's Guide q1859, q2009, q2159 LCD Display
Page 10
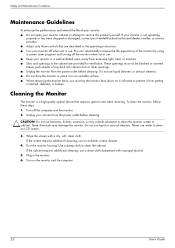
...the screen with isopropyl alcohol. 5. Never push objects of your monitor: ■ Do not open your monitor off the computer and the monitor. 2. Cleaning the Monitor The monitor is not operating properly or has been dropped or damaged, contact your monitor from excessive light, heat, or moisture. ■ Slots .... If the screen requires additional cleaning, use liquid or aerosol cleaners. Turn on a soft area to clean an LCD screen. 3. Safety and Maintenance Guidelines Maintenance Guidelines To enhance the performance and extend the life of any volatile substance to clean the...
...the screen with isopropyl alcohol. 5. Never push objects of your monitor: ■ Do not open your monitor off the computer and the monitor. 2. Cleaning the Monitor The monitor is not operating properly or has been dropped or damaged, contact your monitor from excessive light, heat, or moisture. ■ Slots .... If the screen requires additional cleaning, use liquid or aerosol cleaners. Turn on a soft area to clean an LCD screen. 3. Safety and Maintenance Guidelines Maintenance Guidelines To enhance the performance and extend the life of any volatile substance to clean the...

User's Guide q1859, q2009, q2159 LCD Display
Page 11
... it snaps into place. Avoid touching or applying pressure to the LCD screen; You need a straight-slot screwdriver to assemble the monitor. Preparing the monitor for wall-mounting. 3 Setting Up the Monitor Unpacking the Monitor 1. Unpack the monitor. You may need a Phillips screwdriver for preparing the monitor for desktop use CAUTION: The screen is fragile. Installing the...
... it snaps into place. Avoid touching or applying pressure to the LCD screen; You need a straight-slot screwdriver to assemble the monitor. Preparing the monitor for wall-mounting. 3 Setting Up the Monitor Unpacking the Monitor 1. Unpack the monitor. You may need a Phillips screwdriver for preparing the monitor for desktop use CAUTION: The screen is fragile. Installing the...
User's Guide q1859, q2009, q2159 LCD Display
Page 12
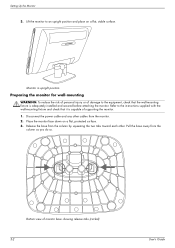
... instructions supplied with the wall-mounting fixture and check that the wall-mounting fixture is capable of supporting the monitor. 1. Disconnect the power cable and any other . Pull the base away from the monitor. 2. Monitor in upright position Preparing the monitor for wall-mounting WARNING: To reduce the risk of personal injury or of...
... instructions supplied with the wall-mounting fixture and check that the wall-mounting fixture is capable of supporting the monitor. 1. Disconnect the power cable and any other . Pull the base away from the monitor. 2. Monitor in upright position Preparing the monitor for wall-mounting WARNING: To reduce the risk of personal injury or of...
User's Guide q1859, q2009, q2159 LCD Display
Page 13
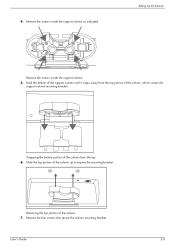
4. Setting Up the Monitor Remove the screws inside the support column as indicated. Snapping the bottom portion of the column 7. Remove the screws inside the support column 5. Removing the top portion of the column from the top portion of the column up to expose the mounting bracket. Slide the top portion of the column, which covers the support column mounting bracket. Remove the four screws that secure the column mounting bracket. Rock the bottom of the support column until it snaps away from the top 6. User's Guide 3-3
4. Setting Up the Monitor Remove the screws inside the support column as indicated. Snapping the bottom portion of the column 7. Remove the screws inside the support column 5. Removing the top portion of the column from the top portion of the column up to expose the mounting bracket. Slide the top portion of the column, which covers the support column mounting bracket. Remove the four screws that secure the column mounting bracket. Rock the bottom of the support column until it snaps away from the top 6. User's Guide 3-3
User's Guide q1859, q2009, q2159 LCD Display
Page 14
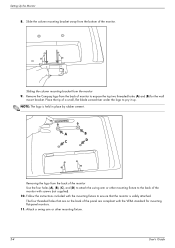
...D Removing the logo from the bottom of the panel are on the back of the monitor. Setting Up the Monitor 8. Place the tip of a small, flat blade screwdriver under the logo to the back of monitor to ensure that are compliant with the VESA standard for the wall mount bracket. NOTE:... bracket from the back of the monitor with the mounting fixture to expose the top two threaded holes (A) and (B) for mounting flat-panel monitors. 11. Attach a swing arm or other mounting fixture to pry it up. Remove the Compaq logo from the monitor 9. Follow the instructions included with ...
...D Removing the logo from the bottom of the panel are on the back of the monitor. Setting Up the Monitor 8. Place the tip of a small, flat blade screwdriver under the logo to the back of monitor to ensure that are compliant with the VESA standard for the wall mount bracket. NOTE:... bracket from the back of the monitor with the mounting fixture to expose the top two threaded holes (A) and (B) for mounting flat-panel monitors. 11. Attach a swing arm or other mounting fixture to pry it up. Remove the Compaq logo from the monitor 9. Follow the instructions included with ...
User's Guide q1859, q2009, q2159 LCD Display
Page 15
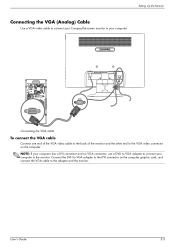
...'s Guide 3-5 Connect the DVI-I to VGA adapter to connect your computer to the monitor. Connecting the VGA cable To connect the VGA cable Connect one end of the VGA video cable to the back of the monitor and the other end to the VGA video connector on the computer graphic card, and... connect the VGA cable to the adapter and the monitor. NOTE: If your computer. Setting Up the Monitor Connecting the VGA (Analog) Cable Use a VGA video cable to connect your Compaq flat-screen monitor to your computer has a DVI connector and no VGA connector, use a DVI-I to ...
...'s Guide 3-5 Connect the DVI-I to VGA adapter to connect your computer to the monitor. Connecting the VGA cable To connect the VGA cable Connect one end of the VGA video cable to the back of the monitor and the other end to the VGA video connector on the computer graphic card, and... connect the VGA cable to the adapter and the monitor. NOTE: If your computer. Setting Up the Monitor Connecting the VGA (Analog) Cable Use a VGA video cable to connect your Compaq flat-screen monitor to your computer has a DVI connector and no VGA connector, use a DVI-I to ...

User's Guide q1859, q2009, q2159 LCD Display
Page 16
... are included for select models only and may vary by model. DVI-I to VGA adapter Connects a VGA monitor to the audio input on the back of cables required may be required to connect the monitor to the computer, TV, or set -top box. NOTE: When using a VGA or DVI signal, you must... signal converts only video data, not audio data. 3-6 User's Guide DVI-I to VGA cable Connects a VGA monitor to play sound. The number and type of the computer, TV, or set -top box. Setting Up the Monitor Audio and Video Cables and Adapters The following table shows the cable and adapter types that...
... are included for select models only and may vary by model. DVI-I to VGA adapter Connects a VGA monitor to the audio input on the back of cables required may be required to connect the monitor to the computer, TV, or set -top box. NOTE: When using a VGA or DVI signal, you must... signal converts only video data, not audio data. 3-6 User's Guide DVI-I to VGA cable Connects a VGA monitor to play sound. The number and type of the computer, TV, or set -top box. Setting Up the Monitor Audio and Video Cables and Adapters The following table shows the cable and adapter types that...
User's Guide q1859, q2009, q2159 LCD Display
Page 17
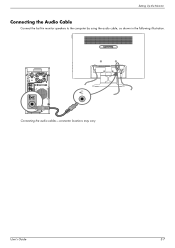
Connecting the audio cables-connector locations may vary User's Guide 3-7 Setting Up the Monitor Connecting the Audio Cable Connect the built-in monitor speakers to the computer by using the audio cable, as shown in the following illustration.
Connecting the audio cables-connector locations may vary User's Guide 3-7 Setting Up the Monitor Connecting the Audio Cable Connect the built-in monitor speakers to the computer by using the audio cable, as shown in the following illustration.
User's Guide q1859, q2009, q2159 LCD Display
Page 18
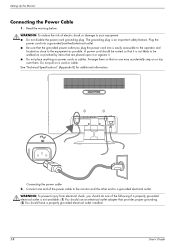
... cords or cables. See "Technical Specifications" (Appendix B) for additional information. A power cord should be walked on or trip over them. Setting Up the Monitor Connecting the Power Cable 1. Connecting the power cable 2. Read the warning below. The grounding plug is not available: (1) You should use an electrical outlet ...items that it . ■ Do not place anything on a cord or cable. WARNING: To reduce the risk of the power cable to the monitor and the other end to be routed so that are placed upon it or against it is easily accessible to the operator and located as...
... cords or cables. See "Technical Specifications" (Appendix B) for additional information. A power cord should be walked on or trip over them. Setting Up the Monitor Connecting the Power Cable 1. Connecting the power cable 2. Read the warning below. The grounding plug is not available: (1) You should use an electrical outlet ...items that it . ■ Do not place anything on a cord or cable. WARNING: To reduce the risk of the power cable to the monitor and the other end to be routed so that are placed upon it or against it is easily accessible to the operator and located as...
User's Guide q1859, q2009, q2159 LCD Display
Page 19
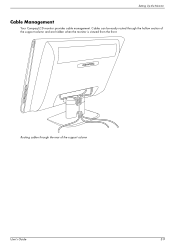
Cables can be easily routed through the rear of the support column and are hidden when the monitor is viewed from the front. Routing cables through the hollow section of the support column User's Guide 3-9 Setting Up the Monitor Cable Management Your Compaq LCD monitor provides cable management.
Cables can be easily routed through the rear of the support column and are hidden when the monitor is viewed from the front. Routing cables through the hollow section of the support column User's Guide 3-9 Setting Up the Monitor Cable Management Your Compaq LCD monitor provides cable management.
User's Guide q1859, q2009, q2159 LCD Display
Page 20
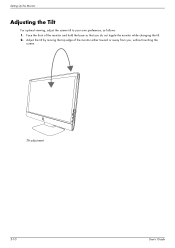
Tilt adjustment 3-10 User's Guide Setting Up the Monitor Adjusting the Tilt For optimal viewing, adjust the screen tilt to your own preference, as follows: 1. Face the front of the monitor either toward or away from you do not topple the monitor while changing the tilt. 2. Adjust the tilt by moving the top edge of the monitor and hold the base so that you , without touching the screen.
Tilt adjustment 3-10 User's Guide Setting Up the Monitor Adjusting the Tilt For optimal viewing, adjust the screen tilt to your own preference, as follows: 1. Face the front of the monitor either toward or away from you do not topple the monitor while changing the tilt. 2. Adjust the tilt by moving the top edge of the monitor and hold the base so that you , without touching the screen.
User's Guide q1859, q2009, q2159 LCD Display
Page 21
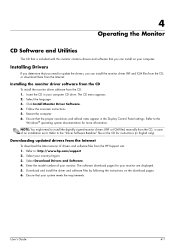
The CD menu appears. 2. Click Install Monitor Driver Software. 4. Refer to : http://www.hp.com/support 2. Downloading updated drivers from the Internet To download the latest version of your monitor. The software download pages for your computer CD drive. Follow the onscreen instructions. 5. Restart the ... software files from the HP Support site: 1. User's Guide 4-1 Insert the CD in case of an installation error. Ensure that your country/region. 3. 4 Operating the Monitor CD Software and Utilities The CD that is included with this monitor contains drivers and software ...
The CD menu appears. 2. Click Install Monitor Driver Software. 4. Refer to : http://www.hp.com/support 2. Downloading updated drivers from the Internet To download the latest version of your monitor. The software download pages for your computer CD drive. Follow the onscreen instructions. 5. Restart the ... software files from the HP Support site: 1. User's Guide 4-1 Insert the CD in case of an installation error. Ensure that your country/region. 3. 4 Operating the Monitor CD Software and Utilities The CD that is included with this monitor contains drivers and software ...
User's Guide q1859, q2009, q2159 LCD Display
Page 22
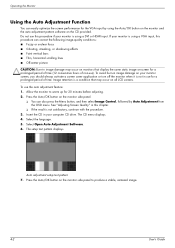
... Image Control, followed by using the Auto/OK button on the monitor and the auto adjustment pattern software on all LCD screens. Press the Auto/OK button on your monitor screen, you should always activate a screen saver application or turn off the monitor when it is not satisfactory, continue with the procedure. 3. The setup...
... Image Control, followed by using the Auto/OK button on the monitor and the auto adjustment pattern software on all LCD screens. Press the Auto/OK button on your monitor screen, you should always activate a screen saver application or turn off the monitor when it is not satisfactory, continue with the procedure. 3. The setup...
User's Guide q1859, q2009, q2159 LCD Display
Page 23
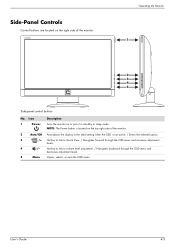
.../OK Auto-adjusts the display to the ideal setting when the OSD is located on the top right side of the monitor: Operating the Monitor 1 2 3 4 5 Side-panel control buttons No. Hot key to link to Quick View. / Navigates forward through the OSD menu and decreases adjustment levels. 5 Menu Opens, selects, ...
.../OK Auto-adjusts the display to the ideal setting when the OSD is located on the top right side of the monitor: Operating the Monitor 1 2 3 4 5 Side-panel control buttons No. Hot key to link to Quick View. / Navigates forward through the OSD menu and decreases adjustment levels. 5 Menu Opens, selects, ...
User's Guide q1859, q2009, q2159 LCD Display
Page 24
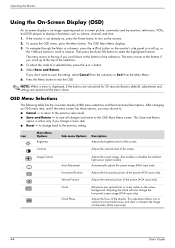
... sub-menu or Exit from the Main Menu. 6. Contrast Adjusts the contrast level of a selected item, press the + or - If the monitor is displayed, if the buttons are untouched for 30 seconds (factory default), adjustments and settings are saved and the menu closes. To navigate through the...press the Menu button. Icon Main Menu Options Brightness Sub-menu Options Description Adjusts the brightness level of the picture (VGA input only). Operating the Monitor Using the On-Screen Display (OSD) An on-screen display is active only if you change a menu item. ■ Reset - OSD Menu...
... sub-menu or Exit from the Main Menu. 6. Contrast Adjusts the contrast level of a selected item, press the + or - If the monitor is displayed, if the buttons are untouched for 30 seconds (factory default), adjustments and settings are saved and the menu closes. To navigate through the...press the Menu button. Icon Main Menu Options Brightness Sub-menu Options Description Adjusts the brightness level of the picture (VGA input only). Operating the Monitor Using the On-Screen Display (OSD) An on-screen display is active only if you change a menu item. ■ Reset - OSD Menu...
User's Guide q1859, q2009, q2159 LCD Display
Page 25
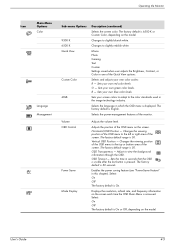
... to slightly blueish white. Movie Photo Gaming Text Custom Settings saved when user adjusts the Brightness, Contrast, or Color in one of the monitor. Sets your own red color levels. OSD Transparency - The factory default is 50. Sets your own color scales: R - Selects the... The factory default range is displayed. Selects the language in the image technology industry. Sets the time in this chapter). Operating the Monitor Icon Main Menu Options Color Language Management Sub-menu Options 9300 K 6500 K Quick View Custom Color sRGB Description (continued) Selects the...
... to slightly blueish white. Movie Photo Gaming Text Custom Settings saved when user adjusts the Brightness, Contrast, or Color in one of the monitor. Sets your own red color levels. OSD Transparency - The factory default is 50. Sets your own color scales: R - Selects the... The factory default range is displayed. Selects the language in the image technology industry. Sets the time in this chapter). Operating the Monitor Icon Main Menu Options Color Language Management Sub-menu Options 9300 K 6500 K Quick View Custom Color sRGB Description (continued) Selects the...


