
Worldwide Limited Warranty and Technical Support - (1 Year)
Page 5
... warranty service according to the terms and conditions of the product, is your HP Hardware Product is not responsible for legal or regulatory reasons. Replacement parts are warranted to provide proof of purchase or lease as external storage subsystems, displays, printers and other governments. You may provide their own warranties directly to...
... warranty service according to the terms and conditions of the product, is your HP Hardware Product is not responsible for legal or regulatory reasons. Replacement parts are warranted to provide proof of purchase or lease as external storage subsystems, displays, printers and other governments. You may provide their own warranties directly to...

Worldwide Limited Warranty and Technical Support - (3 Year)
Page 5
... required to provide proof of purchase or lease as external storage subsystems, displays, printers and other governments. HP may be free from the date HP completes installation. Replacement parts are provided "AS IS" without HP warranty. Transfer of this Limited Warranty. The term "HP Hardware Product" DOES NOT include any tariffs or duties that you...
... required to provide proof of purchase or lease as external storage subsystems, displays, printers and other governments. HP may be free from the date HP completes installation. Replacement parts are provided "AS IS" without HP warranty. Transfer of this Limited Warranty. The term "HP Hardware Product" DOES NOT include any tariffs or duties that you...

Getting Started - SuSE Linux
Page 7
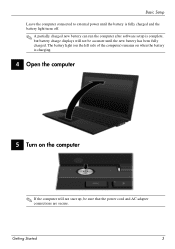
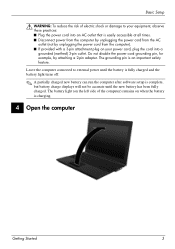
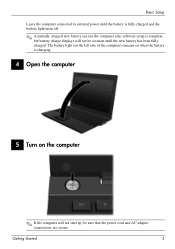
The battery light (on the left side of the computer) remains on when the battery is complete, but battery charge displays will not start up, be accurate until the battery is fully charged and the battery light turns off. ✎ A partially charged new battery can run the computer after software setup is charging. 4 Open the computer 5 Turn on the computer ✎ If the computer will not be sure that the power cord and AC adapter connections are secure. Getting Started 3 Basic Setup Leave the computer connected to external power until the new battery has been fully charged.
The battery light (on the left side of the computer) remains on when the battery is complete, but battery charge displays will not start up, be accurate until the battery is fully charged and the battery light turns off. ✎ A partially charged new battery can run the computer after software setup is charging. 4 Open the computer 5 Turn on the computer ✎ If the computer will not be sure that the power cord and AC adapter connections are secure. Getting Started 3 Basic Setup Leave the computer connected to external power until the new battery has been fully charged.
Getting Started - SuSE Linux
Page 12
... to prevent keys from sticking and to remove dust, lint, and particles that can deposit household debris on the display. Product Information and Troubleshooting Routine care Cleaning the display Ä CAUTION: To prevent permanent damage to start a chat session with a support specialist. ✎ When ...to blow air around and under the keys to contact technical support. Getting Started 9 To remove smudges and lint, frequently clean the display with the computer to loosen and remove debris. Refer to clean the keyboard. A can of electric shock or damage to internal components...
... to prevent keys from sticking and to remove dust, lint, and particles that can deposit household debris on the display. Product Information and Troubleshooting Routine care Cleaning the display Ä CAUTION: To prevent permanent damage to start a chat session with a support specialist. ✎ When ...to blow air around and under the keys to contact technical support. Getting Started 9 To remove smudges and lint, frequently clean the display with the computer to loosen and remove debris. Refer to clean the keyboard. A can of electric shock or damage to internal components...

Getting Started - SuSE Linux
Page 13
... fn+f4. Be sure that the outlet is providing adequate power. ✎ Use only the AC adapter provided with the computer or one approved by HP for this procedure, refer to the next section, "The computer is on but is not responding to software or keyboard commands, try the following suggestions... battery power or is plugged into an external power source other than an AC outlet, plug the computer into the outlet to be set to display the image on the computer screen. To transfer the image to the antivirus software Help for at least 5 seconds. ■ Disconnect the computer from external...
... fn+f4. Be sure that the outlet is providing adequate power. ✎ Use only the AC adapter provided with the computer or one approved by HP for this procedure, refer to the next section, "The computer is on but is not responding to software or keyboard commands, try the following suggestions... battery power or is plugged into an external power source other than an AC outlet, plug the computer into the outlet to be set to display the image on the computer screen. To transfer the image to the antivirus software Help for at least 5 seconds. ■ Disconnect the computer from external...
Getting Started - SuSE Linux
Page 15
... Getting Started For additional information, refer to the relevant help topics and Web site links in Help. Software not installed at the factory. It is displayed on the screen. 3. To recover the original hard drive image using f11, follow these steps: 1.
... Getting Started For additional information, refer to the relevant help topics and Web site links in Help. Software not installed at the factory. It is displayed on the screen. 3. To recover the original hard drive image using f11, follow these steps: 1.
Getting Started - Windows 7
Page 7
Getting Started 3 The battery light (on the left side of the computer) remains on when the battery is complete, but battery charge displays will not start up, be accurate until the new battery has been fully charged. Basic Setup Leave the computer connected to external power until the battery is fully charged and the battery light turns off. ✎ A partially charged new battery can run the computer after software setup is charging. 4 Open the computer 5 Turn on the computer ✎ If the computer will not be sure that the power cord and AC adapter connections are secure.
Getting Started 3 The battery light (on the left side of the computer) remains on when the battery is complete, but battery charge displays will not start up, be accurate until the new battery has been fully charged. Basic Setup Leave the computer connected to external power until the battery is fully charged and the battery light turns off. ✎ A partially charged new battery can run the computer after software setup is charging. 4 Open the computer 5 Turn on the computer ✎ If the computer will not be sure that the power cord and AC adapter connections are secure.

Getting Started - Windows 7
Page 11
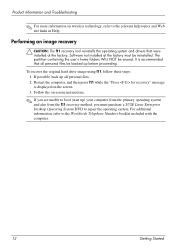
... the on file size and the speed of this guide. 3. The f11 recovery tool reinstalls the operating system and HP programs and drivers that the computer is displayed on -screen instructions. ✎ Windows 7 provides additional recovery tools through the operating system. Refer to AC power before...Computer, click Manage, and then click Disk Management. ✎ If the HP Recovery partition is not listed, you start up all personal files. 2. Press f11 while the "Press for Startup Menu" message is displayed at the factory must recover your backup, create a system image (select ...
... the on file size and the speed of this guide. 3. The f11 recovery tool reinstalls the operating system and HP programs and drivers that the computer is displayed on -screen instructions. ✎ Windows 7 provides additional recovery tools through the operating system. Refer to AC power before...Computer, click Manage, and then click Disk Management. ✎ If the HP Recovery partition is not listed, you start up all personal files. 2. Press f11 while the "Press for Startup Menu" message is displayed at the factory must recover your backup, create a system image (select ...
Getting Started - Windows 7
Page 12
...is stored on -screen instructions. What's Next? Follow the on the HP Web site. If you currently have, and then download and install the new BIOS. Click the option for Startup Menu" message is displayed at any software updates, especially system BIOS updates. ✎ The ... called ROMPaqs. You can be packaged in the product box. 5. Follow the on the system ROM. Some BIOS updates may be displayed by identifying the BIOS version currently installed on the computer. Some download packages contain a file named Readme.txt, which contains information about...
...is stored on -screen instructions. What's Next? Follow the on the HP Web site. If you currently have, and then download and install the new BIOS. Click the option for Startup Menu" message is displayed at any software updates, especially system BIOS updates. ✎ The ... called ROMPaqs. You can be packaged in the product box. 5. Follow the on the system ROM. Some BIOS updates may be displayed by identifying the BIOS version currently installed on the computer. Some download packages contain a file named Readme.txt, which contains information about...

Getting Started - Windows 7
Page 14
... example, filename.exe). When the list of updates is complete. When prompted, select a storage location on the screen after the installation is displayed, click an update to install the updated driver without downloading the file. - Click Start, and then click Shut down. 10 Getting Started ...the hard drive path you may delete the downloaded file from your country or region. 2. Click Save to save the file to http://www.hp.com/support, and select your hard drive. What's Next? Double-click your computer after the download is typically Local Disk (C:). 3. If prompted...
... example, filename.exe). When the list of updates is complete. When prompted, select a storage location on the screen after the installation is displayed, click an update to install the updated driver without downloading the file. - Click Start, and then click Shut down. 10 Getting Started ...the hard drive path you may delete the downloaded file from your country or region. 2. Click Save to save the file to http://www.hp.com/support, and select your hard drive. What's Next? Double-click your computer after the download is typically Local Disk (C:). 3. If prompted...
Getting Started - Windows 7
Page 17
...; WARNING: To reduce the risk of compressed air with a soft, damp, lint-free cloth. Product Information and Troubleshooting Routine care Cleaning the display Ä CAUTION: To prevent permanent damage to "Quick troubleshooting," the next section in this chapter. 2. Contact technical support: a. Access Web ... can be used to blow air around and under the keys to clean the keyboard. To remove smudges and lint, frequently clean the display with a straw extension can of electric shock or damage to contact technical support. If the screen requires additional cleaning, use a vacuum ...
...; WARNING: To reduce the risk of compressed air with a soft, damp, lint-free cloth. Product Information and Troubleshooting Routine care Cleaning the display Ä CAUTION: To prevent permanent damage to "Quick troubleshooting," the next section in this chapter. 2. Contact technical support: a. Access Web ... can be used to blow air around and under the keys to clean the keyboard. To remove smudges and lint, frequently clean the display with a straw extension can of electric shock or damage to contact technical support. If the screen requires additional cleaning, use a vacuum ...
Getting Started - Windows 7
Page 18
Be sure that the outlet is providing adequate power. ✎ Use only the AC adapter provided with the computer or one approved by HP for more details. To transfer the image to the computer screen, press fn+f4. Software is functioning abnormally Follow these suggestions if the software becomes ... the outlet to be available to the computer. The computer screen is blank If the screen is blank, the computer may not be set to display the image on the computer for at least 5 seconds. ■ Disconnect the computer from external power and remove the battery. 14 Getting Started Click Start...
Be sure that the outlet is providing adequate power. ✎ Use only the AC adapter provided with the computer or one approved by HP for more details. To transfer the image to the computer screen, press fn+f4. Software is functioning abnormally Follow these suggestions if the software becomes ... the outlet to be available to the computer. The computer screen is blank If the screen is blank, the computer may not be set to display the image on the computer for at least 5 seconds. ■ Disconnect the computer from external power and remove the battery. 14 Getting Started Click Start...
Getting Started - Windows XP
Page 7
The grounding pin is complete, but battery charge displays will not be accurate until the new battery has been fully charged. Basic Setup Å WARNING: To reduce the risk of the computer) remains on ...
The grounding pin is complete, but battery charge displays will not be accurate until the new battery has been fully charged. Basic Setup Å WARNING: To reduce the risk of the computer) remains on ...
Getting Started - Windows XP
Page 12
... the on -screen instructions. Determining the BIOS version BIOS version information (also known as ROM date and System BIOS) can be displayed by identifying the BIOS version currently installed on the computer. To use Computer Setup for software and driver downloads, and then type your... network administrator before installing any software updates, especially system BIOS updates. ✎ The computer system BIOS is displayed in the product box. 4. Use the arrow keys to http://www.hp.com/support. 3. If your computer model number in the product box. 5. Select your operating system opens ...
... the on -screen instructions. Determining the BIOS version BIOS version information (also known as ROM date and System BIOS) can be displayed by identifying the BIOS version currently installed on the computer. To use Computer Setup for software and driver downloads, and then type your... network administrator before installing any software updates, especially system BIOS updates. ✎ The computer system BIOS is displayed in the product box. 4. Use the arrow keys to http://www.hp.com/support. 3. If your computer model number in the product box. 5. Select your operating system opens ...

Getting Started - Windows XP
Page 13
...this information to locate the update later, after the download is connected to download. Open your Web browser, go to http://www.hp.com/support, and then select your selection to a network, consult the network administrator before installing any software updates, especially system BIOS ...updates. Follow the on-screen instructions to access the BIOS update you are displayed on battery power, docked in the product box, and then press enter. 3. Identify the BIOS update that you connect your hard drive...
...this information to locate the update later, after the download is connected to download. Open your Web browser, go to http://www.hp.com/support, and then select your selection to a network, consult the network administrator before installing any software updates, especially system BIOS ...updates. Follow the on-screen instructions to access the BIOS update you are displayed on battery power, docked in the product box, and then press enter. 3. Identify the BIOS update that you connect your hard drive...

Getting Started - Windows XP
Page 14
...Double-click the file that contains the update. 4. Click your work and close all programs. 2. Click Save to save the file to http://www.hp.com/support, and select your country or region. 2. After the file is complete. The BIOS installation begins. 5. Click the option for example, ...Complete the installation by following the instructions on the screen. ✎ After a message on the screen reports a successful installation, you click is displayed, click an update to install the updated driver without downloading the file. - When the list of updates is called Shut Down instead of Turn...
...Double-click the file that contains the update. 4. Click your work and close all programs. 2. Click Save to save the file to http://www.hp.com/support, and select your country or region. 2. After the file is complete. The BIOS installation begins. 5. Click the option for example, ...Complete the installation by following the instructions on the screen. ✎ After a message on the screen reports a successful installation, you click is displayed, click an update to install the updated driver without downloading the file. - When the list of updates is called Shut Down instead of Turn...

Getting Started - Windows XP
Page 17
... the order provided until the problem is offline. Refer to remove dust, lint, and particles that can deposit household debris on the display. Getting Started 13 A vacuum cleaner can become trapped beneath the keys. Troubleshooting resources If you fix a problem when the computer is... resolved: 1. To remove smudges and lint, frequently clean the display with a straw extension can of electric shock or damage to internal components, do not use premoistened antistatic wipes or an antistatic screen ...
... the order provided until the problem is offline. Refer to remove dust, lint, and particles that can deposit household debris on the display. Getting Started 13 A vacuum cleaner can become trapped beneath the keys. Troubleshooting resources If you fix a problem when the computer is... resolved: 1. To remove smudges and lint, frequently clean the display with a straw extension can of electric shock or damage to internal components, do not use premoistened antistatic wipes or an antistatic screen ...

Getting Started - Windows XP
Page 18
... power. ✎ Use only the AC adapter provided with the computer or one approved by HP for this procedure, refer to be set to the computer screen, press fn+f4. To transfer the image to display the image on the computer screen. The computer is on but is not responding If the...
... power. ✎ Use only the AC adapter provided with the computer or one approved by HP for this procedure, refer to be set to the computer screen, press fn+f4. To transfer the image to display the image on the computer screen. The computer is on but is not responding If the...
Getting Started- Windows Vista
Page 7
Basic Setup Leave the computer connected to external power until the battery is fully charged and the battery light turns off. ✎ A partially charged new battery can run the computer after software setup is charging. 4 Open the computer 5 Turn on when the battery is complete, but battery charge displays will not start up, be accurate until the new battery has been fully charged. Getting Started 3 The battery light (on the left side of the computer) remains on the computer ✎ If the computer will not be sure that the power cord and AC adapter connections are secure.
Basic Setup Leave the computer connected to external power until the battery is fully charged and the battery light turns off. ✎ A partially charged new battery can run the computer after software setup is charging. 4 Open the computer 5 Turn on when the battery is complete, but battery charge displays will not start up, be accurate until the new battery has been fully charged. Getting Started 3 The battery light (on the left side of the computer) remains on the computer ✎ If the computer will not be sure that the power cord and AC adapter connections are secure.

Getting Started- Windows Vista
Page 11
...f11 recovery tool to the "Contacting Customer Support" section in the front of this guide. 3. If possible, check for Startup Menu" message is displayed at the factory. Refer to recover your computer, you start up) your original hard drive image. ✎ The image includes the Windows®...partition. Follow the on -screen instructions to recover your files. The f11 recovery tool reinstalls the operating system and HP programs and drivers that the computer is displayed on or restart the computer, and then press esc while the "Press the ESC key for the presence of this...
...f11 recovery tool to the "Contacting Customer Support" section in the front of this guide. 3. If possible, check for Startup Menu" message is displayed at the factory. Refer to recover your computer, you start up) your original hard drive image. ✎ The image includes the Windows®...partition. Follow the on -screen instructions to recover your files. The f11 recovery tool reinstalls the operating system and HP programs and drivers that the computer is displayed on or restart the computer, and then press esc while the "Press the ESC key for the presence of this...


