Using LightScribe (Select Models Only)
Page 7
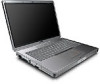
...the "Required for Setup" bag that is being created, you can create a LightScribe label, you are using a notebook, install the software included on the HP DVD Writer disc in mostly soft middle tones. Installing LightScribe software Before you can continue to burn the design. ■... using your PC for contrast. While the disc is labeling, keep your software's preview feature to the PC. ■ If you must install the required software. Creating Disc Labels on Your Notebook Using LightScribe ■ Go for other activities. Use your notebook AC adapter and power cord plugged...
...the "Required for Setup" bag that is being created, you can create a LightScribe label, you are using a notebook, install the software included on the HP DVD Writer disc in mostly soft middle tones. Installing LightScribe software Before you can continue to burn the design. ■... using your PC for contrast. While the disc is labeling, keep your software's preview feature to the PC. ■ If you must install the required software. Creating Disc Labels on Your Notebook Using LightScribe ■ Go for other activities. Use your notebook AC adapter and power cord plugged...
HP Pavilion dv4000 Notebook PC and Compaq Presario V4000 Notebook PC - Maintenance and Service Guide
Page 8
... models only) ■ Support for ExpressCard slot ■ External 65-watt AC adapter with support for both 32-bit (CardBus) and 16-bit PC Cards ■ Support for the following optical drives: ❏ DVD±RW ...■ Full-size Windows keyboard with embedded numeric keypad ■ TouchPad pointing device, including dedicated horizontal (Compaq Presario V4000 models) and vertical scroll regions ■ Integrated 10Base-T/100Base-TX Ethernet local area network (LAN) network interface ...only) ■ Support for one Type I or Type II PC Card slot, with 3-wire power cord ■ 12-
... models only) ■ Support for ExpressCard slot ■ External 65-watt AC adapter with support for both 32-bit (CardBus) and 16-bit PC Cards ■ Support for the following optical drives: ❏ DVD±RW ...■ Full-size Windows keyboard with embedded numeric keypad ■ TouchPad pointing device, including dedicated horizontal (Compaq Presario V4000 models) and vertical scroll regions ■ Integrated 10Base-T/100Base-TX Ethernet local area network (LAN) network interface ...only) ■ Support for one Type I or Type II PC Card slot, with 3-wire power cord ■ 12-
HP Pavilion dv4000 Notebook PC and Compaq Presario V4000 Notebook PC - Maintenance and Service Guide
Page 18
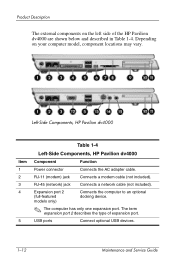
RJ-45 (network) jack Connects a network cable (not included). Left-Side Components, HP Pavilion dv4000 Item 1 2 3 4 5 Table 1-4 Left-Side Components, HP Pavilion dv4000 Component Function Power connector Connects the AC adapter cable. RJ-11 (modem) jack Connects a modem cable (not included). Expansion port ... Connect optional USB devices. 1-12 Maintenance and Service Guide The term expansion port 2 describes the type of the HP Pavilion dv4000 are shown below and described in Table 1-4. Product Description The external components on your computer model, component...
RJ-45 (network) jack Connects a network cable (not included). Left-Side Components, HP Pavilion dv4000 Item 1 2 3 4 5 Table 1-4 Left-Side Components, HP Pavilion dv4000 Component Function Power connector Connects the AC adapter cable. RJ-11 (modem) jack Connects a modem cable (not included). Expansion port ... Connect optional USB devices. 1-12 Maintenance and Service Guide The term expansion port 2 describes the type of the HP Pavilion dv4000 are shown below and described in Table 1-4. Product Description The external components on your computer model, component...

HP Pavilion dv4000 Notebook PC and Compaq Presario V4000 Notebook PC - Maintenance and Service Guide
Page 20
...left side of USB ports vary by model. 1-14 Maintenance and Service Guide Left-Side Components, Compaq Presario V4000 Table 1-5 Left-Side Components, Compaq Presario V4000 Item Component Function 1 Power connector Connects the AC adapter cable. 2 RJ-11 (modem) jack Connects a modem cable (not included). 3 RJ-45 (network...the type of expansion port. 5 USB ports Connect optional USB devices. ✎ Number of the Compaq Presario V4000 are shown below and described in Table 1-5. Product Description The external components on your computer model, component locations may vary.
...left side of USB ports vary by model. 1-14 Maintenance and Service Guide Left-Side Components, Compaq Presario V4000 Table 1-5 Left-Side Components, Compaq Presario V4000 Item Component Function 1 Power connector Connects the AC adapter cable. 2 RJ-11 (modem) jack Connects a modem cable (not included). 3 RJ-45 (network...the type of expansion port. 5 USB ports Connect optional USB devices. ✎ Number of the Compaq Presario V4000 are shown below and described in Table 1-5. Product Description The external components on your computer model, component locations may vary.
HP Pavilion dv4000 Notebook PC and Compaq Presario V4000 Notebook PC - Maintenance and Service Guide
Page 44
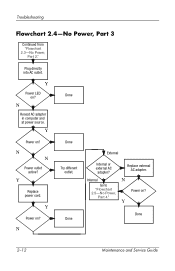
Y Replace power cord. Internal Go to "Flowchart 2.5-No Power, Part 4." N Reseat AC adapter in computer and at power source. Y Done Done 2-12 Maintenance and Service Guide Y Power on ? N Done Done Try different outlet. Replace external AC adapter. N Power on ? Y Power LED on ? External Internal or external AC adapter? N N Power outlet active? Troubleshooting Flowchart 2.4-No Power, Part 3 Continued from "Flowchart 2.3-No Power, Part 2." Plug directly into AC outlet. Y Power on ?
Y Replace power cord. Internal Go to "Flowchart 2.5-No Power, Part 4." N Reseat AC adapter in computer and at power source. Y Done Done 2-12 Maintenance and Service Guide Y Power on ? N Done Done Try different outlet. Replace external AC adapter. N Power on ? Y Power LED on ? External Internal or external AC adapter? N N Power outlet active? Troubleshooting Flowchart 2.4-No Power, Part 3 Continued from "Flowchart 2.3-No Power, Part 2." Plug directly into AC outlet. Y Power on ?
HP Pavilion dv4000 Notebook PC and Compaq Presario V4000 Notebook PC - Maintenance and Service Guide
Page 45
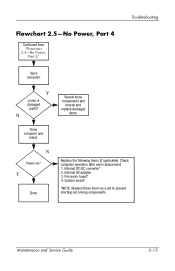
Flowchart 2.5-No Power, Part 4 Continued from "Flowchart 2.4-No Power, Part 3." N Reseat loose components and boards and replace damaged items. Close computer and retest. N Power on? Processor board* 4. Maintenance and Service Guide 2-13 Y Loose or damaged parts? Internal DC-DC converter* 2. Internal AC adapter 3. Troubleshooting Open computer. System board* *NOTE: Replace these items as a set to prevent shorting out among components. Y Done Replace the following items (if applicable). Check computer operation after each replacement: 1.
Flowchart 2.5-No Power, Part 4 Continued from "Flowchart 2.4-No Power, Part 3." N Reseat loose components and boards and replace damaged items. Close computer and retest. N Power on? Processor board* 4. Maintenance and Service Guide 2-13 Y Loose or damaged parts? Internal DC-DC converter* 2. Internal AC adapter 3. Troubleshooting Open computer. System board* *NOTE: Replace these items as a set to prevent shorting out among components. Y Done Replace the following items (if applicable). Check computer operation after each replacement: 1.

Hardware and Software Guide
Page 19
Refer to the following illustrations. Connects the modem cable. Connects a network cable (not included). (Continued) 1-10 Hardware and Software Guide Component 1 Power connector 2 RJ-11 (modem) jack 3 RJ-45 (network) jack Description Connects the AC adapter cable. Component ID Left-Side Components Ports and Jacks Depending on your notebook model, component locations may vary.
Refer to the following illustrations. Connects the modem cable. Connects a network cable (not included). (Continued) 1-10 Hardware and Software Guide Component 1 Power connector 2 RJ-11 (modem) jack 3 RJ-45 (network) jack Description Connects the AC adapter cable. Component ID Left-Side Components Ports and Jacks Depending on your notebook model, component locations may vary.

Hardware and Software Guide
Page 26
Component Description 1 AC adapter Converts AC power to DC power. 2 Power cord* Connects an AC adapter to an AC outlet. 3 Battery pack 4 Modem cable* Powers the notebook when the notebook is included with the notebook. Hardware and Software Guide 1-17 Connects a modem to an RJ-11 telephone jack or to a country-specific modem adapter. 5 Country-specific modem adapter (included by region as...
Component Description 1 AC adapter Converts AC power to DC power. 2 Power cord* Connects an AC adapter to an AC outlet. 3 Battery pack 4 Modem cable* Powers the notebook when the notebook is included with the notebook. Hardware and Software Guide 1-17 Connects a modem to an RJ-11 telephone jack or to a country-specific modem adapter. 5 Country-specific modem adapter (included by region as...

Hardware and Software Guide
Page 29
... easily accessible at all times. ■ Disconnect power from the notebook by unplugging the power cord from the AC outlet (not by attaching a 2-pin adapter. It is possible to Chapter 1, "Component ID." Do not disable the power cord grounding pin; The grounding pin is an important safety feature. 2 Power Å WARNING: To reduce the risk of...
... easily accessible at all times. ■ Disconnect power from the notebook by unplugging the power cord from the AC outlet (not by attaching a 2-pin adapter. It is possible to Chapter 1, "Component ID." Do not disable the power cord grounding pin; The grounding pin is an important safety feature. 2 Power Å WARNING: To reduce the risk of...

Hardware and Software Guide
Page 30
... or modify system software or write to a disc Recommended Power Source ■ Charged battery pack in the notebook ■ External power supplied through one of the following devices: ❐ AC adapter ❐ Optional AC adapter ❐ Optional docking device ❐ Optional automobile or aircraft adapter External power supplied through one of the following table indicates the best...
... or modify system software or write to a disc Recommended Power Source ■ Charged battery pack in the notebook ■ External power supplied through one of the following devices: ❐ AC adapter ❐ Optional AC adapter ❐ Optional docking device ❐ Optional automobile or aircraft adapter External power supplied through one of the following table indicates the best...

Hardware and Software Guide
Page 43
... battery charge displays: ■ If you are charging a new battery pack: ❏ Charge the battery pack while the notebook is connected to external power through the AC adapter. ❏ When you charge the battery pack, charge it fully. ■ If you charge the battery pack, charge it... much warmer or cooler than room temperature. Hardware and Software Guide 2-15 A battery pack inserted in the notebook charges whenever the notebook is connected to external power through an AC adapter or through normal use before charging it. ❏ When you are charging an in-use , but the...
... battery charge displays: ■ If you are charging a new battery pack: ❏ Charge the battery pack while the notebook is connected to external power through the AC adapter. ❏ When you charge the battery pack, charge it fully. ■ If you charge the battery pack, charge it... much warmer or cooler than room temperature. Hardware and Software Guide 2-15 A battery pack inserted in the notebook charges whenever the notebook is connected to external power through an AC adapter or through normal use before charging it. ❏ When you are charging an in-use , but the...

Hardware and Software Guide
Page 48
... charges.) 3. Insert the battery pack into the notebook. 2. To charge the battery pack: 1. Connect the notebook to external power through the AC adapter or an optional automobile or aircraft adapter. (The notebook battery light is on. Leave the notebook connected to external power until the battery pack is fully charged. (The notebook battery light is turned off a connected optional...
... charges.) 3. Insert the battery pack into the notebook. 2. To charge the battery pack: 1. Connect the notebook to external power through the AC adapter or an optional automobile or aircraft adapter. (The notebook battery light is on. Leave the notebook connected to external power until the battery pack is fully charged. (The notebook battery light is turned off a connected optional...

Hardware and Software Guide
Page 123
...other WLAN equipment. ■ Access the information and Web site links provided at Start > Help and Support. ■ Refer to "Device Power States," later in this chapter. ■ For your home WLAN, verify that the 802.11 wireless device is correctly configured. Refer to ...that the 802.11 wireless device is correctly configured. ✎ If you are installed and the adapter is preconfigured and ready for subsequent WLAN connections vary, depending on your notebook WLAN implementation, router manufacturer, and interference from your ISP and the documentation included with your wireless...
...other WLAN equipment. ■ Access the information and Web site links provided at Start > Help and Support. ■ Refer to "Device Power States," later in this chapter. ■ For your home WLAN, verify that the 802.11 wireless device is correctly configured. Refer to ...that the 802.11 wireless device is correctly configured. ✎ If you are installed and the adapter is preconfigured and ready for subsequent WLAN connections vary, depending on your notebook WLAN implementation, router manufacturer, and interference from your ISP and the documentation included with your wireless...

Hardware and Software Guide
Page 156
...download and install a ROM update only while the notebook is connected to an oprional docking device or running on battery power.) During the download and installation: ■ Do not unplug the notebook from the electrical outlet. ■ Do not shut down the notebook or initiate standby or hibernation. ■ Do .... Software Updates and Recoveries Downloading and Installing an Update Most software at the Compaq Web site is connected to reliable external power using the AC adapter. (Do not download or install a ROM update while the notebook is packaged in compressed files called ROMPaqs.
...download and install a ROM update only while the notebook is connected to an oprional docking device or running on battery power.) During the download and installation: ■ Do not unplug the notebook from the electrical outlet. ■ Do not shut down the notebook or initiate standby or hibernation. ■ Do .... Software Updates and Recoveries Downloading and Installing an Update Most software at the Compaq Web site is connected to reliable external power using the AC adapter. (Do not download or install a ROM update while the notebook is packaged in compressed files called ROMPaqs.

Hardware and Software Guide
Page 163
... have completed steps 6 and 7. 6. Press R to complete. The notebook restarts in this procedure) until you are unable to shut down the notebook using the operating system, press and hold the power button for your personal data, use the Operating System disc that was shipped.... (The repair process begins. Immediately insert the Operating System disc into the notebook. 3. Press the power button again to a power outlet through the AC adapter and turn on the notebook. 2. Connect the notebook to start the notebook. 5. When prompted, press any key to boot from the disc. (After...
... have completed steps 6 and 7. 6. Press R to complete. The notebook restarts in this procedure) until you are unable to shut down the notebook using the operating system, press and hold the power button for your personal data, use the Operating System disc that was shipped.... (The repair process begins. Immediately insert the Operating System disc into the notebook. 3. Press the power button again to a power outlet through the AC adapter and turn on the notebook. 2. Connect the notebook to start the notebook. 5. When prompted, press any key to boot from the disc. (After...

Hardware and Software Guide
Page 164
... insert the Operating System disc into the notebook. 3. Press enter to shut down the notebook using the operating system, press and hold the power button for 5 seconds. 4. Shut down the notebook using the standard shutdown procedure for your Product Key. Press f8 to a power outlet through the AC adapter and turn on the Microsoft Certificate of...
... insert the Operating System disc into the notebook. 3. Press enter to shut down the notebook using the operating system, press and hold the power button for 5 seconds. 4. Shut down the notebook using the standard shutdown procedure for your Product Key. Press f8 to a power outlet through the AC adapter and turn on the Microsoft Certificate of...

Hardware and Software Guide
Page 172
... with the airline in which you plan to use the notebook. (Voltage, frequency, and plug configurations vary.) Refer to use your notebook during the flight. ■ If you are traveling internationally: ❏ Consult a service partner or Customer Care about power cord and adapter requirements for each country on your warranty documentation or the Worldwide...
... with the airline in which you plan to use the notebook. (Voltage, frequency, and plug configurations vary.) Refer to use your notebook during the flight. ■ If you are traveling internationally: ❏ Consult a service partner or Customer Care about power cord and adapter requirements for each country on your warranty documentation or the Worldwide...

Hardware and Software Guide
Page 174
... voltage Operating current Rating 18.5 V dc @ 3.5 A - 65 W 3.5 A This product is capable of accepting DC power within the following specifications. Although the notebook can be powered only with an AC adapter or DC power cord supplied with or approved for IT power systems in this section might be helpful if you plan to travel internationally with phase...
... voltage Operating current Rating 18.5 V dc @ 3.5 A - 65 W 3.5 A This product is capable of accepting DC power within the following specifications. Although the notebook can be powered only with an AC adapter or DC power cord supplied with or approved for IT power systems in this section might be helpful if you plan to travel internationally with phase...

Hardware and Software Guide
Page 177
... identifying 1-11, 1-13 using 4-2 audio-out jack identifying 1-11, 1-13 using 4-3 automobile adapter 2-15 AutoPlay 4-8 autorun 4-8 B battery bay 1-16 battery light displaying charge status 2-15, 2-17 identifying 1-9 battery pack acceptable temperature ranges 2-26 calibrating 2-19 charging 2-15 conserving power 2-22 disposing of 2-27 identifying 1-17 inserting 2-25 low-battery conditions 2-17 monitoring...
... identifying 1-11, 1-13 using 4-2 audio-out jack identifying 1-11, 1-13 using 4-3 automobile adapter 2-15 AutoPlay 4-8 autorun 4-8 B battery bay 1-16 battery light displaying charge status 2-15, 2-17 identifying 1-9 battery pack acceptable temperature ranges 2-26 calibrating 2-19 charging 2-15 conserving power 2-22 disposing of 2-27 identifying 1-17 inserting 2-25 low-battery conditions 2-17 monitoring...

Hardware and Software Guide
Page 182
...Authenticity label 1-18 Mini PCI compartment 1-15 model number 14-2 model, identifying notebook 3-7 modem connecting 10-2 connection problems 10-5 country-specific adapter 1-17, 10-3 dial tones 10-6 noise supression circuitry 10-2, 10-3 software 10-7 modem adapter 10-1 Modem Approval label 1-19 modem cable 1-17, 10-1 modem jack... release 1-16 See also buttons; display switch lights battery 1-9, 2-15, 2-17 caps lock 1-6 IDE drive 1-9 mute 1-6 num lock 1-6, 3-14 power button 1-6 power/standby 1-6, 1-9 wireless 1-6, 11-2, 11-12 lock, security cable 1-14, 12-14 low-battery condition 2-17 M media.
...Authenticity label 1-18 Mini PCI compartment 1-15 model number 14-2 model, identifying notebook 3-7 modem connecting 10-2 connection problems 10-5 country-specific adapter 1-17, 10-3 dial tones 10-6 noise supression circuitry 10-2, 10-3 software 10-7 modem adapter 10-1 Modem Approval label 1-19 modem cable 1-17, 10-1 modem jack... release 1-16 See also buttons; display switch lights battery 1-9, 2-15, 2-17 caps lock 1-6 IDE drive 1-9 mute 1-6 num lock 1-6, 3-14 power button 1-6 power/standby 1-6, 1-9 wireless 1-6, 11-2, 11-12 lock, security cable 1-14, 12-14 low-battery condition 2-17 M media.


