Safety and Regulatory Information Desktops, Thin Clients, and Personal Workstations
Page 28
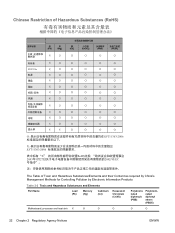
... 2-2 Toxic and Hazardous Substances and Elements Part Name Lead (Pb) Mercury (Hg) Cadmium (Cd) Hexavalent Chromium (Cr(VI)) Polybrominated biphenyls (PBB) Polybrominated diphenyl ethers (PBDE) Motherboard, processor and heat sink X O O O O O 22 Chapter 2 Regulatory Agency Notices ENWW
... 2-2 Toxic and Hazardous Substances and Elements Part Name Lead (Pb) Mercury (Hg) Cadmium (Cd) Hexavalent Chromium (Cr(VI)) Polybrominated biphenyls (PBB) Polybrominated diphenyl ethers (PBDE) Motherboard, processor and heat sink X O O O O O 22 Chapter 2 Regulatory Agency Notices ENWW
PC Basics Guide
Page 7
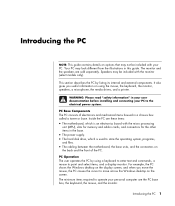
...• The hard disk drive, which is used to move across the Windows desktop on the back and the front of electronics and mechanical items housed in a chassis box called a tower or base. Introducing the PC NOTE: This guide contains details on options that may not be included with the ...monitor (select models only). It also gives you move the mouse, the PC causes the cursor to store the operating system, programs, and files. • The cabling between the motherboard, the base units, and the connectors on the screen. The minimum items required to the electrical...
...• The hard disk drive, which is used to move across the Windows desktop on the back and the front of electronics and mechanical items housed in a chassis box called a tower or base. Introducing the PC NOTE: This guide contains details on options that may not be included with the ...monitor (select models only). It also gives you move the mouse, the PC causes the cursor to store the operating system, programs, and files. • The cabling between the motherboard, the base units, and the connectors on the screen. The minimum items required to the electrical...
PC Basics Guide
Page 8
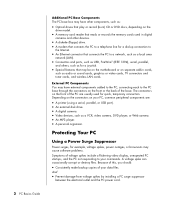
...the connectors on your PC, common peripheral components are usually used in digital cameras and other components, such as: • Optical drives that play or record (burn) CD or DVD discs, depending on the drive model. • A memory card reader that may be on the motherboard or on the ...front of the PC are : • A printer (using a serial, parallel, or USB port). • An external disk drive. • A digital camera. • Video devices...
...the connectors on your PC, common peripheral components are usually used in digital cameras and other components, such as: • Optical drives that play or record (burn) CD or DVD discs, depending on the drive model. • A memory card reader that may be on the motherboard or on the ...front of the PC are : • A printer (using a serial, parallel, or USB port). • An external disk drive. • A digital camera. • Video devices...
Upgrading and Servicing Guide
Page 11
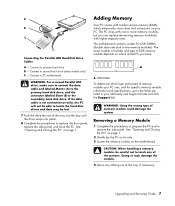
A DDR DIMM To determine which type and speed of DDR memory module depends on the motherboard. See "Opening and Closing the PC" on page 1. 2 Gently lay the PC on its side. 3 Locate the memory sockets on which temporarily stores data and instructions on page 1. CAUTION: When handling a memory module, be careful not to ... so may be able to replace the front panel, replace the side panel, and close the PC. Connect to PC motherboard WARNING: For a second Parallel ATA drive, make sure to connect the data cable end labeled Master (A) to the primary hard disk drive, and the connector ...
A DDR DIMM To determine which type and speed of DDR memory module depends on the motherboard. See "Opening and Closing the PC" on page 1. 2 Gently lay the PC on its side. 3 Locate the memory sockets on which temporarily stores data and instructions on page 1. CAUTION: When handling a memory module, be careful not to ... so may be able to replace the front panel, replace the side panel, and close the PC. Connect to PC motherboard WARNING: For a second Parallel ATA drive, make sure to connect the data cable end labeled Master (A) to the primary hard disk drive, and the connector ...
Upgrading and Servicing Guide
Page 13
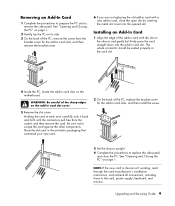
Installing an Add-In Card 1 Align the edge of the PC, replace the bracket cover for the add-in card slots, and then remove the bracket cover. 6 If you are not replacing the old add-in card with the slot on the motherboard. Holding the card at each end, carefully rock it back... the other components. Be sure not to the card, power supply, keyboard, and monitor. Removing an Add-In Card 1 Complete the procedures to prepare the PC and to replace the side panel, and close the open slot by inserting the metal slot cover into the add-in card slots on the...
Installing an Add-In Card 1 Align the edge of the PC, replace the bracket cover for the add-in card slots, and then remove the bracket cover. 6 If you are not replacing the old add-in card with the slot on the motherboard. Holding the card at each end, carefully rock it back... the other components. Be sure not to the card, power supply, keyboard, and monitor. Removing an Add-In Card 1 Complete the procedures to prepare the PC and to replace the side panel, and close the open slot by inserting the metal slot cover into the add-in card slots on the...
Upgrading and Servicing Guide
Page 14
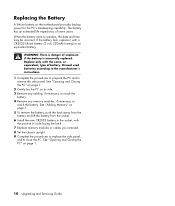
... Closing the PC" on the motherboard provides backup power for the PC's timekeeping capability. When the battery starts to remove the side panel. See "Adding Memory" on its side. 3 Remove any cabling, if necessary, to reach the battery. 4 Remove any memory modules, if necessary, to close the PC. WARNING: ...used batteries according to the manufacturer's instructions. 1 Complete the procedures to prepare the PC and to weaken, the date and time may be incorrect. See "Opening and Closing the PC" on page 1. 2 Gently lay the PC on page 7. 5 To remove the battery, push the latch away from the...
... Closing the PC" on the motherboard provides backup power for the PC's timekeeping capability. When the battery starts to remove the side panel. See "Adding Memory" on its side. 3 Remove any cabling, if necessary, to reach the battery. 4 Remove any memory modules, if necessary, to close the PC. WARNING: ...used batteries according to the manufacturer's instructions. 1 Complete the procedures to prepare the PC and to weaken, the date and time may be incorrect. See "Opening and Closing the PC" on page 1. 2 Gently lay the PC on page 7. 5 To remove the battery, push the latch away from the...

